Table of Contents
Advertisement
Safety Information
MAINS CONNECTIONS (FOR UNITED KINGDOM ONLY)
EN
CAUTION:
Do NOT under any circumstances plug the severed plug
into any mains socket as this could result in electric
shock.
Do NOT make any connection to the terminal in the
plug which is marked by the letter E or by the earth
symbol
or coloured green and yellow.
A fuse plug must be fitted with a 3A fuse approved by
ASTA or BSI to BS 1362 and fuse covers must always be
securely replaced. If your unit does not work, the fuse
may be blown.
T H E
FLASH AND ARROW-
HEAD WITHIN THE
T R I A N G L E I S
W A R N I N G
ALERTING YOU OF
" D A N G E R O U S
VOLTAGE" INSIDE
THE PRODUCT.
WARNING:
SHOCK HAZARD, DO NOT EXPOSE THIS PRODUCT
TO RAIN OR MOISTURE.
C_RR520CD EN
CAUTION
RISK OF ELECTRIC SHOCK
DO NOT OPEN
L I G H T N I N G
CAUTION: TO REDUCE THE
RISK OF ELECTRIC SHOCK,
D O N OT R E M OV E C OV E R
A
( O R B A C K ) . N O U S E R -
S I G N
S E RV I C E A B L E PA RT S I N -
S I D E . R E F E R S E RV I C I N G
T O Q UA L I F I E D S E RV I C E
PERSONNEL.
SEE MARKING ON BOTTOM / BACK OF PRODUCT
TO PREVENT FIRE OR ELECTRICAL
1
Connect the
power cord into
a mains power
socket
THE EXCLAMATION
POINT WITHIN THE
T R I A N G L E I S A
WARNING
SIGN
ALERTING YOU OF
I M P O R T A N T
I N S T R U C T I O N S
A C C O M PA N Y I N G
T H E
P R O D U C T.
5/20/04, 1:06 PM
Advertisement
Table of Contents

Related Manuals for THOMSON RR520CD - annexe 2


Summary of Contents for THOMSON RR520CD - annexe 2
- Page 1 ALERTING YOU OF ALERTING YOU OF S I D E . R E F E R S E RV I C I N G I M P O R T A N T " D A N G E R O U S...
-
Page 2: Safety Information
LASER = 780nm, P max=5 mW CAUTION – INVISIBLE LASER RADIATION WHEN OPEN AND INTERLOCKS FAILED OR DEFEATED. AVOID EXPOSURE TO BEAM. Rating Information : At the bottom of the ATTENTION – RAYONNEMENT LASER INVISIBLE unit. DANGEREUX EN CAS D'OUVERTURE ET LORSQUE LA SECURITE EST NEUTRALISEE. - Page 3 • This set uses a laser beam. To prevent designed receptacles. any accident due to this type of beam, the set should only be opened by properly trained personnel.
-
Page 4: Table Of Contents
Automatic Time Set ......2 Setting Time Zone ....... 2 Alarm Settings ....... 10 Time Zone (Table 1) ......2 2. Plugging In for Power ....3 Setting Alarm Time ........ 10 3. Daylight Saving Time ....3 Selecting Alarm Source ......10 Alarm Tone .......... -
Page 5: Before Your Begin
Automatic Time Set bottom of the clock to 1,2,3 or 4. You do not have to set the clock time as a built-in automatic time set system is equipped in this clock powered by 3V (2 x “AA” batteries (included)). All you... -
Page 6: Plugging In For Power
Before Your Begin 2. Plugging In For Power 3. Daylight Saving Time POWER SUPPLY: 230V~50Hz Press and hold DAYLIGHT SAVING button at the side of the unit to turn on/ Note Note Note Note Note: off daylight saving time in areas... -
Page 7: General Controls
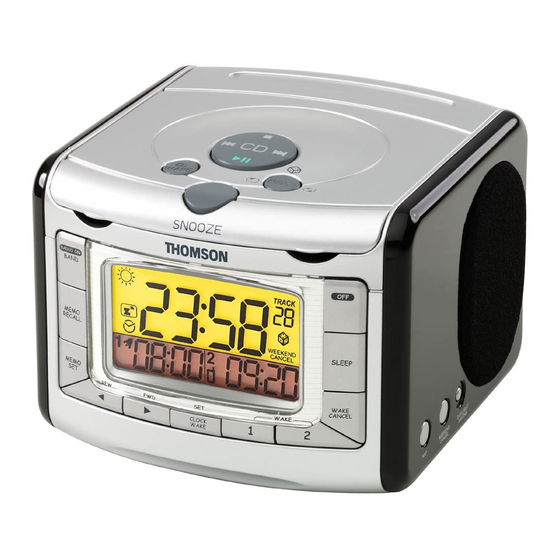
WAKE TIME ALARM Track MODE Station RADIO ON / BAND - Turns radio on. PLAY/PAUSE - Starts and pauses CD Selects between FM and MW radio band. playback. OFF - Turns power off. STOP - Stops CD playback. MEMO RECALL - In radio mode, access SKIP FORWARD - Skips to the next memory location. -
Page 8: Side Views
Headphones - Insert headphones disable Daylight Saving Time in areas here. observing/not observing such time change. Note: Note: Note: Speakers will still sound when Note: Note: any wake mode is activated even if headphone is plugged in. C_RR520CD EN 5/20/04, 1:06 PM... -
Page 9: Display
Alarm 2 Display Alarm 1 Display Clock Display Section MHz / kHz - Radio frequency unit. MON TUE WED THU FRI SAT SUN - - In clock setting mode. Weekday indicator - Daylight Saving Time activated. WEEKEND CANCEL - Weekend cancel Alarm 1 and Alarm 2 Display is activated. -
Page 10: Setting The Clock
You are not required to set is displayed. the clock manually, however, in case 2. Press REV or FWD to set the time. the memory holding batteries are Press and hold the respective buttons accidentally removed, you may reset... -
Page 11: Operating The Radio
Control (AFC) works only on FM. It radio. helps to reduce drift on FM reception Press OFF to turn off the radio. and to keep the radio locked in on the FM station to which it is tuned. Selecting Bands Antennas... -
Page 12: Radio Frequency Memory
1. Press MEMO RECALL to select the displayed with the memory icon memory location you want to cancel. flashing. 2. Press and hold MEMO SET to cancel 3. To select another memory location, memory setting. press MEMO RECALL. 4. Once the desired memory location is selected, press MEMO SET to save setting. -
Page 13: Alarm Settings
Radio Alarm 2. Press REV or FWD to set the alarm When radio alarm is selected, the time. icon will be displayed. Press and hold REV or FWD to fast search reverse or forward clock time. -
Page 14: Cd Alarm
Note: Note: Note: Note: Note: When AC power is interrupted 2. Press ALARM SET 1 or ALARM SET 2 and the unit is operating through the button to cancel the corresponding DC backup batteries, all wake mode wake function permanently. -
Page 15: Operating The Clock
SLEEP SLEEP is activated again, Note: Note: SLEEP the sleep time will be the same as the In sleep mode, the unit will turn off one you have set before. automatically after a specified time. Setting Sleep Time Nap Mode 1. -
Page 16: Snooze Alarm Operation
The unit may display in seconds. after the alarm is on. The alarm will be off by pressing SNOOZE until the 1. Press and hold REV or FWD to show snooze period is over. Snooze function seconds display. can be used repeatedly up to 2 hours. -
Page 17: Installing Back-Up Batteries
2. Remove battery compartment door (located at the bottom of the radio) by applying thumb pressure to the tab on battery door and then lift the door out and off the cabinet. 3. Before inserting the batteries, observe the polarities (That is, + and... -
Page 18: Care And Maintenance
Prior to cleaning the exterior, be sure to • Do not touch the signal surfaces. Hold unplug the power cord from the AC by the edges, or by one edge and the power outlet. Wipe the exterior with a hole.