Behringer S16 - I/O Box with 16 Remote-Controllable Midas Preamps Manual
- Quick start manual (18 pages) ,
- User manual (15 pages) ,
- Datasheet (6 pages)
Advertisement
Hook-up
Rear panel connections

FCB1010 MIDI pedal
Cabling for all AES50 connections between X32 and S16 stageboxes:
- Shielded Cat-5e cables only
- Ethercon terminated cable ends
- Maximum cable length 100 meters (300 feet)
Cabling for all AES50 connections between X32 and S16 stageboxes:
- Shielded CAT-5e, Ethercon terminated ends
- Maximum cable length 100 meters (330 feet)
Common connections

As standalone snake

Linking two S16 units

 Note: The signals on both S16 units (Out 1-8 and 9-16) and both ADA8000 units (Out 17-24 and 25-32) are fully defined on the X32's 'Routing/AES50 Output' page. The second S16's outputs must be set to Out +8 on the unit itself.
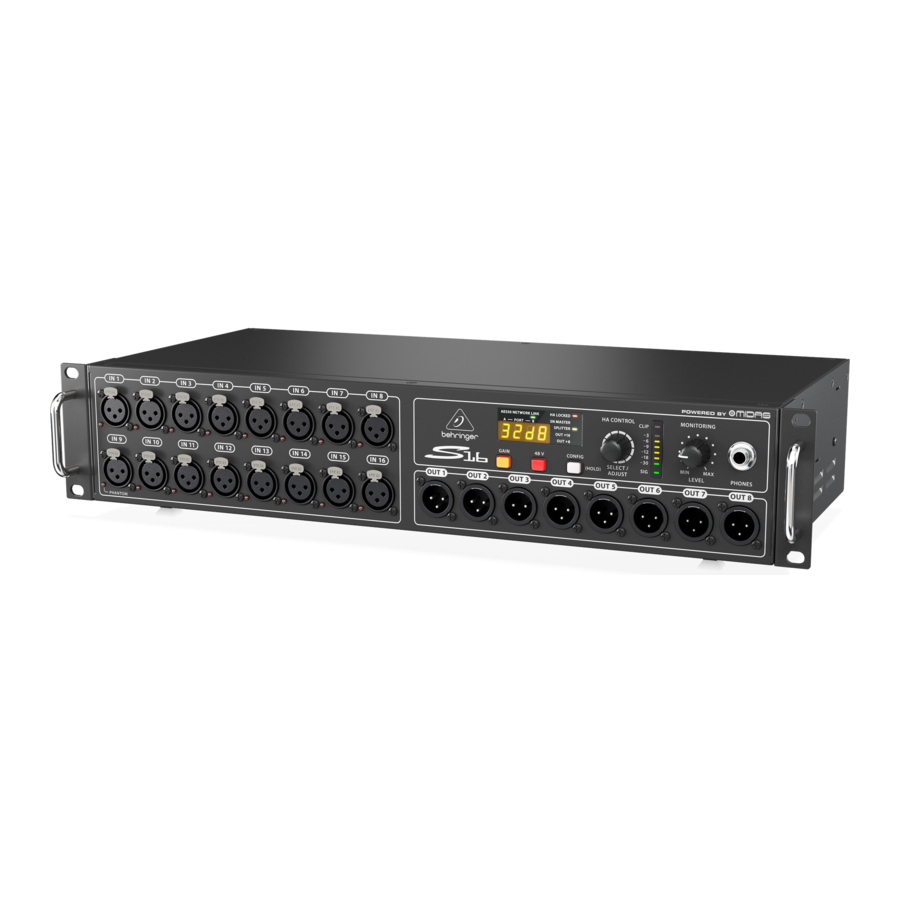
Controls

- PHANTOM LEDs light when the 48V button is engaged for a particular channel.
- Midas-designed mic/line inputs accept balanced XLR male plugs.
- GAIN button, when pressed and held, displays the currently selected mic input's gain setting, which may then be adjusted using the SELECT/ADJUST knob.
- DISPLAY shows the selected channel number, its gain setting, or the sample rate in Snake Master configuration.
- NETWORK LINK LEDs light red to indicate the AES50 ports are connected but not synchronized, and light green to indicate they are connected and synchronized.
- 48 V button sends phantom power to the currently selected mic input, indicated by a lit button when active.
- STATUS LEDs show the operation mode of various features. See the Operation Mode Chart for details. The HA LOCKED LED indicates that preamp gain adjustment has been blocked by the controlling X32. To unlock, open the X32 Setup/Global page and un-check the General Preference 'Lock Stagebox'.
- CONFIG button, when pressed and held, allows the device's operation mode to be adjusted by the SELECT/ADJUST knob. See Operation Mode Chart for details.
- SELECT/ADJUST knob scrolls through the 16 channels, adjusts the gain of the currently selected input, and changes the operating mode. Push repeatedly to scroll Inputs, Outputs, P16 channels, ADAT outputs, and Stage (only in Snake Master mode).
- LED METER displays the signal level of the currently selected channel.
- MONITORING LEVEL knob adjusts the level of the PHONES output.
- XLR outputs accept balanced XLR female plugs.
- POWER switch turns the unit on and off.
- USB input accepts a USB type-B plug for firmware updates via PC.
- AES50 ports A and B allow connection to a SuperMAC digital multi-channel network via shielded Cat-5e Ethernet cable with terminated ends compatible to Neutrik etherCON.
![warning]() NOTE: The clock master, typically the digital mixer, must be connected to the AES50 port A, while additional stage boxes would be connected to port B.
NOTE: The clock master, typically the digital mixer, must be connected to the AES50 port A, while additional stage boxes would be connected to port B. - ULTRANET port sends 16 channels to a Behringer P-16 personal monitoring system.
- ADAT OUT jacks send AES50 channels 17-32 to external equipment via optical cable, or split the local 16 inputs for direct ADAT recording.
- MIDI IN/OUT jacks accept standard 5-pin MIDI cables for MIDI communication to and from an X32 console.
Operation Mode Chart
| Seq. | LED SN MASTER | sync clock | LED SPLITTER | LED OUT +16 | LED OUT +8 | XLR analog out 1-8 | ADAT out 1-8 | ADAT out 9-16 | P-16 Ultranet out 1-16 |
| 1 (default) | AES50 (console) | = AES50-A, ch01-ch08 | = AES50-A ch17-ch24 | = AES50-A ch25-ch32 | = AES50-A ch33-ch48 | ||||
| 2 | AES50 (console) | on | = AES50-A ch09-ch16 | = AES50-A ch17-ch24 | = AES50-A ch25-ch32 | = AES50-A ch33-ch48 | |||
| 3 | AES50 (console) | on | = AES50-A ch17-ch24 | = AES50-A ch17-ch24 | = AES50-A ch25-ch32 | = AES50-A ch33-ch48 | |||
| 4 | AES50 (console) | on | = AES50-A, ch01-ch08 | = Local In 01 - 08 | = Local In 09 - 16 | = Local In 01 - 16 | |||
| 5 | AES50 (console) | on | on | = AES50-A ch09-ch16 | = Local In 01 - 08 | = Local In 09 - 16 | = Local In 01 - 16 | ||
| 6 | AES50 (console) | on | on | = AES50-A ch17-ch24 | = Local In 01 - 08 | = Local In 09 - 16 | = Local In 01 - 16 | ||
| 7 | on | 48 kHz (int) | = AES50-A, ch01-ch08 | = AES50-A, ch01-ch08 | = AES50-A ch09-ch16 | = AES50-A ch01-ch16 | |||
| 8 | on | 44.1 kHz (int) | = AES50-A, ch01-ch08 | = AES50-A, ch01-ch08 | = AES50-A ch09-ch16 | = AES50-A ch01-ch16 | |||
| 9 | on | 48 kHz (int) | on | = AES50-A, ch01-ch08 | = Local In 01 - 08 | = Local In 09 - 16 | = Local In 01 - 16 | ||
| 10 | on | 44.1 kHz (int) | on | = AES50-A, ch01-ch08 | = Local In 01 - 08 | = Local In 09 - 16 | = Local In 01 - 16 |
Getting started
- Before powering the unit on, make all started audio and digital connections.
- Turn on the power.
![]()
- The default configuration is active when all status LEDs above the CONFIG button are off (see Seq. 1 in Operation Mode Chart). If your application requires a different output setup, press and hold the CONFIG button to enter configuration mode. While pressing the CONFIG button, turn the SELECT/ADJUST knob to scroll through the items. You can select from the following options:
- Engage the SN MASTER function to designate the master unit when using two S16 units in a standalone snake application. This is available in 4 modes, 44.1 kHz and 48 kHz, each with Splitter mode engaged or disengaged.
- Engage the SPLITTER function to send the 16 local input signals directly to the ADAT OUT and P16 jacks. When the SPLITTER function is disengaged, the ADAT OUT jacks carry AES50 channels 17-32 and P16 carries channels 33-48.
- Select whether the OUTPUT jacks 1-8 carry the AES50 channels 1-8 (LEDs off), 9-16, or 17-24 by engaging the OUT +8 or OUT +16 function.
- Release the CONFIG button to exit configuration mode. See the Operation Mode Chart for more details.
- Repeatedly press the SELECT/ADJUST knob until the left side of the display shows "In". Turn the SELECT/ADJUST knob to select one of the inputs 1-16.
- Press the 48 V button to toggle the selected channel's phantom power on/off, if necessary.
- Press the GAIN button. The button will light, and the gain can now be adjusted with the SELECT/ADJUST knob. Turn the knob to the right until the loudest peaks in your speaking or playing cause the -9 dB LED to light briefly in the meter.
![]()
- With headphones connected to the PHONES jack, turn the adjacent MONITORING LEVEL knob up to a comfortable listening level.


Specifications
Processing
| A/D-D/A conversion (Cirrus Logic A/D CS5368, D/A CS4385) | 24-bit @ 44.1 / 48 kHz, 114 dB dynamic range |
| Networked I/O latency (stagebox in > console processing* > stagebox out) | 1.1 ms |
Connectors
| XLR inputs, programmable mic preamps, designed by Midas | 16 |
| XLR outputs | 8 |
| Phones outputs, 1/4" TRS | 1 (mono) |
| AES50 ports, SuperMAC, NEUTRIK etherCON | 2 |
| P-16 connector, Ultranet (no power supplied) | 1 |
| MIDI inputs / outputs | 1 /1 |
| ADAT Toslink outputs (2x 8 Ch) | 2 |
| USB type B, rear panel, for system updates | 1 |
Mic Input Characteristics
| Design | Midas |
| THD + noise, 20 dB gain, 0 dBu out | < 0.006% A-weighted |
| Input impedance XLR, unbal. / bal. | 5 kΩ / 10 kΩ |
| Non clip maximum input level, XLR | +23 dBu |
| Phantom power, switchable per input | 48 V |
| Equivalent input noise level, XLR (input shorted) | -128 dBu |
| CMRR, XLR, @ 20 dB gain (typical) | > 70 dB |
| CMRR, XLR, @ 40 dB gain | > 80 dB |
Input/Output Characteristics
| Frequency range, @ 48 kHz sample rate, 0 dB to -1 dB | 10 Hz - 22 kHz |
| Dynamic range, analog in to analog out (typical) | 106 dB |
| A/D dynamic range, preamp and converter (typical) | 109 dB |
| D/A dynamic range, converter and output | 108 dB |
| Cross talk rejection @ 1 kHz, adjacent channels | 100 dB |
| Output level, XLR, nom./max. | +4 dBu / +21 dBu |
| Output impedance, XLR, unbal. / bal. | 75 Ω / 75 Ω |
| Phones output impedance / level | 40 Ω / +25 dBm (mono) |
| Residual noise level, XLR and TRS | -87 dBu A-weighted |
Indicators
| Display | 4-digit, 7-segment, LED |
| Front status LEDs | AES50-A, red/green AES50-B, red/green HA Locked, red SN Master, green Splitter, orange Out +16, orange Out +8, orange |
| Meter | Sig, -30 dB, -18 dB, -12 dB, -9 dB, -6 dB, -3 dB, Clip |
| Rear panel | Splitter mode, orange |
Power
| Switch-mode autorange power supply | 100-240 V (50/60 Hz) |
| Power consumption | 45 W |
Physical
| Dimensions | 482 x 225 x 89 mm (19 x 8.9 x 3.5") |
| Weight | 4.7 kg (10.4 lbs) |
*incl. all channel and bus processing, excl. insert effects and line delays
NOTE: Please verify that your specific AES50 connections provide stable operation prior to using the products in a live performance or recording situation. The maximum distance for AES50 CAT5 connections is 100 m / 330 ft. Please consider using shorter connections where possible for gaining safety margin. Combining 2 or more cables with extension connectors can reduce the reliability and maximum distance between AES50 products. Unshielded (UTP) cable may work well for many applications, but entails an additional risk for ESD issues. We guarantee, that all our products will perform as specified with 50 m of Klark Teknik NCAT5E-50M, and we recommend using cable of similar quality, only. Klark Teknik also offers the very cost-effective DN9610 AES50 Repeater or DN9620 AES50 Extender for situations where extremely long cable runs are required.
Other important information
- Register online.
Please register your new Music Tribe equipment right after you purchase it by visiting musictribe.com. Registering your purchase using our simple online form helps us to process your repair claims more quickly and efficiently. Also, read the terms and conditions of our warranty, if applicable. - Malfunction.
Should your Music Tribe Authorized Reseller not be located in your vicinity, you may contact the Music Tribe Authorized Fulfiller for your country listed under "Support" at musictribe.com. Should your country not be listed, please check if your problem can be dealt with by our "Online Support" which may also be found under "Support" at musictribe.com. Alternatively, please submit an online warranty claim at musictribe.com BEFORE returning the product. - Power Connections.
Before plugging the unit into a power socket, please make sure you are using the correct mains voltage for your particular model. Faulty fuses must be replaced with fuses of the same type and rating without exception.
Important Safety Instructions

RISK OF ELECTRIC SHOCK
DO NOT OPEN
 Terminals marked with this symbol carry electrical current of sufficient magnitude to constitute risk of electric shock.
Use only high-quality professional speaker cables with ¼" TS or twist-locking plugs pre-installed. All other installation or modification should be performed only by qualified personnel.
This symbol, wherever it appears, alerts you to the presence of uninsulated dangerous voltage inside the enclosure - voltage that may be sufficient to constitute a risk of shock.
This symbol, wherever it appears, alerts you to important operating and maintenance instructions in the accompanying literature. Please read the manual.
To reduce the risk of electric shock, do not remove the top cover (or the rear section). No user serviceable parts inside. Refer servicing to qualified personnel.

To reduce the risk of fire or electric shock, do not expose this appliance to rain and moisture. The apparatus shall not be exposed to dripping or splashing liquids and no objects filled with liquids, such as vases, shall be placed on the apparatus.
These service instructions are for use by qualified service personnel only. To reduce the risk of electric shock do not perform any servicing other than that contained in the operation instructions. Repairs have to be performed by qualified service personnel.
- Read these instructions.
- Keep these instructions.
- Heed all warnings.
- Follow all instructions.
- Do not use this apparatus near water.
- Clean only with dry cloth.
- Do not block any ventilation openings. Install in accordance with the manufacturer's instructions.
- Do not install near any heat sources such as radiators, heat registers, stoves, or other apparatus (including amplifiers) that produce heat.
- Do not defeat the safety purpose of the polarized or grounding-type plug. A polarized plug has two blades with one wider than the other. A grounding-type plug has two blades and a third grounding prong. The wide blade or the third prong are provided for your safety. If the provided plug does not fit into your outlet, consult an electrician for replacement of the obsolete outlet.
- Protect the power cord from being walked on or pinched particularly at plugs, convenience receptacles, and the point where they exit from the apparatus.
- Use only attachments/accessories specified by the manufacturer.
![]()
Use only with the cart, stand, tripod, bracket, or table specified by the manufacturer, or sold with the apparatus. When a cart is used, use caution when moving the cart/apparatus combination to avoid injury from tip-over.- Unplug this apparatus during lightning storms or when unused for long periods of time.
- Refer all servicing to qualified service personnel. Servicing is required when the apparatus has been damaged in any way, such as power supply cord or plug is damaged, liquid has been spilled or objects have fallen into the apparatus, the apparatus has been exposed to rain or moisture, does not operate normally, or has been dropped.
- The apparatus shall be connected to a MAINS socket outlet with a protective earthing connection.
- Where the MAINS plug or an appliance coupler is used as the disconnect device, the disconnect device shall remain readily operable.
- Do not install in a confined space, such as a book case or similar unit.
- Do not place naked flame sources, such as lighted candles, on the apparatus.
- Please keep the environmental aspects of battery disposal in mind. Batteries must be disposed-of at a battery collection point.
- This apparatus may be used in tropical and moderate climates up to 45°C.


Documents / Resources
References
Download manual
Here you can download full pdf version of manual, it may contain additional safety instructions, warranty information, FCC rules, etc.
Download Behringer S16 - I/O Box with 16 Remote-Controllable Midas Preamps Manual
Advertisement
Thank you! Your question has been received!


Need Assistance?
Do you have a question about the S16 that isn't answered in the manual? Leave your question here.