TP-Link KL420L5 - Kasa Smart Light Strip User Guide
- User manual (30 pages) ,
- Instructions (4 pages)
Advertisement
Conventions
In this guide, the following convention is used:
| Convention | Description |
| Teal | Key information appears in teal, including management page text such as menus, items, buttons and so on. |
| Underline | Hyperlinks are in teal and underlined. You can click to redirect to a website. |
 Note Note | Ignoring this type of note might result in a malfunction or damage to the device. |
Support
- Specific product information can be found on the product page at https://www.tp-link.com/.
- A Technical Community is provided for you to discuss our products at https://community.tp-link.com/.
- Our Technical Support contact information can be found at the Help center of the Kasa Smart app and the Contact Technical Support page at https://www.tp-link.com/support/.
- Videos about how to configure the Smart Light Strip features can be found on the Setup Videos page at https://www.tp-link.com/support/ setup-video/#smart-bulbs.
Introduction
This guide provides a brief introduction to Kasa Smart Light Strip and the Kasa Smart app, as well as regulatory information.
Features available in Kasa may vary by model and software version. Kasa availability may also vary by region. All images, steps, and descriptions in this guide are only examples and may not reflect your actual Kasa experience.
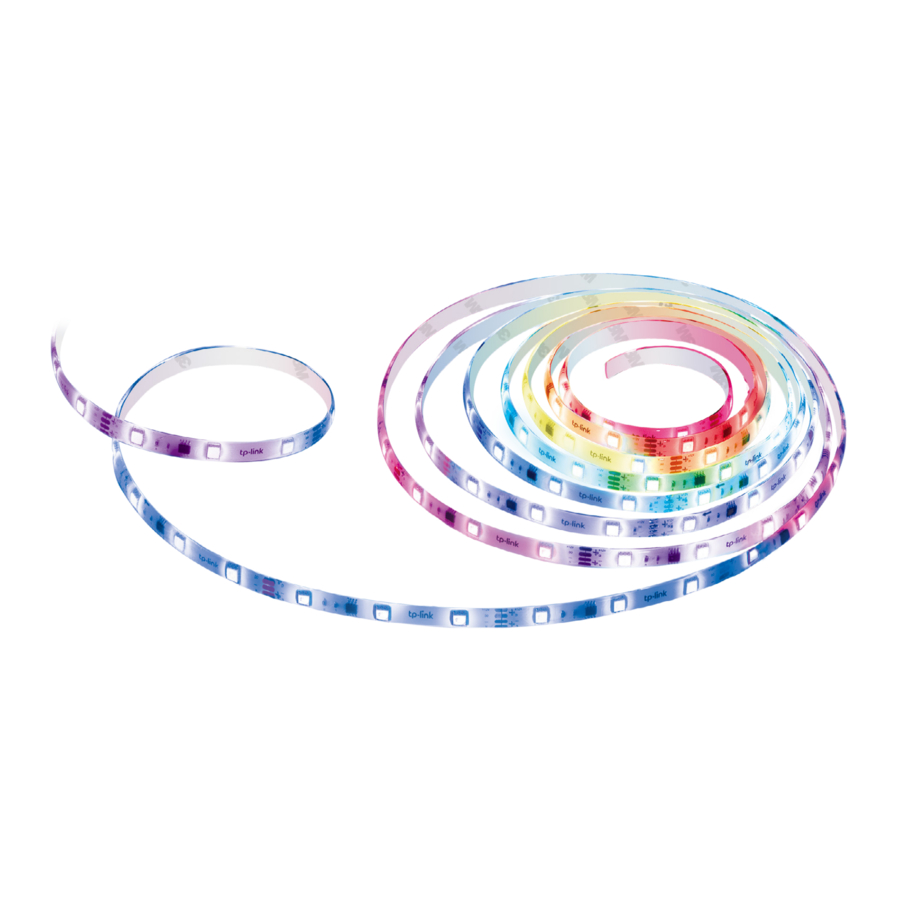
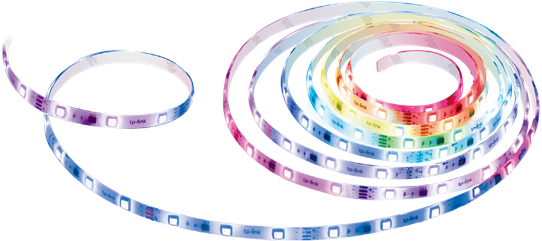
The Smart Light Strip is part of the Kasa smart home family of products, including plugs, switches, cameras and more. You can simply download the Kasa Smart app, connect to Wi-Fi and enjoy. No special hardware is needed. 16 color zones and millions of colors are available for you to pick from and create your own scenes.
You can also control multiple smart home devices with the Kasa Smart app or use your voice for added convenience. With Kasa, your home is never more than a few taps away.
- Multicolor - Offers endless lighting possibilities with 16 million colors and dimming capabilities.
- Voice Control - Control your Light Strip hands-free with Alexa or Google Assistant.
- Set Schedules - Run your Light Strip automatically to fit any event with the Kasa Smart app.
- Flexible and Easy Install - The flexibility to bend and cut* allows you to stick it or place it in the exact spot you desire.
*Once cut, it cannot be reattached. Prevent accidental shocks by removing its power and then cutting along the strip's indicator lines. - Group and Scenes - Combine your strip with other Kasa devices for seamless control with a single tap.
![]()
Set Up Your Smart Light Strip
Follow the steps below to set up your Light Strip via the Kasa Smart app.
Step 1. Download Kasa Smart App
Go to Google Play or the App Store or scan the QR code below to download and install the Kasa Smart app.


OR


Step 2. Log In to Kasa Smart App
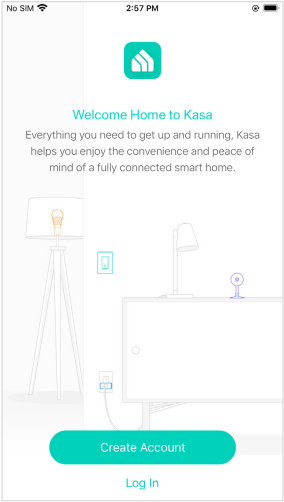
Open the app and log in with your TP-Link ID. If you don't have a TP-Link ID, create one first.
Step 3. Add Your Devices
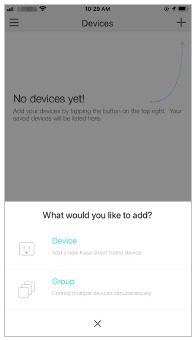
Tap +, select Device and your model to add your new Light Strip. Follow app instructions to complete the setup.
Step 4. Connect All the Parts
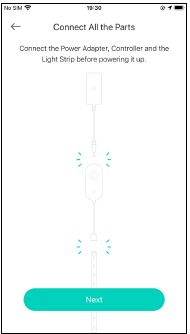
Connect the Power Adapter, Controller and the Light Strip before powering it up.
Step 5. Power Up Light Strip
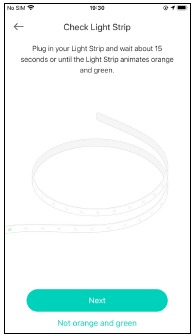
Plug in the power adapter and wait until the Light Strip animates orange and green.
Note: Do not roll up when using. Spread out the Light Strip before connect the power supply.
Step 6. Join Your Light Strip's Wi-Fi
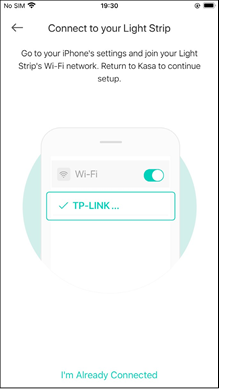
Join your Light Strip's Wi-Fi to continue the setup.
Step 7. Join Your Home's Wi-Fi
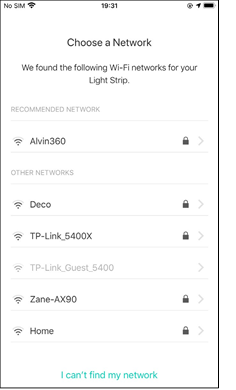
Select your home Wi-Fi to connect.
Step 8. Setup Complete
Now you can start using your Light Strip.
Install Your Smart Light Strip
 Instalation Tips

After you have set up the Light Strip via the Kasa Smart app, you can cut it to length-fit and attach it to any surface with the 3M adhesive.
To avoid damaging your Light Strip, please note the following Installation tips before installing the Light Strip.
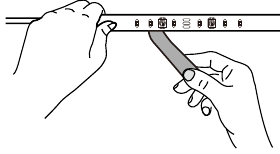
Cut Only On Specific Areas of Light Strip
You can custom tailor the length of your Light Strip with scissors. Unplug the Light Strip and cut only on these specific areas or your Light Strip will no longer function.
Avoid Bending on LED Beads
The bend should be avoided just in the position of the LED components, so as not to damage the product and affect the life of the product.
Avoid Sharp Turns
Carefully roll the Light Strip into a clover or use a gentle hill when making 90° turns like those need behind a TV. Sharp bends can damage your Light Strip.
Avoid Sharp Corners
Use gentle weeps when bending Light Strip around corners and avoid creases as they may cause damage.
Installation Steps
Step 1. Choose Location
Choose a dry, clean, and smooth surface. Wipe off the dust. Otherwise, the Light Strip will be easily fall off.
Note: Choose a location that avoids static and stays away from water splashing.
Step 2. Remove Adhesive Tape

Unplug the Light Strip first. Peel away the 3M adhesive backing bit by bit and stick your Light Strip to the surface.
Note: Do not peel off the tape under the 3M adhesive backing.
Step 3. Stick Light Strip
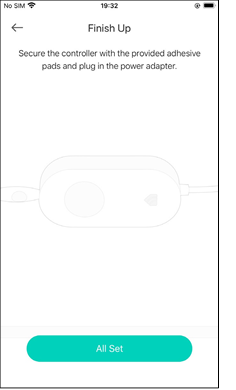
Stick the Light Strip and press over it about 10-15 seconds. Secure the controller with the adhesive pads. Do not move it to other place after it is attached.
Step 4. Power Up Light Strip
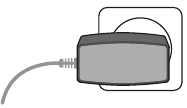
Plug in the power adapter to power on your Light Strip.
Main Device Control
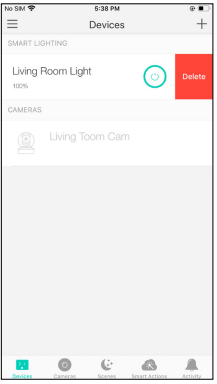
After you successfully set up your Light Strip, you will see the Devices page on the Kasa Smart app. You can add new devices, control multiple devices simultaneously in a group, configure account settings, and more.
Devices Page
After you successfully set up your Light Strip, you will see the Devices page on the Kasa Smart app. You can add new devices, control multiple devices simultaneously in a group, configure account settings, and more.
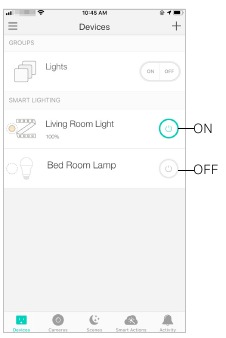
On the Devices page, you can instantly turn on/off the Light Strip, or tap a Light Strip to adjust brightness or colors.
Add a Group
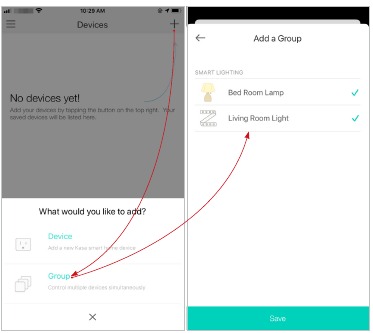
Tap + and select Group to add a group for controlling multiple devices simultaneously.
Tip: You need to add some devices before you group them together.
Configure Kasa Settings
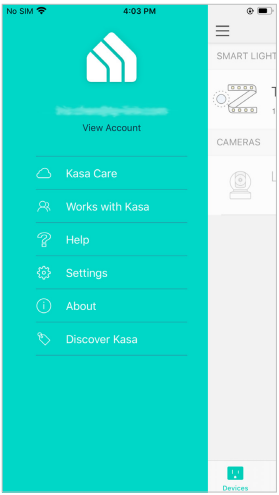
Swipe right and you can configure settings for your Kasa account or get more information about Kasa.
Configure Your Smart Light Strip
On the Devices page, tap a Light Strip and you can adjust the light brightness or color, set schedules, save a preset for a light effect, track energy consumption and configure the Light Strip settings.
Power On/Off At One Tap
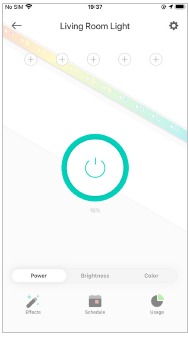
Quickly power on or off your Light Strip with a single button.
Adjust Brightness
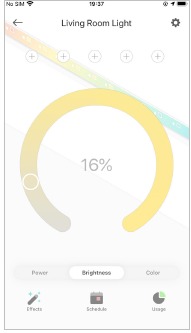
Slide to dim your Light Strip with a range from 1% to 100%.
Adjust Color
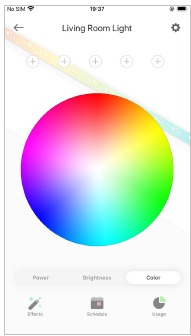
Tap to choose a preferred color on the color palette for your Light Strip.
Add One-Tap Presets

To save a shortcut for a color effect, choose a color and brightness you want, then tap + and the current effect will be saved for quick access.
Delete Presets

To delete a preset, just select one and tap ×, and then tap Delete.
Add Effects

Tap ![]() and tap any color effect, then your Light Strip will go to the certain light effect instantly. You can also customize the color effect and apply it to your Light Strip in Color Painting and Customized Effects.
and tap any color effect, then your Light Strip will go to the certain light effect instantly. You can also customize the color effect and apply it to your Light Strip in Color Painting and Customized Effects.
- Color Painting
Each part of your Light Strip can be set to different colors. Choose from a variety of animated effects for each part of your strip to enjoy a unique lighting experience. Follow the steps below:
- Tap Create New.
- Tap the color palette and choose a color effect, then start painting on the Light Strip as you like.


Tip: If you don't want any color effect, just tap OFF beside the color palette and then tap the Light Strip.
- Customized Effects
Your Light Strip provides you with multiple default lighting effects. You can select any of them and customize it as you want. Follow the steps below to customize a lighting effect.

- Tap Create New.
- Select an effect to customize, then tap Next.
- Customize the effect name, color effect and the animation speed as you want, then tap Save.
Add Schedules

Tap  to add schedules to simplify your daily routine by creating automatic On/Off actions.
Track Energy Usage

Tap ![]() to view and track energy consumption of your Light Strip.
to view and track energy consumption of your Light Strip.
Configure Device Settings
Tap  to configure device settings and check device information.

- Customize the device name and icon.
- Set the default state when your Light Strip is turned on from the app. For example, if you select Last "ON" State and then turn it on from the app, your Light Strip will go to the state when it was last turned on.
- Set the default state when your Light Strip is turned on from the power source. For example, if you select Last "ON" State and then turn it on from power source, your Light Strip will go to the state when it was last turned on.
- Check what's new with your Light Strip.
- Check device and network information.
- Check how to install your Light Strip.
Create Scenes
A scene is a preset group of smart devices that can be customized and activated simultaneously at the touch of a button from your smartphone or tablet, allowing you to easily set your mood, activity or fit any special occasion. This page allows you to preset how your smart home devices should act automatically at special occasions.
- On the Scenes page, tap +.
- Choose a default one or customize a new scene.
- Tap the Light Strip and set what would you like it to do when the scene is run.


- Pick an icon for your Light Strip.
- Set a name for the scene.
- After created the new scene, tap the scene to apply it.


Schedule A Scene
After you created a scene, you can schedule it to be applied automatically at the time specified. For example, if you want to automatically apply your scene "TV Time" at 7:33 PM every weekday, follow the steps below.

- Go to Smart Actions page and tap Add an Action.
- Select Schedule a Scene.
- Select a scene and set a time schedule for the scene.
- Give this schedule a name to help you remember.
Auto-Off Timer
Whenever your smart bulb is turned on, you can turn it off after the designated amount of time by setting an auto-off timer for the device. For example, if you want your Light Strip to turn off automatically after being turned on for 21 minutes, follow the steps below:

- Go to Smart Actions page and tap Add an Action.
- Select Auto-Off Timer.
- Select a device and set the autooff timer for the device.
- Give this timer a name to help you remember.
Reset Your Smart Light Strip
There are two types of reset available: a soft reset which resets the Wi-Fi settings only, and a factory reset that erases all of your custom settings and restore them to factory defaults.
Soft Reset
Press and hold the light switch controller for more than 5 seconds but no more than 10 seconds and release. The Light Strip animating orange and green after that indicates a successful soft reset.
Factory Reset
Method 1:
Press and hold the light switch controller for 10 seconds or more and then release. The Light Strip animating orange and green after that indicates a successful factory reset.
Method 2:
On the Devices page on Kasa Smart app, swipe left the Light Strip and tap Delete.
OR
On the Devices page on Kasa Smart app, tap the Light Strip and tap , then select Remove Device.

Works with Kasa

Use the Kasa app to pair your Light Strip with Amazon Alexa, Google Home Assistant, Samsung SmartThings, and other third-party services to enjoy a full hands-free experience. Kasa helps manage the rest of your smart home too, working with Nest to trigger changes when you arrive home or leave for the day.
Launch the Kasa Smart app, swipe right and you can go to Works with Kasa for detailed instructions.

Documents / Resources
References
![www.tp-link.com]() WiFi Networking Equipment for Home & Business | TP-Link
WiFi Networking Equipment for Home & Business | TP-Linkhttps://community.tp-link.com
TP-Link Product Support - Wireless Networking Equipment Support
![www.apple.com]() App Store - Apple
App Store - Apple![play.google.com]() Google Play
Google Play
Download manual
Here you can download full pdf version of manual, it may contain additional safety instructions, warranty information, FCC rules, etc.
Download TP-Link KL420L5 - Kasa Smart Light Strip User Guide
Advertisement
Thank you! Your question has been received!


Need Assistance?
Do you have a question about the KL420L5 that isn't answered in the manual? Leave your question here.