Advertisement
- 1 About This Guide
- 2 Introduction
- 3 Appearance
- 4 Set Up Your Light Strip
- 5 Add Your Light Strip to Home
- 6 Install Your Light Strip
- 7 Basic Device Control
-
8
Configure Your Light Strip
- 8.1 Power On/Off At One Tap
- 8.2 Adjust Brightness
- 8.3 Auto White
- 8.4 Change Color & Lighting Effect
- 8.5 Presets
- 8.6 Presets Settings
- 8.7 Sync to Sound
- 8.8 Set Lighting Effects
- 8.9 Option 1: Choose a Solid Color
- 8.10 Option 2: Choose a Predefined Effect
- 8.11 Option 3: Create a Color Painting
- 8.12 Option 4: Create a Lighting Effect
- 8.13 Set Schedule
- 8.14 Set Away Mode
- 8.15 Set Timer
- 8.16 Check Runtime & Energy Usage
- 8.17 Share Your Light Strip
- 8.18 Device Default State
- 8.19 Option 1: Last "On" State
- 8.20 Option 2: Custom
- 8.21 Light Strip Length
- 8.22 Light On/Off Gradually
- 9 Smart Actions
- 10 Third-Party Services
- 11 Reset Your Light Strip
- 12 Documents / Resources
About This Guide
This guide provides a brief introduction to the Tapo Smart Light Strip and the Tapo app, as well as regulatory information.
Features available in Tapo may vary by model and software version. Tapo availability may also vary by region. All images, steps, and descriptions in this guide are only examples and may not reflect your actual Tapo experience.
Conventions
In this guide, the following convention is used:
| Convention | Description |
| Blue | Key information appears in blue, including management page text such as menus, items, buttons and so on. |
| Underline | Hyperlinks are in blue and underlined. You can click to redirect to a website. |
 Note Note | Ignoring this type of note might result in a malfunction or damage to the device. |
More Info
- Specifications can be found on the product page at https://www.tapo.com.
- Our Technical Support and troubleshooting information can be found at https://www.tapo.com/support/.
- A Technical Community is provided for you to discuss our products at https://community.tp-link.com.
Introduction
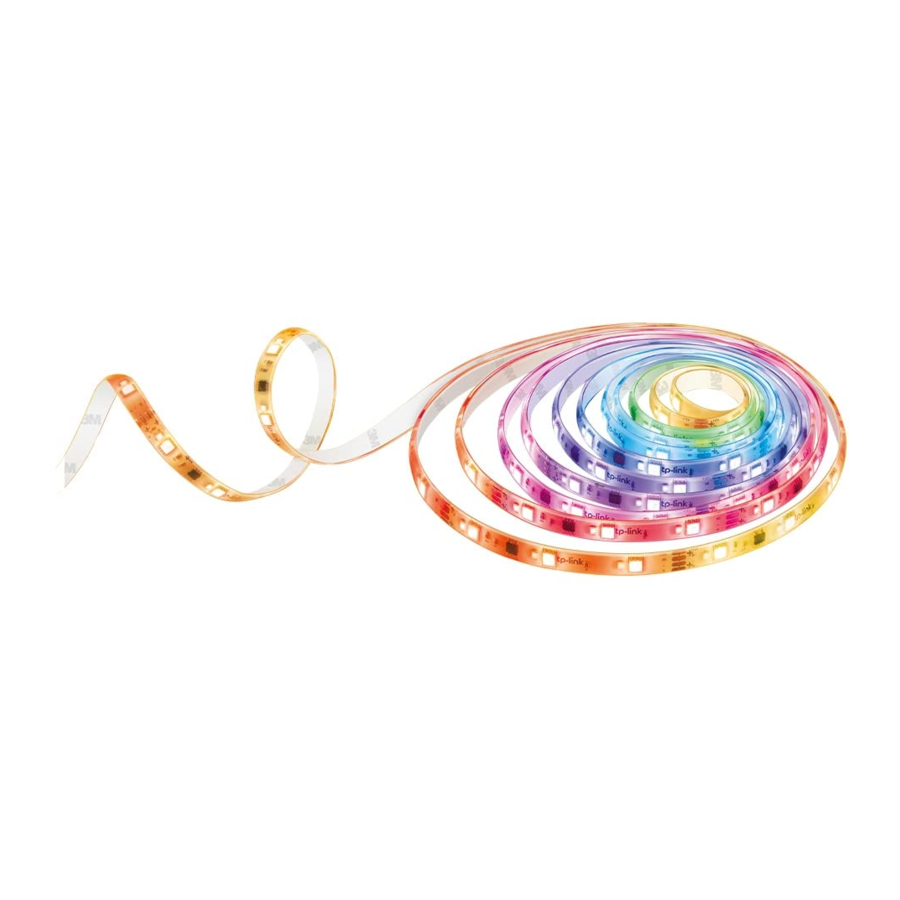
The Tapo Smart Wi-Fi Light Strip is part of the Tapo smart home family of products, including plugs, switches, cameras and more. Over 16 million vibrant colors and 1000 lumens brightness are available for you to pick from and create your own scenes. Cut it to whatever length you want and attach it to any surface with the 3M adhesive. You can light up walkways, TV setups, bookshelves, bedrooms and so much more.
Whether you use your preferred Tapo app or Smart Voice Assistant, you can control the light strip easily. With Tapo, your home is never more than a few taps away.
- Custom Color Zones - Have the lights match your mood, with different color zones to fill the room with lights the way you want it.
- Connect It Your Way - Control it directly via your smart assistants or Tapo App. Connect the Light Strip to the Tapo Hub to create useful sensor-activated lighting effects, like night lights.
- Whiter Whites for General Lighting - Appreciate high-lumen white lighting of the brightest & cleanest quality, meeting your daily work and relaxation needs.
- Sync-to-Sound - Bounce to the beat of your favorite tunes. Coordinate the vibrant colors to your songs and fill your life with energy.
- Made for Everyday Wear and Tear - The strip's durable PU coating prevents moisture and dust intrusion and electrical leaks.
- No Hub Required - Connect to your home's secure Wi-Fi network. No need for a hub or extra equipment.
- Flexible Installation* - Cut it to whatever length you want and attach it to any surface with the 3M adhesive.
*Once cut, it cannot be reattached. Prevent accidental shocks by removing its power and then cutting along the strip's indicator lines. - Preset for Convenience - Save and preset your favorite lightings for multiple scenarios.
- Schedule & Timer - Create schedules and count plans to turn on/off with the brightness/color you set.
- Away Mode - Simulate someone being at home to frighten away unwanted visitors.
- Voice Control - Use simple voice commands to control your light strip with Alexa or Google Assistant.
Appearance
The Tapo Smart Light Strip includes a power adapter, a control button, a controller, and the Light Strip.

Control Button Explanation
| Button Function | Description |
| Switch Preset Lighting Effects | Press the button two or three times to switch the preset lighting effects forward or backward. |
| Soft Reset (Only reset Wi-Fi info) | Press and hold the button for 5s but no more than 10s and release. The light strip will blink orange and green. |
| Factory Reset (Reset to factory settings) | Press and hold the button for at least 10s until the light strip turns solid white then blinks orange and green. |
LED Light Status
| LED Status | Description |
| Blinks orange and green | Ready for setup |
| Blinks green and white | Connecting to Wi-Fi |
| Blinks among several colors, then remains solid white | Connected to Wi-Fi and TP-Link server |
Set Up Your Light Strip
Follow the steps below to get started with your new light strip.
Step 1. Download Tapo App
Get the Tapo app from the App Store or Google Play, or by scanning the QR code below.


OR

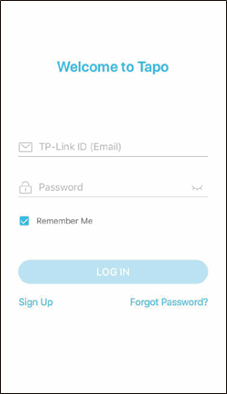
Step 2. Log In
Open the app, and log in with your TP-Link ID. If you don't have an account, create one first.
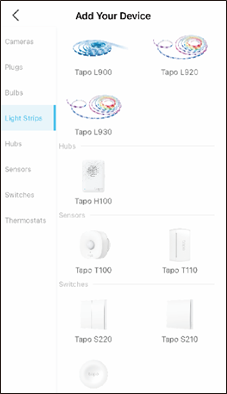
Step 3. Add Your Light Strip
Tap the ![]() button in the app, tap Light Strips, and select your model.
button in the app, tap Light Strips, and select your model.
Step 4. Connect All Parts
Connect the Power Adapter, Controller, and the Light Strip before powering it up.
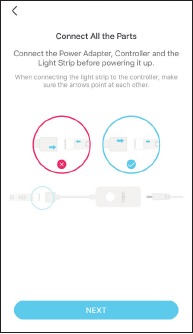
 Note: Make sure the arrows on the light strip and the controller point at each other. Otherwise, it will not be powered on.
Step 5. Power Up Light Strip
Plug in the power adapter and check the lights.
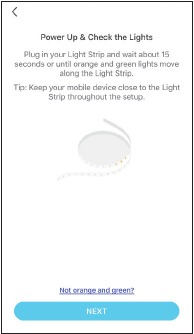
Note: Do not roll up when using. Spread out the light strip before connecting the power supply.
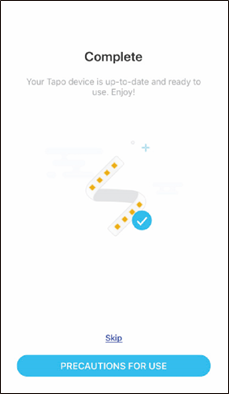
Step 6. Join Your Home Wi-Fi
Follow app instructions to add your light strip to your home network.
Add Your Light Strip to Home
This is a HomeKit-enabled device. You can also add it to the Home app for easy control from your iPhone or iPad. Follow the steps below to add your smart light strip via the Home app.
Before you start
- Your iPhone or iPad should be connected to a stable 2.4 GHz Wi-Fi network.
- To control this HomeKit-enabled accessory, the latest version of iOS or iPadOS is recommended.
- HomeKit will be disabled after 10 minutes since the light strip is powered on. You can power off your light strip and power it back on, then try again.
Add to Home
- Open the Home app. Or if you have added the light strip to Tapo, you can also tap Add to Home in the Device Settings page.

- Scan the HomeKit QR code on the bottom of the light strip controller box. It will be added to Home automatically.

Failed to add to Home?
- Press and hold the control button for 10 seconds to factory reset the light strip.

- Move both your iPhone/iPad and the light strip closer to the router to get a stronger Wi-Fi signal.
- Turn off the Wi-Fi on your iPhone/iPad for a few seconds, then turn it back on to clear the cache of the Home app.
- Make sure your iPhone/iPad is connected to the 2.4 GHz Wi-Fi network. Set different names for 2.4 GHz and 5 GHz networks, or temporarily turn off the router's 5 GHz Wi-Fi until your smart device is successfully added.
- Change the router's 2.4 GHz Wi-Fi channel to a fixed one, such as 1, 6, and 11. Then reboot your router.
- If you still cannot add the light strip to Home, tap set it up with Tapo manually. Then follow the app instructions to add your light strip.

- If the problem persists, refer to the FAQ for detailed instructions: https://www.tp-link.com/support/faq/3390/
![]()


Install Your Light Strip
After you have set up the light strip via the Tapo app, you can cut it to length-fit and attach it to any surface with the 3M adhesive.
To avoid damaging your light strip, please note the following Installation Tips before installing the light strip.
Installation Tips

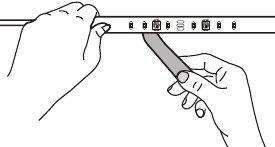
Cut Only On Specific Areas of Light Strip
You can custom tailor the length of your light strip with scissors. Unplug the Light Strip and cut only on these specific areas or your light strip will no longer function.
Avoid Bending on LED Beads
The bend should be avoided just in the position of the LED components, so as not to damage the product and affect the life of the product.
Avoid Sharp Turns
Carefully roll the light strip into a clover or use a gentle hill when making 90° turns like those need behind a TV. Sharp bends can damage your light strip.
Avoid Sharp Corners
Use gentle weeps when bending light strip around corners and avoid creases as they may cause damage.
Step 1. Choose Location
Choose a location that avoids static and eases away from splashing water. Find a clean, dry and smooth surface, then wipe off the dust.

Step 2. Remove Adhesive Tape
Unplug the light strip first. Slowly peel away the 3M adhesive backing and take it out bit by bit.

Note: Do not peel off the tape under the adhesive backing.
Step 3. Stick Light Strip
Stick the light strip and press it down for 10-15 seconds. Secure the controller with the adhesive pads. Do not move it to other place after it is attached.
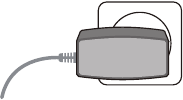
Step 4. Power Up Light Strip
Plug in the power adapter to power on your light strip.
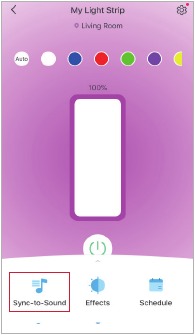
Basic Device Control
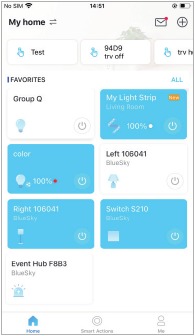
After successfully setting up your light strip, you will see the home page of the Tapo app. Here you can view the status of all devices that you've added and manage them. You can tap on the device to control and manage.
Home Page
You can turn on or off the light strip anytime anywhere and tap the card to enter the status page.
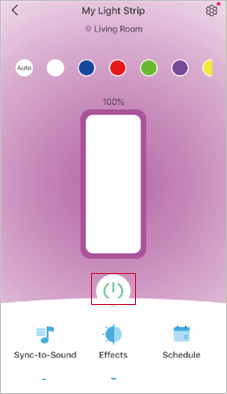
Device Status Page
You can adjust brightness and colors, start sync-to-sound, set lighting effects, create schedules, enable away mode, or set a timer to automatically control your device, view its runtime & energy usage, and more.

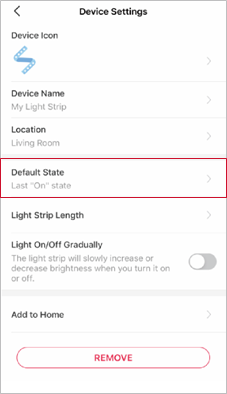
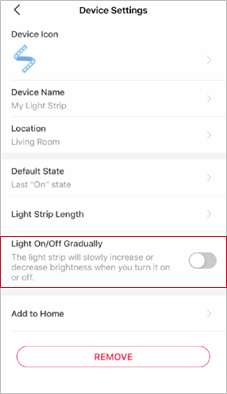
Device Settings Page
You can edit the basic information, set default state, change the illuminated length, enable gentle on/off, update firmware, and more.
Configure Your Light Strip
You can configure your light strip by adjusting lighting settings and setting Presets, Schedule, Timer, Away Mode and more.
Power On/Off At One Tap
Quickly power on or off your light strip with a tap.
Adjust Brightness
Slide to dim your light strip with a range from 1% to 100%.

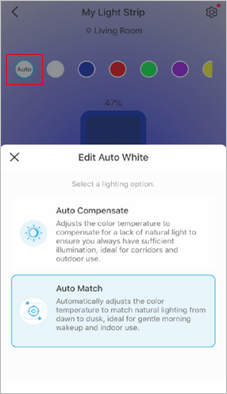
Auto White
Tap ![]() to select a lighting option for different use.
to select a lighting option for different use.
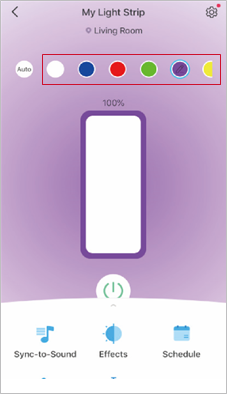
Change Color & Lighting Effect
Tap to apply the color or lighting effect.
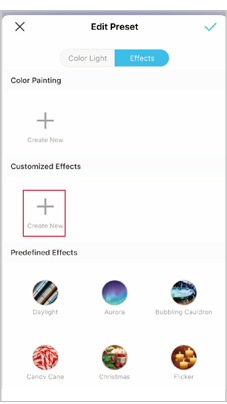
Presets
Tap on a preset to quickly apply your favorite colors or lighting effects.
To edit Presets, tap on a preset and the edit icon ![]() will appear, then tap the edit icon
will appear, then tap the edit icon ![]() .
.

Presets Settings
White Light: Change color temperature and brightness for the preset.
Color Light: Change the color and brightness for the preset.
Effects: Select or create a new lighting effect for the preset.

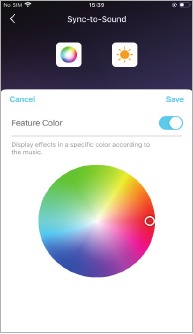
Sync to Sound
Tap  to start sync-to-sound to coordinate your favorite music with your Tapo lights.
Keep sync-to-sound page in the foreground to ensure audio reception.
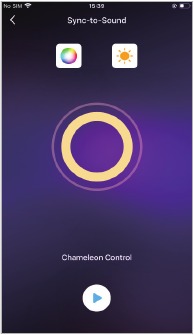
Adjust the displayed color and brightness according to the music.
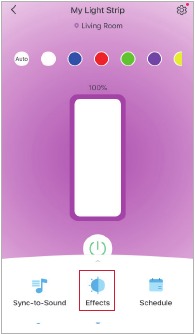
Set Lighting Effects
Tap ![]() to create wonderful lighting effects to meet your needs.
to create wonderful lighting effects to meet your needs.
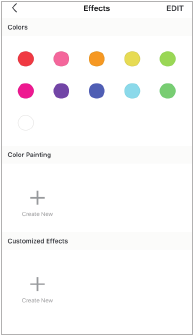
Option 1: Choose a Solid Color
Multiple colors are provided and you can select a color you prefer.
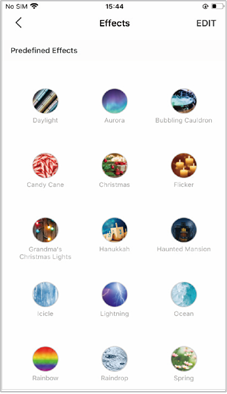
Option 2: Choose a Predefined Effect
There are all kinds of predefined effects to fit different scenarios. Select the one you prefer.
Option 3: Create a Color Painting
- Tap
![]() to create a new color painting.
to create a new color painting.
![]()
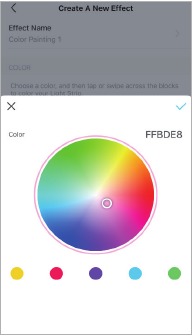
- Choose a color you prefer.
![]()
- Tap or swipe across the blocks to color your light strip and set the brightness as needed. Tap SAVE to save the color painting.
![]()
 to create a new color painting.
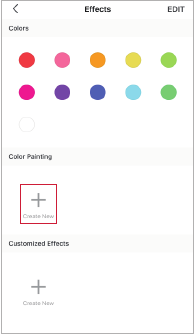

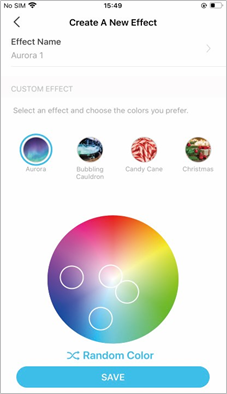
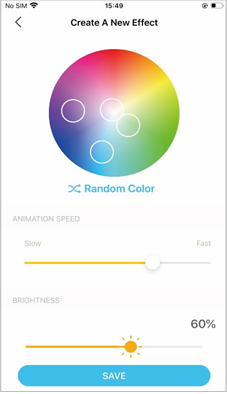
Option 4: Create a Lighting Effect
- Tap
![]() to create a new effect.
to create a new effect.
![]()
- Edit the name as needed, then select an effect and choose colors you prefer. If you have no idea, tap Random Color and Tapo will help select colors for you.
![]()
- Adjust how fast you want the color to switch and set the brightness as needed. Tap SAVE to save the custom effect.
![]()
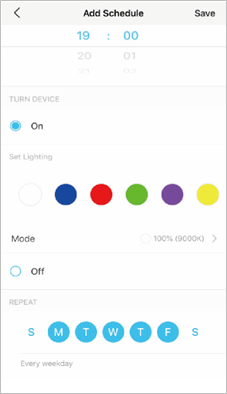
Set Schedule
Tap ![]() to add a schedule for your light strip to automatically turn on/off and adjust the lighting settings to simplify your daily routine.
to add a schedule for your light strip to automatically turn on/off and adjust the lighting settings to simplify your daily routine.
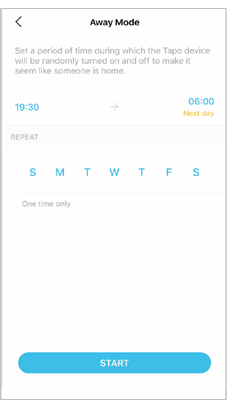
Set Away Mode
Tap ![]() to preset the Away Mode, set the start and end time, then your light strip will be randomly turned on/off during this period.
to preset the Away Mode, set the start and end time, then your light strip will be randomly turned on/off during this period.
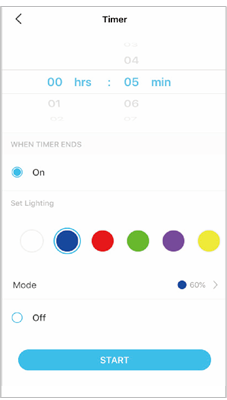
Set Timer
Tap ![]() to set the timer and lighting settings, then your light strip will automatically turn on with the specific settings after the timer ends.
to set the timer and lighting settings, then your light strip will automatically turn on with the specific settings after the timer ends.
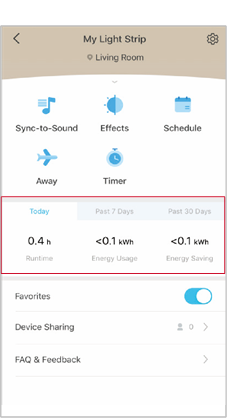
Check Runtime & Energy Usage
Slide up to check your light strip's Runtime and Energy Usage today, past 7 days or past 30 days.
Share Your Light Strip
You can invite your family members to manage your Tapo devices together by entering the TP-Link ID (email) you want to share the devices with.
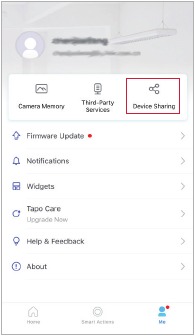
Method 1: Go to Device Status page, slide up and tap Device Sharing.
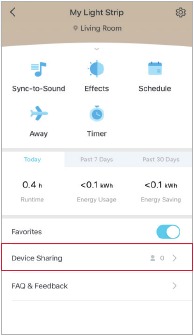
Method 2: Go to Me page and tap Device Sharing.
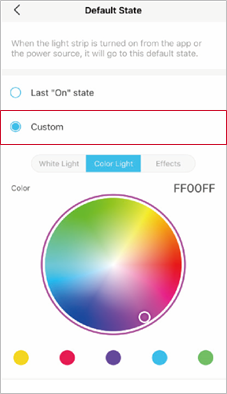
Device Default State
Set the state (color/brightness/effect) of your light strip, and then each time you turn on the light strip, your light strip will go to this set state.
Option 1: Last "On" State
When you turn off the light strip, the light strip will remember the state (color/brightness/effect) before it was turned off. Therefore, if you select Last "On" state, the light strip will go to the remembered state each time it's turned on.
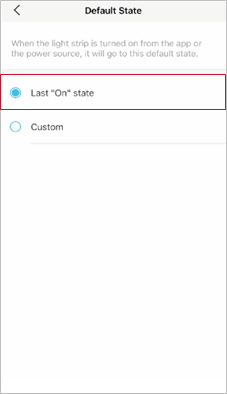
Option 2: Custom
Set a preferred state (color/brightness/effects), and then you light strip will go to your preferred state each time it's turned on.
Light Strip Length
Changing the default length of your light strip will change how much of the strip illuminates. It takes effect after you switch the lighting effect.

![]() Note: For Tapo L930-10, illuminated lengths of two strips synchronize according to the length set. If you prepare to cut the strips, it is recommended to cut them into equal lengths to ensure the lighting effect.
Note: For Tapo L930-10, illuminated lengths of two strips synchronize according to the length set. If you prepare to cut the strips, it is recommended to cut them into equal lengths to ensure the lighting effect.
Light On/Off Gradually
Enable Light On/Off Gradually and your light strip will slowly increase or decrease brightness when you turn it on or off.
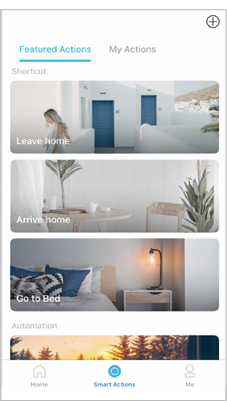
Smart Actions
Smart Actions automate repetitive tasks, allowing you to blaze through tedium with utmost ease. Set everything up once and never have to worry about it again. With Smart Actions, giving your home that level of intelligence is a snap. Shortcut lets you perform an action with a simple tap. Automation allows you to automate tasks to be performed at a set time. e.g. The light will light on at sunset.
Option 1: Edit based on the featured actions
- Go to the Smart Actions page and you will see the Featured Actions (Shortcut or Automation).
![]()
- Tap on a featured action. Tap EDIT to change the settings as needed and tap APPLY to save changes.


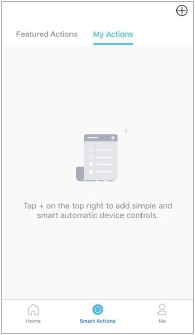
Option 2: Create your own actions
- Go to My Actions page. Tap + on the top right to add a simple and smart action.
![]()
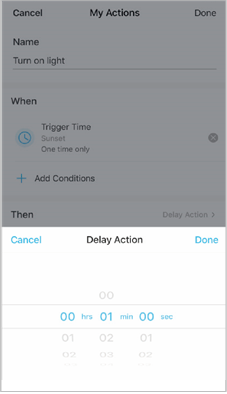
- Name the new action. Tap + to add conditions (When) like the trigger time, and tap + to add tasks (Then) like turning on your light strip with specific effects.
![]()
- When the action created, you can also delay the action for a specific time. Tap Done to save all the settings.
![]()
If there are more than 2 conditions added, you can decide when to perform the action. Tap When Any Condition is Met, and select "Any Condition is Met" or "All Conditions Are Met".
![]()


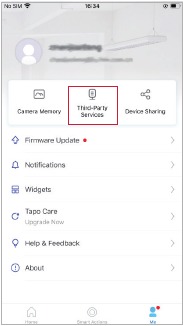
Third-Party Services
Control your smart devices through third-party services, including voice control. Free up your hands with simple voice commands to control your devices via Amazon Alexa or Google Assistant.
Go to Me page and tap Third-Party Services.
Select Amazon Alexa or Google Assistant. Follow the app instructions to control your device via voice.

Select Add to Siri. Follow the app instructions to create a new, custom shortcut using the Shortcuts app for iPhone or iPad.

Select IFTTT. Follow the app instructions to set up IFTTT.

Reset Your Light Strip
There are two types of reset available: a soft reset which resets the Wi-Fi settings only, and a factory reset that erases all of your custom settings and restore them to factory defaults.
Soft Reset (without losing the configuration settings except Wi-Fi)
Press and hold the button on your controller for more than 5 seconds but no more than 10 seconds and release. The light strip animating orange and green after that indicates a successful soft reset. Then you can reconfigure your light strip in Tapo app.
Factory Reset (back to factory default settings)
Method 1
Press and hold the button on the controller for at least10 seconds until the light strip turns solid white then blinks orange and green. Then you can reconfigure your light strip in Tapo app.
Method 2
On the home page in Tapo app, long press the card and tap ![]() .
.

OR
Go to Device Settings page and tap REMOVE at the bottom.


Documents / Resources
References
Tapo Smart | Smart Devices for Smart Living
Support | Tapo
https://community.tp-link.com
![www.apple.com]() App Store - Apple
App Store - Apple![play.google.com]() Google Play
Google PlayHow to Troubleshoot when a TP-Link HomeKit-enabled device fails to add to Apple’s Home App
Download manual
Here you can download full pdf version of manual, it may contain additional safety instructions, warranty information, FCC rules, etc.
Download TP-Link Tapo L930 - Smart Light Strip, Multicolor Manual
Advertisement
Thank you! Your question has been received!


Need Assistance?
Do you have a question about the Tapo L930 that isn't answered in the manual? Leave your question here.