Advertisement

About This Guide
This guide provides a brief introduction to the Indoor/Outdoor Security Camera System and the Kasa app, as well as regulatory information.
Features available in Kasa Smart Wire-Free Camera may vary by model and software version. Kasa Smart Wire-Free Camera availability may also vary by region. All images, steps, and descriptions in this guide are only examples and may not reflect your actual experience.
Conventions
In this guide, the following convention is used:
| Convention | Description |
| Camera | Stands for Kasa Smart Wire-Free Camera. |
| Hub | Stands for Kasa Smart Camera Hub. |
| Teal | Key information appears in teal, including management page text such as menus, items, buttons and so on. |
| Underline | Hyperlinks are in teal and underlined. You can click to redirect to a website. |
More Info
- Specifications can be found on the product page at https://www.tp-link.com.
- Our Technical Support and troubleshooting information can be found at https://www.tp-link.com/support.
Introduction
An Indoor/Outdoor Security Camera System generally includes one Kasa Smart Camera Hub and one or more Kasa Smart Wire-Free Cameras. The Kasa Smart Wire-Free Camera monitors anywhere and everywhere. Monitor live video and recordings directly on the Kasa Smart app from the convenience of your smartphone. The Kasa Smart Camera Hub adds a layer of security with a siren, alert and audio recordings to mimic occupancy. Your home is always protected.
- Night Vision
At night, the camera will detect activity up to 25 ft. away with night vision. - Wired or Wire-free
A camera that gives you freedom to take it anywhere you want. When connected to our adapter, the Kasa Smart camera allows for a pre-roll which begins recording a few seconds before every clip. - Crystal Clear 1080p Video
Sharp and clear 1080p video makes sure you never miss a thing. In the dark, the camera will detect activity up to 25 feet away with Night Vision. - Rechargeable Lithium Ion Battery*
With a low-power Wi-Fi protocol, we've extended the battery life for a longer and smarter experience. *Optional: Adapter for wired use if needed. - Built-in Siren and 2-way Talk
Use crisp 2-way audio to communicate with the delivery person at your front door or use the camera's siren to scare away intruders. - More Than A Hub
The hub helps save power and also plays as a secondary security alarm. Any intruder will be met with an unwelcome sound. - Weatherproof
The Kasa Smart Wire-Free Camera is weatherproof and will be protected against rain and dust.
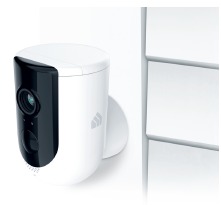
Appearance
Kasa Smart Wire-Free Camera has a system LED that changes color according to its status, speakers and microphone, and a Sync button. See the explanation below:

System LED
 | Alternating amber and green: Powering on or starting up |
 | Flashing green: Connecting to hub (Discovery mode) |
 | Solid green: Connected to hub |
 | Quick flashing red: Failed to connect to or sync with hub Flashing red once per minute: Low battery (below 15%) |
 | Quick flashing amber: Firmware updating Flashing amber once per second: Factory resetting |
 | Solid amber: No connection, initializing, or rebooting |
 | Solid blue: Battery starts charging |
 | Off: No power or Status LED off |
Speaker and Microphone
Built-in internal speaker and microphone are protected by the waterproof membrane.

Do NOT insert objects into the holes!
Sync button
- Press for 1 second during Discovery mode: Initiates the syncing process with hub
- Press and hold for about 15 seconds: Resets the camera to factory settings
Kasa Smart Camera Hub has a LED ring that changes color according to its status, a Siren Off button, and a Reset button. See the explanation below:
 System LED
 | Alternating orange and green: Connected to home router but no internet connection |
 | Alternating red and green: Not connected to home router and internet |
 | Quick flashing green: Camera attempting to sync with hub (Discovery mode) Flashing green once per second: Connected to home router and internet |
 | Solid green: Camera connected to hub |
 | Solid red: Camera too far from hub |
 | Flashing red: Siren or speaker is on |
 | Quick flashing orange: Firmware updating Flashing orange once per second: Factory resetting |
 | Solid orange: Powering on or starting up |
 | Off: Communicating with camera and internet, no camera connected, or no power |
Siren Off button
- Press for 1 second when siren is on: Turns off the siren
Reset button
- Press and hold for about 15 seconds when neither siren nor alert is playing:
Resets the hub to factory settings
Power Up Your Camera
Method 1: Powered by Battery
- Remove the protective film on the battery.

- Open the cover of the camera.

- Insert the battery. Make sure its positive and negative ends are facing the correct direction.

- Firmly press the cover for the secure seal.


Method 2: Powered by Power Adapter
- Pull up the cover for USB cable on the back and connect it to the provided power adapter.

- Connect the power adapter to an outlet.


How to Charge Your Battery
If you have installed the battery but the LED of the camera is off, then probably the battery is out of power and need to be charged. When the LED of the camera blinks red once per minute, it means the battery power is low and need to be charged. Follow the instructions below to charge the battery.
- Insert the battery based on Method 1 above.
- Connect the camera to a power outlet based on Method 2 above.


Set Up Your Camera
Follow the steps below to get started with your new camera.
Step 1. Download Kasa
Get the Kasa Smart app from the Apple App Store or Google Play, or by scanning the QR code below.


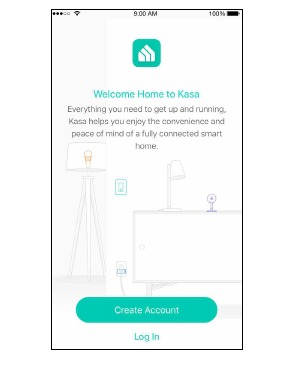
Step 2. Log In
Open the app, and log in with your TP-Link ID.
If you don't have an account, create one first.
Step 3. Add Camera
Tap the ![]() button in the Kasa app, select Add a Device, then select Kasa Cam Wire- Free. Follow app instructions to add hub and cameras.
button in the Kasa app, select Add a Device, then select Kasa Cam Wire- Free. Follow app instructions to add hub and cameras.

Step 4. Mount Camera
Follow mounting instructions in the app for ideal camera placement.

![]() Enjoy!
Enjoy!
Your camera is ready for use in your device list.

View Your Camera
After initial setup is complete, you can view your camera from anywhere.
View Smart Devices List
Go to the Devices page, then you can view the list of all your cameras and any other smart devices if any.

View Cameras List
Go to the Cameras page, then you can view the list of all your cameras.

View Live Video
Tap a camera on the Devices or Cameras page, then you can view the live video, talk to a person near the camera, sound the siren to scare away intruders, and more.

Check Battery Power
If you power up your camera with the battery, you can check battery power at the following pages.
Check Battery Power on Devices Page
Go to the Devices page, battery power is listed below the the device name.

Check Battery Power on Live View Page
Tap your camera on the Cameras page to go to the Live View page.
You can find the battery power below the device name.

Configure Your Camera
On the live video page, you can configure your camera to meet various needs.
Set Schedule
Tap ![]() on the live video page, then you can schedule an automatic
on the live video page, then you can schedule an automatic
On/Off event for your camera to simplify your daily routine.

Change Camera Settings
Tap ![]() on the live video page, then you can view and change camera settings.
on the live video page, then you can view and change camera settings.

Check Activities
When you receive an activity notification, you can check the live video immediately, or check the recordings at any time.
Check Activity History
Go to the Activity page, then you can view the activity clips that your camera records.

Filter Activity Clips
Tap ![]() on the Activity page, then you can filter activity clips according to your needs.
on the Activity page, then you can filter activity clips according to your needs.

Discover Kasa
Use the Kasa Smart app to pair your Smart Wi-Fi Power Strip with Amazon Alexa or Google Home Assistant, and enjoy a full hands-free experience. Kasa helps manage the rest of your smart home too, working with Samsung SmartThings to trigger changes when you arrive home or leave for the day.
Launch the Kasa Smart app. Go to the sidebar and tap Works with Kasa. You can choose Amazon Alexa / Google Assistant / IFTTT / Samsung SmartThings for detailed instructions.


Documents / Resources
References
![www.tp-link.com]() WiFi Networking Equipment for Home & Business | TP-Link
WiFi Networking Equipment for Home & Business | TP-LinkTP-Link Product Support - Wireless Networking Equipment Support
![www.tp-link.com]() WiFi Networking Equipment for Home & Business | TP-Link
WiFi Networking Equipment for Home & Business | TP-LinkTP-Link Product Support - Wireless Networking Equipment Support
![www.apple.com]() App Store - Apple
App Store - Apple![play.google.com]() Google Play
Google Play
Download manual
Here you can download full pdf version of manual, it may contain additional safety instructions, warranty information, FCC rules, etc.
Advertisement
Thank you! Your question has been received!


Need Assistance?
Do you have a question about the KC300S2 that isn't answered in the manual? Leave your question here.