TP-Link Tapo C100 - Home Security Wi-Fi Camera Manual
- User manual (24 pages) ,
- Quick start manual (67 pages) ,
- User manual (20 pages)
Advertisement
Conventions
In this guide, the following convention is used:
| Convention | Description |
| Underline | Hyperlinks are in teal and underlined. You can click to redirect to a website. |
 Note: Note: | Ignoring this type of note might result in a malfunction or damage to the device. |
More Info
- Specifications can be found on the product page at https://www.tapo.com.
- Our Technical Support and troubleshooting information can be found at https://www.tapo.com/support/.
- The setup video can be found at https://www.tp-link.com/support/setup-video/#cloud-cameras.
Introduction
This guide provides a brief introduction to the Home Security Wi-Fi Camera and the Tapo app, as well as regulatory information.
Please note that features available of the Tapo smart camera may vary by model and software version. The availability may also vary by region. All images, steps, and descriptions in this guide are only examples and may not reflect your actual experience.
When you are away home, there are always something you care about. Tapo C100 helps you receive a notification whenever your camera detects movement and check it in detail through the Tapo app. Also, you can personalize your security by setting motion detection zones to only notify you of what happens in areas that you choose.
- 1080p High-Definition – Provides greater sharpness and clarity.
- Night Vision – Provides a visual distance of up to 30 ft in total darkness.
- Live View – Always keep an eye on what matters most to you—anytime, anywhere.
- Two-Way Audio – Communicate in real time through a built-in microphone and speaker.
- Alarm System – Triggers lights and sounds as an alarm when motion is detected.
- Privacy Mode - Temporarily shut down surveillance with a tap in the app.
- Sharing - Share interesting and funny videos to everyone on social media.
- Easy Setup - Follow in-app instructions to easily set up within minutes.
- Local Storage – Store up to 128 GB of video on a microSD card†, equal to 384 hours (16 days) of footage△.
† The SD card is not provided. △The data comes from TP-Link laboratory.
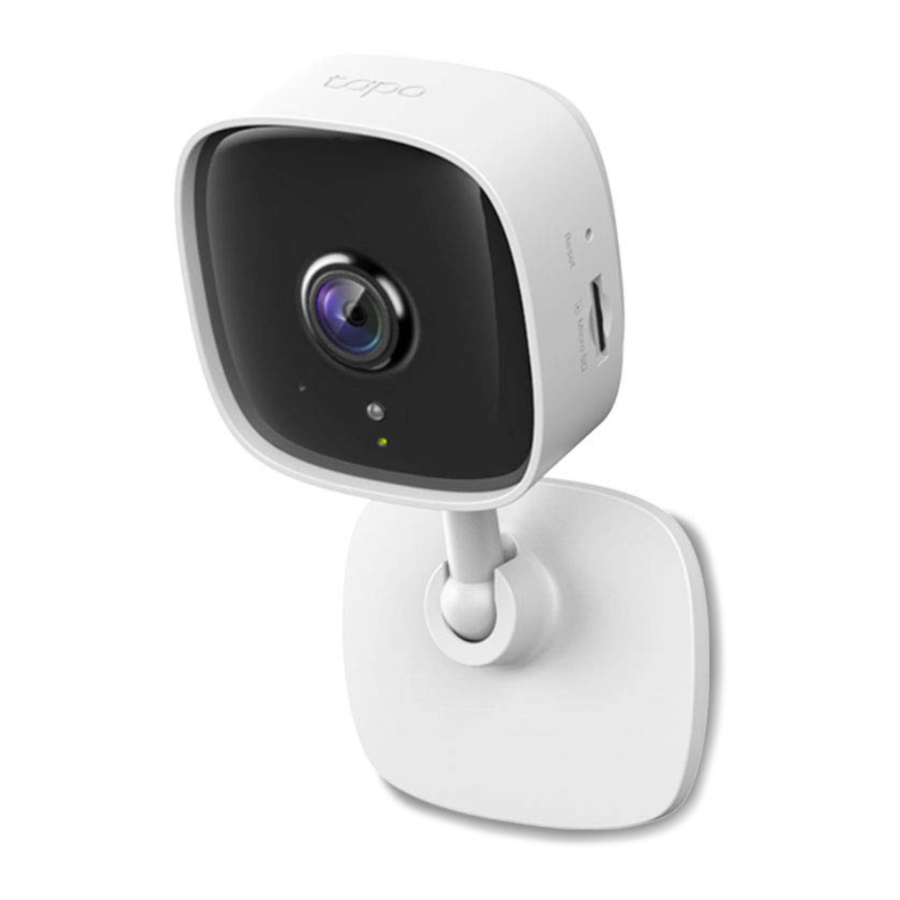
Appearance
The Home Security Wi-Fi Camera has a system LED that changes color according to its status, an alert light, lens, microphone, DC power port, RESET button and a microSD card slot. Refer below for details.

Microphone
Built-in internal microphone.
Note: Do NOT insert objects into the hole.
Alert Light
Blinks to alert you when the activity detected.
DC Power Port
Connect the power cord provided.
RESET Button
Press and hold for at least 5 seconds until the LED blinks red to reset your camera.
microSD Card Slot
Insert a microSD card and initialize it on the app for local recording.
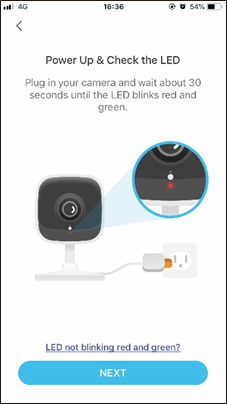
System LED
- Solid red: Starting up
- Blinking red and green: Ready for setup
- Blinking red slowly: Connecting to Wi-Fi
- Solid amber: Connected to Wi-Fi
- Solid green: Connected to TP-Link Cloud server
- Blinking red quickly: Camera resetting
- Blinking green quickly: Camera updating
Set Up Your Camera
Follow the steps below to get started with your new camera.
Step 1. Download App
Get the Tapo app from the App Store or Google Play, or by scanning the QR code below.


OR


Step 2. Log In

Open the app, and log in with your TP-Link ID. If you don't have an account, create one first.
Step 3. Add Your Camera
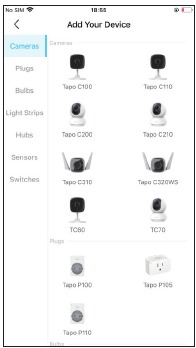
Tap the ![]() button in the app and select your model.
button in the app and select your model.
Step 4. Configure Camera
Follow app instructions to configure your camera and add it to your home network.
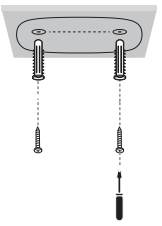
Step 5. Place Camera
Place your camera on a flat surface, or install it on a wall or ceiling with the provided mounting screws.
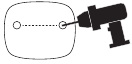
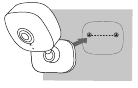
- Mark Position
![]()
Place the mounting template where you want the camera.
For wall mounting, drill two holes through two circles. - Mount Base
![]()
Affix two mounting screws with the help of mounting template.
For wall mounting, insert two anchors into holes and screw the screws into the anchors. - Secure Camera
![]()
Hang your camera on the screws.


Main Camera Controls
After you successfully set up the camera, you will see your camera listed on the home page. You can view and manage your camera from anywhere at any time with the Tapo app.
Home Page
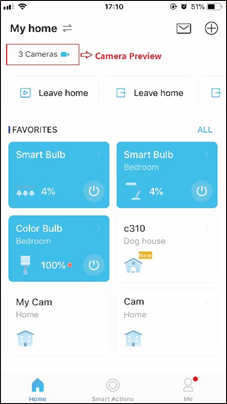
This page lists all your cameras you've added and you can view them directly and manage them easily. Tap the camera or go to Camera Preview > Manage to enter the Live View page.
Live View

Multi-Screen
View live videos from multiple cameras at the same time
Tap Talk or Voice Call to communicate with loved ones, turn on Alarm to get noticed when motion detected, enable the Privacy Mode to temporarily shut down the surveillance for privacy, or go to Playback & Memory to check all recordings and saved moments.
Camera Settings
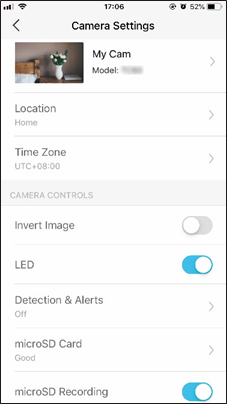
On Live View page, tap ![]() to enter the Camera Settings page. You can change the settings of your camera to meet various needs, such as change your camera name, customize detection settings and recording schedules, turn on or off notifications, set activity zones, etc.
to enter the Camera Settings page. You can change the settings of your camera to meet various needs, such as change your camera name, customize detection settings and recording schedules, turn on or off notifications, set activity zones, etc.
Me

Account Info
Change your avata, edit your name, or modify the password
Camera Memory
Photos and videos you took will appear here
Camera Preferences
You can choose to display the Live or Speed tag on the screen for all your Tapo cameras
Voice Control
Set up connections with third-party services to control your Tapo devices by voice
Device Sharing
Share your Tapo devices to your family members to manage devices together
On this page, you can edit your account, quickly check the memorable moments you saved, or find the FAQs of using smart camera and basic info related to the Tapo app.
Motion Detection
With motion detection, the Tapo app alerts you of activity that matters and sends notifications straight to you when motion detected. Insert a microSD card to record the clips when motion detected. Otherwise, you can only receive the notifications.
Note: Initialize the SD card on the app before using it.
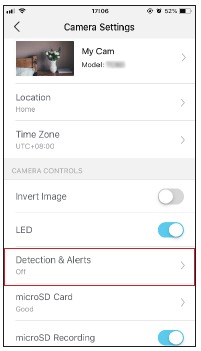
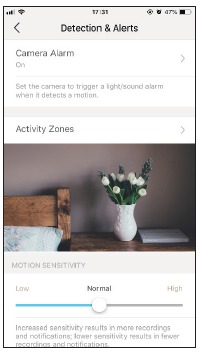
- Go toCamera Settings page and tap Detection & Alerts to customize its current detection settings.
![]()
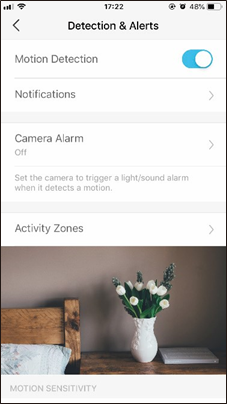
- On theDetection & Alerts page, enable the Motion Detection function. It's recommended to enable the Notifications function to receive motion detection messages.
![]()
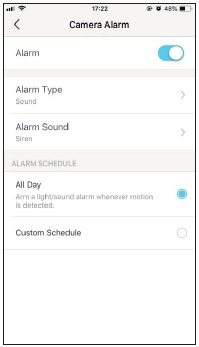
- Customize Camera Alarm settings. Choose Alarm Type (Sound/Light) 4. Customize Activity Zones and the camera will only detect motion in and Alarm Sound (Siren/Tone), and set Alarm Schedule as needed. custom zones. Entire view is covered by default.
![]()
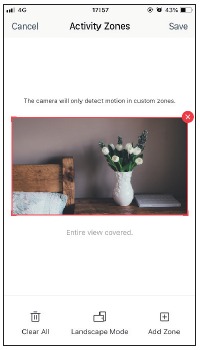
- Customize Activity Zones and the camera will only detect motion in custom zones. Entire view is covered by default.
![]()
- Adjust Motion Sensitivity (Low/Normal/High) as needed. Increased 6. After editing the detection settings for the camera, you can set the sensitivity results in more recordings and notifications. Recording Schedule for the motion detection.
![]()
- After editing the detection settings for the camera, you can set the Recording Schedule for the motion detection.

- On the Live View page, tap
![]() to find all recordings. The orange sections are recordings for motion detection.
to find all recordings. The orange sections are recordings for motion detection.

![warning]() Note: The microSD card is needed for recordings. Initialize the SD card on the app before using it.
Note: The microSD card is needed for recordings. Initialize the SD card on the app before using it.


24-hour Recordings
The microSD card is needed for 24-hour recording and it's suggested to initialize the SD card on the app before using it.
- On the Live View page, tap
![]() to enter the Camera Settings page.
to enter the Camera Settings page.
![]()
- Toggle on to enable the microSD Recording function and set the Recording Schedule for Continuous Recording (24-hour Recording) as needed.

- On the Live View page, tap
![]() to find all recordings. The blue sections mean continuous recording.
to find all recordings. The blue sections mean continuous recording.

![warning]() Note: The microSD card is needed for recordings. Initialize the SD card on the app before using it.
Note: The microSD card is needed for recordings. Initialize the SD card on the app before using it.
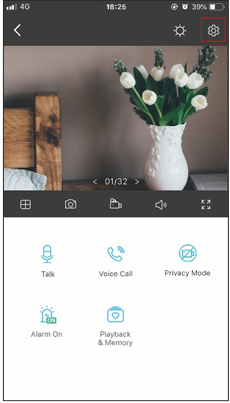


Privacy Mode
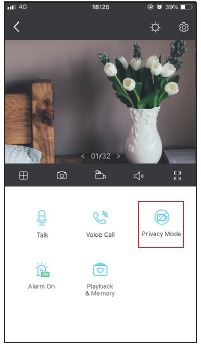
On the Live View page, tap  to enable the Privacy Mode. When enabled, streaming and recording functions will be temporarily disabled to protect your privacy.

Documents / Resources
References
Download manual
Here you can download full pdf version of manual, it may contain additional safety instructions, warranty information, FCC rules, etc.
Download TP-Link Tapo C100 - Home Security Wi-Fi Camera Manual
Advertisement
Thank you! Your question has been received!


Need Assistance?
Do you have a question about the Tapo C100 that isn't answered in the manual? Leave your question here.