Advertisement
About This Guide
This guide provides a brief introduction to the Kasa Spot and the Kasa Smart app, as well as regulatory information.
Features available of this product and in Kasa Smart may vary by model and software version. Kasa Spot and Kasa Smart availability may also vary by region. All images, steps, and descriptions in this guide are only examples and may not reflect your actual experience.
Conventions
In this guide, the following convention is used:
| Convention | Description |
| Teal | Key information appears in teal, including management page text such as menus, items, buttons and so on. |
| Underline | Hyperlinks are in teal and underlined. You can click to redirect to a website. |
More Info
- Specifications can be found on the product page at https://www.tp-link.com.
- Our Technical Support and troubleshooting information can be found at https://www.tp-link.com/support.
- Frequently Asked Questions (FAQs) can be found at https://www.tp-link.com/support/faq.
Introduction
With the Kasa Spot connected to your home network, you can see what happens in your home even when you're away. This keeps your home safe and gives yourself a little peace of mind — all while seeing every detail on your phone.
You can set up and use your Kasa Spot alone, or use it together with other smart home devices including plugs, bulbs, switches and more. All these can be achieved on the app.
- Crystal Clear Video – Sharp and clear Full HD provides high-quality video right in the palm of your hand.
- Night Vision – Kasa camera detects activity up to 30 feet away even in total darkness.
- Live View – Keep an eye on what's important to you from anywhere in real time with the Kasa Smart app.
- Secure Local Storage – Save your footage on a microSD card* and play back with your Kasa Smart app. *microSD card not included.
- Kasa Care Cloud Storage – Subscribe to a Kasa Care Plan ‡ to store your video clips to the cloud for added backup and more beneficial functions. ‡Kasa Care Plans vary in different countries and regions.
- Customizable Activity Zones – Create dynamic activity zones around important areas and receive alerts you care about.
- Crisp Two-Way Audio – Built-in microphone and speaker allow you to carry on a conversation from anywhere with your phone or other supported devices.
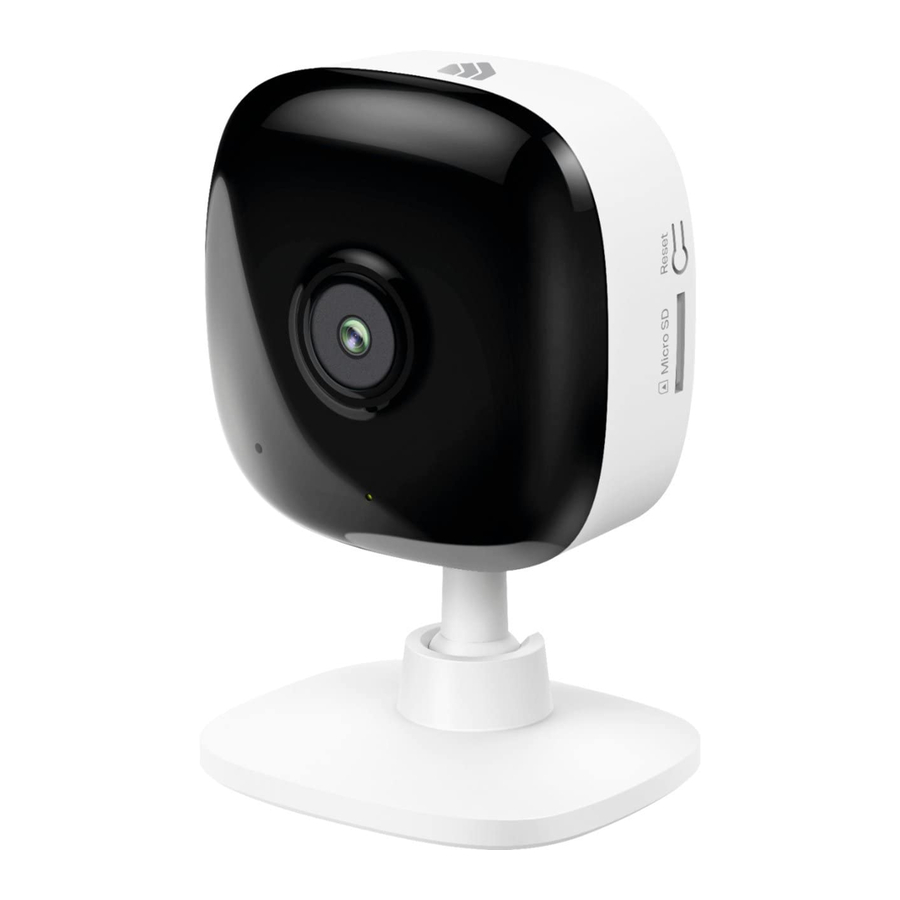
Appearance
Kasa Spot has a system LED that changes color according to its status, a microphone, a speaker, a micro USB port, a micro SD card slot and a RESET button. Refer below for details.
*Images may differ from actual product.

Microphone
Built-in internal microphone. Note: Do NOT insert objects into the hole.
System LED
 | Solid amber: Rebooting |
 | Alternating amber and green: Ready for setup |
 | Flashing red Connecting to Wi-Fi |
 | Flashing green: Connected to Wi-Fi |
 | Solid green: Bound to Cloud |
 | Flashing amber: Resetting |
Speaker
The sound comes out of the camera.
Micro USB Port
Connect the power cord provided.
microSD Card Slot
Insert a microSD card to save the recorded videos locally.
RESET Button
- Press and hold for 3 to 15 seconds: Reenable setup mode
- Press and hold for over 15 seconds: Reset to factory default settings
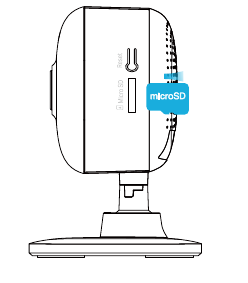
Insert a microSD Card
Kasa provides options for your video recording. You can subscribe to a Kasa Care Plan to store 30-day video clips to the cloud for added backup and more beneficial functions.
Or you can save the footage continuously on a microSD card* and play back with your Kasa Smart app. The camera will overwrite the oldest files when the microSD card memory is full. See the instructions below to insert a microSD card to your Kasa Spot.
*Micro SD card not included.
- Find the SD card slot on the side panel of your Kasa Spot.
- Holding the card in the correct orientation, carefully insert the SD card into the slot. Push in the SD card until you hear a clicking sound.
![]()
Set Up Your Camera
Follow the steps below to get started with your new camera.
Step 1. Download Kasa
Get the Kasa Smart app from the App Store or Google Play, or by scanning the QR code below.


Step 2. Log In
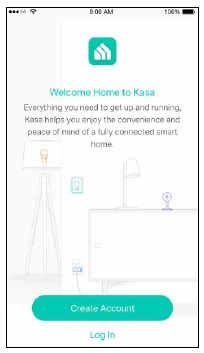
Open the app, and log in with your TP-Link ID.
If you don't have an account, create one first.
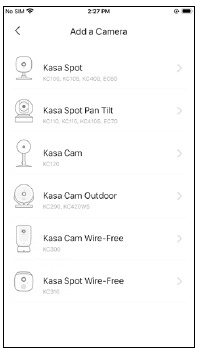
Step 3. Start Setup
Tap the ![]() button in the Kasa app and select Kasa Spot.
button in the Kasa app and select Kasa Spot.
Step 4. Configure Camera
Follow app instructions to configure your camera and add it to your home network.
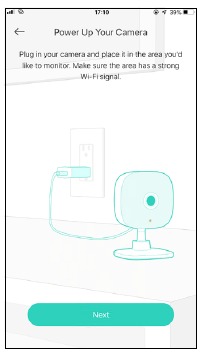
Step 5. Place Camera
Place your camera on a flat surface, or install it on a wall or ceiling with the provided indicator label and mounting screws.
- For cement wall: Drill two φ6mm holes with the help of indicator label, insert the plastic expansion tubes into holes and screw the mounting screws into the expansion tubes.
- For soft surface: Directly screw the screws in.


Main Device Controls
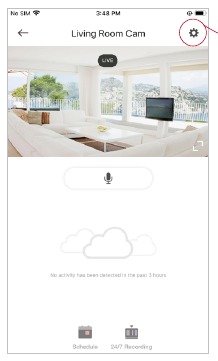
After you successfully set up your camera, you will see the home page of the Kasa Smart app. Here you can view and manage all devices that you've added to Kasa. Tap your camera to enter the live view page and further manage it.
Home Page
You can see all your Kasa devices listed in the Home page.
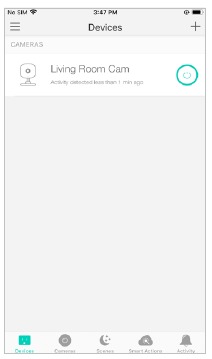
Turn on/off your camera
Turn on/off your camera quickly by tapping the switch in the home page. If the camera is off, it means you are entering Privacy Mode and cannot stream live video.

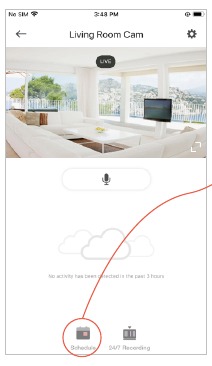
Set Schedules
Schedule: Set schedules to automatically turn on/off your camera at set times according to your daily routine.
- Tap your camera in the Home page to enter the live view page, and then tap
![]() .
.
![]()
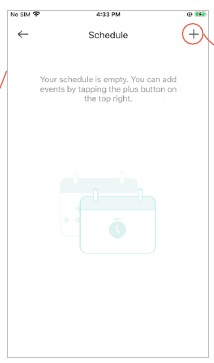
- Tap + on the top right corner.
![]()
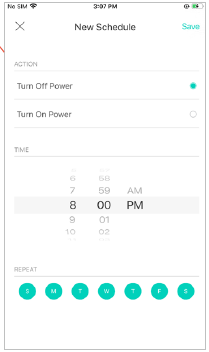
- Set a schedule to turn the camera on or off at set time.
E.g. I want to turn off the camera at 8:00 PM every day.
![]()
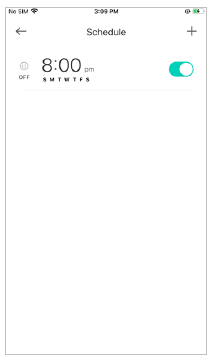
- Tap Save and you'll see your schedule listed in the Schedule Page. You can add more schedules following the same steps.
![]()
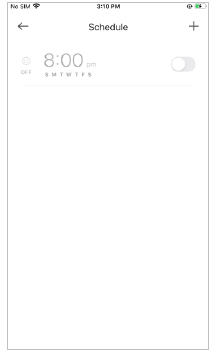
- You can turn off your schedule any time at the Schedule page.
![]()
 .
.
24/7 Recording
- What is 24/7 Recording?
When 24/7 Recording is enabled, your camera can record every minute of every day so you'll never miss a thing.
Note: Format your microSD card in the Kasa Smart app before using it.

- Enable / Disable 24/7 Recording
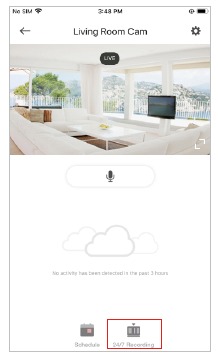
Tap![]() your in the live view page and tap 24/7 Recording. Here you can enable or disabled the feature and check the storage of your microSD card.
your in the live view page and tap 24/7 Recording. Here you can enable or disabled the feature and check the storage of your microSD card.
Encryption: when enabled, all videos recorded to your SD card can only be read from this camera.

- Check Recorded Videos
Go to the live view page and tap 24/7 Recording. You can check all your recorded videos here.
![]()


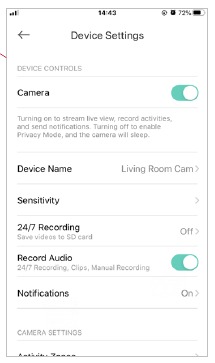
Manage Device Settings
- Tap your camera in the Home page to enter the live view page and then tap
![]() .
.
![]()
- Turn on or off the camera.
When turned off, it means your camera is in privacy mode. You can turn the camera off when you do not want your camera to stream live view video and record videos.
![]()
- Edit device name.

- Set sensitivity for recording videos.
Enable Detect Motion if you want your camera to record when motion is detected. Also set the sensitivity of detection.
Enable Listen for Sound if you want your camera to record when sound is detected. Then set its sensitivity.

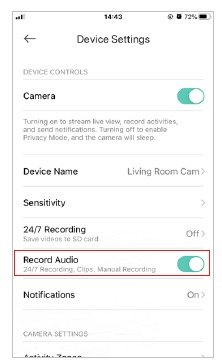
- Choose whether to record audio.
Enable Record Audio if you want to also record sound during recording.
![]()
- Choose whether to receive notifications.
Enable Activity Notifications if you want to be notified when activity is detected. You can also set the time when you want to receive notifications.
If you don't want to be bothered by frequent notifications, enable Automatically Limit Notifications.

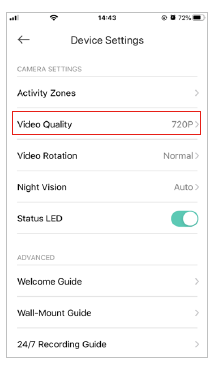
- Set activity zones.
Control what alerts you by creating multiple custom activity zones around areas that are important to you.

- Choose the resolution for videos.
The highest quality looks better but requires faster internet connection and larger size for saving the videos.
![]()
- Choose to rotate the video.

- Choose when you want the night vision to be on.
Night vision allows you to see clearly at night. You can choose Automatic to turn on night vision automatically in low light conditions and turn off in daylight.

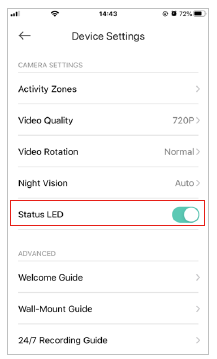
- Turn on/off Status LED.
Turn on or off the status LED on the camera.
![]()
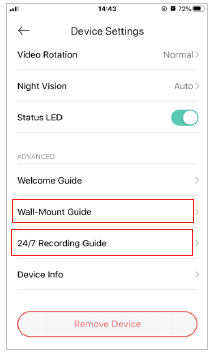
- Get to know more about the wall-mount information or 24/7 recording information by tapping Wall-Mount Guide or 24/7 Recording Guide.
![]()


Reset Your Camera
Kasa provides two methods to reset your camera.
Method 1
Swipe left your camera on the Home page and tap Delete. Then tap Remove Device. Your camera will be removed from your Kasa account and restored to factory settings.

Method 2
Tap your camera and go to the Devices Settings page. Then tap Remove Device in the bottom.
Your camera will be removed from your Kasa account and restored to factory settings.

Smart Actions - Motion Sensing
Smart Actions is a function provided that enables device interconnections and home automations. With Smart Actions, your Kasa devices can work together to create a smarter smart home. From the moment you wake up to the moment you drift asleep, Smart Actions make your home safer and more comfortable. There are four types of smart actions. For your Kasa Spot, you can set Motion Sensing smart action.
- Tap
![]() at the bottom, then tap Add an Action.
at the bottom, then tap Add an Action.
![]()
- Select an automation type for your Smart Actions. Here we choose Motion Sensing.
![]()
 at the bottom, then tap Add
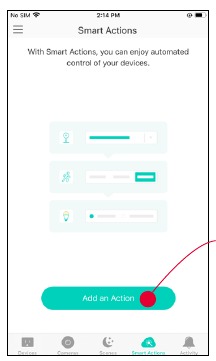
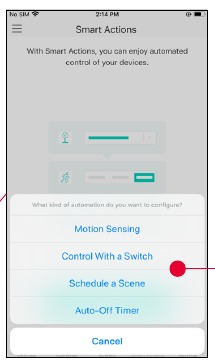
Motion Sensing: Take actions when a Kasa camera senses a motion.
Control With a Switch: Extend the Smart Switch control to other Kasa Smart devices. Turn on/off a group of devices with the Smart Switch all together.
Schedule a Scene: Schedule a "Scene" to be turned on automatically at the time specified.
Auto-off Timer: Whenever a Smart device is turned on, turn it off after the designated amount of time.
Configure Motion Sensing if you also have another Kasa smart device
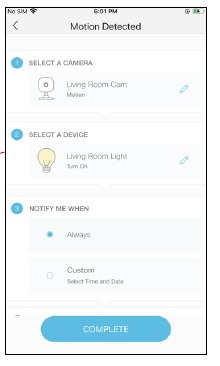
E.g. I want to turn my living room light (plugged in my Kasa Smart Plug) on when my Kasa Spot senses a motion.
- Tap Motion Sensing then select a camera.

- Select your Kasa Smart Plug in which your living room light is plugged.
![]()
- Set the time when you want the action to run. You can choose Always or tap Custom to choose time according to your needs. E.g. I want the motion to trigger the light on from 11:00 PM to 7:00 AM every day.

- (Optional) Set an auto-off timer then tap Complete. Then your light will be turned off after the time when it is triggered on.

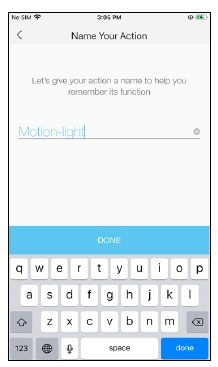
- Name your action for easy identification.
![]()
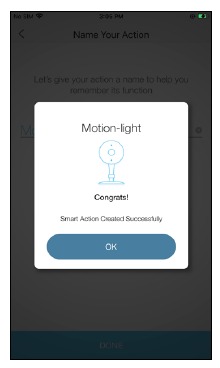
- The Smart Action is created successfully and displayed in the Smart Actions list.
![]()


Voice & 3rd Party Support
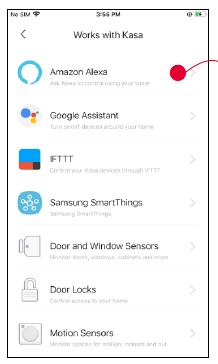
Use the Kasa Smart app to control your Kasa Spot with Amazon Alexa or Google Home Assistant, and enjoy a full hands-free experience. Kasa helps manage the rest of your smart home too, working with Samsung SmartThings to trigger changes when you arrive home or leave for the day.
Launch the Kasa Smart app. Go to the sidebar and tap Works with Kasa. You can choose Amazon Alexa / Google Assistant / IFTTT / Samsung SmartThings for detailed instructions.
Set up Amazon Alexa
- Tap Amazon Alexa.
![]()
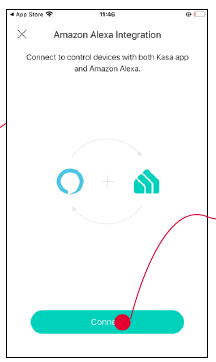
- Tap Connect.
![]()
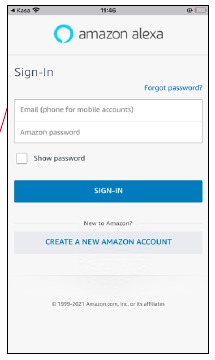
- Sign in with your amazon account.
![]()
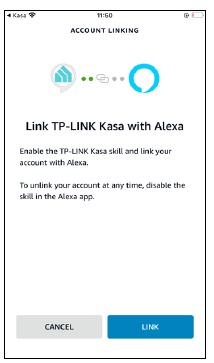
- After sign-in, tap LINK.
![]()
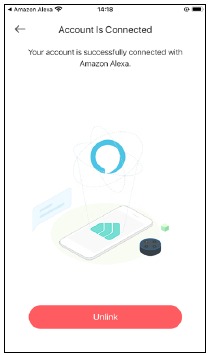
- Your TP-Link ID has been successfully linked with your amazon account. You can use Alexa voice commands to control your Kasa Spot.
![]()
Set up Google Assistant
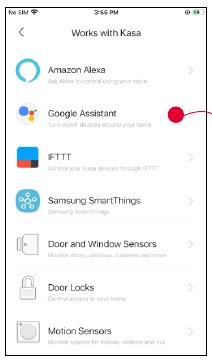
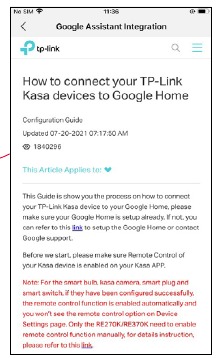
- Tap Google Assistant.
![]()
- Follow instructions to connect your device to your Google Home.
![]()
Or find the FAQ at https://www.tp-link.com/en/support/faq/1534/.

Documents / Resources
References
![www.tp-link.com]() WiFi Networking Equipment for Home & Business | TP-Link
WiFi Networking Equipment for Home & Business | TP-LinkTP-Link Product Support - Wireless Networking Equipment Support
TP-Link Frequently Asked Questions - FAQS
![www.apple.com]() App Store - Apple
App Store - Apple![play.google.com]() Google Play
Google PlayHow to connect your TP-Link Kasa devices to Google Home
Download manual
Here you can download full pdf version of manual, it may contain additional safety instructions, warranty information, FCC rules, etc.
Download TP-Link KC105 V2 - Kasa Spot, 24/7 Recording Camera Manual
Advertisement
Thank you! Your question has been received!


Need Assistance?
Do you have a question about the KC105 V2 that isn't answered in the manual? Leave your question here.