Ricoh A6500, A7500, A8600 - Interactive Whiteboard Quick Guide
- Operating instructions manual (160 pages)
Advertisement
Turning ON the Power
For safe and correct use, be sure to read the Safety Information in "Read This First" before using the machine. Some illustrations in this manual might be slightly different from the machine.
- Turning the main power ON and OFF
Press the main power switch on the back side of the machine. When you turn on the main power switch, the machine will start up.- RICOH Interactive Whiteboard A6500

- RICOH Interactive Whiteboard A7500/A8600

![]() : ON
: ON
![]() : OFF
: OFF
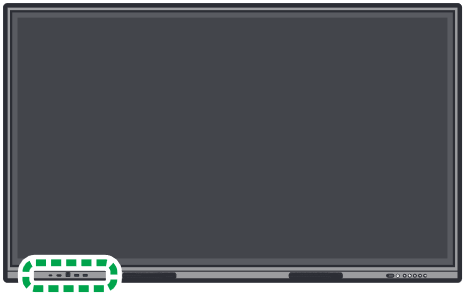
When the machine starts up, the indicator on the front side of the machine will light up, and the home screen will appear.

![]()
- The indicator shows the status of the machine.

Green: Power on / Power save mode
Red: Standby mode
Off: Power off
- RICOH Interactive Whiteboard A6500
- Power save mode
Turn off the screen display and enter power save mode. Press the power button on the front side of the machine or on the remote control.


- Front side of the machine

- Remote control
To return from power save mode, press the power button again.


- Standby mode
Press and hold the power button on the front side of the machine or on the remote control. A dialog box will appear on the screen. When you touch [OK] or when the countdown reaches 0, the machine turns off and enters standby mode. To return from standby mode, press the power button again.
Attaching the Pen
Attach the included pens to the pen mark positions on the front side of the machine by magnet.

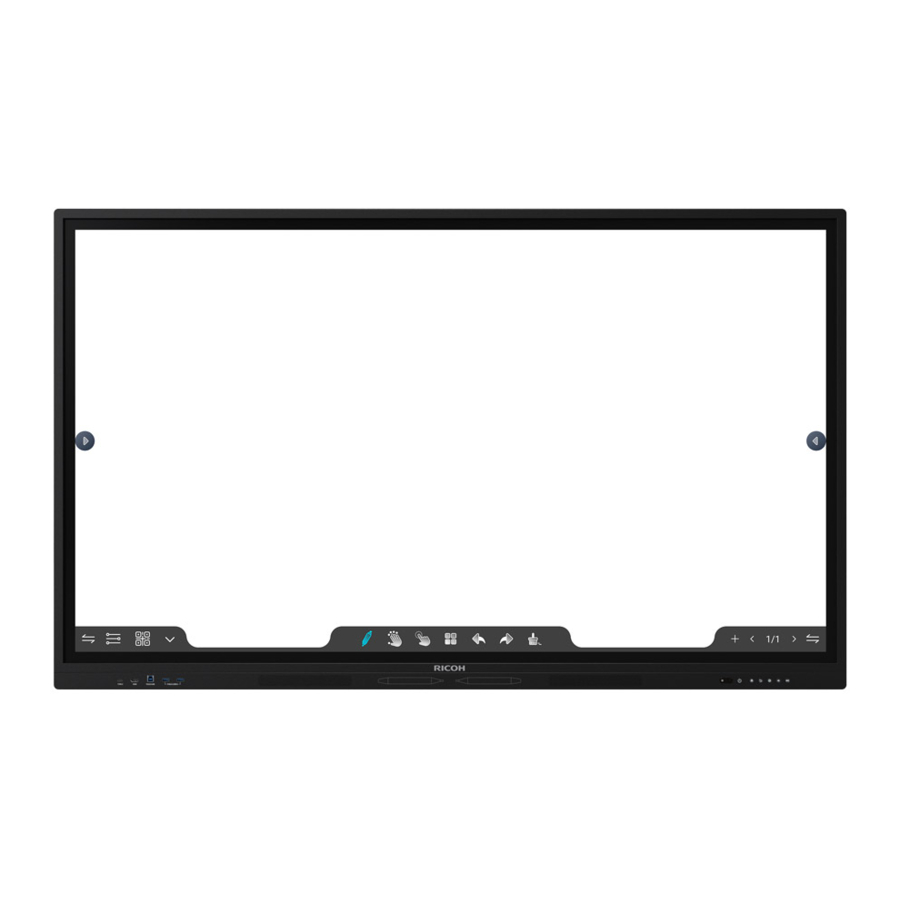
About the Home Screen
- Icon displayed in the home screen


| No. | Name | Description |
| 1 | Sidebar menu | The sidebar menu allows you to switch the video input and to check or change various settings. If the sidebar menu is not displayed, touch  or or  on either side of the screen to display the sidebar menu. on either side of the screen to display the sidebar menu. |
| 2 | Whiteboard app | Use your finger or a pen to write letters, shapes, etc., on the whiteboard. |
| 3 | File Manager | Manages the files stored in the machine |
| 4 | EShare | Share the screen and files of this machine with devices using Windows, macOS, Android, or iOS. On this machine, you can also display the screen of a device using Windows, macOS, Android, or iOS. |
| 5 | Browser | Displays a web page |
| 6 | Application box | Displays a list of applications installed on the machine |
- Icon displayed in the sidebar menu
Icon Description ![]()
Used to return to the previous screen ![]()
Displays the home screen ![]()
Displays the source settings
In the source settings, you can change the video input (source) settings, display a preview that allows you to check all video inputs, and switch to the video input screen.![]()
Lowers the top edge of the displayed screen ![]()
Displays the utility menu The following utilities are available: - Countdown
- Eye Protection Mode
- Calculator
- Vote
- Screen capture
- Screen Recorder
- Stopwatch
- Spotlight
- Touch Sound
![]()
Displays the system settings You can check and change the system settings of this machine. ![]()
Enters a mode in which you can write to the currently displayed content You can write to the video input screen from an external device, the display screen of a document file, or a web page. ![]()
Displays a list of screens that are processing in the background You can switch the display to another processing screen or exit the screen. ![]()
Shifts to standby mode
![]()
- The [Turn Off OPS] option is only available when a controller that supports the OPS (Open Pluggable Specification) standard is installed.


- For details about setting items in the sidebar menu, see Operating Instructions.
Connecting Devices for Display
If you want to display images, you can use a cable to connect devices such as computers, tablets, document cameras, or other devices to this machine.
- Connect the device that you want to use as a display to the video input terminal of this machine.
- Front side of the machine
HDMI
TYPE-C (USB Type-C) *1
*1 Only devices that support the alternate mode can be connected.
![]()
- Back side of the machine
VGA
HDMI1
HDMI2 DP (DisplayPort)

- Front side of the machine
- Touch
![]() in the sidebar menu to select the video input terminal to which the device is connected.
in the sidebar menu to select the video input terminal to which the device is connected.
You can also select a screen from the [Source Preview] list.


- The screen of a device connected via a network using Eshare can also be displayed on this machine. For details, see Operating Instructions.
- For details about connecting devices, see Operating Instructions.
Using the Whiteboard App
Touch  on the home screen to launch the whiteboard app.
- Icons displayed on the whiteboard screen


| No. | Icon | Description |
| 1 |  | Toggles the whiteboard menu bar display between left and right |
 | Displays a sub-menu : Loads a file into the page : Loads a file into the page : Saves the page : Saves the page : Uploads the page to a drive on the network <Supported services> OneDrive, Google Drive : Uploads the page to a drive on the network <Supported services> OneDrive, Google Drive : Sets the mode to reduce the blue light of the screen : Sets the mode to reduce the blue light of the screen : Quits the whiteboard app : Quits the whiteboard app | |
 | Displays a QR code that can be used to access the whiteboard from a smart device or other device Scan the QR code with your smart device to see what you have written.
| |
 | Shows or hides the whiteboard menu bar | |
| 2 |  | Displays writing settings You can switch between pen/handwriting input and marker input. You can also change the color and thickness of the writing. |
 | This is used when multiple people want to perform touch operations, such as writing.: Only one can be written. When multiple fingers touch the screen, the display magnification can be changed. : Multiple people can write and perform other operations at the same time. : Multiple people can write and perform other operations at the same time. | |
 | Encloses the written content, selects it, and moves or transforms it | |
 | Displays the whiteboard screen settings : Loads a video file <Supported files> mp4, mkv, avi : Loads a video file <Supported files> mp4, mkv, avi : Loads an image file <Supported files> jpg, png, bmp : Loads an image file <Supported files> jpg, png, bmp : Splits the whiteboard screen (up to three sections) : Splits the whiteboard screen (up to three sections) : Selects a shape and writes on it : Selects a shape and writes on it : Changes the background of the whiteboard screen : Changes the background of the whiteboard screen | |
 | Undoes writing, editing, or erasing, or redoes an undo operation | |
 | Erases everything on the page | |
| 3 |  | Creates a new page Up to 20 pages can be created. |
 | Operates the page | |
 | Toggles the whiteboard menu bar display between left and right |
- Basic operations
- Writing
Touch![]() , and then use the supplied pen or your finger to write on the screen by moving the pen/your finger around.
, and then use the supplied pen or your finger to write on the screen by moving the pen/your finger around.
Both ends of the pen can be used as a pen nib. Depending on the thickness you want to use, use a different pen nib. - Erasing
Touch the display with the palm of your hand and intersect the content.
To select and erase, use![]() to enclose the written content, and then press [x].
to enclose the written content, and then press [x].
To erase everything on the page, touch![]() and then slide the left part of the displayed bar to the right.
and then slide the left part of the displayed bar to the right. - Enlarging/reducing the written content
Use![]() to enclose the written content, and then touch the screen with two fingers and spread them or pinch them together.
to enclose the written content, and then touch the screen with two fingers and spread them or pinch them together. - Moving written content
Use![]() to enclose the written content, and then touch it within the selected area and move it.
to enclose the written content, and then touch it within the selected area and move it. - Changing the display magnification
Make sure that![]() is set, and then touch the screen with two fingers and spread them or pinch them together.
is set, and then touch the screen with two fingers and spread them or pinch them together.
If![]() is set, touch
is set, touch ![]() to set it to
to set it to ![]() , and then change the display magnification.
, and then change the display magnification.
- Writing
 , and then use the supplied pen or your finger to write on the screen by moving the pen/your finger around.
 to enclose the written content, and then press [x].
 and then slide the left part of the displayed bar to the right.
 to set it to
- For details about how to operate the whiteboard application, see Operating Instructions.
- For details about how to operate applications other than the whiteboard app, see Operating Instructions.

Documents / ResourcesDownload manual
Here you can download full pdf version of manual, it may contain additional safety instructions, warranty information, FCC rules, etc.
Download Ricoh A6500, A7500, A8600 - Interactive Whiteboard Quick Guide
Advertisement
Thank you! Your question has been received!


Need Assistance?
Do you have a question about the A6500 that isn't answered in the manual? Leave your question here.