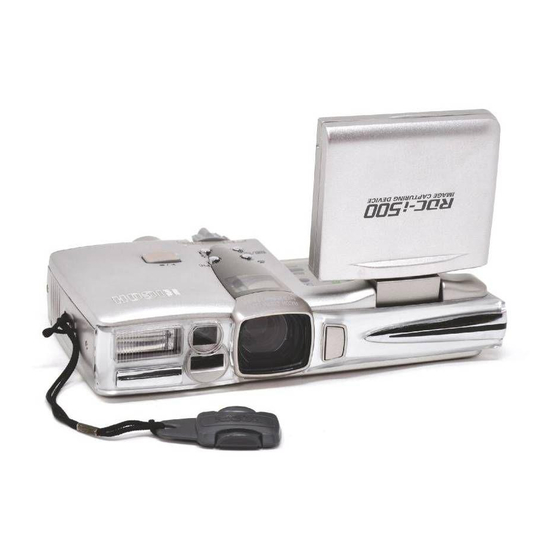
Ricoh RDC-i500 Basic Operations
Ricoh rdc-i500: user guide
Hide thumbs
Also See for RDC-i500:
- Operation manual (182 pages) ,
- Specifications (2 pages) ,
- Operation manual (27 pages)
Table of Contents
Advertisement
Quick Links
Download this manual
See also:
Operating Manual
Chapter
Basic Operations
Turning On/Off the Camera .... 24
How to Use the Mode Dial ...... 25
Recording Mode ........................... 26
Play Mode .................................... 27
How to Select the Items .......... 28
Character Input ........................ 30
Information .............................. 31
Setting the Date and Time ........... 31
Checking Owner Information ........ 34
Before You Start Recording ... 35
Brightness .................................... 37
How to Hold the Camera .............. 37
2
Advertisement
Table of Contents

Related Manuals for Ricoh RDC-i500

Summary of Contents for Ricoh RDC-i500
-
Page 1: Table Of Contents
Chapter Basic Operations Turning On/Off the Camera ... 24 How to Use the Mode Dial ... 25 LCD Monitor and LCD Panel .. 26 Recording Mode ... 26 Play Mode ... 27 How to Select the Items ... 28 Character Input ... 30 Registering the Camera Information ... -
Page 2: Turning On/Off The Camera
Turning On/Off the Camera Use the power button to turn the camera on and off. Turning the Camera ON A Press the power switch. • You can turn the camera on when Note the LCD monitor is opened P.117 “Turning the Camera On When the LCD Monitor is Opened”... -
Page 3: How To Use The Mode Dial
How to Use the Mode Dial The camera offers a number of modes for shooting and playback. Use the mode dial to select the mode you need. Mode Dial Mode Setup mode Play mode Still Picture mode Voice Memo mode Text mode Motion Picture mode... -
Page 4: Lcd Monitor And Lcd Panel
LCD Monitor and LCD Panel The LCD monitor or LCD panel displays the camera status, such as the battery level, recordable picture count and mode setting, in symbols and figures. Recording Mode LCD panel LCD monitor Remaining picture count Message Storage Memory Flash mode Red-eye reduction... -
Page 5: Play Mode
Play Mode LCD panel LCD monitor Storage memory File type Size/No. of pixels Image quality/ Compression rate Battery symbol Protect symbol Voice annotation is displayed in the LCD panel even when the Microdrive has been inserted in the card slot. *2 The battery mark will be displayed when the battery level gets low. -
Page 6: How To Select The Items
How to Select the Items You can select items, and confirm or cancel camera settings using the buttons on the operation panel. Switching the Displays Display the MENU screen Press the MENU Press the button. button to move the focus (blue frame enclosing an item) on the lower item. - Page 7 How to Use the Check Box ( ) Use the · · · buttons to set the focus on the desired item and press the FUNCTION button. To cancel the selection, press the button again. How to Use the Spin Box ( Use the ·...
-
Page 8: Character Input
PPP account PPP password Primary name server Secondary name server IP address • Network connection RDC-i500 host name DNS server address Gateway address RDC-i500 IP address Subnet mask • P.106 “Adding or Deleting a Folder” • “Chapter 2 Setting the Communication Function” in the ‘Communication/Internet’... -
Page 9: Registering The Camera Information
Registering the Camera Information This section explains how to register the camera information such as setting the date and time and owner information. Setting the Date and Time Set the date and time on the camera. You can also follow these procedures when you use the camera for the first time or need to change the date and time settings. - Page 10 Setting the Date and Time Set the date and time. You can set the date in two patterns, HOME and DESTINATION, and switch the pattern when you travel across the time zone. A Select [HOME DATE/TIME] or [DESTINATION DATE/TIME] and press button.
-
Page 11: Selecting The Date Format
B Select [HOME DATE/TIME] or [DESTINATION DATE/TIME] and then press the ENTER button. C Press the ENTER button. The display will return to the Camera Settings menu. Press the CANCEL button to return to the Setup menu. Selecting the Date Format Select the date format. -
Page 12: Checking Owner Information
Checking Owner Information You can check owner information, such as your name, telephone number, company name, and the name of the photographer registered on a PC. • Register the owner information from a PC. Note Settings” in the ‘Connecting to a Personal Computer’ operation manual A Set the mode dial to [SET]. -
Page 13: Before You Start Recording
Before You Start Recording Before you start recording, format the storage media, adjust the viewfinder diopter and check the way to hold the camera. Formatting the Storage Memory This function enables you to format the card and internal memory. Before using a new card or a card that has been used on another device, such as a PC, format the card with the camera first. -
Page 14: Adjusting The Viewfinder Diopter
D Press the shutter release button. CF Card The “Formatting ...” message will be displayed. When formatting is completed, the screen will return to the Setup menu. Internal memory (IN) The confirmation message will be displayed. Press the shutter release button again. The “Formatting ...”... -
Page 15: Adjusting The Lcd Monitor Brightness
Adjusting the LCD Monitor Brightness If the LCD monitor is hard to see, for example in bright sunlight, adjust the brightness of the monitor. A Press the DISPLAY button approximately 2 seconds. B Adjust the brightness of the LCD monitor using the The adjustment bar will disappear 2 seconds later. - Page 16 When viewing using the LCD monitor Hold the camera firmly in both hands, aim it at your subject and look at the LCD monitor. B Press the shutter release button lightly with your fingertip. The shutter release buttons are located on top and front sides of the camera. Use either button depending on the situation.