Table of Contents
Advertisement
Quick Links
Read this manual carefully before you use this machine and keep it handy for future reference. For safe and correct use, be sure to read the "Safety
Information" before using the machine.
1
Read This First
2
Preparing for Printing
3
Printer Driver
4
Monitoring and Configuring the Printer
5
Using the Printer with a Macintosh
6
Maintaining
7
Troubleshooting
8
Appendix
GX e5550
User Guide
N
Advertisement
Table of Contents
Troubleshooting

Related Manuals for Ricoh GelSprinter GX e5550n


Summary of Contents for Ricoh GelSprinter GX e5550n
- Page 1 GX e5550 User Guide Read This First Preparing for Printing Printer Driver Monitoring and Configuring the Printer Using the Printer with a Macintosh Maintaining Troubleshooting Appendix Read this manual carefully before you use this machine and keep it handy for future reference. For safe and correct use, be sure to read the "Safety Information"...
-
Page 3: Table Of Contents
TABLE OF CONTENTS 1. Read This First About This Product..............................9 Introduction..............................9 Legal Prohibition.............................9 Trademarks..............................9 Disclaimer..............................11 User's Notes..............................11 Manuals for This Printer..........................13 How to Read This Manual..........................15 Description for the Specified Model......................15 Symbols................................16 Installing User Guide...........................16 How to Use User Guide..........................17 Removing the User Guide...........................19 Guide to Components............................20 Machine Body..............................20... - Page 4 Before Installing the Software (USB)......................56 Quick Install for USB............................57 Connecting the Computer and Installing the Software (Network Connection)..........60 Before Installing the Software (Network Connection)................60 Quick Install for Network..........................63 Checking the Printer Status and Settings using the Printer's Control Panel (List/Test Print Menu).....65 Interpreting the Configuration Page......................65 Confirming the Connection Method.......................66 Installing the PCL or RPCS Raster Printer Driver (USB)..................68...
- Page 5 Canceling Printing from the Status Monitor.....................104 Canceling Printing Using the [Job Reset] Key of the Printer..............104 Canceling Printing from the Taskbar......................105 Selecting the Printer Driver Language......................106 4. Monitoring and Configuring the Printer Using the Status Monitor..........................109 Receiving Notification of Print Job Status via the Status Monitor............109 Using SmartDeviceMonitor for Client......................110 Using Notification via SmartDeviceMonitor for Client................111 Specifying the Settings for Monitoring the Printer...................112...
- Page 6 Canceling a Print Job on a Macintosh.....................144 Monitoring and Configuring the Printer (for Macintosh)................146 Displaying the Printer Status on a Macintosh....................147 Checking whether Bidirectional Communication is Working on a Macintosh........147 Displaying the Status Monitor on a Macintosh..................147 Opening Help on a Macintosh........................149 Displaying Help from the Print dialog on a Macintosh................149 Displaying Mac Help..........................149 Maintaining (for Macintosh).........................150...
- Page 7 Selecting the Control Panel Language......................187 Restricting Printer Functions...........................189 Locking the Keys............................189 Unlocking the Keys............................189 Replacing a Print Cartridge...........................191 Checking the Remaining Ink........................191 Replacing a Print Cartridge........................193 Handling Print Cartridges.........................195 Replacing an Ink Collector Unit........................197 Cleaning.................................200 Cleaning the power Cable Plug.......................200 Moving................................201 Moving a Short Distance..........................201 Moving a Long Distance...........................201...
- Page 8 Removing Paper Jammed in Tray 1......................218 Removing Paper Jammed in Tray 2/Tray 3 (optional)................220 Removing Paper Jammed in the Rear Unit (optional)................222 Removing Paper Jammed in the Multi Bypass Tray (optional)..............223 Removing Paper Jammed under the Top Cover..................227 Removing Paper Jammed around the Guide Board................230 Removing Paper Jammed in the Duplex Unit..................234 If You Cannot Remove Jammed Paper....................237 Print Results Are Not Satisfactory.........................241...
- Page 9 Used Cartridge............................274 Ink Collector Unit Not Detected.......................275 Ink Collector Unit Almost Full........................277 Ink Collector Unit Full..........................277 Used Ink Collector Unit..........................277 Out of Printable Temperature Range.......................278 Printer Error..............................278 Network Interface Error..........................279 Envelope Selector Position Mismatch......................279 Maintenance Failed..........................282 Cannot Recover Error Page........................282 8.
- Page 10 TCP/IP................................315 JPEG LIBRARY............................315 print language emulations......................315 Where to Inquire............................316 Recommended Consumables........................317 Option and Consumables..........................318 INDEX ................................319...
-
Page 11: Read This First
1. Read This First About This Product This section tells you about the product. Introduction This manual describes detailed instructions on the operation and notes about the use of this machine. To get maximum versatility from this machine, all operators are requested to read this manual carefully and follow the instructions. - Page 12 1. Read This First AppleTalk, ColorSync, Mac OS, Macintosh, and Power Mac are registered trademarks of Apple Inc., registered in the U.S. and other countries. Intel and Intel Core are registered trademarks of Intel Corporation or its subsidiaries in the United States and other countries.
-
Page 13: Disclaimer
About This Product ® ® Microsoft Windows Server 2008 Enterprise ® ® Microsoft Windows Server 2008 Datacenter ® ® Microsoft Windows Server 2008 for Itanium-based Systems ® ® Microsoft Windows Web Server 2008 ® ® Microsoft Windows HPC Server 2008 ®... - Page 14 1. Read This First • During printing, do not pull out a paper tray. Printing will stop and the paper will jam. • Do not touch the feed belt, the transparent black band, print head rail rod, ink tubes, paper pressing board, or the toothed rubber belt.
-
Page 15: Manuals For This Printer
About This Product • This printer is designed to have an operational life of 5 years or be good for 200,000 pages. • Depending on your printing document, the ink collector unit may fill up sooner than normal. An "Ink Collector almost full" message appears shortly before the ink collector unit is full. Although the printer remains usable until the unit is completely full, contact your sales or service representative as early as possible (charge incurred). - Page 16 1. Read This First Quick Installation Guide This guide briefly explains how to unpack and install the printer. User Guide (HTML) This guide, which is on the CD-ROM, explains in detail how to use the printer. The guide explains how to make network and printer driver settings, and how to make and check printer settings using a Web browser and other utilities.
-
Page 17: How To Read This Manual
How to Read This Manual How to Read This Manual Be sure to read this section before anything else. • This guide uses Windows XP procedures for its examples. Procedures and screens might vary depending on the operating system you are using. The color samples in this manual may differ slightly from the colors of actual copies. -
Page 18: Symbols
1. Read This First Symbols The following set of symbols is used in this manual. Indicates points to pay attention to when using the machine, and explanations of likely causes of paper misfeeds, damage to originals, or loss of data. Be sure to read these explanations. Indicates supplementary explanations of the machine's functions, and instructions on resolving user errors. -
Page 19: How To Use User Guide
How to Read This Manual Confirm the program folder in which you want to install User Guide, and then click [Next >]. Click [Install]. Installation starts. During installation, a message asking whether you want to create a desktop shortcut icon is displayed. Click [Yes] or [No] as appropriate. - Page 20 1. Read This First Opening from the Icon This section explains how to open User Guide from the desktop icon. Double-click the User Guide icon on your desktop. The browser opens, and then User Guide appears. Opening from the [Start] Menu This section explains how to open User Guide from the Windows Start menu.
-
Page 21: Removing The User Guide
How to Read This Manual Opening from Printer Status Error Messages This section explains how to open User Guide when Printer Status error message is displayed. The Status monitor displays an error message if a problem occurs. Click [User Guide]. The browser opens, and then User Guide appears. -
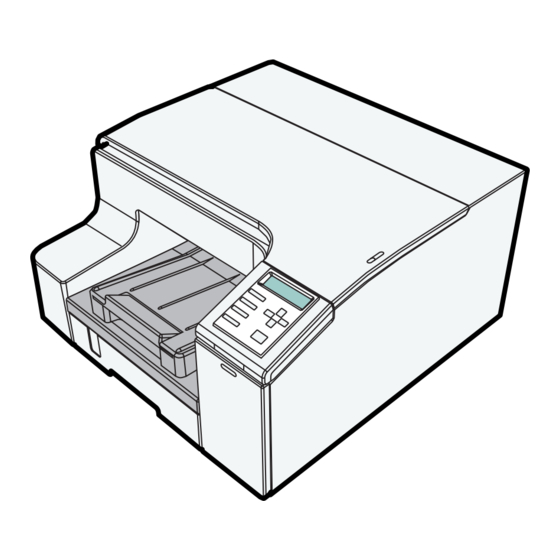
Page 22: Guide To Components
1. Read This First Guide to Components The names and functions of parts of the printer body, control panel, and options are explained. Machine Body This is a front view of the printer. BUG102S BUG103S 1. Top Cover Normally, keep this cover closed. If you cannot locate paper jams, or jammed paper cannot be removed easily, you can check the condition of paper from the top of the printer. -
Page 23: Machine Rear
Guide to Components 5. Envelope Selector For envelopes, set the lever to the rear position ; for everything else, set the lever to the forward position 6. Print Cartridge (black) 7. Print Cartridge (cyan) 8. Print Cartridge (magenta) 9. Print Cartridge (yellow) 10. -
Page 24: Control Panel
1. Read This First 1. USB slot Connect the USB cable from the computer here. 2. Ethernet port Use a network interface cable to connect the printer to a network. 3. Duplex Unit Turns the paper over when performing duplex printing. 4. - Page 25 Guide to Components 4. [ Online] key Indicates whether the printer is online or offline. Press this to switch between online and offline. When the lamp is lit, the printer is online, enabling data reception from the host computer. When the lamp is unlit, the printer is offline, disabling data reception from the host computer. Press to return to the ready condition.
- Page 26 1. Read This First • For details about the Key Repeat, see p.159 "Performing Maintenance using the Control Panel (Maintenance Menu)". Adjusting the Angle of the Control Panel You can adjust the angle of the control panel for easier usage. Use the following procedure to adjust the angle of the control panel.
-
Page 27: Making Printer Settings Using The Control Panel
Making Printer Settings Using the Control Panel Making Printer Settings Using the Control Panel This section explains how to change the default settings of the printer and provides information about the parameters included in each menu. For details about procedures and settings, see the information under Counter Menu Show Counter... - Page 28 1. Read This First Menu Head Position Adj.Paper Feed Registration Date/Time Key Repeat Dry-delay (Exit) Dry-delay (Dup) Paper Feed Test De-condensation System Menu Prt. Err Report Auto Continue Sub Paper Size Energy Saver Notify by Email Memory Usage Unit of Measure Page Size Paper Type Preprinted Ppr...
- Page 29 Making Printer Settings Using the Control Panel Menu Tray Switching Uni-direct.Prt. Density Color Mode Recycl.Ppr.Mode Env.Slctr.Alert Pg Recov. Error Ink C.U. Space Host Interface Menu I/O Timeout Network Setup USB Setting PCL Menu Menu Orientation Form Lines Font Source Font Number Point Size Font Pitch Symbol Set...
- Page 30 1. Read This First Menu Append CR to LF Resolution Black Printing Language Menu Japanese English German French Italian Dutch Danish Swedish Norwegian Spanish Finnish Portuguese Czech ( only) Polish ( only) Hungarian ( only) • p.157 "Checking the Number of Printed Pages using the Control Panel (Counter Menu)" •...
- Page 31 Making Printer Settings Using the Control Panel • p.178 "Specifying System Settings using the Control Panel (System Menu)" • p.73 "Specifying the Interface and Network Settings using the Printer's Control Panel (Host Interface Menu)" • p.184 "Specifying PCL Settings using the Control Panel (PCL Menu)" •...
-
Page 32: Options
1. Read This First Options This section explains the names and functions of the various available options. Paper Feed Unit TK1110 This optional tray can hold 500 sheets. BUG221S 1. Tray 2/Tray 3 Load paper here. If you want to print on paper larger than A4 or letter size, pull the tray extension out. 2. -
Page 33: Multi Bypass Tray By1000
Options Multi Bypass Tray BY1000 Use this tray to feed in sheets manually. BPR107S 1. Bypass tray Load paper here. 2. Bypass tray extension Pull this out according to the paper size. 3. Wheel Use this to wind out paper that became jammed after being fed in from the bypass tray. Detaching and Reattaching the Multi Bypass Tray To clear a paper jam, you might have to detach the bypass tray. - Page 34 1. Read This First Reattach the bypass tray. BUG109S Pull the bypass tray extension out. Load paper in the bypass tray. • After attaching the paper feed unit, you must register where to start printing on paper loaded in the paper feed unit.
-
Page 35: Recommended Functions
Recommended Functions Recommended Functions This section lists useful and recommended functions. Automatically selecting the tray for printing See p.94 "Specifying the Paper Settings using the Printer's Control Panel (Paper Input Menu)". Copy-guard of printed documents for preventing information leaks See p.101 "Printing". Notifying the printer status by e-mail on an occasion such as if the printer runs out or paper or paper is jammed See p.117 "Notifying the Printer Status by E-mail". - Page 36 1. Read This First...
-
Page 37: Preparing For Printing
2. Preparing for Printing Setting Up the Hardware This section explains how to install the printer. Checking the Computer and Installation Area The printer's location should be carefully chosen because environmental conditions greatly affect its performance. The area where the printer is to be placed •... - Page 38 2. Preparing for Printing BPR172S BPR173S • White area: Permissible Range • Blue area: Recommended Range • The diagram below shows the ideal clearance for loading paper, replacing print cartridges, and removing jammed paper BUG205S a. If you attach the bypass tray (option), provide additional clearance of 29 cm (11.5 inches).
-
Page 39: Checking The Supplied Items And Unpacking The Printer
Setting Up the Hardware Check the power source • Keep the machine away from humidity and dust. Otherwise a fire or an electric shock might occur. • Place the machine on a strong and level surface. Otherwise, the machine might fall and cause personal injury. - Page 40 2. Preparing for Printing • Careless handling and over exertion when lifting can result in breakage and/or injury. • Do not turn the machine on until you have read how to do so. BUG111S Open the box and take out all supplied items. Check that all the following items are present: •...
-
Page 41: Attaching The Options
Setting Up the Hardware Remove the orange tape from the printer body. • We recommend you keep the box, so you can use it again when relocating the printer. • Remove all the orange tape, except the tape around the power cord. •... -
Page 42: Installing The Print Cartridges
2. Preparing for Printing • Be careful not to trap your fingers. • Up to two paper feed units can be attached. • To install two paper feed units, put the upper paper feed unit (tray 2) on the lower paper feed tray (tray 3) first, and then lower the printer onto the upper paper feed unit (tray 2). - Page 43 Setting Up the Hardware • If ink is ingested, induce vomiting by drinking a strong saline solution. Consult a doctor immediately. • If your skin comes into contact with ink, wash the affected area thoroughly with soap and water. • Keep the ink or ink container out of reach of children. •...
-
Page 44: Plugging In The Power Cord And Turning The Power On
2. Preparing for Printing Check the orientation of each cartridge, and then install them gently. BUG114S Install in the following order from the left: black, cyan, magenta, and yellow. Push in each cartridge. Repeat steps 3 to 4 for all four cartridges. Close the right front cover. - Page 45 Setting Up the Hardware • Do not plug or unplug the power cord with your hands wet. Otherwise, an electric shock might occur. • Do not handle the machine while the cartridge is being filled. Ink filling begins when the machine's power is switched on.
-
Page 46: Loading Paper
2. Preparing for Printing Press the [Power] key. BUG118S The printer starts feeding ink into its print-heads (taking approximately 10 minutes). Make sure the "Ready" message is displayed on the control panel. Do not switch off the power of the machine during this period. Make sure the plug is not removed from the wall outlet. - Page 47 Setting Up the Hardware Hold the Tray 1 grip, pull the tray halfway out, lift it slightly ( ), and then pull it out further ( ). BUG183S Pull tray 1 completely out. Take care not to drop it. While squeezing the catch on the paper guide, slide the guide so it is positioned according to the paper size.
- Page 48 2. Preparing for Printing Squeeze the front end paper guide, and then slide it to meet the edge of the paper. BPR123S Push tray 1 gently in until it stops. BUG125S Loading Paper Larger than A4/Letter (Tray1) Follow the procedure below to use the paper tray extension for paper larger than A4/Letter size, such as Legal size paper.
- Page 49 Setting Up the Hardware Hold the Tray 1 grip, pull the tray halfway out, lift it slightly ( ), and then pull it out further ( ). BUG183S Pull tray 1 completely out. Take care not to drop it. Slide the tabs on both sides of the tray's interior to the unlocked position. BPR166S Pull out the paper tray extension.
- Page 50 2. Preparing for Printing Slide the tabs back into place to lock the paper tray extension into position. BPR168S While squeezing the catch on the paper guide, slide the guide so it is positioned according to the paper size. BPR169S Do not use the paper tray extension for A4 (Letter) size paper or smaller paper.
- Page 51 Setting Up the Hardware Squeeze the front end paper guide, and then slide it to meet the edge of the paper. BPR171S Push tray 1 gently in until it stops. BUG174S Pull out the output ramp extension. BUG175S Loading Paper into Tray 2/Tray 3 Follow the procedure below to load paper into tray 2/tray 3.
- Page 52 2. Preparing for Printing • Load A4/Letter paper in orientation. Hold the Tray 2/Tray 3 grip, pull the tray halfway out, lift it slightly ( ), and then pull it out further ( ). BUG224S Pull tray 2/tray 3 completely out. Take care not to drop it. While squeezing the catch on the paper guide, slide the guide so it is positioned according to the paper size.
- Page 53 Setting Up the Hardware Push tray 2/tray 3 gently in until it stops. BUG223S Loading Paper Larger than A4/Letter (Tray 2/Tray 3) Follow the procedure below to use the paper tray extension for paper larger than A4/Letter size, such as Legal size paper.
- Page 54 2. Preparing for Printing Pull out the paper tray extension. BUG236S Slide the tabs back into place to lock the paper tray extension into position. BUG237S While squeezing the catch on the paper guide, slide the guide so it is positioned according to the paper size.
- Page 55 Setting Up the Hardware Load paper with the print side face down but not over the limit mark. BUG239S Push tray 2/tray 3 gently in until it stops. BUG223S Loading Paper into Bypass Tray (optional) Follow the procedure below to load paper into bypass tray. A4/Letter size paper is loaded here.
-
Page 56: Printing A Configuration Page
2. Preparing for Printing BUG176S Printing a Configuration Page After setting up the hardware and before connecting the printer to a computer, make a test print by printing the configuration page. Printing the configuration page as a test print primes the print heads and allows you to check that the printer is functional. - Page 57 Setting Up the Hardware The configuration page is printed. The List/Test Print menu screen returns on completion of printing. Check whether the print-head nozzles are clogged up or not by printing a nozzle check test pattern. Hold the [Power] key down until the printer shuts down. If you are connecting the printer to a computer via USB, proceed to p.56 "Connecting the Computer and Installing the Software (USB Connection)".
-
Page 58: Connecting The Computer And Installing The Software (Usb Connection)
2. Preparing for Printing Connecting the Computer and Installing the Software (USB Connection) After setting up the hardware and making a test print, connect the printer to your computer. This section explains how to connect the printer to a computer using a USB cable, and how to install the software using "Quick Install". -
Page 59: Quick Install For Usb
Connecting the Computer and Installing the Software (USB Connection) Remove the seal on the USB slot located on the rear of the printer, and then insert the USB cable's hexagonal (type B) plug firmly into the slot. BUG128S Insert the USB cable's rectangular (type A) plug firmly into the computer's USB slot. •... - Page 60 2. Preparing for Printing Notes on the Installation (USB Connection) If the message "Digital Signature Not Found" or the [Software Installation] , [Hardware Installation] or [Windows can't verify the publisher of this driver software] dialog box appears: 1. Click [Yes], [Continue Anyway] or [Install this driver software anyway] to continue the installation.
- Page 61 Connecting the Computer and Installing the Software (USB Connection) Check the installation result, and then click [Next >]. Install User Guide. Click [Finish]. The printer driver and User Guide are now installed. If the message "Digital Signature Not Found" or the [Found New Hardware Wizard] or [Hardware Installation] dialog box appears, see "Notes on the Installation".
-
Page 62: Connecting The Computer And Installing The Software (Network Connection)
2. Preparing for Printing Connecting the Computer and Installing the Software (Network Connection) After setting up the hardware and making a test print, connect the printer to your computer. This section explains how to connect the printer to a computer via Ethernet cable, and how to use "Quick Install". •... - Page 63 Connecting the Computer and Installing the Software (Network Connection) AKR136S 1. Indicator (green) Remains green as long as the machine is properly connected to the network via 100 BASE-TX cable. Unlit if 10 BASE-T cable is connected. 2. Indicator (orange) Lights whenever the printer is sending or receiving data via the network.
- Page 64 2. Preparing for Printing Press the [Power] key. BUG118S Press the [Menu] key. BUG127S The Menu screen appears on the display. Press the [ ] or [ ] key to display the [Host Interface] menu, and then press the [#Enter] key.
-
Page 65: Quick Install For Network
Connecting the Computer and Installing the Software (Network Connection) Press the [ ] or [ ] key to enter the left most entry field of the IP address, and then press the [#Enter] key. IP Address: To get an IP address for the printer, contact your network administrator. The value moves by 10 if the [ ] or [ ] key is kept pressed. - Page 66 2. Preparing for Printing Start Windows, and insert the provided CD-ROM into the CD-ROM drive. Quit all other applications currently running. Select a language for the interface, and then click [OK]. Click [Quick Install for Network]. Read the entire license agreement carefully. If you accept its terms, click [I accept the agreement.], and then click [Next >].
-
Page 67: Checking The Printer Status And Settings Using The Printer's Control Panel (List/Test Print Menu)
Checking the Printer Status and Settings using the Printer's Control Panel (List/Test Print Menu) Checking the Printer Status and Settings using the Printer's Control Panel (List/Test Print Menu) Using the List/Test Print menu on the control panel, you can print a configuration page to check whether the printer is working properly and to ascertain the printer's status and settings. -
Page 68: Confirming The Connection Method
2. Preparing for Printing Confirming the Connection Method This printer supports local and network connection. Before installing the drivers, check how the printer is connected. Follow the driver installation procedure that is appropriate to the connection method. • The printer driver for the 64-bit Windows is not included on the supplied CD-ROM. If your operating system is the 64-bit Windows, download the drivers from the supplier's Web site, and then store the files in an easily accessible folder. - Page 69 Confirming the Connection Method • Once the settings are complete, the printer becomes ready for use. • With a network connection, you can use the Windows printer port to send print jobs to the printer directly (peer-to-peer transfer) or use the printer as a network printer and send print jobs to the printer from a client computer via a print server.
-
Page 70: Installing The Pcl Or Rpcs Raster Printer Driver (Usb)
2. Preparing for Printing Installing the PCL or RPCS Raster Printer Driver (USB) This section explains how to install only the printer driver when the printer is connected to a computer via USB. If you installed the printer driver by performing Quick Install for USB, there is no need to install it again here. - Page 71 Installing the PCL or RPCS Raster Printer Driver (USB) Read the entire license agreement carefully. If you accept its terms, click [I accept the agreement.], and then click [Next >]. Click [Connected with USB cable], and then click [Next >]. Check again that the power of the printer is off, and then click [Next >].
-
Page 72: Sharing The Printer
2. Preparing for Printing • p.247 "If a Message Appears during Installation" • p.209 "If Test Print Fails" Sharing the Printer This section explains how to share the printer over a network by connecting it via USB to a computer acting as a print server. - Page 73 Installing the PCL or RPCS Raster Printer Driver (USB) Setting Up a Client Computer Follow the procedure below to configure a computer as a client computer and connect it to the shared printer. Make this setting when installing the printer driver from the CD-ROM provided. •...
- Page 74 2. Preparing for Printing • If the message prompting you to restart the computer appears, restart the computer.
- Page 75 Specifying the Interface and Network Settings using the Printer's Control Panel (Host Interface Menu) Specifying the Interface and Network Settings using the Printer's Control Panel (Host Interface Menu) In the Host Interface menu, you can make network settings and settings for the computer to printer USB connection (if used).
- Page 76 2. Preparing for Printing When DHCP is set to on, the subnet mask cannot be changed. To change it, set DHCP to off. Contact your network administrator for information about the network configuration. Default: 0.0.0.0 Gateway Address You can specify the gateway address. When DHCP is set to on, the gateway address cannot be changed.
-
Page 77: Changing The Host Interface Menu
Specifying the Interface and Network Settings using the Printer's Control Panel (Host Interface Menu) Changing the Host Interface Menu This section gives an example of changing a setting in the Host Interface menu. Press the [Menu] key. BUG127S Press the [ ] or [ ] key to display [Host Interface], and then press the [#Enter] key. Menu: Host Interface Press the [ ] or [ ] key to display [I/O Timeout], and then press the [#Enter] key. -
Page 78: Installing The Drivers For Network Connection
2. Preparing for Printing Installing the Drivers for Network Connection This section explains how to install the printer driver for a network printer and configure it according to the printer port. Using this Printer as the Windows Printing Port Network connections can be established through Ethernet. Available ports are determined based on the combination of Windows operating system version and connection method used. -
Page 79: Installing The Pcl Or Rpcs Raster Printer Driver (Network)
Installing the Drivers for Network Connection Windows 2000/XP/Vista Windows Server 2003/2008 Print Server Windows 2000/XP/Vista Windows Server 2003/2008 BUG131S • p.81 "Using as the Windows Network Printer" Installing the PCL or RPCS Raster Printer Driver (Network) Using the SmartDeviceMonitor for Client Port This section explains how to install the printer driver (TCP/IP) and set up the SmartDeviceMonitor for Client port. - Page 80 2. Preparing for Printing Double-click the printer name or click [+] to display the printer settings. The details shown in [Comment:], [Driver:], and [Port:] vary depending on the operating system, printer model, and port. Click [Port:], and then click [Add]. Click [SmartDeviceMonitor], and then click [OK].
- Page 81 Enter the printer name or IP address in the [Printer Name or IP Address] box. The [Port Name] text box automatically obtains a port name. Change this name if necessary. When screen for Device selection appears, select "RICOH Network Printer C model". Click [Finish] in the [Add Standard TCP/IP Printer Port Wizard] dialog box.
- Page 82 2. Preparing for Printing • Click [Yes], [Continue Anyway] or [Install this driver software anyway] to continue the installation. • A message about restarting the computer may appear. Restart the computer to complete installation. • A message appears if there is a newer version of the printer driver already installed. If there is, you cannot install the printer driver using Auto Run.
- Page 83 Installing the Drivers for Network Connection Click [Next >]. Click [Finish] in the installation completion dialog box. • If the message "Digital Signature Not Found" or the [Software Installation], [Hardware Installation] or [Windows can't verify the publisher of this driver software] dialog box appears: •...
-
Page 84: Installing The Desktopbinder - Smartdevicemonitor For Client
2. Preparing for Printing Double-click the printer name or click [+] to display the printer settings. The details shown in [Comment:], [Driver:], and [Port:] vary depending on the operating system, printer model, and port. Click [Port:], and then click [Add]. Click [Network Printer], and then click [OK]. - Page 85 Installing the Drivers for Network Connection • Install SmartDeviceMonitor for Client before installing the printer driver when using the SmartDeviceMonitor for Client port. You can install SmartDeviceMonitor for Client in either of the following two ways: Full install Installs all modules. Custom Install You can select which modules to install.
-
Page 86: Paper
2. Preparing for Printing Paper This section explains the available paper types and how to load paper. Compatible Paper Types You can use various types of paper. • Plain paper This paper is normally used for copying and printing. Unlike inkjet plain paper or glossy paper, it is uncoated. - Page 87 Paper Type Size Paper capacity Letter (8 " × 11") Legal (8 " × 14") " × 5 " Executive (7 " × 10 ") 8" × 13" " × 13" " × 13" Plain / Inkjet Plain Paper Custom paper sizes Maximum paper capacity: 250 Vertical: 139.7- 356.0 mm sheets...
- Page 88 2. Preparing for Printing Type Size Paper capacity Legal (8 " × 14") Executive (7 " × 10 ") 8" × 13" " × 13" " × 13" Plain / Inkjet Plain Paper Custom paper sizes Maximum paper capacity: 500 Vertical: 148.0 - 356.0 mm sheets (5.83 - 14.01 inch), Horizontal:...
-
Page 89: Paper Handling Precautions
Paper Type Size Paper capacity 55.0-216.0 mm (2.17-8.50 capacity: 100 sheets inch) Glossy Paper A4 (210 × 297 mm ) Maximum paper capacity: 100 sheets Maximum paper output: 1 sheets Envelope Com10 Envelope (4 " × Maximum paper capacity: 10 ") sheets Monarch Envelope (3... - Page 90 2. Preparing for Printing • Load paper with the paper grain parallel to the feed direction. • Do not load paper of different types at the same time. • To load a different type of paper than that already loaded, first remove all currently loaded paper. •...
- Page 91 Paper Set paper according to the orientation of the print image, as follows. BUG132S Compatible Paper Sizes for the Duplex Unit Type Size Paper capacity Plain / Inkjet Plain Paper A4 (210 × 297 mm) A5 (148 × 210 mm) A6 (105 ×...
- Page 92 2. Preparing for Printing 1. To print over a portrait image: Load paper so that its top edge is pointing in the paper feed direction. 2. To print over a landscape image: Load paper so that its right edge is pointing in the paper feed direction. Paper Storage Precautions This section gives cautions on storing paper.
- Page 93 Paper • Ink smearing can be caused by environmental conditions (such as high humidity) and the type of image being printed (such as ink-heavy images). If smearing occurs, set [Print Quality] to [Quality priority] or [Speed priority]. This may stop the ink smearing. •...
- Page 94 2. Preparing for Printing • absorbent • dry and conducive to static buildup • already printed on (such as the back of pre-printed paper) • pre-printed (unless specified) • heat sensitive/non-carbon • too thick or thin • pre-stitched • glued or tacked •...
- Page 95 Paper BPR196S a. Output Direction b. Printable Area c. 8 mm (0.4 inches) d. 38 mm (1.5 inches) e. 3 mm (0.2 inches)
-
Page 96: Specifying The Paper Settings Using The Printer's Control Panel (Paper Input Menu)
2. Preparing for Printing Specifying the Paper Settings using the Printer's Control Panel (Paper Input Menu) This section explains the settings you can specify in the Paper Input menu, such as those for the size and type of the paper loaded in each tray. The very first time you load paper or anytime you change to a different size or type of paper, you must specify the paper settings using "Paper Input Menu"... - Page 97 Specifying the Paper Settings using the Printer's Control Panel (Paper Input Menu) On the control panel, press the [Menu] key. BUG127S Press the [ ] or [ ] key to display [Paper Input], and then press the [#Enter] key. Menu: Paper Input Press the [ ] or [ ] key to display [Tray Paper Size], and then press the [#Enter] key.
- Page 98 2. Preparing for Printing...
-
Page 99: Printer Driver
3. Printer Driver Two Types of Printer Properties Dialog Box There are two types of printer properties dialog box, namely: Custom Setting and Multi-tab. The default is Custom Setting. • Custom Setting This type is suitable for users who rarely need to change printer properties settings and print using generally the same settings. -
Page 100: Opening From An Application
3. Printer Driver Click the icon of the printer, and then click [Printing Preferences...] on the [File] menu. The printing preferences dialog box appears. Opening from an Application If you open the printer properties dialog box from an application, the factory settings appear. Change the settings as required and carry out printing. -
Page 101: Specifying Settings On [Accessories] Tab
Specifying Settings on [Accessories] Tab Specifying Settings on [Accessories] Tab If the printer and computer are not configured for bidirectional communication, open the printer driver and specify the optional units attached to the printer and the size and type of paper loaded in the printer. Conditions for Bidirectional Communication Bidirectional communication allows information about paper size and feed direction settings to be automatically sent to the printer. - Page 102 3. Printer Driver Click the [Accessories] tab. If options in the [Accessories] tab are disabled, bidirectional connection is enabled. In this case, no change is necessary for option settings. Select options installed from the [Select printer options:] area, and then make the necessary settings.
-
Page 103: Printing
Printing Printing Follow the procedure below to print on plain paper. • You can load 100 sheets in the optional bypass tray unit. • Curled paper may jam. Straighten any curls within 2 mm (0.08 inches) before loading. • Load paper with the print side face down in the paper trays. •... -
Page 104: Unauthorized Copy Control
3. Printer Driver Make print settings, and then click [OK]. • If you set [Paper type:] to [Glossy Paper] in the printer properties dialog box, be sure to remove each sheet as it is delivered to the output ramp. • You can load up to 20 envelopes. •... - Page 105 Printing 1. The pattern and text you have set is printed. a: Text b: Pattern 2. The document is copied to the machine that the Copy Data Security unit is installed. 3. The document is blanked by gray overprint. Printing a Document Using [Mask type:] BPR200S 1.
-
Page 106: Canceling Printing
3. Printer Driver Canceling Printing Print jobs can be canceled from either a printer or computer. How to cancel print jobs differs according to their job status. Check the job status first. Canceling a Print Job Being Printed Cancel the print job from the Status monitor or by pressing the [Job Reset] key of the printer. Canceling a print job in queue Cancel the print job from the taskbar of the computer. -
Page 107: Canceling Printing From The Taskbar
Canceling Printing If you press the [Job Reset] key while the printer is receiving print data for a print job (the Data in lamp is blinking), that print job is also canceled. Press the [Job Reset] key. BUG134S The confirmation screen appears. Press the [#Enter] key. -
Page 108: Selecting The Printer Driver Language
3. Printer Driver Selecting the Printer Driver Language This section explains how to select the language used for the settings and messages displayed on the Printer Driver. Open the printer properties dialog box. Click [Printing Preferences]. Click the [Printer Configuration] tab. Click [Environment Settings...]. - Page 109 Selecting the Printer Driver Language Click [Environment Settings...] ( ). BPR204S In the language list (shown below), find the language you require. The languages in the list appear in the following order: • 1.Japanese • 2.English • 3.German • 4.French •...
- Page 110 3. Printer Driver...
-
Page 111: Monitoring And Configuring The Printer
4. Monitoring and Configuring the Printer Using the Status Monitor Using the Status monitor, you can check the print job status, error messages amount of remaining ink, and other printer status information. • p.191 "Replacing a Print Cartridge" • p.254 "Status Monitor Errors" •... -
Page 112: Using Smartdevicemonitor For Client
4. Monitoring and Configuring the Printer Using SmartDeviceMonitor for Client SmartDeviceMonitor for Client is an application that has functions such as the peer-to-peer printing machine monitoring. We recommend you install this application on the client computer. • Operating System: Windows 2000 Protocol Stack TCP/IP protocol supplied with Windows 2000 •... -
Page 113: Using Notification Via Smartdevicemonitor For Client
Using SmartDeviceMonitor for Client • View up to 100 print jobs that belong to you. • The status monitor function might not be able to monitor all possible items or events. Using Notification via SmartDeviceMonitor for Client This section explains how to use the Notification function in SmartDeviceMonitor for Client. If a client computer uses SmartDeviceMonitor for Client to access a network printer, you can specify the Notification setting to allow the computer to receive print job status notification. -
Page 114: Specifying The Settings For Monitoring The Printer
4. Monitoring and Configuring the Printer Specifying the Client Computer Settings Follow the procedure below to make the settings on the client. On the [Start] menu, point to [All Programs], point to [DeskTopBinder], [SmartDeviceMonitor for Client], and then click [Extended Features Settings]. The Extended Features Settings dialog box opens. -
Page 115: Displaying The Printer Status
Using SmartDeviceMonitor for Client Displaying the Printer Status You can display the printer status. Launch SmartDeviceMonitor for Client. Right-click the SmartDeviceMonitor for Client icon. The printer status is reflected in the SmartDeviceMonitor for Client icon in the taskbar system tray. To monitor the status in more detail, right-click the SmartDeviceMonitor for Client icon, and then select the printer you want to monitor. -
Page 116: Using Web Browser
4. Monitoring and Configuring the Printer Using Web Browser Available operations The following operations can be remotely performed using Web browser from a client computer. • Displaying printer status or settings • Resetting the printer • Making printer settings • Making e-mail notification settings •... - Page 117 Using Web Browser Launch the Web browser. In the Web browser's address bar, enter "http://(printer's IP address)/" to access the printer. If a DNS or WINS server is in use and the printer's host name has been specified, you can enter the host name instead of the IP address.
-
Page 118: Menu
4. Monitoring and Configuring the Printer Menu This section explains the items in the Web browser menu. BPR136S 1. Home The [Status] and [Device Info] tab are displayed. Details of the tab menu are displayed on the work area. 2. Configuration Make system settings for the machine, interface settings, and security. -
Page 119: Notifying The Printer Status By E-Mail
Using Web Browser Launch the Web browser. In the address bar, enter "http://(printer's IP address or host name)/". Click [Configuration], and then click [General Settings]. A dialog box for entering the user name and password opens. Enter the user name and password, and then click [OK]. If this is the first time to do this, enter "admin"... - Page 120 4. Monitoring and Configuring the Printer • The paper has been loaded incorrectly. • The machine is out of its operational temperature range. Flowchart showing how to specify notification by e-mail Specify the printer setting. Specify the network interface setting (using the Web browser). To specify the network interface setting, use the Web browser.
- Page 121 Using Web Browser Functions Selectable value Default Text in E-mail 255 characters max. (1-byte None alphanumerics) (2-byte characters available) Specifying SMTP Authentication By specifying the SMTP authentication setting, you can send e-mails to destinations where the e-mail server carries out SMTP authentication. By specifying the SMTP authentication setting, you can log on to SMTP servers which require authentication.
- Page 122 4. Monitoring and Configuring the Printer If you set [POP Authentication Encryption] to [On], the printer will try logging on only by APOP login. If you set [POP Authentication Encryption] to [Off], the printer will try logging on only in plain text. In standby time following POP authentication (in milliseconds), you can specify how long the printer can wait for logging on to the SMTP server after logging on to the POP server.
- Page 123 Using Web Browser Functions Selectable value Default Italian Spanish Dutch Swedish Norwegian Danish Portuguese Finnish E-mail Language Polish English Czech Hungarian Russian Subject 31 characters max. (1-byte None alphanumerics) (2-byte characters available) Text 255 characters max. (1-byte None alphanumerics) (2-byte characters available) Destinations Destination 1-10...
- Page 124 4. Monitoring and Configuring the Printer Functions Selectable value Default Printer Error Cartridge Empty Cartridge Almost Empty Replace Ink Collector Unit Ink Collector Unit Near Full No Paper Paper Misfeed Paper Size Mismatch Paper Type Mismatch Paper Size and Type Mismatch ON Cover Open Unit/Cartridge Not Set Out of Printable Temperature...
- Page 125 Using Web Browser Auto E-mail Notification: Counter Notification Group Group to Notify Functions Selectable value Default E-mail Language English English Japanese German French Italian Spanish Dutch Swedish Danish Norwegian Portuguese Finnish E-mail Language Polish English Czech Hungarian Russian Subject 31 characters max. (1-byte None alphanumerics) (2-byte characters available)
- Page 126 4. Monitoring and Configuring the Printer Counter Notification Functions Selectable value Default Machine Total Auto E-mail Notification: Error Notification Printer Error Functions Selectable value Default Notify when error Occurs Occurs Notify within 30 (minutes) Cartridge Empty Functions Selectable value Default Occurs Notify when error Occurs...
- Page 127 Using Web Browser Cartridge Almost Empty Functions Selectable value Default Occurs Notify when error Occurs Occurs & Fixed Notify within 30 (%) Replace Ink Collector Unit Functions Selectable value Default Notify when error Occurs Occurs Notify within 30 (minutes) Ink Collector Unit Near Full Functions Selectable value Default...
- Page 128 4. Monitoring and Configuring the Printer No Paper Functions Selectable value Default Occurs Notify when error Occurs Occurs & Fixed Notify within 30 (minutes) Paper Misfeed Functions Selectable value Default Occurs Notify when error Occurs Occurs & Fixed Notify within 30 (minutes) Paper Size Mismatch Functions...
- Page 129 Using Web Browser Functions Selectable value Default 30 (minutes) Paper Type Mismatch Functions Selectable value Default Occurs Notify when error Occurs Occurs & Fixed Notify within 30 (minutes) Paper Size and Type Mismatch Functions Selectable value Default Occurs Notify when error Occurs Occurs &...
- Page 130 4. Monitoring and Configuring the Printer Cover Open Functions Selectable value Default Occurs Notify when error Occurs Occurs & Fixed Notify within 30 (minutes) Unit/Cartridge Not Set Functions Selectable value Default Occurs Notify when error Occurs Occurs & Fixed Notify within 30 (minutes) Out of Printable Temperature Range Functions...
-
Page 131: About The Web Browser Help
Using Web Browser Functions Selectable value Default 30 (minutes) Auto E-mail Notification: Counter Notification Machine Total Functions Selectable value Default Number of Pages Notification Method Number of Pages Number of Pages & Monthly Notify Every 100 (pages) 1000 2000 (pages) Notification Day 1-28 (days) 1 (day) -
Page 132: Snmp
4. Monitoring and Configuring the Printer SNMP The Ethernet interface includes the Simple Network Management Protocol (SNMP) agent for UDP. Using the SNMP manager, you can obtain printer data. The default community name is "public". Using this community name, you can obtain MIB data. Supporting MIB (SNMP v1/v2c) •... -
Page 133: Using The Printer With A Macintosh
5. Using the Printer with a Macintosh System Requirements for Macintosh Operating System (for Macintosh) • PowerPC-Based Macintosh: Mac OS X 10.3 or later • Intel-Based Macintosh: Mac OS X 10.4.5 or later • The operating environment for the printer driver depends on the application in use. •... -
Page 134: Preparing For Printing (For Macintosh)
5. Using the Printer with a Macintosh Preparing for Printing (for Macintosh) For details about preparing to print from a Macintosh computer, see the following sections: Checking the printer status and settings using the printer's control panel See p.65 "Checking the Printer Status and Settings using the Printer's Control Panel (List/Test Print Menu)"... -
Page 135: Installing The Printer Driver Under Mac Os X
Installing the Printer Driver under Mac OS X Installing the Printer Driver under Mac OS X This section explains how to install the printer driver. After installing the printer driver, adjust the settings necessary for printer use. The following procedures are based on Mac OS 10.5.1. The procedures for your machine might differ slightly from those shown if you are using a different version of Mac OS. -
Page 136: Specifying The Printer Settings On A Macintosh
5. Using the Printer with a Macintosh Click [Agree]. If you click [Disagree], the screen that appeared in the previous step returns. Click [Install]. The [Authenticate] dialog box appears. To select where to install the file, click [Change Install Location...]. Under Mac OS X 10.3.x - 10.4.x, select where to install the file in the [Select a Destination] dialog box, Enter the administrator's user name and password, and then click [OK]. - Page 137 Installing the Printer Driver under Mac OS X Click [ ]. The add printer screen appears. Under Mac OS X 10.3.x - 10.4.x, click [Add Printer...] on the [Printers] menu or [Add] on the toolbar. The [Printer Browser] appears. On the add printer screen, click [Default], and then make sure [Kind] is set to [USB]. The name of the printer connected to the USB port appears.
- Page 138 Select [Select a driver to use...] in the [Print Using] field, and then select a printer in the list. Under Mac OS X 10.3.x - 10.4.x, select [RICOH] in the [Printer Using] field, and then select a printer in the [Model Name] list.
-
Page 139: Printer Properties Dialog Box On A Macintosh
Printer Properties Dialog Box on a Macintosh Printer Properties Dialog Box on a Macintosh This section describes the printer properties dialog box and explains how to open it. Dialog Boxes for Printer Settings on a Macintosh The dialog boxes for specifying the printer driver settings consist of the Page Setup dialog and Print dialog. The printer settings can be adjusted in [Maintenance Utility]. - Page 140 5. Using the Printer with a Macintosh • For details about specifying the printer driver settings, see p.133 "Installing the Printer Driver under Mac OS X". Displaying the Page Setup dialog on a Macintosh From the application's File menu, click [Page Setup...]. The Page Setup dialog appears.
- Page 141 Printer Properties Dialog Box on a Macintosh The [Printer List] appears. From the [Print & Fax], select the printer you want to use, and then click [Open Print Queue...]. If you want to use a network printer, select it according to its name of the printer. On the [Print &...
-
Page 142: Printing With A Macintosh
5. Using the Printer with a Macintosh Printing with a Macintosh This section explains how to start and stop printing. Basic Printing Procedure for Macintosh This section explains the basic procedure for printing from an application. Printing on a Macintosh •... - Page 143 Printing with a Macintosh Printing on Paper in a Paper Tray with a Macintosh This section explains how to load paper in the paper tray and print on it. • Curled paper may jam. Straighten any curls before loading. • Load paper with the print side face down in the paper trays. •...
- Page 144 5. Using the Printer with a Macintosh To display the [Setup] settings, using the pop-up menu in the middle-right of the dialog box, switch from [the name of the application in use] to [Printer Features], and then select [Setup] from the [Feature Sets:] pop-up menu.
- Page 145 Printing with a Macintosh Insert a sheet of paper into tray 2/tray 3 with the print side face down. Insert the sheet straight into tray 2/tray 3. Make print settings, and then click [Print]. • To use tray 2/tray 3, click the [Driver] tab in the [Printer Info] dialog box, and then select the [Tray 2]/[Tray 3] from the pop-up menu.
-
Page 146: Canceling A Print Job On A Macintosh
5. Using the Printer with a Macintosh • To use the bypass tray, click the [Driver] tab in the [Printer Info] dialog box, and then select the [Bypass Tray Unit] check box. To display the [Printer Info] dialog box, display the [Print & Fax], double-click the printer from the printer list, and then click [Info] on the toolbar. - Page 147 Printing with a Macintosh Canceling Printing Using the [Job Reset] Key of the Printer (for Macintosh) You can cancel a print job while it is being transmitted or printed. Check that printing has started. Not only the print job being printed but also the print jobs in queue will be canceled. If you press the [Job Reset] key while the printer is receiving print data for a print job (the Data in lamp is blinking), that print job is also canceled.
-
Page 148: Monitoring And Configuring The Printer (For Macintosh)
5. Using the Printer with a Macintosh Monitoring and Configuring the Printer (for Macintosh) For details about using a Macintosh to obtain a list of the printer's settings, the printer's status, or similar printer information, see the following section: Checking the printer's status or changing the printer's network settings using a Web browser See p.114 "Using Web Browser"... -
Page 149: Displaying The Printer Status On A Macintosh
Displaying the Printer Status on a Macintosh Displaying the Printer Status on a Macintosh Using the Status Monitor, you can display the amount of ink left and other printer status details on the computer. You can also check any errors that occur in the print job queue window. The print job queue window opens automatically when you execute a print command. - Page 150 5. Using the Printer with a Macintosh • For details about displaying the [Print & Fax], see p.138 "Displaying the Print dialog on a Macintosh".
-
Page 151: Opening Help On A Macintosh
Help]. The Help screen appears. Under Mac OS X 10.3.x - 10.4.x, start Help Viewer from Mac Help, and then select [RICOH RPCS Raster Help] from the [Library] menu. • For details about displaying the [Setup] or [Paper Feed] settings, see p.138 "Displaying the Print dialog on a Macintosh". -
Page 152: Maintaining (For Macintosh)
5. Using the Printer with a Macintosh Maintaining (for Macintosh) For details about maintaining and managing the printer with a Macintosh computer, see the following sections: Checking the number of printed pages using the control panel See p.157 "Checking the Number of Printed Pages using the Control Panel (Counter Menu)" Performing maintenance using the control panel See p.159 "Performing Maintenance using the Control Panel (Maintenance Menu)"... -
Page 153: Troubleshooting (For Macintosh)
Troubleshooting (for Macintosh) Troubleshooting (for Macintosh) Printing will not start See p.213 "Printing Will Not Start" Paper is not fed or delivered normally See p.215 "Paper Is Not Fed or Delivered Normally" Paper jam See p.217 "Paper Jam" Print results are not satisfactory See p.241 "Print Results Are Not Satisfactory"... -
Page 154: Updating The Printer Driver On A Macintosh
5. Using the Printer with a Macintosh Updating the Printer Driver on a Macintosh Checking the Version of the Printer Driver on a Macintosh This section explains how to check the version of the current printer driver. Display the [Print & Fax]. Under Mac OS X 10.3.x - 10.4.x, Display the [Printer List]. - Page 155 Updating the Printer Driver on a Macintosh The printer is deleted from [Printer List]. Click [OK]. The printer is deleted from [Print & Fax]. Click [Quit System Preferences] on the [System Preferences] menu. The [System Preferences] closes. Under Mac OS X 10.3.x - 10.4.x, click [Quit Printer Setup Utility] on the [Printer Setup Utility] menu. The [Printer Setup Utility] closes.
-
Page 156: Software On The Cd-Rom For Macintosh
5. Using the Printer with a Macintosh Software on the CD-ROM for Macintosh This section describes the CD-ROM supplied with the printer. Files for Macintosh The following is a list of the files on the CD-ROM. File Name product name_Mac_OS_X RPCS Raster Printer Driver for Macintosh •... -
Page 157: Manuals (Html Files) For Macintosh
Software on the CD-ROM for Macintosh • For details about using the printer driver, see the printer driver Help. Manuals (HTML files) for Macintosh This section gives the location of the manuals. File Location The manuals are in the following folders on the supplied CD-ROM. MANUAL_HTML\LIST... - Page 158 5. Using the Printer with a Macintosh...
-
Page 159: Maintaining
6. Maintaining Checking the Number of Printed Pages using the Control Panel (Counter Menu) You can check and print out the printer's counter figures. Counters show the number of prints made by the printer. Print counter numbers do not include test patterns printed using "Maintenance", system configurations printed using "List/Test Print", and counter printouts made using "Counter". - Page 160 6. Maintaining Press the [Menu] key. BUG127S Press [ ] or [ ] to display [Counter], and then press the [#Enter] key. Menu: Counter Press [ ] or [ ] to display [Show Counter], and then press the [#Enter] key. Menu: Show Counter Press [ ] or [ ], and then check the [Color], [Black], and [EconClr] on the display.
-
Page 161: Performing Maintenance Using The Control Panel (Maintenance Menu)
Performing Maintenance using the Control Panel (Maintenance Menu) Performing Maintenance using the Control Panel (Maintenance Menu) Using the Maintenance menu, you can specify printer maintenance settings for adjusting settings such as gradation and density. Nozzle Check You can print a test pattern to check whether the inks are being correctly ejected from the print head nozzles. -
Page 162: Nozzle Check
6. Maintaining The interval must be long enough to allow a sheet to dry. • Off • 1 sec • 2 sec • 5 sec • 10 sec • 15 sec • 20 sec Default: Off Dry-delay (Dup) To prevent spoiling of duplex-printed copies, select a print delivery interval to allow them to dry. The interval must be long enough to allow a duplex-printed sheet to dry. - Page 163 Performing Maintenance using the Control Panel (Maintenance Menu) Press the [Menu] key. BUG127S Press the [ ] or [ ] key to display [Maintenance], and then press the [#Enter] key. Menu: Maintenance Press the [ ] or [ ] key to display [Nozzle Check], and then press the [#Enter] key. Maintenance: Nozzle Check Press the [#Enter] key.
-
Page 164: Head-Cleaning
6. Maintaining BPR212S Head-cleaning Follow the procedure below to perform a normal print-head cleaning. Perform a head cleaning when a particular color cannot be printed or print images are blurred. Head cleaning consumes ink. When the Print cartridge is empty, replace it instead of performing a print-head cleaning. After a Print cartridge is replaced, a print-head cleaning will be automatically performed. - Page 165 Performing Maintenance using the Control Panel (Maintenance Menu) Press the [ ] or [ ] key to display [Maintenance], and then press the [#Enter] key. Menu: Maintenance Press the [ ] or [ ] key to display [Head-cleaning], and then press the [#Enter] key. Maintenance: Head-cleaning Press the [ ] or [ ] key to select a color, and then press the [#Enter] key.
- Page 166 6. Maintaining Press the [ ] key. BUG191S The following message appears: Press # to clean heads Press the [#Enter] key. BUG161S Head cleaning starts. Hold the [Form Feed] key down for 3 seconds. BUG143S Head cleaning starts.
-
Page 167: Head-Flushing
Performing Maintenance using the Control Panel (Maintenance Menu) Head-flushing Follow the procedure below to perform a thorough print-head cleaning. Since this consumes more ink than a normal head cleaning does, perform this when the problem persists after performing a normal head cleaning. -
Page 168: Head Position
6. Maintaining BUG217S 1. Head 1 (Yellow/Magenta) 2. Head 2 (Black) 3. Head 3 (Cyan) 4. Head 4 (Magenta/Yellow) Press the [#Enter] key. Press # to flush heads Head flushing starts. Maintenance in process... Press the [Online] key. The initial screen appears. Head Position Follow the procedure below to print a test pattern and adjust the print-head positions if vertical lines are printed unaligned or printed colors look blurred. - Page 169 Performing Maintenance using the Control Panel (Maintenance Menu) Press the [Menu] key. BUG127S Press the [ ] or [ ] key to display [Maintenance], and then press the [#Enter] key. Menu: Maintenance Press the [ ] or [ ] key to display [Head Position], and then press the [#Enter] key. Maintenance: Head Position Press the [ ] or [ ] key to display [Pr.Test Pattern], and then press the [#Enter] key.
-
Page 170: Adj.paper Feed
6. Maintaining BUG243S Press the [ ] or [ ] key to display [Adjustment], and then press the [#Enter] key. Press the [ ] or [ ] key to select a resolution from step 5, and then press the [#Enter] key. Adjustment: High Speed Press the [ ] or [ ] key to select a line, and then press the [#Enter] key. - Page 171 Performing Maintenance using the Control Panel (Maintenance Menu) Slide the envelope selector to the forward position. BUG137S Press the [Menu] key. BUG127S Press the [ ] or [ ] key to display [Maintenance], and then press the [#Enter] key. Menu: Maintenance Press the [ ] or [ ] key to display [Adj.Paper Feed], and then press the [#Enter] key.
-
Page 172: Registration
6. Maintaining BPR214S When horizontal lines beside the lightest gray square are broken, select the optimal adjustment value by referring to the lines broken in the opposite direction. When the "+2" square is the lightest gray square and the "+6" horizontal lines are broken in the opposite direction, the optimal adjustment value is between "+3"... - Page 173 Performing Maintenance using the Control Panel (Maintenance Menu) Slide the envelope selector to the forward position. BUG137S Press the [Menu] key. BUG127S Press the [ ] or [ ] key to display [Maintenance], and then press the [#Enter] key. Menu: Maintenance Press the [ ] or [ ] key to display [Registration], and then press the [#Enter] key.
- Page 174 6. Maintaining A test pattern to adjust the print start position is printed. Check the optimal adjustment values on the printed test pattern. Fold the test pattern sheet in half lengthwise. BPR197S The optimal adjustment value is the difference between the single vertical line and the cross's vertical line that you can see when the folded paper is held up to light.
-
Page 175: Setting The Date And Time
Performing Maintenance using the Control Panel (Maintenance Menu) Press the [ ] or [ ] key to select a paper type, and then press the [#Enter] key. Adjustment: *Plain Paper Press the [ ] or [ ] key to enter the adjustment values (-4.0 to +4.0) in the [Read Direction] from step 7, and then press the [#Enter] key. - Page 176 6. Maintaining Press the [ ] or [ ] key to display [Maintenance], and then press the [#Enter] key. Menu: Maintenance Press the [ ] or [ ] key to display [Date/Time], and then press the [#Enter] key. Maintenance: Date/Time Press the [ ] or [ ] key to display [Date Setting], and then press the [#Enter] key.
- Page 177 Performing Maintenance using the Control Panel (Maintenance Menu) Press the [ ] or [ ] key to display [Maintenance], and then press the [#Enter] key. Menu: Maintenance Press the [ ] or [ ] key to display [Date/Time], and then press the [#Enter] key. Maintenance: Date/Time Press the [ ] or [ ] key to display [Time Setting], and then press the [#Enter] key.
-
Page 178: De-Condensation
6. Maintaining Press the [ ] or [ ] key to display [Maintenance], and then press the [#Enter] key. Menu: Maintenance Press the [ ] or [ ] key to display [Date/Time], and then press the [#Enter] key. Maintenance: Date/Time Press the [ ] or [ ] key to display [Time Zone], and then press the [#Enter] key. - Page 179 Performing Maintenance using the Control Panel (Maintenance Menu) Press the [ ] or [ ] key to display [De-condensation], and then press the [#Enter] key. Maintenance: De-condensation Three sheets are fed through the printer without anything being printed on them. Switch the printer off and then back on again.
-
Page 180: Specifying System Settings Using The Control Panel (System Menu)
6. Maintaining Specifying System Settings using the Control Panel (System Menu) You can set basic functions required to use the printer. The printer can be used on factory default, but the configuration can be changed depending on the condition of the user. The changed condition holds even if the printer is turned off. - Page 181 Specifying System Settings using the Control Panel (System Menu) • 60 minutes Default: 5 minutes Notify by Email You can specify whether or not to send notification that a printer error has occurred to a particular e- mail address. After changing this setting, turn the printer off and then back on. •...
- Page 182 6. Maintaining • 8 ×13 • 8 ×13 • 16K (195×267) • 4 ×9 • 3 ×7 • C5 Env (162×229) • C6 Env (114×162) • DL Env (110×220) • Custom Size Default: A4 (210×297) Paper Type You can select the default paper type. •...
- Page 183 Specifying System Settings using the Control Panel (System Menu) • Long Edge Bind Default: Off Blank Pg. Print Specify whether or not to print blank pages. • On • Off Default: On Tray Switching You can set to switch the paper tray. •...
-
Page 184: Changing The System Menu
6. Maintaining Color Mode You can select the default color mode. • Color • Economy Color • Black and White Default: Color Recycl.Ppr.Mode You can enable this to print on recycled paper. • Off • On Default: Off Env.Slctr.Alert You can specify whether or not to enable the Env.Slctr.Alert function. •... - Page 185 Specifying System Settings using the Control Panel (System Menu) Press the [Menu] key. BUG127S Press [ ] or [ ] key to display [System], and then press the [#Enter] key. Menu: System Press [ ] or [ ] key to display [Energy Saver], and then press the [#Enter] key. System: Energy Saver Press [ ] or [ ] key to select the lead time needed to switch to the Energy Saver mode.
-
Page 186: Specifying Pcl Settings Using The Control Panel (Pcl Menu)
6. Maintaining Specifying PCL Settings using the Control Panel (PCL Menu) You can set conditions when using PCL for printing. Orientation You can select the page orientation. • Portrait • Landscape Default: Portrait Form Lines You can specify the number of lines per page between 5 and 128. Default: •... - Page 187 Specifying PCL Settings using the Control Panel (PCL Menu) Default: 10.00 pitch This setting is effective only for fixed-space fonts. Symbol Set You can specify the character set for the default font. Available sets are as follows: Roman-8, ISO L1, ISO L2, ISO L5, PC-8, PC-8 D/N, PC-850, PC-852, PC8-TK, Win L1, Win L2, Win L5, Desktop, PS Text, VN Intl, VN US, MS Publ, Math-8, PS Math, VN Math, Pifont, Legal, ISO 4, ISO 6, ISO 11, ISO 15, ISO 17, ISO 21, ISO 60, ISO 69, Win 3.0 Default: PC-8...
-
Page 188: Changing The Pcl Menu
6. Maintaining Changing the PCL Menu This section explains setting the symbol set mode as an example of how to change a PCL menu setting. Press the [Menu] key. BUG127S Press [ ] or [ ] key to display [PCL Menu], and then press the [#Enter] key. Menu: PCL Menu Press [ ] or [ ] key to display [Symbol Set], and then press the [#Enter] key. -
Page 189: Selecting The Control Panel Language
Selecting the Control Panel Language Selecting the Control Panel Language This section explains how to select the language used for the settings and messages displayed on the control panel. Press the [Menu] key. BUG127S Press the [ ] or [ ] key to display [Language], and then press the [#Enter] key. Menu: Language Press the [ ] or [ ] key to select the language, and then press the [#Enter] key. - Page 190 6. Maintaining Press the [ ] key once, and then press the [#Enter] key. The Language setting appears. In the language list (shown below), find the language you require. On the printer's control panel, the names of the available languages appear in English. Language List Language Name Displayed on Control Panel Language...
-
Page 191: Restricting Printer Functions
Restricting Printer Functions Restricting Printer Functions This section explains how to lock keys on the printer's control panel to prevent general users from changing settings and performing certain functions. By locking certain control panel keys, you can prevent users other than the administrator from doing the following: •... - Page 192 6. Maintaining Simultaneously hold the [ ], [Escape], and [#Enter] keys down for 3 seconds, and then [#Enter] key. The following message appears: Press # to unlock Press the [#Enter] key. The following message appears: Panel Unlocked The initial screen appears.
-
Page 193: Replacing A Print Cartridge
Replacing a Print Cartridge Replacing a Print Cartridge Follow the procedure below to replace a Print cartridge. Checking the Remaining Ink Follow the procedure below to check when to replace Print cartridges using the Status monitor or the cartridge replacement indicators. Checking the cartridge replacement indicators of the printer control panel BPR201S The illustration above indicates the control panel is indicating that the cyan print cartridge is empty. - Page 194 6. Maintaining Check the cartridge status. The illustration above indicates the cyan ink has completely run out. A red background in the image indicates that printing is not possible. Check which color of cartridge needs to be replaced, and then replace it. From left to right, the cartridge replacement indicators display the status of the black (K), cyan (C), magenta (M), and yellow (Y) Print cartridges.
-
Page 195: Replacing A Print Cartridge
Replacing a Print Cartridge BPR193S • Be sure to insert the print cartridges correctly. If you insert them incorrectly, Status Monitor might not be able to detect the amount of ink that is remaining in the cartridges. For details about handling the print cartridges, see p.195 "Handling Print Cartridges". - Page 196 6. Maintaining While pressing the recessed area ( ) of the right front cover, open the cover ( ). BUG113S Take out the empty cartridges. When doing this, be sure to hold the printer firmly so that it does not move. BUG140S Check the cartridges' orientation, and then install them gently.
-
Page 197: Handling Print Cartridges
Replacing a Print Cartridge Close the right front cover. BUG115S • p.317 "Recommended Consumables" Handling Print Cartridges Important points about handling Print cartridges are explained. • If ink comes into contact with your eyes, rinse immediately in running water. For other symptoms, consult a doctor. - Page 198 6. Maintaining • Do not take apart Print cartridges. • Do not open the right front cover except when installing Print cartridges. Do not turn off the power or unplug the power cord during the process of installing the cartridges. •...
-
Page 199: Replacing An Ink Collector Unit
Replacing an Ink Collector Unit Replacing an Ink Collector Unit Follow the procedure below to replace an ink collector unit. • Keep the polythene materials (bags, gloves, etc.) supplied with this machine away from babies and small children at all times. Suffocation can result if polythene materials are brought into contact with the mouth or nose. - Page 200 6. Maintaining While pressing the recessed area ( ) of the right front cover, open the cover ( ). BUG113S Wait at least five seconds, and then remove the full ink collector unit from the printer. BUG185S When pulling the unit out, keep the unit level and press on the area marked "Push". Put the Ink collector unit in the supplied plastic bag.
- Page 201 Replacing an Ink Collector Unit Insert the new ink collector unit. BUG187S Slide the ink collector unit carefully into the printer, until you hear it click. BUG194S Close the right front cover.
-
Page 202: Cleaning
6. Maintaining Cleaning Clean the outside of the printer regularly to maintain the condition of the printer. • To avoid hazardous electric shock, do not remove any covers or screws other than those specified in this manual. When the machine needs to be checked, adjusted, or repaired, contact your service representative. -
Page 203: Moving
Moving Moving The precautions when moving the printer a short distance or long distance are explained. Moving a Short Distance Take the following precautions when moving the printer a short distance - for instance, when attaching an optional tray or relocating the printer inside the same room. •... - Page 204 6. Maintaining Pack the printer for transport when moving it a long distance such as when changing office or residence. Disconnect all cables, place the printer in the box it was in when purchased, and transport in a level manner. Contact sales or service representative for details.
-
Page 205: Disposing
Disposing Disposing Consult with an authorized dealer to dispose of the printer. When disposing of the printer yourself, be sure to comply with local disposal regulations. -
Page 206: When Not Using For A Long Period Of Time
6. Maintaining When Not Using for a Long Period of Time If the printer will not be used for a long time, turn its power off, disconnect the USB cable, and then unplug it from the wall outlet. It is recommended to print at least once a month, because the printer consumes a considerable amount of ink for periodic maintenance and print head cleaning when switched on after a long period of inactivity. -
Page 207: Troubleshooting
7. Troubleshooting Software Cannot Be Installed This section explains how to troubleshoot software installation problems under different environments. Confirming Installation Check whether the software has been installed. Checking icons When the printer driver is properly installed, the icon of the printer appears in the [Printers and faxes] folder. - Page 208 7. Troubleshooting Quick Install for USB The CD-ROM may not be inserted properly. Check that the CD-ROM is inserted properly. Check also that it is not damaged and the CD-ROM drive is working properly. The power cord or USB cable may not be properly Check that the power cord and USB cable are connected.
-
Page 209: Printer Driver Cannot Be Installed
Software Cannot Be Installed Devices], select the printer, and then open its properties dialog box. On the [General] tab, click [Reinstall Driver] to reinstall the software. Quick Install for Network The CD-ROM may not be inserted properly. Check that the CD-ROM is inserted properly. Check also that it is not damaged and the CD-ROM drive is working properly. -
Page 210: Usb Connection Is Not Automatically Detected
7. Troubleshooting The printer driver installer does not start. • If the screen does not appear even when you double-click the SETUP.EXE icon, or if an error An error occurs during installation. occurs during installation, access the CD- ROM drive from [My Computer] or [Explorer]. -
Page 211: If Test Print Fails
If Test Print Fails If Test Print Fails This section explains how to troubleshoot Test Print problems. The power cord or USB cable or Ethernet cable is Check that the power cord and USB cable, Ethernet not properly connected. cable are properly connected. The port connection is not properly set. -
Page 212: Uninstalling
7. Troubleshooting Uninstalling If software was installed incorrectly or incompletely, uninstall and then reinstall it. • Before uninstalling software or deleting devices, turn off any other printers connected to your computer via USB, or disconnect the USB cable to the printers. •... -
Page 213: Deleting Devices
Uninstalling Double-click [My computer]. On the [Tools] menu, click [Folder Options...]. Click the [View] tab. In the [Advanced Settings:] box, click [Show hidden files and folders], and then deselect the [Hide extension for known file types] check box. Click [OK]. On the [Start] menu, click [Search]. - Page 214 7. Troubleshooting Click [System]. Click the [Hardware] tab. Click [Device Manager]. Right-click [USB Printing Support] or [Product Name], and then click [Uninstall]. A confirmation message appears. Click [OK]. Click [Close].
-
Page 215: Printing Will Not Start
Printing Will Not Start Printing Will Not Start If printing will not start, check whether the power of the printer is on or whether the power can be turned on or not. If an error occurs when you try printing, change the computer or printer driver settings. Power Cannot Be Turned On If the [Power] key does not light or does not blink when it is pressed, check if there is something wrong with the power cord or wall outlet. - Page 216 7. Troubleshooting • Check whether other applications are operating. Close all other applications because these could be interfering with the installation. Be sure to close all resident programs also. • Check the printer properties settings. In the [Change User Settings] dialog box, on the [Misc.] tab, select the [Change data processing] check box.
-
Page 217: Paper Is Not Fed Or Delivered Normally
Paper Is Not Fed or Delivered Normally Paper Is Not Fed or Delivered Normally If the printer is operating but paper will not feed or paper jams multiple times, check the condition of the printer and paper. Paper does not feed smoothly. Paper guides are not adjusted properly. - Page 218 7. Troubleshooting Multiple sheets of paper are fed at one time. Load the paper again. Remove the paper from the paper tray, fan it well, and tap it on a flat surface such as a desk to even the edges. Check the position of the paper guides of the paper tray, and then load the paper again.
-
Page 219: Paper Jam
Paper Jam Paper Jam This explains how to remove a paper jam. When a paper jam error appears in the Status monitor, remove the paper from the location indicated. If you cannot locate paper jams or jammed paper cannot be removed easily, you can check the condition of paper from the top of the printer. -
Page 220: Removing Paper Jammed In Tray 1
7. Troubleshooting • p.215 "Paper Is Not Fed or Delivered Normally" • p.218 "Removing Paper Jammed in Tray 1" • p.223 "Removing Paper Jammed in the Multi Bypass Tray (optional)" • p.227 "Removing Paper Jammed under the Top Cover" • p.230 "Removing Paper Jammed around the Guide Board" •... - Page 221 Paper Jam Open the output ramp. BUG184S Remove jammed paper. BUG146S If you cannot remove the jammed paper or it is difficult to remove, the paper may be jammed inside the printer. Examine the paper carefully and remove. Close the output ramp. BUG202S...
-
Page 222: Removing Paper Jammed In Tray 2/Tray 3 (Optional)
7. Troubleshooting Push tray 1 gently in until it stops. BUG125S Printing starts. Blank paper may be delivered after printing resumes. • p.215 "Paper Is Not Fed or Delivered Normally" • p.220 "Removing Paper Jammed in Tray 2/Tray 3 (optional)" •... - Page 223 Paper Jam Pull tray 2/tray 3 completely out. Take care not to drop it. Remove jammed paper. BUG226S Push tray 2/tray 3 gently in until it stops. BUG223S Press the [Form Feed] key. BUG143S Printing starts. Blank paper may be delivered after printing resumes. •...
-
Page 224: Removing Paper Jammed In The Rear Unit (Optional)
7. Troubleshooting • p.222 "Removing Paper Jammed in the Rear Unit (optional)" • p.223 "Removing Paper Jammed in the Multi Bypass Tray (optional)" • p.227 "Removing Paper Jammed under the Top Cover" • p.230 "Removing Paper Jammed around the Guide Board" •... -
Page 225: Removing Paper Jammed In The Multi Bypass Tray (Optional)
Paper Jam Attach the rear unit. BUG242S Printing starts. Blank paper may be delivered after printing resumes. • p.218 "Removing Paper Jammed in Tray 1" • p.220 "Removing Paper Jammed in Tray 2/Tray 3 (optional)" • p.223 "Removing Paper Jammed in the Multi Bypass Tray (optional)" •... - Page 226 7. Troubleshooting Remove any paper in the bypass tray. BUG148S Remove jammed paper. BUG149S Load paper in the bypass tray with the side to be printed on facing up. BUG126S If it is difficult to remove jammed paper, follow the procedure below to remove it.
- Page 227 Paper Jam Remove any paper in the bypass tray. BUG148S Push the bypass tray extension in. Detach the bypass tray. BUG108S Remove the jammed paper from the rear of the printer. BUG188S...
- Page 228 7. Troubleshooting Reattach the bypass tray. BUG109S Pull the bypass tray extension out. Load paper in the bypass tray with the side to be printed on facing up. BUG126S • If you cannot remove the jammed paper using the above procedure, clear the jam from the multi bypass tray.
-
Page 229: Removing Paper Jammed Under The Top Cover
Paper Jam • p.215 "Paper Is Not Fed or Delivered Normally" • p.218 "Removing Paper Jammed in Tray 1" • p.220 "Removing Paper Jammed in Tray 2/Tray 3 (optional)" • p.222 "Removing Paper Jammed in the Rear Unit (optional)" • p.227 "Removing Paper Jammed under the Top Cover" •... - Page 230 7. Troubleshooting BUG145S If turning the paper wheel does not remove the jammed paper, use the following procedure to remove it: Open the top cover. BUG178S Open the left cover, and then turn the paper feed wheel. Turn the wheel while looking for the jammed paper through the top cover opening. BUG179S...
- Page 231 Paper Jam Remove the jammed paper through the top cover opening. BUG180S If the carriage has stopped halfway, move it to either end. Close the left cover. BUG181S Close the top cover. BUG182S Printing starts. After completing this procedure, print the nozzle check test pattern to make sure the print head's nozzles are not clogged.
-
Page 232: Removing Paper Jammed Around The Guide Board
7. Troubleshooting • Align the paper and reload it in the paper tray. Loading paper over the limit line in the tray may result in a paper jam. BPR122S • p.44 "Loading Paper" • p.160 "Nozzle Check" • p.218 "Removing Paper Jammed in Tray 1" •... - Page 233 Paper Jam BUG150S Unlock the guide board by moving the tabs on both sides toward the middle, and then open the guide board. BUG151S Open the left cover. BUG152S...
- Page 234 7. Troubleshooting Turn the paper feed wheel to release paper from the feed belt. BUG153S Release paper from the feed belt to make it removable. Insert your finger between the paper and the feed belt, and then remove the paper slowly. BUG154S Do not touch the feed belt.
- Page 235 Paper Jam Without pressing the catches on its sides, push the duplex unit all the way in until it clicks into place. BUG155S Close the left cover. BUG156S Printing starts. • Depending on how the paper was jammed, printing may resume from the next page, not the one jammed.
-
Page 236: Removing Paper Jammed In The Duplex Unit
7. Troubleshooting Removing Paper Jammed in the Duplex Unit Follow the procedure below to remove paper jammed in the duplex unit. • Make sure the duplex unit is attached properly. • If the bypass tray is attached to the printer, switch the printer off and detach the bypass tray. You can feed the jammed paper to output ramp by opening the left cover and turning the paper feed wheel. - Page 237 Paper Jam Remove jammed paper. BUG158S Close the duplex unit cover. BUG159S If the bypass tray has been detached, be sure to switch the power off before reattaching the tray. Printing starts. If it is difficult to remove jammed paper, follow the procedure below to remove it. Pressing the catches on both side of the duplex unit, remove the unit.
- Page 238 7. Troubleshooting Remove the jammed paper from the rear of the printer. BUG160S Without pressing the catches on its sides, push the duplex unit all the way in until it clicks into place. BUG155S If the bypass tray has been detached, be sure to switch the power off before reattaching the tray. •...
-
Page 239: If You Cannot Remove Jammed Paper
Paper Jam If You Cannot Remove Jammed Paper This section explains how to remove badly jammed paper that you cannot remove by the usual methods. • If the bypass tray and duplex unit are attached to the printer, switch the printer off and detach the duplex unit. - Page 240 7. Troubleshooting Open the left cover, and then turn the paper feed wheel. Turn the wheel while looking for the jammed paper through the top cover opening. BUG179S Remove the jammed paper through the top cover opening or back of the printer. BUG180S BUG154S Before removing jammed paper from the back of the printer, remove the duplex unit.
- Page 241 Paper Jam Close the left cover. BUG181S Close the top cover. BUG182S Printing starts. • Align the paper and reload it in the paper tray. Loading paper over the limit line in the tray may result in a paper jam. BPR122S •...
- Page 242 7. Troubleshooting • p.222 "Removing Paper Jammed in the Rear Unit (optional)" • p.223 "Removing Paper Jammed in the Multi Bypass Tray (optional)" • p.227 "Removing Paper Jammed under the Top Cover" • p.230 "Removing Paper Jammed around the Guide Board" •...
-
Page 243: Print Results Are Not Satisfactory
Print Results Are Not Satisfactory Print Results Are Not Satisfactory If print quality is poor, check the printer and printer driver settings for problems. If no problems are apparent, check the print cartridge or other consumables. Prints are Unsatisfactory This section explains how to troubleshoot the printer when printing is uneven (due to the wrong amount of ink being used) or when prints are smudged, smeared, or blotchy. - Page 244 7. Troubleshooting as this will position the print heads correctly. If you switch the envelope selector to , be sure to select the [Uni-directional printing only] check box in the printer properties dialog box. Have the print-heads been aligned? Blurred or double lines indicate the print heads are incorrectly positioned. Resolve this by switching the envelope selector to and then selecting [Head Position].
-
Page 245: Colors Do Not Match The Displayed Image
Print Results Are Not Satisfactory Are you printing densely colored images on both sides of paper? When a large amount of ink is used to completely cover a side, one-sided printing is recommended. Colors Do Not Match the Displayed Image If there are differences between colors of the print results and the displayed image, the following questions should be addressed. -
Page 246: Other Problems
7. Troubleshooting Does the envelope selector setting match? Set the envelope selector according to the type of paper. For envelopes, set the lever to the rear position ; for everything else, set the lever to the forward position . See p.279 "Envelope Selector Position Mismatch". - Page 247 Print Results Are Not Satisfactory Some characters are garbled or missing. • In the [Change User Settings] dialog box, on the [Misc.] tab, select the [Change methods to extract TrueType fonts] check box. • In the [Printer Configuration] tab, set [Spool format:] to [EMF]. In the [Change User Settings] dialog box, on the [Misc.] tab, select the [Print as bitmap] check box.
-
Page 248: Checking The Consumables
7. Troubleshooting How can I prevent ink transfer between printed sheets during duplex printing? On the [Printer Configuration] tab, in the [Sheet-dry Print Delay...] dialog box, change [Print delay time:]. Ink smudges and characters are not properly formed when printing white text on a black background. -
Page 249: If A Message Appears During Installation
If a Message Appears during Installation If a Message Appears during Installation Message number 58 or 34 indicates the printer driver cannot be installed using Auto Run. Uninstall and then reinstall the printer driver. -
Page 250: Error & Status Messages On The Control Panel
7. Troubleshooting Error & Status Messages on the Control Panel This section explains what the messages that appear on the control panel mean and what to do when a particular message appears. Depending on the "Auto Continue" and "Env.Slctr.Alert" settings specified on the System menu, some of the following messages might not appear. - Page 251 Error & Status Messages on the Control Panel Load the tray with paper of the specified type, and then change the paper type setting for the tray on the control panel. Alternatively, press the [Form Feed] key, select a tray containing paper of the specified type, and then print.
- Page 252 7. Troubleshooting See p.197 "Replacing an Ink Collector Unit". Ink depleted The ink has run out. Change the indicated print cartridge. See p.191 "Replacing a Print Cartridge". Left Cover is open / Close the Left Cover The left cover is open. Close the left cover. See p.267 "Cover Open".
- Page 253 Error & Status Messages on the Control Panel Paper Misfeed / Press Form Feed The printer failed to feed paper from the specified paper tray. Press the [Form Feed] key to feed the paper. See p.217 "Using the [Form Feed] Key to Remove Jammed Paper". Paper Misfeed Bypass Tray / Check Paper Press Form Feed Paper has jammed in the bypass tray.
- Page 254 7. Troubleshooting If a print cartridge starts running out of ink when the ink collector unit is almost full, the alert indicator will flash and a message informing you of the cartridge's low ink level will appear on the control panel. To prevent job delay due to a full ink collector unit, always have a new ink collector unit ready.
- Page 255 Error & Status Messages on the Control Panel Setting change... The printer is changing its settings. Wait a moment. Temp. alert Please wait... The printer is too hot or cold at start-up. Wait until "Ready" appears on the control panel. Waiting...
-
Page 256: Status Monitor Errors
7. Troubleshooting Status Monitor Errors If an error occurs with the printer, Status Monitor displays an error message. Click [User Guide...] to display the page corresponding to the error where you can check how to solve the problem in more detail. Depending on the "Auto Continue"... - Page 257 Status Monitor Errors • To load the tray, see p.44 "Loading Paper". Printing by Form Feed Press the [Form Feed] key, select the tray, and then print by Form Feed. Press the [Form Feed] key. BUG143S Press [ ] or [ ] key to select a paper tray, and then press the [#Enter] key. Print: Tray 1 ?: A4 (210 x 297) Print: Tray 1 ?:...
-
Page 258: No Paper/Tray Not Detected (Tray 2/Tray 3)
7. Troubleshooting Press the [Job Reset] key. BUG134S Press the [#Enter] key. BUG161S Press the [#Enter] key. No Paper/Tray Not Detected (Tray 2/Tray 3) Tray 2/Tray 3 is empty or the paper in it is not loaded properly. Do one of the following: •... - Page 259 Status Monitor Errors Press the [Form Feed] key. BUG143S Press [ ] or [ ] key to select a paper tray, and then press the [#Enter] key. Print: Tray 1 ?: A4 (210 x 297) Print: Tray 1 ?: Plain Paper BUG161S Printing starts.
-
Page 260: No Paper/Tray Not Detected (Bypass Tray)
7. Troubleshooting Press the [Job Reset] key. BUG134S Press the [#Enter] key. BUG161S Press the [#Enter] key. No Paper/Tray Not Detected (Bypass Tray) There is no paper in the bypass tray or the paper is not loaded properly. Do one of the following: •... - Page 261 Status Monitor Errors Press the [#Enter] key. BUG161S Printing starts. • To load paper, see p.44 "Loading Paper". Canceling the Print Job Cancel the print job. Press the [Job Reset] key. BUG134S Press the [#Enter] key. BUG161S...
-
Page 262: Paper Size Mismatch/Paper Type Mismatch (Tray 1)
7. Troubleshooting Press the [#Enter] key. Paper Size Mismatch/Paper Type Mismatch (Tray 1) The tray is not loaded with paper of the correct size or type. Do one of the following: • Change the paper settings. • Print by Form Feed (Change the tray). •... -
Page 263: Paper Size Mismatch/Paper Type Mismatch (Tray 2/Tray 3)
Status Monitor Errors BUG161S Canceling the Print Job Cancel the print job. Press the [Job Reset] key. BUG134S Press the [#Enter] key. BUG161S Press the [#Enter] key. Paper Size Mismatch/Paper Type Mismatch (Tray 2/Tray 3) The tray is not loaded with paper of the correct size or type. Do one of the following:... - Page 264 7. Troubleshooting • Change the paper settings. • Print by Form Feed (Change the tray). • Cancel the print job. • To change the paper settings, see p.94 "Specifying the Paper Settings using the Printer's Control Panel (Paper Input Menu)". Printing by Form Feed Press the [Form Feed] key, select the tray, and then print by Form Feed.
-
Page 265: Paper Size Mismatch/Paper Type Mismatch (Bypass Tray)
Status Monitor Errors Canceling the Print Job Cancel the print job. Press the [Job Reset] key. BUG134S Press the [#Enter] key. BUG161S Press the [#Enter] key. Paper Size Mismatch/Paper Type Mismatch (Bypass Tray) The tray is not loaded with paper of the correct size or type. Do one of the following: •... - Page 266 7. Troubleshooting Printing by Form Feed Press the [Form Feed] key, select the tray, and then print by Form Feed. Press the [Form Feed] key. BUG143S Press [ ] or [ ] key to select a paper tray, and then press the [#Enter] key. Print: Tray 1 ?: A4 (210 x 297) Print: Tray 1 ?:...
-
Page 267: Paper Size Mismatch/Paper Type Mismatch (Auto Tray Select)
Status Monitor Errors Press the [Job Reset] key. BUG134S Press the [#Enter] key. BUG161S Press the [#Enter] key. Paper Size Mismatch/Paper Type Mismatch (Auto Tray Select) The automatically detected tray is not loaded with paper of the correct size or type. Do one of the following: •... - Page 268 7. Troubleshooting Press the [Form Feed] key. BUG143S Press [ ] or [ ] key to select a paper tray, and then press the [#Enter] key. Print: Tray 1 ?: A4 (210 x 297) Print: Tray 1 ?: Plain Paper BUG161S Canceling the Print Job Cancel the print job.
-
Page 269: Cover Open
Status Monitor Errors Press the [Job Reset] key. BUG134S Press the [#Enter] key. BUG161S Press the [#Enter] key. Cover Open A cover is open. Make sure all covers are fully closed. If the cover is already closed, open and then reclose it. Follow the procedure below to close the cover. - Page 270 7. Troubleshooting Close the cover. Top cover BUG182S Left cover BUG156S Duplex unit cover BUG159S If the bypass tray is attached to the printer, switch the printer off and detach the bypass tray. Check that the duplex unit is correctly attached and the duplex unit cover is closed. •...
-
Page 271: Cover Open / Print Cartridge(S) Not Detected
Status Monitor Errors BUG142S • p.31 "Detaching and Reattaching the Multi Bypass Tray" • p.20 "Guide to Components" Cover Open / Print Cartridge(s) Not Detected The right front cover is open. Close the right front cover. Alternatively, the print cartridges are not installed or are installed incorrectly. - Page 272 7. Troubleshooting If the print cartridges are not installed or are installed incorrectly: While pressing the recessed area ( ) of the right front cover, open the cover ( ). BUG113S Push in the cartridge. BUG141S Close the right front cover. BUG115S •...
-
Page 273: Duplex Unit Not Detected
Status Monitor Errors Duplex Unit Not Detected The duplex unit is not attached correctly. Follow the procedure below to attach the duplex unit correctly. • If the bypass tray is attached to the printer, switch the printer off and detach the bypass tray. Without pressing the catches on its sides, push the duplex unit all the way in until it clicks into place. -
Page 274: Cartridge Almost Empty
7. Troubleshooting Cartridge Almost Empty One of the print cartridges is almost empty. Check which color print cartridge will soon have to be replaced, and then have a new cartridge handy. Checking ink colors • Checking using the Status monitor The illustration above indicates the cyan print cartridge is almost empty. -
Page 275: Cartridge Empty
Status Monitor Errors • Do not carry out head cleaning or head flushing. If you do, the ink may run out. • If you turn the power off and then back on, the printer will send the ink in the print cartridge to the printer. -
Page 276: Used Cartridge
7. Troubleshooting Checking the cartridge replacement indicators of the printer control panel BPR201S The illustration above indicates the control panel is indicating that the cyan Print cartridge has completely run out. • From left to right, the cartridge replacement indicators display the status of the black (K), cyan (C), magenta (M), and yellow (Y) Print cartridges. -
Page 277: Ink Collector Unit Not Detected
Status Monitor Errors Checking the cartridge replacement indicators of the printer control panel BPR220S The illustration above indicates the cyan print cartridge is empty. • Under this condition, the printer cannot carry out head cleaning or head flushing. • From left to right, the cartridge replacement indicators display the status of the black (K), cyan (C), magenta (M), and yellow (Y) Print cartridges. - Page 278 7. Troubleshooting While pressing the recessed area ( ) of the right front cover, open the cover ( ). BUG113S Attach the ink collector unit by pushing it in until it clicks. Take care not to spill the ink. Remove the ink collector unit only when necessary. BUG162S Close the right front cover.
-
Page 279: Ink Collector Unit Almost Full
Status Monitor Errors Ink Collector Unit Almost Full The ink collector unit is almost full. Have a new ink collector unit handy. Checking using the printer's control panel Prepare new Ink Collector Unit • If a print cartridge starts running out of ink when the ink collector unit is almost full, the alert indicator will flash and a message informing you of the cartridge's low ink level will appear on the control panel. -
Page 280: Out Of Printable Temperature Range
7. Troubleshooting Out of Printable Temperature Range Follow the procedure below to relocate the printer when the temperature inside the printer is inappropriate, extremely high or low, for printing. Turn the printer off. BUG118S Place the printer in a 10 to 32°C (50 to 89.6°F) environment. Turn the printer on. -
Page 281: Network Interface Error
Status Monitor Errors • If the error still does not clear after the printer acclimates to room temperature and the power is turned back on, contact your sales or service representative. Network Interface Error An error in the Ethernet port network function has occurred. Do the following: Turn the printer off. - Page 282 7. Troubleshooting Check the position of the envelope selector For envelopes, set the lever to the rear position ; for everything else, set the lever to the forward position BUG137S Check the printer driver settings In the application, open the printer properties dialog box. Click the [Setup] tab.
- Page 283 Status Monitor Errors Press the [Form Feed] key. BUG143S Press the [#Enter] key. BUG161S Canceling the Print Job Cancel the print job. Press the [Job Reset] key. BUG134S...
-
Page 284: Maintenance Failed
7. Troubleshooting Press the [#Enter] key. BUG161S Press the [#Enter] key. Maintenance Failed Head cleaning or head flushing has failed. The error is cleared when the following occur: • The printer receives another print job • Press the [#Enter] key Cannot Recover Error Page When the printer resumes printing after a paper jam has been cleared, some pages might be missing from the print job. - Page 285 Status Monitor Errors Press the [Form Feed] key. BUG143S Press the [#Enter] key. BUG161S Canceling the Print Job Cancel the print job. Press the [Job Reset] key. BUG134S...
- Page 286 7. Troubleshooting Press the [#Enter] key. BUG161S Press the [#Enter] key.
-
Page 287: Appendix
8. Appendix Updating the Firmware To update the printer and network interface board firmware, download the latest firmware from the website and installing it. • To check the current firmware version, print the system configuration page from the [List/Test Print] menu. -
Page 288: Checking The Current Printer Driver Version
8. Appendix Checking the Current Printer Driver Version Follow the procedure below to check the version of the printer driver currently installed. Open the printer properties dialog box. Click the [Setup] tab. Click [About]. The [About] dialog box appears. Check the version. Click [OK]. -
Page 289: Software On The Cd-Rom
Software on the CD-ROM Software on the CD-ROM This section describes the CD-ROM supplied with the printer. Files The following is a list of the files on the CD-ROM. File Name SETUP.EXE RPCS Raster Printer Driver for Windows 2000/XP/Vista and Windows Server 2003/2008 PCL 5c Printer Driver for Windows 2000/XP/Vista and Windows Server 2003/2008 PCL 6 Printer Driver for Windows 2000/XP/Vista and Windows Server 2003/2008 SmartDeviceMonitor for Client... -
Page 290: Pcl Printer Drivers
8. Appendix • The printer drivers do not support clustering technology under Windows 2000 and Windows Server 2003/2008. • For details about using the printer driver, see the printer driver Help. PCL Printer Drivers This section gives the file locations of the different PCL 5c printer drivers and their system requirements. These drivers allow your computer to communicate with this printer via a printer language. -
Page 291: Manuals (Html Files)
Software on the CD-ROM • Under Windows 2000/XP/Vista, and Windows Server 2003/2008, you can print over a peer-to- peer TCP/IP network. • You can monitor the printer status over a TCP/IP network. File Location SmartDeviceMonitor for Client is in the following folder on the supplied CD-ROM. Network\Devmon\Client\Disk1 •... -
Page 292: Cautions To Take When Using In A Network
8. Appendix Cautions to Take When Using in a Network Using DHCP This printer can be used in a DHCP environment. In a WINS server environment, the printer name can simultaneously be registered with a WINS server. • Supported DHCP server operating systems are: Windows 2000 Server, Windows Server 2003, Windows Server 2008, and UNIX standard. -
Page 293: Electromagnetic Interference
Electromagnetic Interference Electromagnetic Interference If another electronic device is placed next to the printer, each will influence the other negatively. In the case of a television or radio, noise may be generated. If this happens, do the following: • Move the television or radio as far as possible from the printer. •... -
Page 294: Specifications
8. Appendix Specifications Specifications of the printer and options are listed. Printer Body Print speed Measurements according to the manufacturer's measurement system Black draft: 30.0 ppm Color draft: 30.0 ppm Depending on the operating environment, printing may take longer than normal. Print direction Supports bidirectional, minimum distance printing Print resolution... - Page 295 Specifications Paper weight Tray 1/ optional tray: 60-157 g/m (16.0-42.0 lb.) Paper capacity Tray 1: 250 sheets Maximum paper capacity 1350 sheets (with the optional tray installed) Output ramp capacity 100 sheets The capacity may be less depending on the images printed. Power source 100-120V: 50/60Hz 1.2A (when fully equipped) 220-240V: 50/60Hz 0.6A (when fully equipped)
-
Page 296: Option (Paper Feed Unit)
8. Appendix Noise emission Sound Power Level Main unit only During Printing Quality priority : 62.7 dB(A) or less Speed priority : 66.7 dB(A) or less Standby 40 dB(A) or less Sound Pressure Level Main unit only During Printing Quality priority : 56.7 dB(A) or less Speed priority : 60.7 dB(A) or less Standby 34 dB(A) or less... -
Page 297: Option (Bypass Tray)
Specifications Glossy paper Paper weight 60-105 g/m (16.0-28.0 lb.) Paper capacity 500 sheets Option (Bypass tray) Multi Bypass Tray Type BY1000 Paper sizes A4 , A5 , A6 , B5 JIS , Letter (8 " × 11") , Legal (8 "... -
Page 298: List Of Printer Driver Functions (Windows/Macintosh)
8. Appendix List of Printer Driver Functions (Windows/ Macintosh) The following tables list the functions available under Mac OS X and their Windows printer driver equivalents. Paper source tray Windows Mac OS X Tray 1 Tray 1 Tray 2 Tray 2 Tray 3 Tray 3 Bypass Tray... - Page 299 List of Printer Driver Functions (Windows/Macintosh) Windows Mac OS X B1 JIS B2 JIS B3 JIS B4 JIS B5 JIS B5 JIS B6 JIS B6 JIS Letter Letter (US Letter) Legal Legal (US Legal) 12" ×18" " × 8 " "...
- Page 300 8. Appendix Windows Mac OS X DL Env. DL Env. (DL Envelope) Custom Paper Size Custom Paper Size The sizes shown in the brackets ( ) for Mac OS X are the sizes shown on the printer driver. Printout paper size Windows Mac OS X B5 JIS...
- Page 301 List of Printer Driver Functions (Windows/Macintosh) Windows Mac OS X Custom Size Custom Size The sizes shown in the brackets ( ) for Mac OS X are the sizes shown on the printer driver. Original orientation Windows Mac OS X Portrait Portrait (This function is provided by the operating system.)
- Page 302 8. Appendix Windows Mac OS X Send to Job Binding... Save as Overlay Data... Print to file Windows Mac OS X Available (This function is provided by the Available (Rendered as PDF, PostScript, This operating system.) function is provided by the operating system.) Print quality Windows Mac OS X...
- Page 303 List of Printer Driver Functions (Windows/Macintosh) Windows Mac OS X Text Text Thin lines Use error diffusion Use error diffusion Windows Mac OS X Available Available Color profile Windows Mac OS X Optimize color Presentation Presentation Photographic Photographic Text Text Gray reproduction Windows Mac OS X...
- Page 304 8. Appendix Contrast Windows Mac OS X Unavailable Saturation Windows Mac OS X Unavailable Color balance: Cyan Windows Mac OS X Unavailable Color balance: Magenta Windows Mac OS X Unavailable Color balance: Yellow Windows Mac OS X Unavailable Use ICM Windows Mac OS X Available...
- Page 305 List of Printer Driver Functions (Windows/Macintosh) Windows Mac OS X Pictures (Perceptual) Proof (Relative Colorimetric) Match (Absolute Colorimetric) Use ColorSync Windows Mac OS X Unavailable Unavailable Print as bitmap Windows Mac OS X Available Unavailable Change data processing Windows Mac OS X Available Unavailable Separate into CMYK, then print in designated color only...
- Page 306 8. Appendix Directional Magnification Windows Mac OS X Available Unavailable Layout Windows Mac OS X 2 pages per sheet (2-up) (left right) (Top 2 pages per sheet (2-up) (left right) (Top Bottom) Bottom) (This function is provided by the operating system.) 2 pages per sheet (2-up) (right left) 2 pages per sheet (2-up) (right left) (This function...
- Page 307 List of Printer Driver Functions (Windows/Macintosh) Windows Mac OS X 6 pages per sheet (6-up) (In columns starting on the right) (This function is provided by the operating system.) 9 pages per sheet (9-up) (In rows running left to 9 pages per sheet (9-up) (In rows running left to right) right) (This function is provided by the operating system.)
- Page 308 8. Appendix Windows Mac OS X Single Thin Line (This function is provided by the operating system.) Double Hairline (This function is provided by the operating system.) Double Thin Line (This function is provided by the operating system.) Poster Windows Mac OS X 1 page into 2 sheets Unavailable...
- Page 309 List of Printer Driver Functions (Windows/Macintosh) Booklet Windows Mac OS X Booklet 1 -Open to left Unavailable Booklet 1 -Open to right Booklet 2 -Open to left Booklet 2 -Open to right Specifying the long edge of custom-size paper Windows Mac OS X Available Available (This function is provided by the...
- Page 310 8. Appendix Watermarks: Bitmap Windows Mac OS X Available Unavailable Overlay Windows Mac OS X Available Unavailable Header/Footer Windows Mac OS X Available Unavailable Economy Color Windows Mac OS X Available Available Sheet-dry print delay in duplex Windows Mac OS X Available Available Mixed Original Orientations...
- Page 311 List of Printer Driver Functions (Windows/Macintosh) Use preprinted/prepunched paper Windows Mac OS X Available Unavailable Measurement Unit Windows Mac OS X Available Available (This function is provided by the operating system.) Uni-directional printing only Windows Mac OS X Available Unavailable Display Preview and Print screen Windows Mac OS X...
- Page 312 8. Appendix Windows Mac OS X Standard Dark Environment Settings Windows Mac OS X Available Unavailable Printable area Windows Mac OS X Regular Unavailable Enlarged Maximum...
-
Page 313: Information About Installed Applications
Information about Installed Applications Information about Installed Applications expat Use of the software installed on this product, including the controller (hereinafter "software") and the expat Version 1.95.2 application software (hereinafter "expat 1.95.2"), is subject to the following conditions: The product manufacturer provides warranty and support to the software of the product including expat 1.95.2 and the product manufacturer allows the initial developer of expat 1.95.2 to be free from these obligations. -
Page 314: Netbsd
8. Appendix RSA Data Security, Inc. makes no representations concerning either the merchantability of this software or the suitability of this software for any particular purpose. It is provided "as is" without express or implied warranty of any kind. These notices must be retained in any copies of any part of this documentation and/or software. NetBSD Copyright Notice of NetBSD For all users to use this product:... - Page 315 Information about Installed Applications Authors Name List All product names mentioned herein are trademarks of their respective owners. The following notices are required to satisfy the license terms of the software that we have mentioned in this document: • This product includes software developed by the University of California, Berkeley and its contributors. •...
-
Page 316: Original Ssleay License
8. Appendix Original SSLeay License Copyright (C) 1995-1998 Eric Young (eay@cryptsoft.com) All rights reserved. This package is an SSL implementation written by Eric Young (eay@cryptsoft.com). The implementation was written so as to conform with Netscapes SSL. This library is free for commercial and non-commercial use as long as the following conditions are aheared to. -
Page 317: Tcp/Ip
Information about Installed Applications LIABILITY, OR TORT (INCLUDING NEGLIGENCE OR OTHERWISE) ARISING IN ANY WAY OUT OF THE USE OF THIS SOFTWARE, EVEN IF ADVISED OF THE POSSIBILITY OF SUCH DAMAGE. The licence and distribution terms for any publically available version or derivative of this code cannot be changed. -
Page 318: Where To Inquire
8. Appendix Where to Inquire For inquiries, contact your sales or service representative. -
Page 319: Recommended Consumables
Recommended Consumables Recommended Consumables Consumables recommended for this printer are listed. Purchase necessary consumables before your supply runs out. For information about consumables, contact your sales or service representative. • Print cartridges • Ink Collector Unit... -
Page 320: Option And Consumables
8. Appendix Option and Consumables The following options can be used with the printer: • Paper Feed Unit TK1110 This unit feeds paper in bulk. • Multi Bypass Tray BY1000 You can also feed paper from the bypass tray. • For information about options and consumables, contact your service representative. -
Page 321: Index
INDEX Checking the Current Printer Driver Version..Checking the Number of Printed Pages from the About the Web Browser Help......Control Panel............About This Product........... Checking the Printer Status......... Adj.Paper Feed............ Checking the Printer Status and Settings using the Printer's Control Panel........... Alert indicator............ - Page 322 Displaying the [Maintenance Utility]....If Bidirectional Communication is Disabled..Displaying the Counter........If Test Print Fails........... Displaying the Page Setup dialog..... If You Cannot Remove Jammed Paper....Displaying the Print dialog......... Important Notice..........Displaying the Printer Driver Settings Dialog Boxes Information about Installed Applications..
- Page 323 Locking the Keys..........Opening Help............. Opening the Printer Properties Dialog Box..Opening the Printing Preferences Dialog Box..Machine Body............................Machine Rear............Operating System..........Maintenance Menu..........Option (Bypass tray)........... Making Printer Settings Using the Control Panel..Option (Paper Feed Unit)........................
- Page 324 Power key.............. Removing Paper Jammed under the Top Cover..................Print cartridge............Removing the User Guide........Print Cartridge End LED......... Replacing a Ink Collector Unit......Print Cartridge(s) Not Detected......Replacing a Print Cartridge....... 191, 193 Print results are not satisfactory......Restricting Printer Functions........
- Page 325 Top cover............... Where to Inquire..........Trademarks............... Tray 1..............Tray 2..............Tray 2 cover............Tray 3..............Tray 3 cover............Troubleshooting........... Two Types of Printer Properties Dialog Box..Unauthorized Copy Control....... Uninstalling............Uninstalling the Printer Driver....152, 210 Unlocking the Keys..........up arrow, down arrow keys......... Updating the Firmware........
- Page 326 MEMO J018-6620...
- Page 327 Copyright © 2009...
- Page 328 J018-6620...