Table of Contents
Advertisement
Available languages
Available languages
Quick Links
Advertisement
Table of Contents

Related Manuals for Anker EverFrost Powered Cooler 40


Summary of Contents for Anker EverFrost Powered Cooler 40
- Page 1 Live Charged. Anker EverFrost Powered Cooler 40 USER MANUAL...
- Page 2 English 日本語 Français...
-
Page 3: Important Safety Instructions
Do not modify or attempt to repair the appliance or the battery pack except as indicated in the instructions for use and care. Detachable Supply Unit GM95-145600-D The battery pack must be used with the Anker adapter (GM95-145600-D) for charging. • Suitable for camping. 01 EN... - Page 4 Do not expose the charger to rain, moisture, or snow. (3) Connect the equipment into an outlet on a circuit different from that to which the receiver is connected. To reduce the risk of damage to the cigarette lighter plug and cord, pull by plug rather than the cord when disconnecting the charger.
-
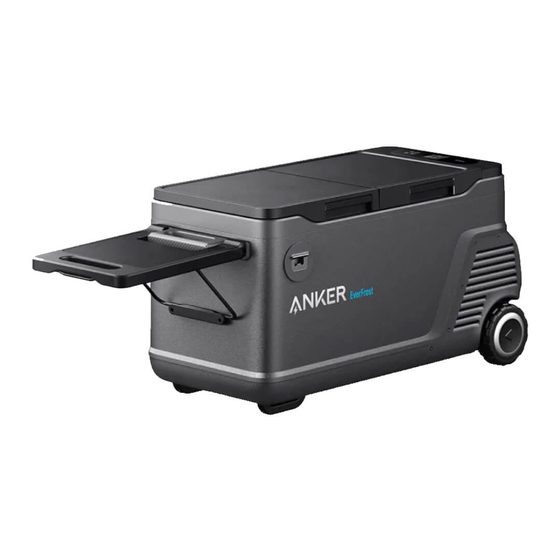
Page 5: What's In The Box
Bluetooth: The Bluetooth® word mark and logos are registered trademarks owned by the Bluetooth SIG, Inc. and any use of such marks by Anker Innovations Limited is under license. Other trademarks and trade names are those of their respective owners. -
Page 6: Lcd Screen
Powering Your Cooler LCD Screen We do not recommend using multiple charging methods at the same time. Without the Battery Input Port Temperature Bluetooth AC Power Temperature Unit Power the cooler by connecting to a wall outlet with the AC charging cable. Remaining Battery in Percentage (if using battery to power) Voltage Protection Level... - Page 7 Recharging via Solar Panel With the Battery Power the cooler by connecting the battery to a solar panel with an XT-60 to XT-60 cable. Input Port Input Port USB-C Recharging Power the cooler by connecting the battery to a wall outlet with the USB-C cable. AC Power Power the cooler by connecting to a wall outlet with the AC charging cable.
-
Page 8: Using Your Cooler
Using Your Cooler Installing the battery 1. Press the power button for two seconds to turn on your cooler. The LCD screen will light up. Press the snap-fi ts to remove the battery cover. Place the battery inside and you will hear a click when the installation is successful. -
Page 9: Setting The Temperature Unit
The Anker App for Smart Control Bluetooth You can remotely control your powered cooler using the Anker app. Please download the app and its Press the settings button for 2 seconds to turn on Bluetooth. The Bluetooth icon on the screen will fl ash. -
Page 10: Specifications
Middle East & Africa: +971 4242 8633 This Anker EverFrost Powered Cooler purchased on AnkerDirect and Anker authorized resellers to come with a limited warranty (“warranty”) as set out below. By using an Anker EverFrost Powered Cooler, you agree to be Valid Proof of Purchase bound by the terms of the Anker limited warranty. -
Page 11: Customer Service
* Please note that your rights under applicable law governing the sale of consumer goods remain una ected by the warranties given in this Limited Warranty. Lifetime technical support • Scan the QR code below to enter the smart self-service page for more information about your Anker EverFrost. support@anker.com support.mea@anker.com (For Middle East and Africa Only) - Page 12 等料金(リサイクル料金)をお支払いの上、対象品を販売店や、市町村に適正に引き渡すこ 能が損なわれる恐れがあり、保証の対象外となります。 とが求められています。 • 本製品の修理は、弊社より認定を受けた者によって行われる必要があります。本製品に不 詳しくは、下記のウェブサイトをご確認ください。 具合が生じた場合は、ご自身および第三者による修理を行わず、弊社カスタマーサポート 一般社団法人 家電製品協会:https://www.aeha.or.jp までお問い合わせください。 • 使用しない、または保守・点検お手入れする場合は製品の電源を切り、バッテリーを本体 ◆リチウムイオン蓄電池を廃棄する際のご注意 から抜いてください。また、電源コードをコンセント(シガーソケット)から抜いてくだ 本製品は、バッテリーにリチウムイオン蓄電池を使用しています。お住まいの自治体のルー さい。 ルに従って廃棄いただくか、お近くの Anker Store へご持参ください。 注意 警告:AC アダプタからバッテリーを充電する際は付属の AC アダプタのみをご使用ください。 DC 電源に接続されている場合、本製品の仕様に記載されている電圧を超えて充電しないで • お子様、精神的または身体的な障がいをお持ちの方、知識や経験に乏しい方が本製品をご ください。 使用になる場合は、本製品の安全な使い方を指導・説明できる方の監視のもとご使用くだ さい。 • お子様が本製品で遊ぶことがないようご注意ください。 警告:本製品を使用する際は、電源コードが挟まったり損傷したりしていないことを確認し てください。 • 損傷したコードやプラグを使用しないでください。説明書にしたがった正しい使用方法で 本製品が故障した場合は、カスタマーサポートまでお問合せください。 警告:本製品の近くで複数のコンセントまたはポータブル電源を使用しないでください。...
- Page 13 パッケージ内容 Bluetooth® のワードマークとロゴは、Bluetooth SIG, Inc. が所有する登録商標です。Anker Innovations Limited はライセンスに基づき、これらのマークの使用を許可されています。そ の他の商標および商標名は、それぞれの所有者に帰属します。 製造元: Anker Innovations Limited Room 1318-19, Hollywood Plaza, 610 Nathan Road, Mongkok, Kowloon, Hong Kong 本製品は、他の機器に組み込んで使用するものではありません。 収納バスケット Anker Detachable Battery Anker EverFrost Powered For Powered Cooler Cooler 40 シガーソケット充電ケーブル AC 充電ケーブル...
- Page 14 本製品への給電方法 液晶画面 同時に複数の充電を行うことはお勧めしません。 バッテリーを使用しない場合 Input Port 温度 Bluetooth コンセントからの給電 温度の単位 AC 充電ケーブルをコンセントに挿し込み、本製品と接続します。 バッテリー残量 (%) ( 電源の供給にバッ テリーを使用している場合 ) 電圧保護レベル シガーソケットからの給電 シガーソケット充電ケーブルを車のシガーソケットに挿し込み、本製品と接続します。 23 JP JP 24...
- Page 15 ソーラーパネルによる充電 バッテリーを使用する場合 XT-60 メスコネクタを備えたソーラーパネルに本製品を接続します。 Input Port Input Port USB-C ポートからの充電 USB-C ケーブルをコンセントに挿し込み、本製品と接続します。 コンセントからの給電 AC 充電ケーブルをコンセントに挿し込み、本製品と接続します。 Input Port シガーソケットからの給電 シガーソケット充電ケーブルを車のシガーソケットに挿し込み、本製品と接続します。 25 JP JP 26...
- Page 16 本製品の使用方法 バッテリーの取り付け 1. 電源ボタンを 2 秒間長押しして、本製品の電源をオンにします。電源がオンになると、液晶画面が点 左右にあるツメを押し下げながらバッテリーカバーを取り外します。バッテリーを中に入れ、カチッと 灯します。 音がするまで押し込みます。次に、バッテリーカバーを元に戻します。 2. フタを開けます。 3. 電源ボタンを 1 回押して、液晶画面を点灯させます。 バッテリーカバーは持ち上げると自動的に開きます。 27 JP JP 28...
- Page 17 10.4V 以下 11.3V 以上 21.9V 以下 22.9V 以上 車載バッテリーの電圧が本製品の取り外し可能バッテリーを使用した場合の設定値を下回ると、取り外 し可能バッテリーからの電源供給に切り替わります。 Bluetooth 接続 車載バッテリーの電圧が回復すると電源供給は再び車載バッテリーへと切り替わります。 設定ボタンを 2 秒間長押しすると、Bluetooth がオンになり、画面上の Bluetooth アイコンが点滅します。 Anker アプリによる操作 Bluetooth がオンになっているスマートフォンに自動的に接続され、Bluetooth アイコンが白く点灯しま す。 Anker アプリを使用して、本製品を遠隔操作することができます。Anker アプリの使用方法については、 以下 QR コードから Anker Japan 公式サイトをご確認ください。 12 時間接続されないと、Bluetooth 機能はオフになります。 29 JP JP 30...
- Page 18 製品の仕様 カスタマーサポート 庫内容積 43 L バッテリー容量 299.52Wh AC 入力電圧 100V-240V, 50Hz/60Hz 最大 2 年保証(通常 18 ヶ月、Anker Japan 公式サイト会員登録で 2 年に延長) AC 入力電力 最大 95W DC 入力 5.5A (12V) / 2.5A (24V) 定格電流 (AC) 1.2A - 0.7A テクニカルサポート 定格電流 (DC) 5.5A (12V) / 2.5A (24V) 発泡剤...
-
Page 19: Consignes De Sécurité Importantes
Attention • L’appareil ne doit pas être exposé à la pluie. Ne pas stocker de substances explosives telles que des bombes aérosols avec un propulseur Non autorisé à bord des avions. infl ammable dans cet appareil. AVERTISSEMENT : Lors du positionnement de l’appareil, s’assurer que le cordon d’alimentation Consignes de sécurité... - Page 20 Si cet équipement provoque des interférences nuisibles à La batterie doit être utilisée avec l’adaptateur Anker (GM95-145600-D) pour le chargement. la réception des signaux de radio ou de télévision, ce qui peut être détecté en mettant l’équipement Ne pas exposer le chargeur à...
-
Page 21: Contenu De La Boîte
Bluetooth: La marque verbale et les logos Bluetooth® sont des marques déposées appartenant à Bluetooth SIG, Inc. et toute utilisation de ces marques par Anker Innovations Limited se fait sous licence. Les autres marques et noms commerciaux sont ceux de leurs détenteurs respectifs. -
Page 22: Écran Lcd
Alimentation de votre glacière Écran LCD Il est déconseillé d’utiliser plusieurs méthodes de charge en même temps. Sans la batterie Input Port Température Bluetooth Alimentation CA Unité de température Pourcentage de batterie restante (en Alimentez la glacière en la connectant à une prise murale à l’aide du câble de charge CA. cas d’utilisation de la batterie pour Niveau de protection contre la surtension l’alimentation) - Page 23 Recharge par panneau solaire Avec la batterie Alimentez la glacière en connectant la batterie à un panneau solaire à l’aide d’un câble XT-60 à XT-60. Input Port Input Port Recharge par USB-C Alimentez la glacière en connectant la batterie à une prise murale à l’aide du câble USB-C. Alimentation CA Alimentez la glacière en la connectant à...
-
Page 24: Installation De La Batterie
Utilisation de votre glacière Installation de la batterie 1. Appuyez sur le bouton d’alimentation pendant deux secondes pour allumer votre glacière. L’écran LCD Appuyez sur les boutons-pression pour retirer le couvercle de la batterie. Placez la batterie à l’intérieur s’allume. et vous entendrez un clic lorsque l’installation est réussie. -
Page 25: Réglage De La Température
Il se connectera automatiquement à votre téléphone avec le Bluetooth activé, et l’icône deviendra blanche fi xe. Application Anker pour un contrôle intelligent Vous pouvez contrôler à distance votre glacière électrique à l’aide de l’application Anker. Veuillez télécharger l’application et son manuel d’utilisation en scannant ce code QR. -
Page 26: Spécifications
Veuillez vous référer au site : https://us.anker.com/policies/refund-policy Anker. La période de garantie commence à partir de la date d’achat. Cette page est jointe à la page de garantie Anker, et Anker se réserve le droit d’interprétation fi nale du contenu. La garantie limitée Anker est restreinte au pays d’achat. La garantie limitée est nulle et non avenue pour les articles emportés en dehors du pays où... -
Page 27: Service Clientèle
Enregistrez votre Anker EverFrost dès aujourd’hui Pourquoi s’enregistrer ? 1.Garantie sans tracas : Confi rmez la garantie limitée de 2 ans pour votre Anker EverFrost Powered Cooler et la garantie limitée de 3 ans pour le compresseur. 2.Service client rapide : Bénéfi ciez d’un service client exclusif et obtenez rapidement ce dont vous avez besoin.