
Related Manuals for Miracle-Ear MEEASE ITE


Summary of Contents for Miracle-Ear MEEASE ITE
- Page 1 MEEASY ITE, ITC & CIC ™ with Audiotone Pro Technology User Manual ® www.miracle-ear.com...
-
Page 2: Table Of Contents
Content Welcome Your hearing aids Hearing aid type Getting to know your hearing aids Components and names Controls Settings Batteries Battery size and handling tips Replacing batteries Daily use Turning on and off Inserting and removing the hearing aids Adjusting the volume Changing the hearing program Special listening situations On the phone... - Page 3 Further information Safety information Accessories Symbols used in this document Troubleshooting Service and warranty...
-
Page 4: Welcome
Welcome Thank you for choosing Miracle-Ear hearing aids to ® accompany you through everyday life. Like anything new, it may take you a little time to become familiar with them. This guide, along with support from your Hearing Care Specialist, will help you understand the advantages and greater quality of life your hearing aids offer. -
Page 5: Your Hearing Aids
Your hearing aids This user manual describes optional features that your hearing aids may or may not have. Ask your Hearing Care Specialist to indicate the features that are valid for your hearing aids. Hearing aid type Your hearing aids are customized models that have been individually manufactured based on the anatomy of your ears. -
Page 6: Components And Names
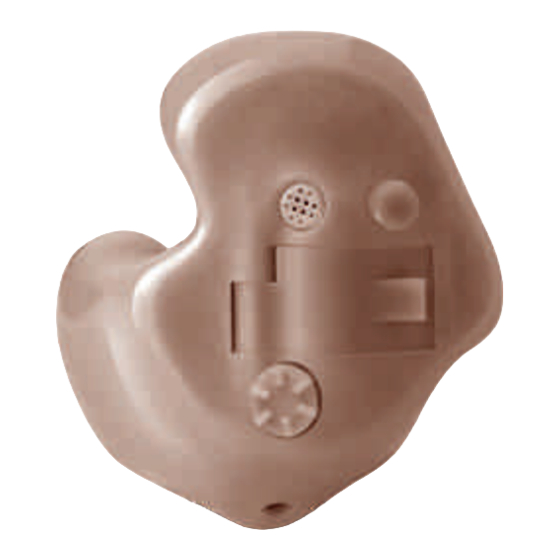
Components and names This user guide describes several types of hearing aids. Use the following pictures to identify the type of hearing aid that you use. Note that the push button, volume control wheel and vent are individually positioned on your hearing aid to best suit your ear. - Page 7 ITC (In The Canal) with controls ➊ Vent (optional) ➋ Volume control wheel (optional) ➌ Battery compartment ➍ Push button (optional) ➎ Microphone CIC (Completely In the Canal) ➊ ➊ Vent (optional) ➋ Battery compartment ➋ (with optional push button function) ➌...
-
Page 8: Controls
Controls With the controls you can, for example, adjust the volume or switch hearing programs. Your hearing aids either have a push button, a volume control wheel, or no control at all. For some hearing aids, the battery compartment also functions as a push button. Your Hearing Care Specialist has programmed your desired functions to the controls. - Page 9 Push button function Press briefly: Program change Press long: Standby/turn on L = Left, R = Right Volume control wheel function Increase volume: Rotate wheel forward. Decrease volume: Rotate wheel backward.
-
Page 10: Settings
Settings Hearing programs Read more in section “Changing the hearing program”. Features Power-on delay enables whistle-free insertion of hearing aids. Read more in section “Turning on and off”. A telecoil is built into the hearing aid, so it can connect with audio induction loops. Read more in section “Audio induction loops”. -
Page 11: Batteries
Batteries When the battery is low the sound becomes weaker or you will hear an alert signal. The battery type will determine how long you have to replace the battery. Battery size and handling tips Ask your Hearing Care Specialist for recommended batteries. -
Page 12: Replacing Batteries
Replacing batteries Removing the battery: Open the battery compartment. Remove the battery by hand. Inserting the battery: If the battery has a protective film, remove it only when you are ready to use the battery. Insert the battery with the “+”... -
Page 13: Daily Use
Daily use Turning on and off You have the following options to turn your hearing aids on or off. Via battery door: Turning on: Close the battery compartment. The default volume and hearing program are set. Turning off: Open the battery compartment fully. Via push button: Turning on or off: Press and hold the push button for several seconds. -
Page 14: Inserting And Removing The Hearing Aids
Inserting and removing the hearing aids Your hearing aids have been fine-tuned for your right and left ear. The color of the labeling on the hearing aids indicates the side: ● red labeling = right ear ● black or blue labeling = left ear Inserting a hearing aid: Carefully push the hearing aid into the ear canal. - Page 15 ● It may be helpful to insert the right hearing aid with the right hand and the left hearing aid with the left hand. ● If you have problems inserting the ear piece, use the other hand to gently pull your earlobe downwards.
- Page 16 Removing a hearing aid: NOTICE Never pull on the battery door or volume control wheel to remove the hearing aid. This could damage your hearing aid. Push lightly on the back of your ear to loosen the hearing aid. If your hearing aid is equipped with a removal cord, remove the hearing aid by pulling the removal cord towards the back of your head.
-
Page 17: Adjusting The Volume
Adjusting the volume Your hearing aids automatically adjust the volume to the listening situation. If you prefer manual volume adjustment, rotate the volume control wheel. Refer to section “Controls” for the settings of your controls. An optional signal tone can indicate the volume change. -
Page 18: Special Listening Situations
Special listening situations On the phone When you are on the phone, turn the receiver slightly so that it does not completely cover your ear. Telephone program You may prefer a certain volume when using the phone. Ask your Hearing Care Specialist to configure a telephone program. -
Page 19: Audio Induction Loops
Audio induction loops Some telephones and public places like theatres offer the audio signal via an audio induction loop. With this system, your hearing aids can directly receive the desired signal – without distracting noise in the environment. You can usually recognize audio induction loop systems by certain signs. -
Page 20: Maintenance And Care
Maintenance and care To prevent damage it is important that you take care of your hearing aids and follow a few basic rules, which will soon become a part of your daily routine. Hearing aids Drying and storage Dry your hearing aids overnight. Ask your Hearing Care Specialist for recommended drying products. -
Page 21: Professional Maintenance
Never use running water or immerse the devices in water. Never apply pressure while cleaning. Ask your Hearing Care Specialist for recommended cleaning products, special care sets, or more information on how to keep your hearing aids in good condition. Professional maintenance Your Hearing Care Specialist can perform a thorough professional cleaning and maintenance. - Page 22 Further information Safety information For more safety information, refer to the safety manual supplied with the device. Accessories The type of available accessories depends on the hearing aid type. An example is: a remote control. Consult your Hearing Care Specialist for further information.
- Page 23 Troubleshooting Problem and possible solutions Sound is weak. ● Increase the volume. ● Gently close the battery compartment completely. ● Clean the hearing aid. ● Replace the empty battery. ● Ask your Hearing Care Specialist to exchange the wax protection and/or the microphone cover. Hearing aid emits whistling sounds.
- Page 24 Problem and possible solutions Hearing aid does not work. ● Turn the hearing aid on. ● Gently close the battery compartment completely. ● Replace the empty battery. ● Make sure the battery is inserted correctly. ● Power-on delay is active. Wait several seconds and check again.
- Page 25 Service and warranty Serial numbers Left: Right: Service dates Warranty Date of purchase: Warranty period in months: Your Hearing Care Specialist...
- Page 29 MEEASY ITE, ITC & CIC ™ con tecnología Audiotone Pro Manual del usuario ® www.miracle-ear.com...
- Page 30 Contenidos Bienvenido Los audífonos Tipo de audífono La importancia de conocer el audífono Componentes y nombres Controles Configuración Pilas Tamaño de la pila y consejos para el manejo Sustituir las pilas Uso diario Conexión y desconexión Inserción y extracción de los audífonos Regulación del volumen Cambio del programa de audición Situaciones de escucha especiales...
- Page 31 Información adicional Información de seguridad Accesorios Símbolos utilizados en este documento Solución de problemas Servicio y garantía...
-
Page 32: Bienvenido
Bienvenido Gracias por elegir nuestros audífonos para que le acompañen en su vida cotidiana. Como todas las cosas nuevas, es posible que tarde un poco en familiarizarse con ellos. Este manual, junto con la asistencia de su especialista en audición, le ayudará a conocer las ventajas y la calidad de vida superior que le ofrecen los audífonos. -
Page 33: Los Audífonos
Los audífonos En este manual del operador se describen prestaciones opcionales que sus audífonos pueden tener o no tener. Solicite al especialista en audición que le indique qué prestaciones son válidas para sus audífonos. Tipo de audífono Los audífonos son modelos personalizados que se han fabricado específicamente para la anatomía de sus oídos. -
Page 34: Componentes Y Nombres
Componentes y nombres En este manual del operador se describen diversos tipos de audífonos. Utilice las imágenes siguientes para identificar su tipo de audífono. Tenga en cuenta que tanto el pulsador como la rueda de control de volumen y el respiradero están colocados individualmente en el audífono para adaptarse mejor a su oído. - Page 35 ITC (In The Canal) con controles ➊ Respiradero (opcional) ➋ Rueda de control de volumen (opcional) ➌ Compartimento de la pila ➍ Pulsador (opcional) ➎ Micrófono CIC (Completely In the Canal) ➊ ➊ Respiradero (opcional) ➋ Compartimento de la pila ➋...
-
Page 36: Controles
Controles Con los controles podrá, por ejemplo, ajustar el volumen o cambiar de programa de audición. Los audífonos poseen un pulsador, una rueda de control de volumen o bien no tienen controles. En algunos instrumentos, el compartimento de la pila también funciona como pulsador. - Page 37 Función del pulsador Si se pulsa brevemente: Cambio de programa Pulsación larga: En espera/Conectar L = izquierda, R = derecha Función de rueda de control de volumen Aumente el volumen: Girar rueda hacia delante. Disminuir volumen: Girar rueda hacia atrás.
-
Page 38: Configuración
Configuración Programas de audición Obtenga más información en la sección “Cambio del programa de audición”. Características El retardo de la conexión activa la inserción de audífonos sin silbidos. Obtenga más información en la sección “Conexión y desconexión”. En el audífono hay una bobina telefónica integrada de forma que pueda conectarse con bucles de inducción de audio. -
Page 39: Pilas
Pilas Cuando el nivel de la pila es bajo, el sonido se vuelve más débil o se oye una señal de alerta. El tipo de pila determinará el tiempo disponible hasta tener que sustituir la pila. Tamaño de la pila y consejos para el manejo Solicite las pilas recomendadas a su especialista en audición. -
Page 40: Sustituir Las Pilas
Sustituir las pilas Retirar la pila: Abra el compartimento de la pila. Extraiga la pila manualmente. Colocar la pila: Si la pila tiene una película protectora, retírela solo cuando vaya a utilizar la pila. Inserte la pila con el símbolo “+” hacia arriba. Cierre con cuidado el compartimento de la pila. -
Page 41: Uso Diario
Uso diario Conexión y desconexión Dispone de las siguientes opciones para conectar y desconectar los audífonos. Con el compartimento de la pila: Conexión: Cierre el compartimento de la pila. Se restablecen el volumen y el programa de audición predeterminados. Desconexión: Abra totalmente el compartimento de la pila. - Page 42 Al llevar los audífonos puestos, un tono de alerta puede indicar cuándo se conecta o se desconecta el audífono. Cuando se activa el retardo de la conexión, el audífono se conecta tras un retardo de varios segundos. Durante ese tiempo, podrá ponerse los audífonos en los oídos sin experimentar silbidos de retroalimentación desagradables.
-
Page 43: Inserción Y Extracción De Los Audífonos
Inserción y extracción de los audífonos Los audífonos se han ajustado para el oído derecho e izquierdo. El color de la etiqueta de los audífonos señala el lado al que corresponden: ● Etiqueta roja = Oído derecho ● Etiqueta negra o azul = Oído izquierdo Inserción de un audífono: Introduzca con cuidado el audífono en el... - Page 44 ● Puede resultarle útil insertar el audífono derecho con la mano derecha y el audífono izquierdo con la mano izquierda. ● Si tiene problemas para insertar el auricular, utilice la otra mano para tirar suavemente del lóbulo de la oreja hacia abajo. Esto abre el canal auditivo y facilita la inserción del auricular.
- Page 45 Extracción de un audífono: AVISO Nunca tire de la puerta del compartimento de la pila o de la rueda de control de volumen para extraer el audífono. Esto podría dañar el audífono. Empuje ligeramente tras la oreja para aflojar el audífono.
-
Page 46: Regulación Del Volumen
Regulación del volumen Los audífonos ajustan automáticamente el volumen a la situación auditiva. Si prefiere el ajuste manual del volumen, gire la rueda de control de volumen. Consulte la configuración de los controles en la sección “Controles”. Un tono de aviso opcional puede indicar el cambio de volumen. -
Page 47: Situaciones De Escucha Especiales
Situaciones de escucha especiales Al teléfono Cuando esté al teléfono, gire el receptor ligeramente para que no cubra la oreja por completo. Programa de teléfono Al utilizar el teléfono puede ser necesario un volumen determinado. Pregunte a su especialista en audición para configurar un programa de teléfono. -
Page 48: Bucles De Inducción De Audio
Bucles de inducción de audio Algunos teléfonos y lugares públicos como los teatros ofrecen la señal de audio (música y voz) a través de un bucle de inducción de audio. Con este sistema, los audífonos pueden recibir directamente la señal deseada, sin ruido ambiental molesto. -
Page 49: Mantenimiento Y Cuidados
Mantenimiento y cuidados Para evitar daños, es importante cuidar los audífonos y seguir unas reglas básicas que pronto se convertirán en parte de su rutina diaria. Audífonos Secado y almacenamiento Seque el audífono durante la noche. Pregunte a su especialista en audición sobre los productos de secado recomendados. -
Page 50: Mantenimiento Profesional
Los audífonos tienen una protección contra la cera. Esto evita que esta entre en el aparato. Tenga cuidado de no dañar la protección contra la cera al limpiar los audífonos. No utilice nunca agua corriente ni sumerja los dispositivos en agua. No aplique nunca presión durante la limpieza. - Page 51 Información adicional Información de seguridad Para obtener más información de seguridad, consulte el manual de seguridad suministrado con el dispositivo. Accesorios El tipo de accesorios disponibles depende del tipo de audífono. Como ejemplos: un telemando o una aplicación de smartphone para telemando. Si desea más información, consulte a su especialista en audición.
- Page 52 Solución de problemas Problema y posibles soluciones El sonido es débil. ● Suba el volumen. ● Cierre completamente el compartimento de la pila con suavidad. ● Limpie el audífono. ● Sustituya la pila descargada. ● Pida al especialista en audición que cambie la protección contra la cera o la cubierta del micrófono.
- Page 53 Problema y posibles soluciones El audífono no funciona. ● Conecte el audífono. ● Cierre completamente el compartimento de la pila con suavidad. ● Sustituya la pila descargada. ● Compruebe si la pila está bien colocada. ● El retardo de la conexión está activado. Espere unos segundos y vuelva a comprobarlo.
- Page 54 Servicio y garantía Números de serie Izquierda: Derecha: Fechas de servicio Garantía Fecha de compra: Período de garantía (meses): Su especialista en audición...
- Page 56 Information in this manual subject to change without notice. La información de este manual está sujeta a cambio sin previo aviso. Derechos de autor ©2020 Miracle-Ear, Inc. Hearing instrument made in China Instrumento de audición hecho en China 10954785 Rev 4 ©2020 Miracle-Ear, Inc.