Table of Contents
Advertisement
Available languages
Available languages
Quick Links
Advertisement
Chapters
Table of Contents

Related Manuals for Miracle-Ear GENIUS 2.0


Summary of Contents for Miracle-Ear GENIUS 2.0
- Page 1 GENIUS ™ Receiver-In-Canal Hearing Aid User Manual www.miracle-ear.com...
- Page 3 Welcome Thank you for choosing Miracle-Ear hearing aids to accompany you through everyday life. Like anything new, it may take you a little time to become familiar with them. This manual, along with support from your Hearing Care Specialist, will help you understand the advantages and greater quality of life your hearing aids offer.
-
Page 4: Table Of Contents
Content Your hearing aids Instrument type Getting to know your hearing aids Components and names Controls Settings Batteries Battery size and handling tips Replacing batteries Daily use Turning on and off Inserting and removing the hearing aid Adjusting the volume Changing the hearing program Special listening situations On the phone... - Page 5 Further information Wireless functionality Accessories Troubleshooting Service information Symbols used in this document Points out a situation that could lead to serious, moderate, or minor injuries. Indicates possible property damage. Advice and tips on how to handle your device better. Content...
-
Page 6: Your Hearing Aids
Your hearing aids This user manual describes optional features that your hearing aids may or may not have. Ask your Hearing Care Specialist to indicate the features that are valid for your hearing aid. Hearing aid type Your hearing aids are the RIC (Receiver-in-Canal) style. -
Page 7: Components And Names
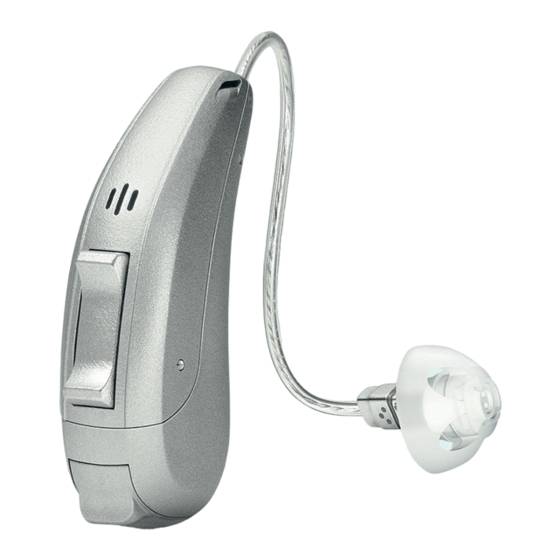
Components and names Ear piece Battery compartment Receiver (on/off) Receiver wire Side indicator (red = right ear, Microphone openings blue = left ear) Rocker switch (standard Receiver connection control), push button or no control (optional) Your hearing aids... - Page 8 You can use standard or custom-made ear pieces. Your Hearing Care Specialist will indicate your model. Standard ear pieces Size Click Dome single ™ (open or closed) Click Dome semi-open Click Dome double You can easily exchange the standard ear pieces. Read more in section “Maintenance and care.”...
-
Page 9: Controls
Controls With the controls you can, for example, adjust the volume or switch hearing programs. Your hearing aids either have a push button or a rocker switch – or no control at all. Your Hearing Care Specialist has programmed your desired functions to the controls. - Page 10 Push button function mini RIC Press <1 second: Program change Press 1-2 seconds: Standby/turn on L = Left, R = Right Push button function RIC Press <1 second: Program change Volume up Volume down Press 1-2 seconds: Standby/turn on L = Left, R = Right Your hearing aids...
-
Page 11: Settings
Rocker switch function Press <1 second: Program up/down Volume up/down Sound balance Press 1-2 seconds: Standby/turn on Program up/down Press >3 seconds: Standby/turn on L = Left, R = Right Settings Hearing programs Read more in section “Changing the hearing program. ” Your hearing aids... - Page 12 Features Power-on delay enables whistle-free insertion of hearing aids. Read more in section “Turning on and off.” AutoPhone automatically switches to the ™ telephone program when the telephone receiver approaches the ear. Read more in section “On the phone.” The wireless functionality enables simultaneous control of both hearing aids.
-
Page 13: Batteries
Batteries When the battery is low the sound becomes weaker or you will hear an alert signal. It depends on the battery type how long you have until you have to replace or recharge the battery. Battery size and handling tips Ask your Hearing Care Specialist for recommended batteries. -
Page 14: Replacing Batteries
Replacing batteries Removing the battery: Open the battery compartment. Use your finger to remove the battery. Or use a cleaning brush with magnet to pull out the battery. The cleaning brush with magnet is available as an optional accessory from your Hearing Care Specialist. Batteries... - Page 15 Inserting the battery: If the battery has a protective film, remove it only when you are ready to use the battery. Insert the battery with the “+” symbol facing up (refer to the picture). Carefully close the battery compartment. If you feel resistance, the battery is not inserted correctly.
-
Page 16: Daily Use
Daily use Turning on and off You have the following options to turn your hearing aids on or off. Via battery compartment: Turning on: Close the battery compartment. The default volume and hearing program are set. Turning off: Open the battery compartment to the first catch. - Page 17 Follow the instructions in the remote control's user manual. After turning on, the previously used volume and hearing program remain set. When wearing the hearing aids, an alert tone can indicate when an hearing aid is being turned on or off. When the power-on delay is activated, the hearing aids turn on after a delay of several seconds.
-
Page 18: Inserting And Removing The Hearing Aid
Inserting and removing the hearing aids Your hearing aids have been fine-tuned for your right and left ear. Colored markers indicate the side: red marker = right ear blue marker = left ear Inserting the hearing aid: Hold the receiver cable at the bend closer to the ear piece. - Page 19 CAUTION Risk of injury! Insert the ear piece carefully and not too deeply into the ear. It may be helpful to insert the right hearing aid with the right hand and the left hearing aid with the left hand. If you have problems inserting the ear piece, use the other hand to gently pull your earlobe downwards.
- Page 20 Removing the hearing aid: Lift the hearing aid and slide it over the top of your ear If your hearing aid is equipped with a custom shell or a Click Mold, remove it by pulling the small removal cord toward the back of your head.
-
Page 21: Adjusting The Volume
Adjusting the volume Your hearing aids automatically adjust the volume to the listening situation. If you prefer manual volume adjustment, press the push button or the rocker switch briefly, or use a remote control. Once the maximum or minimum volume has been reached, you may hear an optional signal tone. -
Page 22: Changing The Hearing Program
Changing the hearing program Depending on the listening situation, your hearing aids automatically adjust their sound. Your hearing aid may also have several hearing programs which allow you to change the sound, if needed. An optional signal tone can indicate the program change. -
Page 23: Special Listening Situations
Special listening situations On the phone When you are on the phone, hold the telephone receiver slightly above your ear. The hearing aid and telephone receiver have to be aligned. Turn the receiver slightly so that the ear is not completely covered. - Page 24 Not all telephones produce a magnetic field strong enough to activate the AutoPhone function. In this case, you can use the Miracle-Ear Phone Surround magnet, which is available as an accessory, and attach it to the telephone receiver.
-
Page 25: Audio Induction Loops
Audio induction loops Some telephones and public places like theatres offer the audio signal (music and speech) via an audio induction loop. With this system, your hearing aids can directly receive the desired signal – without distracting noise in the environment. You can usually recognize audio induction loop systems by certain signs. -
Page 26: Maintenance And Care
Maintenance and care To prevent damage it is important that you take care of your hearing aids and follow a few basic rules, which will soon become a part of your daily routine. Hearing aids Drying and storage Dry your hearing aids overnight. Ask your Hearing Care Specialist for recommended drying products. - Page 27 Ask your Hearing Care Specialist for recommended cleaning products, special care sets, or more information on how to keep your hearing aids in good condition. Cleaning instruction for standard and custom made earpieces Cerumen (ear wax) on the earpiece may affect sound quality.
-
Page 28: Exchanging Ear Pieces
For Click Domes: Squeeze the tip of the dome. Exchanging ear pieces Exchange standard ear pieces like your click domes, when showing any signs of wear such as cracking or discomfort approximately every three months. Replace them sooner if you notice cracks or other changes. The procedure for exchanging depends on the type of ear piece. - Page 29 Exchanging Click Domes If you have problems removing the old Click Dome, use the removal tool or follow the instructions on the packaging of the Click Domes: The removal tool is available as an accessory that is available from your Hearing Care Specialist. Take particular care that the new Click Dome clicks noticeably in place.
-
Page 30: Replacing The Minireceiver 2.0
Replacing the miniReceiver 2.0 The miniReceiver 2.0 is easily exchangeable. To replace the miniReceiver, use the exchange tool to open and close the locking bar for reliable securing and no risk of dislodgement. Open the locking bar R emove / Insert the u miniReceiver. -
Page 31: Professional Maintenance
C lose the locking bar. u Professional maintenance Your Hearing Care Specialist can perform a thorough professional cleaning and maintenance. Custom-made ear pieces and wax filters should be exchanged as needed by a specialist. Ask you Hearing Care Specialist for your individual recommendation of maintenance intervals and for support. -
Page 32: Further Information
Further information Wireless functionality Your hearing aids may be equipped with wireless functionality. This provides synchronization between your two hearing aids: If you change the program or volume on one hearing aid, the other one is automatically changed, too. Both hearing aids automatically adapt to the listening situation simultaneously. -
Page 33: Troubleshooting
Troubleshooting Problem and possible solutions Sound is weak. Increase the volume. Replace the empty battery. Clean or exchange the ear piece. Hearing aid emits whistling sounds. Reinsert the ear piece until it fits securely. Decrease the volume. Clean or exchange the ear piece. Sound is distorted. - Page 34 Problem and possible solutions Hearing aid does not work. Turn the hearing aid on. Gently close the battery compartment completely. Replace the empty battery. Make sure the battery is inserted correctly. Power-on delay is active. Wait several seconds and check again. Consult your Hearing Care Specialist if you encounter further problems.
-
Page 35: Service Information
Service information Serial numbers Receiver Type Left: Right: Service dates Your Hearing Care Specialist Date of purchase: Further information... - Page 39 GENIUS ™ Instrumentos de audición con receptor en el conducto Manual de usuario www.miracle-ear.com...
- Page 41 Bienvenido Gracias por elegir los instrumentos de audición de Miracle-Ear para acompañarle durante la vida diaria. Como con cualquier otra cosa nueva, puede llevarle un tiempo familiarizarse con ellos. Esta guía, junto con el apoyo de un profesional de atención de la audición, le ayudará a comprender las ventajas y la mayor calidad de vida que ofrecen los instrumentos de audición.
- Page 42 Contenido Sus instrumentos de audición Tipo de instrumento Conozca sus instrumentos de audición Nombres y componentes Controles Configuración Baterías Tamaño de la batería y sugerencias de manejo 11 Reemplazo de las baterías Uso diario Encendido y apagado Colocación y extracción del instrumento de audición Ajuste del volumen Cambio del programa de audición...
- Page 43 Más información Funcionalidad inalámbrica Accesorios Solución de problemas Información de servicio Símbolos utilizados en este documento Señala una situación que podría resultar en lesiones menores, moderadas o graves. Indica posibles daños materiales. Consejos y sugerencias sobre cómo manejar mejor el dispositivo. Contenido...
-
Page 44: Sus Instrumentos De Audición
Sus instrumentos de audición Esta guía del usuario describe funciones opcionales que podrían estar presentes o no en sus instrumentos de audición. Pídale a su profesional de atención de la audición que le indique las funciones que sean válidas para el instrumento de audición. -
Page 45: Nombres Y Componentes
Si tiene problemas al presionar los controles de los instrumentos de audición mientras los usa, puede preguntar a su profesional de atención de la audición acerca de la opción de control remoto. Nombres y componentes ➏ Auriculares Compartimento de la batería Receptor (encendido/ ➌... - Page 46 Puede usar auriculares estándar o hechos a medida. Su profesional de atención de la audición le indicará el modelo. Auriculares estándar Tamaño Click Dome sencillo ™ (abierto o cerrado) Encastre de los domos semiabierto Encastre de los domos doble Puede intercambiar los auriculares estándar fácilmente.
-
Page 47: Controles
Controles Con los controles puede, por ejemplo, ajustar el volumen o cambiar los programas de audición. Los instrumentos de audición cuentan con un botón interruptor o con un interruptor de balancín, o puede que no cuenten con ningún control. Su profesional de atención de la audición ha programado las funciones deseadas para los controles. - Page 48 Función del botón interruptor del mini RIC Izq. Der. Presione por menos de 1 segundo: Cambio de programa Presione por 1 o 2 segundos: En espera/encendido Izq = Izquierda, Der = Derecha Función del botón interruptor RIC Izq. Der. Presione por menos de 1 segundo: Cambio de programa Subir el volumen Bajar el volumen...
-
Page 49: Configuración
Función del interruptor de balancín Izq. Der. Presione por menos de 1 segundo: Subir/bajar programa Subir/bajar volumen Equilibrio de sonido Presione por 1 o 2 segundos: En espera/encendido Subir/bajar programa Presione por más de 3 segundos: En espera/encendido Izq = Izquierda, Der = Derecha Configuración Programas de audición Obtenga más información en la sección “Cambio del... - Page 50 Funciones Demora en el encendido permite la inserción sin silbidos de los instrumentos de audición. Obtenga más información en la sección “Encendido y apagado”. AutoPhone cambia, automáticamente, al ™ programa telefónico cuando el receptor telefónico se acerca a la oreja. Obtenga más información en la sección “Al usar el teléfono”.
-
Page 51: Baterías
Baterías Cuando la batería está baja, el sonido se vuelve más débil o escuchará una señal de alerta. Depende del tipo de batería y de cuánto tiempo tiene hasta que deba reemplazarla o recargarla. Tamaño de la batería y sugerencias de manejo Solicite las baterías recomendadas a su profesional de atención de la audición. -
Page 52: Reemplazo De Las Baterías
Reemplazo de baterías Extracción de la batería: Abra el compartimento de la batería. Usa tu dedo para quitar la batería. O utilice un cepillo para limpiar con imán para sacar la batería. El cepillo para limpiar con imán está disponible como accesorio opcional con su profesional de atención de la audición. - Page 53 Colocación de la batería: Si la batería tiene una película protectora, retírela solo cuando esté listo para usar la batería. Inserte la batería con el símbolo “+” mirando hacia arriba (consulte la imagen). Cierre con cuidado el compartimento de la batería. Si siente resistencia, la batería no se insertó...
-
Page 54: Uso Diario
Uso diario Encendido y apagado Usted cuenta con las siguientes opciones para encender o apagar los instrumentos de audición. Mediante el compartimento de la batería: Encendido: Cierre el compartimento de la batería. Se configuran el volumen y el programa de audición predeterminados. - Page 55 Luego del encendido, el volumen y el programa de audición usados anteriormente permanecen configurados. Mediante el control remoto: Siga las instrucciones que se encuentran en la guía de usuario del control remoto. Luego del encendido, el volumen y el programa de audición usados anteriormente permanecen configurados.
-
Page 56: Colocación Y Extracción Del Instrumento De Audición
Colocación y extracción del instrumento de audición Los instrumentos de audición han sido bien sintonizados para sus oídos derecho e izquierdo. Los marcadores de colores indican el lado: marcador rojo= oído derecho marcador azul= oído izquierdo Colocación del instrumento de audición: Mantenga el cable receptor en la curva más cercana a los auriculares. - Page 57 PRECAUCIÓN ¡Peligro de lesión! Colóquese con cuidado los auriculares en el oído y no muy profundamente. Puede ser útil colocar el instrumento de audición derecho con la mano derecha y el instrumento de audición izquierdo con la mano izquierda. Si tiene problemas al colocar los auriculares, use la otra mano para tirar, suavemente, la parte inferior del lóbulo.
- Page 58 Extracción del instrumento de audición: Levante el instrumento de audición y deslícelo por la parte superior del oído . Si el instrumento de audición está equipado con una carcasa personalizada o con un Click Mold, retírelo estirando la cuerda de extracción pequeña hacia la parte posterior de la cabeza.
-
Page 59: Ajuste Del Volumen
Ajuste del volumen Los instrumentos de audición ajustan, automáticamente, el volumen a la situación auditiva. Si prefiere un ajuste de volumen manual, presione, brevemente, el botón interruptor o el interruptor de balancín, o use un control remoto. Una vez alcanzado el volumen máximo o mínimo, podrá... -
Page 60: Cambio Del Programa De Audición
Cambio del programa de audición Dependiendo de la situación auditiva, los instrumentos de audición ajustan, automáticamente, el sonido. El instrumento de audición también podría contar con varios programas de audición que le permiten cambiar el sonido, si es necesario. Una tono de señal opcional puede indicar el cambio del programa. -
Page 61: Situaciones Auditivas Especiales
Situaciones especiales de escucha Al usar el teléfono Cuando esté hablando por teléfono, mantenga el receptor del teléfono, levemente, por encima de la oreja. El instrumento de audición y el receptor del teléfono deben estar alineados. Gire, levemente, el receptor para que la oreja no esté... - Page 62 AutoPhone. En este caso, puede usar el imán Phone Surround de Miracle-Ear, que está disponible como accesorio, y adjuntarlo al receptor del teléfono. AVISO Use solo el imán aprobado por Phone Surround.
-
Page 63: Bucles De Inducción De Audio
Bucles de inducción de audio Algunos teléfonos y lugares públicos, como los teatros, ofrecen una señal de audio (música y habla) mediante un bucle de inducción de audio. Con este sistema, los instrumentos de audición pueden recibir, directamente, la señal deseada en el ambiente, sin ruidos que puedan distraerlo. -
Page 64: Mantenimiento Y Cuidado
Mantenimiento y cuidado Para evitar daños, es importante que cuide los instrumentos de audición y que siga algunas reglas básicas, que pronto se convertirán en parte de su rutina diaria. Instrumentos de audición Secado y almacenamiento Seque los instrumentos de audición durante la noche. Solicite a su profesional de atención de la audición los productos recomendados para secar. - Page 65 Solicite a su profesional de atención de la audición productos de limpieza recomendados, conjuntos de cuidados especiales o más información sobre cómo mantener los instrumentos de audición en buenas condiciones. Instrucciones de limpieza para los auriculares estándar y hecho a medida El cerumen (cera de los oídos) en los auriculares puede afectar la calidad del sonido.
-
Page 66: Intercambio De Los Auriculares
Para los encastres de los domos: Apriete la punta del domo. Intercambio de los auriculares Aproximadamente cada tres meses, intercambie los auriculares estándar como los encastres de los domos cuando vea signos de desgaste, como incomodidad o grietas. Reemplácelos antes si nota grietas u otros cambios. - Page 67 Intercambio del encastre de los domos Si tiene problemas para retirar el encastre del domo antiguo, use la herramienta de extracción o siga las instrucciones que se encuentran en el paquete del encastre de los domos: Su profesional de atención de la audición tiene disponible como un accesorio la herramienta de extracción.
-
Page 68: Reemplazo De La Unidad De Recepción Minireceiver
Reemplazo de la unidad de recepción miniReceiver 2.0 La unidad miniReceiver 2.0 es fácilmente intercambiable. Para reemplazar la unidad de recepción miniReceiver, use la herramienta de intercambio, y abra y cierre la barra de bloqueo para asegurarla y no correr el riesgo de que se desprenda. -
Page 69: Mantenimiento Profesional
C ierre la barra de bloqueo. u Mantenimiento profesional Su profesional de atención de la audición puede realizar un completo mantenimiento y limpieza profesional. Un profesional debe intercambiar los auriculares hechos a medida y los filtros de cera, según sea necesario. -
Page 70: Más Información
Información adicional Funcionalidad inalámbrica Es posible que su instrumento de audición tenga funcionalidad inalámbrica. Esto proporciona una sincronización entre los dos instrumentos de audición: Si cambia el programa o el volumen de un instrumento, el otro también cambia automáticamente. Ambos instrumentos de audición se adaptan de forma simultánea a la situación auditiva. -
Page 71: Solución De Problemas
Solución de problemas Problema y posibles soluciones El sonido es débil. Aumente el volumen. reemplace la batería emtpy. Limpie o intercambie los auriculares. El instrumento de audición emite sonidos de silbido. Vuelva a insertar los auriculares hasta que encajen de manera segura. Reduzca el volumen. - Page 72 Problema y posibles soluciones El instrumento de audición no funciona. Encienda el instrumento de audición. Cierre suave y completamente el compartimento de la batería. reemplace la batería emtpy. Asegúrese de que la batería esté colocada correctamente. La demora en el encendido está activa. Espere algunos segundos y vuelva a verificar.
-
Page 73: Información De Servicio
Información de servicio Números de serie Tipo de receptor Izquierdo: Derecho: Fechas de servicio Su profesional de atención de la audición Fecha de compra: Información adicional... - Page 76 Information in this manual subject to change without notice. La información de este manual está sujeta a cambio sin previo aviso. Derechos de autor ©2018 Miracle-Ear, Inc. Hearing instrument made in Singapore Instrumento de audición hecho en Singapur 10537360 Rev E ©2018 Miracle-Ear, Inc.