Table of Contents
Advertisement
Available languages
Available languages
Quick Links
Advertisement
Chapters
Table of Contents

Related Manuals for Miracle-Ear GO Remote


Summary of Contents for Miracle-Ear GO Remote
- Page 1 GO Remote User Manual www.miracle-ear.com...
-
Page 2: Table Of Contents
Content Your remote control Components Key lock Pairing hearing aids Function overview Further information Cleaning Replacing the battery Troubleshooting... - Page 3 Service Adjusting the signal strength Important safety information Personal safety Product safety Important information Intended use Symbols Operating, transport, and storage conditions Disposal information...
-
Page 5: Your Remote Control
Your remote control GO Remote is a remote control for hearing aids. It works with specific Miracle-Ear hearing aids. Your Hearing Care Specialist will consult with you on the compatible models. CAUTION Read this user manual thoroughly and completely and follow the safety information in this document to... -
Page 6: Components
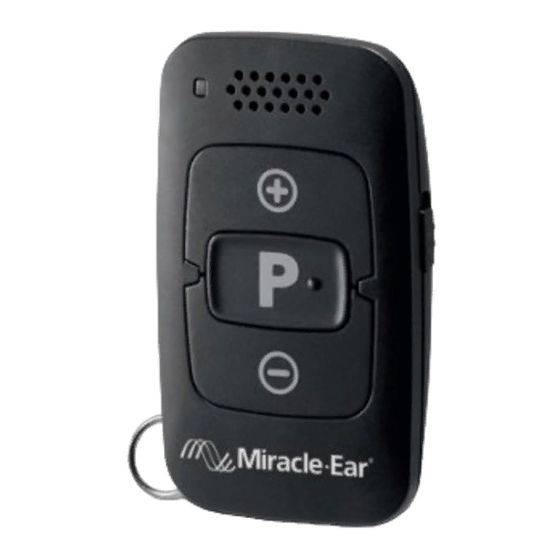
Components Status LED Volume buttons Keyring Key lock switch Program change button... -
Page 7: Key Lock
Key lock To prevent any accidental operation while the remote control is in a pocket or bag, move the key lock switch to the lock position (red color visible). When the key lock is active, all buttons on the remote control are disabled. -
Page 8: Pairing Hearing Aids
Pairing hearing aids Your hearing aids need to be paired with your remote control. After that, the pairing is saved in the hearing aids and remembered each time they are turned on. Lock the remote control (red color visible). First turn the hearing aids off: Open the battery compartments. - Page 9 Then turn the hearing aids on: Close the battery compartments. If your hearing aids do not have a battery compartment, turn them on as described in the hearing aids' user manual. The hearing aids are now in pairing mode. You have 3 minutes to complete the pairing. Follow the steps on the next page.
- Page 10 Insert the hearing aids into your ears. Hold down the button on the remote control while switching the key lock to the unlock position (green color visible). Release the button. The remote control is now in setup mode, the LED will be on. While the remote control is in setup mode, do not press .
- Page 11 Hold down the button until the pairing confirmation sound is played in the hearing aids. It takes approximately 2 seconds for the sound to start playing. Ensure that the confirmation sound is heard in both hearing aids. When heard, the pairing will be complete. The remote control will remain in setup mode for an additional 30 seconds.
- Page 12 When pairing is finished, the remote control is ready for use. Ensure that it is unlocked (green color visible). If the hearing aids could not be paired, refer to the “Troubleshooting” section.
-
Page 13: Function Overview
Function overview Function Description Volume Press once to adjust the volume one level at a time. Or, press and hold until desired volume is reached. Hearing short press program Switches to the next hearing program. - Page 14 Function Description Turn on/off long press (2 seconds) (standby) Turns your hearing aids on or off. Reset long press (2 seconds) Switches to hearing program 1 and sets the default volume level.
-
Page 15: Further Information
Further information Cleaning NOTICE Do not put your remote control in water! Do not clean your remote control with alcohol or benzine. Clean the remote control as necessary with a dry or slightly damp soft cloth. Use only distilled water to dampen the cloth. Avoid any cleaning agents. -
Page 16: Replacing The Battery
Replacing the battery The remote control uses a CR 2450 button cell battery. Slide the battery compartment cover in the direction of the arrow Remove the empty battery by pulling the removal flap... - Page 17 Insert the battery with the "+" symbol facing up: Slide it under the holder, then push it down.
- Page 18 Attach the cover by sliding it onto the remote control.
- Page 19 The pairing status is remembered by the remote control when replacing the battery. There is no need to pair the hearing aids again after battery replacement.
-
Page 20: Troubleshooting
Troubleshooting If the remote control does not work: ● Ensure that the battery is inserted correctly. Refer to section “Replacing the battery.” ● Ensure that the keys are not locked. Refer to section “Key lock.” ● Ensure that there is nothing between the hearing aids and the remote control. - Page 21 ● Ask your Hearing Care Specialist if this remote control is compatible with your hearing aids. If the hearing aids cannot be paired: ● Increase the signal strength. Refer to section “Adjusting the signal strength.” ● Pair the hearing aids again. Refer to section “Pairing hearing aids.”...
-
Page 22: Service
If the LED is no longer activating: ● Ensure that the keys are not locked. Refer to section “Key lock.” ● The battery may be low. Replace the empty battery. Consult your Hearing Care Specialist if you encounter further problems. Service If you have technical problems with the device, consult your Hearing Care Specialist for service purposes. -
Page 23: Adjusting The Signal Strength
Adjusting the signal strength The remote control works by emitting a high-frequency audio signal. This signal may be heard by some people. Two signal strength levels of the control signal are available. By default, the remote control uses the strongest setting to ensure a reliable connection with your hearing aids. - Page 24 Release the button. The remote control is now in setup mode, the LED will be on and the signal strength can now be changed. To switch to the lowest signal strength, press until the LED flashes slowly. To switch to the strongest signal strength, press until the LED flashes quickly.
-
Page 25: Important Safety Information
Important safety information Personal safety WARNING Choking hazard! Your device contains small parts which can be swallowed. Keep hearing aids, batteries and accessories out of reach of children and cognitively impaired persons. If parts have been swallowed consult a physician or hospital immediately. - Page 26 WARNING Risk of injury! Do not use obviously damaged devices and return them to point of sale. WARNING Note that any unauthorized changes to the product may cause damage to the product or cause injury. Use only approved parts and accessories. Ask your Hearing Care Specialist for support.
-
Page 27: Product Safety
WARNING Risk of explosion! Do not use your remote control in explosive atmospheres (e. g. in mining areas). Product safety NOTICE Protect your hearing aids and accessories from extreme heat. Do not expose them to direct sunlight. NOTICE Protect your hearing aids and accessories from high humidity. - Page 28 NOTICE Do not dry your hearing aids and accessories in the microwave oven. NOTICE Different types of strong radiation, e. g. during X-ray or MRI head examinations, may damage hearing aids and accessories. Do not use the devices during these or similar procedures.
- Page 29 NOTICE Your remote control is programmed to exclusively communicate with your hearing aids. If you experience problems with another person's remote control, consult your Hearing Care Specialist.
-
Page 30: Important Information
Important information Intended use The remote control is intended to operate hearing aids. Use the remote control only as described in this user manual. This device is not intended for use and operation by children under the age of 12 years or persons with a developmental age of under 12 years. -
Page 31: Symbols
Symbols Symbols used in this document Points out a situation that could lead to serious, moderate, or minor injuries. Indicates possible property damage. Advice and tips on how to handle your device better. - Page 32 Symbols on device or packaging Read and follow the instructions in the user guide. Do not dispose of the device with household waste. Refer to section "Disposal information".
-
Page 33: Operating, Transport, And Storage Conditions
Operating, transport, and storage conditions Operating conditions Temperature 32 to 113 °F Relative humidity 5 to 93 % During extended periods of transport and storage, please observe the following conditions: Storage Transport Temperature 50 to 104 °F -4 to 140 °F Relative humidity 10 to 80 % 5 to 90 %... -
Page 34: Disposal Information
Disposal information NOTICE Recycle hearing aids, accessories and packaging according to national regulations. NOTICE To avoid environmental pollution, do not throw batteries into household trash. Recycle or dispose of batteries according to national regulations or return them to your Hearing Care Specialist. - Page 37 GO Remote Manual de usuario www.miracle-ear.com...
- Page 38 Contenidos Telemando Componentes Bloqueo de teclas Emparejamiento de audífonos Vista general de las funciones Información adicional Limpieza Cambio de la pila Solución de problemas Servicio técnico Ajuste de la intensidad de la señal...
- Page 39 Información importante de seguridad Seguridad personal Seguridad del producto Información importante Uso previsto Símbolos Condiciones de manejo, transporte y almacenamiento Información sobre la eliminación...
-
Page 41: Telemando
Telemando GO Remote es un telemando para audífonos. Funciona con nuestros audífonos específicos. Su especialista en audición le informará sobre los modelos compatibles. ATENCIÓN Lea este manual del operador por completo y a fondo, y siga la información de seguridad incluida... -
Page 42: Componentes
Componentes LED de estado Botones de volumen Llavero Interruptor de bloqueo de teclas Botón de cambio de programa... -
Page 43: Bloqueo De Teclas
Bloqueo de teclas Para evitar la manipulación accidental del telemando cuando lo lleve en un bolsillo o en el bolso, ponga el interruptor de bloqueo de teclas en la posición de bloqueo (el color rojo quedará visible). Cuando el bloqueo de teclas está activo, todos los botones del telemando están desactivados. -
Page 44: Emparejamiento De Audífonos
Emparejamiento de audífonos Los audífonos tienen que emparejarse con el telemando. Una vez realizado, el emparejamiento queda guardado en los audífonos y se recupera cada vez que estos se conectan. Bloquee el telemando (el color rojo quedará visible). En primer lugar, desconecte los audífonos: Abra los compartimentos de la pila. - Page 45 A continuación, vuélvalos a conectar: Cierre los compartimentos de la pila. Si sus audífonos no tienen compartimento para la pila, conéctelos tal como se describe en el manual del operador de los audífonos. Los audífonos ahora están en modo de emparejamiento. Tiene 3 minutos para efectuar el emparejamiento.
- Page 46 Colóquese los audífonos en los oídos. Mantenga pulsado el botón del telemando mientras cambia el bloqueo de teclas a la posición de desbloqueo (el color verde quedará visible). Suelte el botón . El telemando ahora está en modo de configuración; el LED se encenderá.
- Page 47 Mantenga pulsado el botón hasta que se reproduzca el sonido de confirmación del emparejamiento en los audífonos. El sonido tarda aproximadamente 2 segundos en empezar a reproducirse. Asegúrese de que el sonido de confirmación se oiga en los dos audífonos. Cuando lo oiga, el emparejamiento se habrá...
- Page 48 Cuando el emparejamiento haya finalizado, el telemando estará listo para utilizarse. Asegúrese de que esté desbloqueado (el color verde quedará visible). Si no se han podido emparejar los audífonos, consulte la sección “Solución de problemas.”...
-
Page 49: Vista General De Las Funciones
Vista general de las funciones Función Descripción Volumen Pulse una vez para subir o bajar el volumen un nivel. O bien, pulse y mantenga pulsado el botón hasta alcanzar el volumen deseado. Programa de Pulsación breve de audición Cambia al siguiente programa de audición. - Page 50 Función Descripción Encender/apagar Pulsación larga de (espera) (2 segundos) Enciende o apaga los audífonos. Reiniciar Pulsación larga de (2 segundos) Cambia al programa de audición 1 y establece el nivel de volumen predeterminado.
-
Page 51: Información Adicional
Información adicional Limpieza AVISO No sumerja el telemando en agua. No limpie el telemando con alcohol ni con bencina. Limpie el telemando cuando sea necesario con un paño suave seco o un poco húmedo. Utilice solo agua destilada para humedecer el paño. Evite el uso de productos de limpieza. -
Page 52: Cambio De La Pila
Cambio de la pila El telemando utiliza una pila de botón CR 2450. Deslice la tapa del compartimento de la pila en la dirección de la flecha Retire la pila descargada tirando de la solapa de extracción... - Page 53 Inserte la pila con el símbolo “+” hacia arriba: Deslícela hasta que quede bajo el soporte y, a continuación, empújela hacia abajo.
- Page 54 Deslice la tapa para encajarla en el telemando.
- Page 55 El telemando recuerda el estado de emparejamiento aunque se cambie la pila. No es necesario volver a emparejar los audífonos tras cambiar la pila.
-
Page 56: Solución De Problemas
Solución de problemas Si el dispositivo no funciona: ● Asegúrese de que la pila esté bien colocada. Consulte la sección “Cambio de la pila.” ● Asegúrese de que las teclas no estén bloqueadas. Consulte la sección “Bloqueo de teclas.” ● Asegúrese de que no haya ningún objeto entre los audífonos y el telemando. - Page 57 ● Pregunte a su especialista en audición si el telemando es compatible con sus audífonos. Si los audífonos no se pueden emparejar: ● Aumente la intensidad de la señal. Consulte la sección “Ajuste de la intensidad de la señal.” ● Vuelva a emparejar los audífonos.
-
Page 58: Servicio Técnico
Si el LED ya no se activa: ● Asegúrese de que las teclas no estén bloqueadas. Consulte la sección “Bloqueo de teclas.” ● Puede que a la pila le quede poca carga. Sustituya la pila descargada. En caso de otros problemas, consulte al especialista en audición. -
Page 59: Ajuste De La Intensidad De La Señal
Ajuste de la intensidad de la señal El telemando funciona emitiendo una señal de audio de alta frecuencia. Se trata de una señal que pueden oír los menores de 30 años. Hay dos niveles de intensidad de la señal de control disponibles. De modo predeterminado, el telemando utiliza el ajuste más potente para garantizar una conexión fiable con los audífonos. - Page 60 Suelte el botón . El telemando ahora está en modo de configuración; el LED se enciende y puede cambiar la intensidad de la señal. Para cambiar a la intensidad de señal más baja, pulse hasta que el LED parpadee lentamente. Para cambiar a la intensidad de señal más alta, pulse hasta que el LED parpadee rápidamente.
-
Page 61: Información Importante De Seguridad
Información importante de seguridad Seguridad personal ADVERTENCIA Peligro de asfixia! El dispositivo contiene piezas pequeñas que se pueden tragar. Mantenga los audífonos, pilas y accesorios fuera del alcance de los niños y personas con deficiencias mentales. En caso de ingestión de alguna pieza, consulte con un médico o acuda a un hospital inmediatamente. - Page 62 ADVERTENCIA Peligro de lesiones! Si el aparato está claramente dañado, no lo use y devuélvalo al punto de venta. ADVERTENCIA Tenga en cuenta que cualquier cambio no autorizado en el producto puede provocar daños materiales o personales. Utilice solo piezas y accesorios autorizados. Solicite la asistencia de su especialista en audición.
-
Page 63: Seguridad Del Producto
ADVERTENCIA Peligro de explosión! No use el telemando en atmósferas explosivas (p. ej. en minas). Seguridad del producto AVISO Proteja los dispositivos del calor extremo. No los exponga a la luz directa del sol. AVISO Proteja los audífonos y accesorios de la alta humedad... - Page 64 AVISO No seque los dispositivos en un horno microondas. AVISO Distintos tipos de radiaciones intensas, p. ej. las que se aplican durante los exámenes de rayos X o MRI de la cabeza, pueden dañar los dispositivos. No use los dispositivos durante estos o similares procedimientos.
- Page 65 AVISO Su telemando está programado para comunicarse exclusivamente con sus audífonos. Si se producen problemas con el telemando de otra persona, consulte al especialista en audición.
-
Page 66: Información Importante
Información importante Uso previsto Este telemando tiene como función el control de los audífonos. Utilícelo solo del modo descrito en este manual del operador. Este dispositivo no está diseñado para que lo lleven o utilicen niños menores de 12 años ni para personas cuya edad de desarrollo esté... -
Page 67: Símbolos
Símbolos Símbolos utilizados en este documento Indica una situación que podría provocar lesiones leves, moderadas o graves. Indica posibles daños materiales. Consejos y sugerencias para manejar mejor el dispositivo. - Page 68 Símbolos en el dispositivo o el embalaje Lea y siga las instrucciones del manual del operador. No tire el dispositivo a la basura. Consulte la sección "Información sobre la eliminación".
-
Page 69: Condiciones De Manejo, Transporte Y Almacenamiento
Condiciones de manejo, transporte y almacenamiento Condiciones de manejo Temperatura de 32 a 113 °C Humedad relativa de 5 a 93 % Durante largos períodos de transporte y almacenamiento, tenga en cuenta las condiciones siguientes: Almacenamiento Transporte Temperatura de 50 a 104 °C de -4 a 140 °C Humedad relativa de 10 a 80 %... -
Page 70: Información Sobre La Eliminación
Información sobre la eliminación AVISO Recicle los audífonos, accesorios y embalajes según la normativa del país. AVISO Para evitar la contaminación medioambiental, no tire las pilas en la basura doméstica. Recicle o elimine las pilas según las disposiciones legales del país o devuélvalas al especialista en audición. - Page 72 Information in this manual subject to change without notice. La información de este manual está sujeta a cambio sin previo aviso. Derechos de autor ©2020 Miracle-Ear, Inc. Hearing instrument made in Singapore Instrumento de audición hecho en Singapur 10538144 Rev 3 ©2020 Miracle-Ear, Inc.