
Related Manuals for Miracle-Ear MECONNECT BTE 13


Summary of Contents for Miracle-Ear MECONNECT BTE 13
- Page 1 MECONNECT BTE 13 & 675 ™ with GENIUS 2.0 Technology User Manual ™ www.miracle-ear.com...
- Page 3 Enhance Your Miracle-Ear Experience. ® Learn about your hearing aids and accessories you may nd helpful, access the latest information about hearing health at www.miracle-ear.com * We respect your privacy. We will not sell, rent, or give your name or e-mail address to anyone.
-
Page 4: Table Of Contents
Content Welcome Your hearing aids Hearing aid type Getting to know your hearing aid Components and names Controls Settings Batteries Battery size and handling tips Replacing batteries Recharging rechargeable batteries Daily use Turning on and off Inserting and removing the hearing aid Adjusting the volume Changing the hearing program Further adjustments (optional) - Page 5 Maintenance and care Hearing aids Custom-made ear pieces (earmolds), ear pieces, tubes Professional maintenance Further information Safety information Wireless functionality Accessories Child lock (optional) Troubleshooting Service information Symbols: Be aware of information marked with the warning symbol WARNING, CAUTION or NOTICE! WARNING points out a situation that could lead to serious injuries, CAUTION indicates a situation that could lead to minor and moderate injuries.
-
Page 6: Welcome
Welcome Thank you for choosing Miracle-Ear hearing aids to accompany ® you through everyday life. Like anything new, it may take you a little time to become familiar with them. This manual, along with support from your Hearing Care Specialist, will help you understand the advantages and greater quality of life your hearing aids offer. -
Page 7: Your Hearing Aids
Your hearing aids This user manual describes optional features that your hearing aids may or may not have. Ask your Hearing Care Specialist to indicate the features that are valid for your hearing aid. Hearing aid type Your hearing aids are BTE (Behind-The-Ear) models. A tube delivers the sound from the hearing aid into the ear. -
Page 8: Components And Names
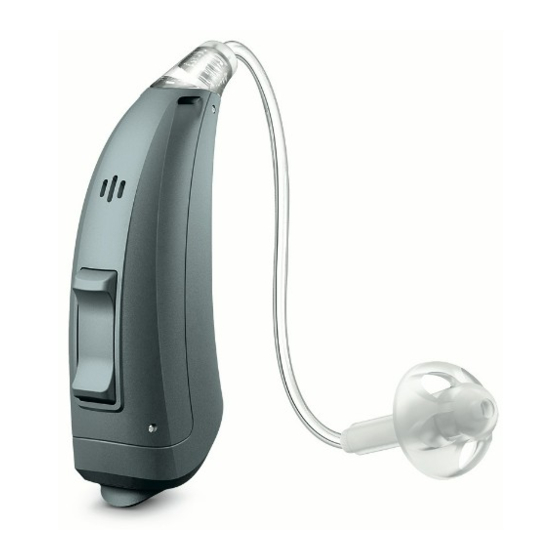
Components and names This user manual describes several types of hearing aids. Use the following pictures to identify the type of hearing aid that you use. Your hearing aids are either attached to an earhook and a custom-made ear piece or to a standard tube (OpenTube, ThinTube) and a standard ear piece (OpenTip). - Page 9 MECONNECT BTE 13 & 675 P BTE ™ ➊ ➏ Ear piece (OpenTip) Rocker switch ➋ ➐ Retention strand (optional) Battery compartment ➌ (on/off switch) Tube (OpenTube) ➍ Earhook ➎ Microphone openings You can use standard ear pieces together with a standard tube (OpenTube, ThinTube) or custom-made ear pieces together with an earhook and tube.
-
Page 10: Controls
Custom-made ear pieces (earmolds) Examples: Controls With the controls you can, for example, adjust the volume or switch hearing programs. Your hearing aids either have a rocker switch, or a rocker switch and a push button. Your Hearing Care Specialist has programmed your desired functions to the controls. - Page 11 Rocker switch function Press <1 second: Program up/down Volume up/down Tinnitus control feature level up/down Treble Control Speech Navigator Span (spatial configurator) Press >3 seconds: Standby/turn on Program up/down Press 5 seconds: Standby/turn on L = Left, R = Right Push button function Press <1 second: Program change...
-
Page 12: Settings
Settings Hearing programs Read more in section “Changing the hearing program”. Features Power-on delay enables whistle-free insertion of hearing aids. Read more in section “Turning on and off”. AutoPhone automatically switches to the telephone ™ program when the telephone receiver approaches the ear. Read more in section “on the phone.”... -
Page 13: Batteries
Batteries When the battery is low the sound becomes weaker or you will hear an alert signal. The battery type will determine how long you have to replace or recharge the battery. Your Hearing Care Specialist can con gure the LED (SP only) to indicate the battery status. -
Page 14: Replacing Batteries
Replacing batteries Removing the battery: Open the battery door. Inserting the battery: If the battery has a protective lm, remove it only when you are ready to use the battery. Insert the battery with the “+” symbol facing up (refer to the picture). Carefully close the battery door. -
Page 15: Daily Use
Daily use Turning on and off You have the following options to turn your hearing aids on or off. Via battery door: Turning on: Close the battery door. The default volume and hearing program are set. Turning off: Open the battery door to the rst catch. Via push button or rocker switch: Turning on or off: Press and hold the push button or the rocker switch for several seconds. -
Page 16: Inserting And Removing The Hearing Aid
Inserting and removing the hearing aids Your hearing aids have been ne-tuned for your right and left ear. Colored markers indicate the side: red marker = right ear blue marker = left ear S, SA, P Inserting a hearing aid: Hold the tube close to the ear piece. - Page 17 It may be helpful to insert the right hearing aid with the right hand and the left hearing aid with the left hand. If you have problems inserting the ear piece, use the other hand to gently pull your earlobe downwards. This opens the ear canal and eases insertion of the ear piece.
-
Page 18: Adjusting The Volume
Adjusting the volume Your hearing aids automatically adjust the volume to the listening situation. If you prefer manual volume adjustment, press the rocker switch brie y or use a remote control. Refer to section “Controls” for the setting of the rocker switch. An optional signal tone can indicate the volume change. -
Page 19: Locking The Controls (Optional)
Sound balance allows you to adjust the bass and treble to your preferences. Refer to section “Controls” for the setting of your controls. Locking the controls (optional) To prevent any accidental operation you can lock the controls. When the controls are locked, both push button and rocker switch are disabled. - Page 20 Prerequisites: You need to wear two hearing aids. On one of your hearing aids the rocker switch needs to be set for the Speech Navigator. Refer to section “Controls” for the setting of the rocker switch. With a suitable remote control and smartphone app you have even more control options.
-
Page 21: On The Phone
Exiting Speech Navigator mode: Toggle to the minimum or maximum level. An optional signal tone can indicate the minimum and maximum level. Toggle one step further. The same signal tone as for changing the hearing program is played, indicating that you have exited the Speech Navigator mode. - Page 22 Not all telephones produce a magnetic eld strong enough to activate this function. In this case, you can use the Miracle-Ear Phone Surround magnet, which is available as an accessory, and attach it to the telephone receiver.
-
Page 23: Audio Induction Loops/Telecoil
You must use the original magnet provided with your hearing aid. Using other magnets may cause irreversible damage to the electronics of your hearing aid. When magnets are properly cared for, they are safe to use and can last a lifetime. However, the following manuallines should be followed while using these magnets. -
Page 24: Audio Input (Fm System)
If a telecoil program is con gured for your hearing aids, it is listed in section “Settings.” Telecoil program and remote control NOTICE For hearing aids with wireless connectivity: When the telecoil program is active, the remote control may cause a pulsing noise. Use the remote control with a distance greater than 4 inches (10 cm). -
Page 25: Maintenance And Care
• Con gure the rocker switch so that you can select between audio input signal only, surrounding sound only, or a mix of both signals. WARNING Risk of electric shock! To prevent very rare cases of electric shock: Use the audio input only with battery operated devices or FM systems. -
Page 26: Custom-Made Ear Pieces (Earmolds), Ear Pieces, Tubes
Cleaning Your hearing aids have a protective coating. However, if not cleaned regularly you may damage the hearing aids or cause personal injury. Clean your hearing aids daily with a soft, dry tissue. Never use running water or immerse the hearing aids in water. - Page 27 Cleaning earmolds or ear pieces Clean the earmold or ear piece upon removal with a soft and dry tissue. This prevents cerumen from becoming dry and hardening. Never use running water or immerse the earmold or ear piece in water. Cleaning tubes Never use running water or immerse the tube in water.
-
Page 28: Professional Maintenance
CAUTION Risk of damage to ear canal and ear drum. Always remove the Open Cleaning Wire from the tube before reattaching it to your hearing aid. Exchanging standard ear pieces (OpenTip) Pull off the used ear piece and plug on the new ear piece. Exchanging standard tubes (OpenTube, ThinTube) Unscrew the used tube and screw the new tube on. -
Page 29: Further Information
Further information Safety information For more safety information, refer to the safety manual supplied with the device. Wireless functionality Your hearing aids are equipped with wireless functionality. This provides synchronization between your two hearing aids: If you change the program or volume on one hearing aid, the other one is automatically changed, too. -
Page 30: Child Lock (Optional)
Child lock (optional - SP only) Your hearing aid can be modi ed to provide a child-safe battery door, which can be locked (child lock). The child lock has to be activated by the Hearing Care Specialist. With the child lock enabled, the battery door will automatically lock when closed. - Page 31 Locking/Unlocking the battery door To lock or unlock the battery door, a special tool is required. Your Hearing Care Specialist will lock or unlock the battery door for you. The following instructions are for your Hearing Care Specialist only. The position of the locking bar in the battery door indicates whether the battery door is locked.
- Page 32 Locking the battery door: Insert the tip of the tool into the small opening. Push / Lever the small plastic part out of the battery door. The battery door is locked. The battery door can be unlocked by the Hearing Care Specialist again. Unlocking the battery door: Push the locking bar with the child lock disabler to...
-
Page 33: Troubleshooting
Troubleshooting Problem and possible hearing aids Sound is weak. Increase the volume. Replace or recharge the battery (depending on the battery type). Clean or exchange the tube and the ear piece. Hearing aid emits whistling sounds. Reinsert the ear piece until it ts securely. Decrease the volume. -
Page 34: Service Information
Service information Serial numbers Left: Right: Service dates Your Hearing Care Specialist Date of purchase:... - Page 35 MECONNECT BTE 13 & 675 ™ con tecnología GENIUS 2.0 Manual del usuario ™ www.miracle-ear.com...
- Page 37 útiles, acceda a la información más reciente sobre salud auditiva y reciba ofertas promocionales al formar parte de la comunidad de salud auditiva de Miracle-Ear en www.miracle-ear.com: * Respetamos su privacidad. No venderemos ni alquilaremos ni daremos su nombre o dirección de correo electrónico a nadie.
- Page 38 Contenido Bienvenida Sus instrumentos auditivos Tipo de instrumento Conozca sus instrumentos auditivos Componentes y sus nombres Controles Con guración Baterías Tamaño de la batería y sugerencias para su manipulación Reemplazo de las baterías Recargar las baterías recargables Uso diario Encendido y apagado Colocación y extracción del instrumento auditivo Ajustar el volumen Cambio de programa auditivo...
- Page 39 Mantenimiento y cuidado Instrumentos auditivos Piezas auditivas hechas a la medida (moldes de oído), auriculares, tubos Mantenimiento profesional Información adicional Información de seguridad Funcionalidad inalámbrica Accesorios Bloqueo infantil opcional Solución de problemas Información de servicio Símbolos: ¡Tenga en cuenta la información marcada con el símbolo de advertencia ADVERTENCIA, ATENCIÓN o AVISO! ADVERTENCIA señala una situación que podría ocasionar lesiones graves ATENCIÓN indica una...
-
Page 40: Bienvenida
Bienvenido Gracias por elegir los audífonos Miracle-Ear para que lo ® acompañen en la vida cotidiana. Como con cualquier cosa nueva, es posible que le tome un poco de tiempo familiarizarse con ellos. Esta guía, junto con el apoyo de su profesional de cuidado auditivo, le ayudarán a entender las ventajas y la mejor calidad... -
Page 41: Sus Instrumentos Auditivos
Sus instrumentos auditivos Esta guía del usuario describe las funciones opcionales que pueden o no tener sus instrumentos auditivos. Pida a su profesional de cuidado auditivo que le indique cuáles de estas funciones son válidas para sus instrumentos auditivos. Tipo de instrumento Sus instrumentos auditivos son los modelos BTE (retroauricular). -
Page 42: Componentes Y Sus Nombres
Componentes y sus nombres Esta guía de usuario describe varios tipos de instrumentos auditivos. Utilice las siguientes imágenes para identi car el tipo de instrumento auditivo que usa. Sus instrumentos auditivos pueden estar conectados a un gancho auricular y a un auricular hecho a la medida o bien, a un tubo estándar (OpenTube, ThinTube) y a un auricular estándar (OpenTip). - Page 43 MECONNECT BTE P BTE ™ ➊ ➏ Auricular (OpenTip) Interruptor oscilante ➋ ➐ Cuerda de sujeción Compartimiento de la batería (opcional) (interruptor de ➌ encendido/apagado) Tubo (OpenTube) ➍ Gancho auricular ➎ Aberturas del micrófono Puede usar los auriculares estándar junto con un tubo estándar (OpenTube, ThinTube) o un auricular hecho a la medida junto con un gancho auricular y un tubo.
-
Page 44: Controles
Auriculares hechos a la medida (moldes de oído) Ejemplos: Controles Con los controles puede, por ejemplo, ajustar el volumen o cambiar el programa de audición. Sus instrumentos pueden tener un interruptor oscilante o un interruptor oscilante y un pulsador. Su profesional de cuidado auditivo programó sus funciones deseadas para los controles. - Page 45 Función del interruptor oscilante Presione < 1 segundo: Programa arriba/abajo Volumen subir/bajar Función para aumentar / disminuir el nivel de control de tinnitus Equilibrio del sonido Discurso Navigator Span Presione > 3 segundos: En espera/Encendido Programa arriba/abajo Presione 5 segundos: En espera/Encendido I = Izquierdo, D = Derecho Función Pulsador...
- Page 46 Configuración Programas auditivos Lea más en la sección “Cambiar el programa de audición”. Características Retardo de encendido permite la inserción de los instrumentos auditivos sin silbidos. Lea más en la sección “Encendido y apagado”. AutoPhone cambia automáticamente al programa para ™...
-
Page 47: Baterías
Baterías Cuando la batería está baja, el sonido se debilita o se escucha una señal de alerta. El tipo de batería determina el tiempo que tiene para cambiarla o recargarla. El especialista en audición puede con gurar el LED (SP solamente) para que indique el estado de la pila. -
Page 48: Reemplazo De Las Baterías
Reemplazo de las baterías Cómo retirar la batería: Abra el compartimiento de la batería. Cómo insertar la batería: Si la batería tiene una película de protección, retírela solo cuando esté listo para usar la batería. Inserte la batería con el símbolo “+” hacia arriba (consulte la imagen). -
Page 49: Uso Diario
Uso diario Encendido y apagado Usted tiene las siguientes opciones para encender o apagar sus instrumentos auditivos. Por medio del compartimiento de la batería: Encendido: Cierre del compartimiento de la batería. El volumen y el programa auditivo predeterminados están con gurados. Apagado: Abra el compartimiento de la batería hasta la primera atadura. -
Page 50: Colocación Y Extracción Del Instrumento Auditivo
La característica “retardo de encendido” puede ser activada por su profesional de cuidado auditivo. Colocación y extracción del instrumento auditivo Sus instrumentos auditivos están a nados para su oreja derecha e izquierda. Los marcadores de color indican el lado: color rojo = oreja derecha color azul = oreja izquierda S, SX/SA, P BTE SP BTE... - Page 51 ATENCIÓN ¡Riesgo de lesiones! Inserte el auricular con cuidado y no muy profundo en el canal auditivo. Puede ser útil insertar el instrumento auditivo derecho con la mano derecha y el instrumento auditivo izquierdo con la mano izquierda . Si tiene problemas para insertar el auricular, use la otra mano para tirar suavemente hacia abajo del lóbulo de la oreja.
-
Page 52: Ajustar El Volumen
ATENCIÓN ¡Riesgo de lesiones! En casos muy raros, el auricular se puede quedar en la oreja al extraer el instrumento auditivo. Si esto le sucede, un profesional médico debe extraer el auricular. Limpie y seque sus instrumentos auditivos después de usarlos. Lea más en la sección “Mantenimiento y cuidado. -
Page 53: Otros Ajustes (Opcional)
Si está activada la función AutoPhone o el Phone Surround, el programa de audición se cambia automáticamente al programa para teléfono al acercar el receptor del teléfono a la oreja. Lea más en la sección “Hablar por teléfono”. Otros ajustes (opcionales) Los controles de sus instrumentos auditivos también se pueden usar para cambiar, por ejemplo, el equilibrio del sonido o el nivel de la función de la terapia de tinnitus. -
Page 54: Situaciones Especiales De Audición
Situaciones especiales Ajuste del Discurso Navigator Si desea enfocarse directamente en la conversación con la persona que está frente a usted o desea escuchar un entorno más amplio, el con gurador espacial le permite el control, según su preferencia. Puede seleccionar diferentes niveles, desde “enfoque en la posición frontal”... -
Page 55: Para Hablar Por Teléfono
El nivel medio está activo como ajuste predeterminado. Presione el interruptor oscilante superior para enfocarse más en el frente o el interruptor oscilante inferior para escuchar un entorno más amplio. Para salir del modo de discurso Navigator: Cambie al nivel mínimo o máximo. Un tono opcional de señal puede indicar el nivel mínimo o máximo. - Page 56 En este caso, puede usar el imán Phone Surround de Miracle-Ear, que está disponible como accesorio y colocarlo en el receptor del teléfono. Consulte en la guía del usuario de Phone Surround las instrucciones sobre cómo colocar el imán.
- Page 57 Usted debe usar el imán original proporcionado con su instrumento auditivo. El uso de otros imanes puede ocasionar daño irreversible al sistema electrónico de su instrumento auditivo. Cuando los imanes se cuidan apropiadamente son seguros de usar y pueden durar toda una vida. Sin embargo, deben seguirse las siguientes directrices cuando se usan estos imanes.
-
Page 58: Entrada De Audio (Sistema Fm)
Secuencia de inducción/telebobina de audio Algunos teléfonos y espacios públicos como los teatros ofrecen señales de audio (música y habla) por medio de una secuencia de inducción de sonido. Con este sistema, sus instrumentos auditivos pueden recibir directamente la señal deseada, sin el ruido distractor del ambiente. - Page 59 La señal es más clara y no se ve afectada por las condiciones acústicas de la sala. Esto puede ser útil para los adultos en situaciones de escucha difíciles y para los niños en el aula. La mayoría de los sistemas FM permiten el acoplamiento con dispositivos de audio, como un reproductor de MP3.
-
Page 60: Mantenimiento Y Cuidado
Mantenimiento y cuidado Para evitar daños, es importante que cuide sus instrumentos auditivos y que siga algunas reglas básicas, que pronto se convertirán en parte de su rutina diaria. Secado y almacenamiento Seque los instrumentos auditivos durante la noche. Pregunte a su profesional de cuidado auditivo acerca de los productos de secado recomendados. -
Page 61: Auriculares, Tubos
Auriculares hechos a la medida (moldes de oído), auriculares, tubos Es posible que se acumule cerumen (cera del oído) en los moldes del oído o en los auriculares. Esto podría afectar la calidad del sonido. Para los instrumentos con tubos estándar (OpenTube, ThinTube): Limpie diariamente los moldes de oído y los auriculares, limpie los tubos cuando sea necesario. - Page 62 Limpieza de los moldes de oído o los auriculares Limpie los moldes de oído o los auriculares con un paño suave y seco cuando los extraiga. Esto evita que el cerumen se seque y se endurezca. Nunca use agua del grifo ni sumerja los instrumentos en agua.
-
Page 63: Mantenimiento Profesional
ATENCIÓN Riesgo o daño al canal auditivo y al tímpano. Retire siempre el alambre de limpieza Open del tubo antes de volver a colocarlo en su instrumento auditivo. Cambio de auriculares estándar (OpenTip) Jale el auricular usado y coloque el auricular nuevo. -
Page 64: Información Adicional
Más información Información de seguridad Para obtener más información de seguridad, consulte el manual de seguridad provisto con el dispositivo. Funcionalidad inalámbrica Es posible que sus instrumentos auditivos estén equipados con funcionalidad inalámbrica. Esto proporciona sincronización entre sus dos instrumentos auditivos: Si cambia el programa o el volumen de un instrumento, el otro también cambia automáticamente. -
Page 65: Bloqueo Infantil Opcional
Bloqueo infantil (opcional - SP solamente) Los audífonos pueden modi carse para proporcionar un puerta de pila a prueba de niños, que puede bloquearse (bloqueo infantil). El bloqueo infantil debe activarlo el especialista en audición. Con este bloqueo infantil activado, la puerta de la pila queda bloqueado automáticamente cuando se cierra. - Page 66 Bloqueo y desbloqueo del puerta de la pila Para bloquear o desbloquear el puerta de la pila, se necesita una herramienta especial. Su especialista en audición bloqueará o desbloqueará el puerta de la pila. Las instrucciones siguientes son solo para su especialista en audición.
- Page 67 Para cerrar el puerta de la pila: Inserte la punta de la herramienta en el pequeño ori cio. Presione/haga palanca en la pequeña pieza de plástico para extraerla del puerta de la pila. El puerta de la pila queda bloqueado. El especialista en audición puede volver a desbloquear el puerta de la pila.
-
Page 68: Solución De Problemas
Solución de problemas Problema y posibles soluciones Sonido débil. Aumente el volumen. Cambie o recargue la batería (dependiendo del tipo de la batería). Limpie o cambie el tubo y el auricular. El instrumento auditivo emite un silbido. Vuelva a insertar el auricular hasta que calce bien. Disminuya el volumen. -
Page 69: Información De Servicio
Información de servicio Números de serie Izquierdo: Derecho: Fechas de servicio Su profesional de cuidado auditivo: Fecha de compra:... - Page 72 Information in this manual subject to change without notice. La información de este manual está sujeta a cambio sin previo aviso. Derechos de autor ©2020 Miracle-Ear, Inc. Hearing instrument made in Singapore Instrumento de audición hecho en Singapur 10537402 Rev 8 ©2020 Miracle-Ear, Inc.