Table of Contents
Advertisement
Available languages
Available languages
Quick Links
PreserveTech
S t a y s C l e a n e r • L a s t s L o n g e r
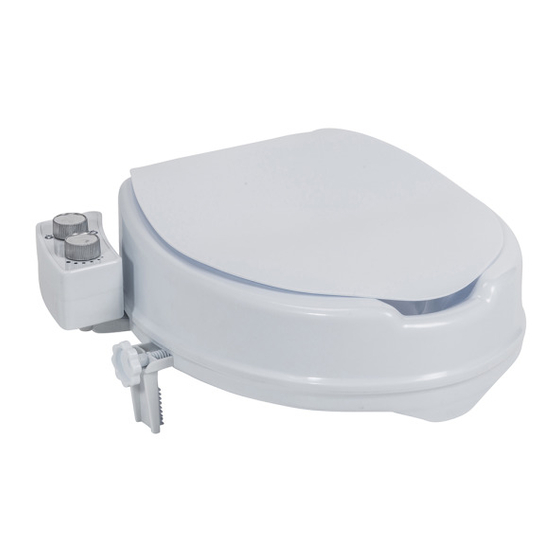
Raised Toilet Seat with Bidet
Ambient Water Temperature
Asiento Elevado para Inodoro con
Bidé y Agua a Temperatura Ambiente
Siège de Toilette Rehaussé avec Bidet,
eau à Température Ambiante
IMPORTANT
IMPORTANT
Item # RTL12C005-WH
IMPORTANT
Scan for easy 3D instructions
Download the BILT app before you begin
Scan for easy 3D instructions
Scan for easy 3D instructions
Download the BILT app before you begin
Download the BILT app before you begin
www.drivemedical.com
VER.A.5.22
IMPORTANT
IMPORTANT
Scan for easy 3D instructions
Scan for easy 3D instructions
Download the BILT app before you begin
Download the BILT app before you begin
Y. Sung Handelsvertretung
Duesselthaler Str. 24
40211 Duesseldorf Germany
TM
Advertisement
Table of Contents

Related Manuals for Drive PreserveTech RTL12C005-WH


Summary of Contents for Drive PreserveTech RTL12C005-WH
- Page 1 PreserveTech S t a y s C l e a n e r • L a s t s L o n g e r Raised Toilet Seat with Bidet Ambient Water Temperature Asiento Elevado para Inodoro con Bidé y Agua a Temperatura Ambiente IMPORTANT Siège de Toilette Rehaussé...
-
Page 2: Included Parts
warnings • READ ALL WARNINGS AND INSTRUCTIONS BEFORE INSTALLATION OR USE – FAILURE TO DO SO COULD RESULT IN INJURY OR PROPERTY DAMAGE. • Be careful to test water pressure before each use of the product, to ensure pre- vention of discomfort or injury from water pressure that is too high. •... -
Page 3: Installation Instructions
installation instructions STEP 1 - PREP Clean your toilet Turn off the cool water supply at the wall beside the toilet Drain the toilet tank completely by flushing the toilet STEP 2 – ATTACH YOUR RAISED TOILET SEAT Turn both locking clamps counterclockwise until they can no longer turn - this will open the locking devices. -
Page 4: Control Panel Guide
Drive recommends periodic visual inspection of this product by the user, to ensure that all parts and hardware are secure, that components are in good working order and not worn, torn, frayed, loose, or rusted and that there are no obstructions or impediments to normal, safe operation. -
Page 5: One-Year Limited Warranty
Your Drive branded product is warranted to be free of defects in materials and workmanship under normal use for (1) one year from date of purchase for the original consumer purchaser. -
Page 6: Piezas Incluidas
advertencia • LEA TODAS LAS ADVERTENCIAS E INSTRUCCIONES ANTES DE REALIZAR LA INSTALACIÓN O USAR; DE LO CONTRARIO, PODRÍAN PRODUCIRSE LE- SIONES O DAÑOS A LA PROPIEDAD. • Pruebe la presión del agua antes de cada uso del producto para prevenir moles- tias o lesiones si la presión del agua es demasiado alta. -
Page 7: Instrucciones Para La Instalación
instrucciones para la instalación PASO 1: PREPARACIÓN Limpie el inodoro. Cierre el suministro de agua fría en la pared al lado del inodoro. Drene completamente el tanque del inodoro descargando el inodoro. PASO 2: COLOQUE EL ASIENTO ELEVADO PARA INODORO Gire ambas abrazaderas de bloqueo en el sentido con- trario a las agujas del reloj hasta que ya no puedan girar;... -
Page 8: Guía Del Panel De Control
Drive recomienda revisiones visuales periódicas de este producto por parte del usuario, para verificar que todas las partes y piezas de ferretería sean seguras, que los componentes funcionen bien y que no estén desgastados, rotos, alterados, flojos u oxidados, y que no existan obstáculos o impedimentos para el funcionamiento... - Page 9 Este producto de la marca Drive cuenta con una garantía contra defectos de materiales y mano de obra en condiciones normales de uso por un (1) año a partir de la fecha de compra del consumidor original.
-
Page 10: Pièces Incluses
avertissement • LIRE TOUS LES AVERTISSEMENTS ET TOUTES LES INSTRUCTIONS AVANT L’INSTALLATION OU L’UTILISATION – LE NON-RESPECT DE CES CONSIGNES POURRAIT ENTRAÎNER DES BLESSURES OU DES DOMMAGES MATÉRIELS. • Prendre soin d’effectuer un essai de pression d’eau avant chaque utilisation du produit pour prévenir tout malaise et les blessures causées par une pression d’eau trop forte. -
Page 11: Mode D'installation
mode d’installation ÉTAPE 1 – PRÉPARATION Nettoyer la toilette Couper l’alimentation en eau tempérée se trouvant au mur près de la toilette Vider entièrement le réservoir de la toilette en utilisant la chasse d’eau ÉTAPE 2 – FIXATION DU SIÈGE DE TOILETTE REHAUSSÉ Faire tourner les deux pinces de verrouillage dans le sens antihoraire jusqu’à... -
Page 12: Mode De Nettoyage
Drive recommande à l’utilisateur d’effectuer une inspection visuelle de ce produit pour s’assurer que toutes les pièces et la quincaillerie sont bien fixées, que les composants sont en bon état et ne sont pas usés, tordus, effilochés, lâches ni rouillés, et qu’il n’y a aucun obstacle ou problème empêchant le fonctionnement normal et sécuritaire du... - Page 13 Les obligations de Drive en vertu de cette garantie se limitent au remplacement, à la discrétion de Drive, de produits et de pièces jugés défectueux à condition que ces produits aient été installés et utilisés selon les instructions. Drive se réserve le droit d’effectuer de telles inspections au besoin pour déterminer la cause du défaut.
- Page 14 - 14 -...
- Page 15 - 15 -...
- Page 16 - 16 -...