Table of Contents
Advertisement
Quick Links
This equipment has been tested and found to comply with the limits for a Class B
digital device, pursuant to part 15 of the FCC Rules. These limits are designed to
provide reasonable protection against harmful interference in residential installation.
This equipment generates, uses and can radiate radio frequency energy and if not
installed and used in accordance with the instructions, may cause harmful interference
to radio communications. However, there is no guarantee that interference will not
occur in a particular installation. If this equipment does cause harmful interference to
radio or television reception, detectable by turning the equipment in question off and
on, the user is encouraged to try to correct the interference by one or more of the
following measures:
Reorient or relocate the receiving antenna
Increase the distance between the equipment and the receiver
Connect the equipment to an outlet on a different circuit than that which the receiver
is connected to
Or consult the dealer or an experienced radio/TV technician for help.
This device complies with Part 15 of the FCC Rules. Operation is subject to following
two conditions:
1.This device may not cause harmful interference, and
2.This device must accept any interference that may cause undesired operation.
User's Manual
FCC Notice
Projector
○ ○ ○ ○ ○ ○ ○ ○ ○ ○ ○
EN-1
Advertisement
Table of Contents

Related Manuals for MAGINON 1100S

Summary of Contents for MAGINON 1100S
- Page 1 Projector User’s Manual FCC Notice This equipment has been tested and found to comply with the limits for a Class B digital device, pursuant to part 15 of the FCC Rules. These limits are designed to provide reasonable protection against harmful interference in residential installation. This equipment generates, uses and can radiate radio frequency energy and if not installed and used in accordance with the instructions, may cause harmful interference to radio communications.
- Page 2 Projector User’s Manual Precautions Safety Instructions 1.Check that the operating voltage of your unit is identical with the voltage of your local power supply. 2. Should any liquid or solid object fall into the cabinet, unplug the unit and have it checked by the qualified personnel before operating it further.
- Page 3 Projector User’s Manual Cautions The projector is equipped with ventilation holes (intake) and ventilation holes (exhaust). Do not block or place anything near these slots, or internal heat build-up may occur, causing picture degradation or damage to the projector. When you replace the projector lamp, never touch the new bulb with your bare hands.
-
Page 4: Table Of Contents
Projector User’s Manual CONTENTS Projector Features and Controls Projector Control Panel Remote Controller Button Function Getting the Most Out of Your Projector Remote Controller Auto Off Mode Control Panel Setup Unpacking the Projector Setting Up the Projector Connecting to a Computer Connecting to a Video Source Using the Projector Turning the Audio/Visual(A/V) Equipment On and Off... - Page 5 Projector User’s Manual Audio Menu MISC Menu Option Menu Reset Menu Other Related OSD Menus Video Input Signal Picture Menu Other OSD Menus No Input Signal Maintenance Cleaning the Lens Cleaning the Projector Housing Cleaning the Air Filter Replacing the Lamp Technical Specifications Appendix A Preset Signals...
-
Page 6: Projector Features And Controls
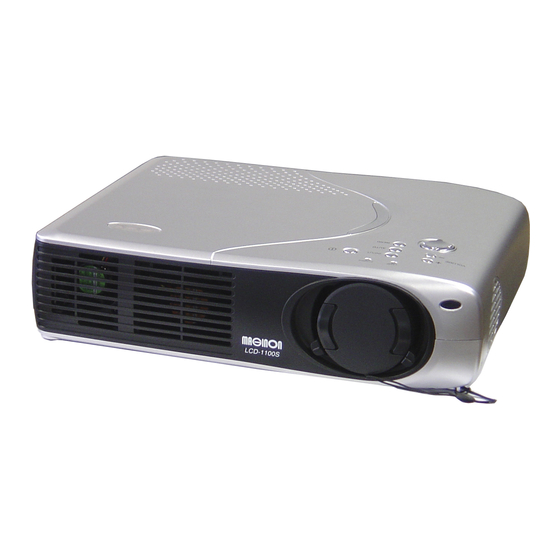
Projector User’s Manual PROJECTOR FEATURES AND CONTROLS PROJECTOR 1.Zoom ring 2.Focus ring 3.Lens 4.Ventilation holes (intake) 5.Ventilation holes (exhaust) 6.Adjuster button 7.Height adjustment 8.Front IR remote controller sensor 9.Speakers 10.Control Panel including Power button 11.AC power socket 12.Rear IR remote controller sensor 13.Security lock receptacle 14.Control port (PS2 &... -
Page 7: Control Panel
Projector User’s Manual CONTROL PANEL POWER Power LED indicator – indicates power to projector. LAMP Lamp LED indicator – indicates lamp power. Button Function Turns the projector and lamp ON and OFF. INPUT Manually selects an input source. AUTO Automatically adjusts frequency and phase. MENU Displays (or hides) the on-screen control menus. -
Page 8: Remote Controller
Projector User’s Manual REMOTE CONTROLLER Button Function POWER Turns the projector and lamp ON and OFF. INPUT Manually selects an input source. AUTO Automatically adjusts frequency and phase. MENU Displays (or hides) the on-screen display menus. Scrolls up through the menu choices. Scrolls down through the menu choices. -
Page 9: Getting The Most Out Of Your Projector
Projector User’s Manual GETTING THE MOST OUT OF YOUR PROJECTOR The projector has a full set of features that allow you to control the settings for video, audio, power management, display parameters, and much more. To derive the greatest utility from your projector, read this section for a quick summary of the important features. -
Page 10: Setup
Projector User’s Manual SETUP This section tells you how to unpack and set up your projector and connect it to other equipment. The projector must be connected to a computer or a video source such as a video tape deck, camcorder, digital camera or laser disk player in order to make a projection. -
Page 11: Setting Up The Projector
Projector User’s Manual Setting Up the Projector 1.Place the projector on a sturdy, level surface within five feet of the computer or video source. Caution: Do not hold the projector by the lens. This can damage the lens. 2.Place the projector the correct distance from the screen. The distance between the projector and the screen determines the actual image size. -
Page 12: Connecting To A Computer
Projector User’s Manual Connecting to a Computer Projector Computer Computer Cable DVI or VGA OUT The projector will always project at SVGA (800 x 600) resolution. (SVGA is the native resolution of the projector.) However, you can connect the projector to a computer source capable of displaying VGA (640 x 480), SVGA (800 x 600), XGA (1024 x 768) or SXGA (1280 x 1024) resolutions. -
Page 13: Connecting To A Video Source
Projector User’s Manual Connecting to a Video Source Y Cb Cr (Component Video Cable) S-Video Cable DVD Player AV Composite Cable Video out VCR You can connect the projector to almost any common video source - VHS player, DVD player, camcorder, laser disc player or any other compatible video image source. The projector can accept composite, component, or S-Video signals: Composite video is characterized by a single-pin “RCA-type”... -
Page 14: Using The Projector
Projector User’s Manual Using the Projector This section describes projector operations: Turning the projector and A/V equipment on and off Adjusting the projected image Projector controls Checking the projector status Turning the Audio/Visual (A/V) Equipment On and Always turn on the projector and related A/V equipment in the following order. 1.Projector 2.Computer 3.Video source... -
Page 15: Focusing And Positioning The Screen Image
Projector User’s Manual 5.To turn off the projector, press the Power button. A message will appear on the screen for about 10 seconds: 6.Press the Power button once again(to turn off the power) while the message is still showing on the screen. Note: Please wait until the fan motor and the Lamp LED turn off before removing the power cord from the projector. -
Page 16: Projector Control Menus
Projector User’s Manual LED TYPE COLOR STATUS MEANING Power LED Green Solid The projector is powered and ready. Power LED Solid The projector system has some problems with its fan, so the projector cannot start up. Lamp LED Green Solid The lamp is in good condition and is projecting at maximum brightness. - Page 17 Projector User’s Manual 2.Selecting the desired menu or sub-menu(to scroll through the menu choices): On the Projector Control Panel: press the button. On the Remote Controller: press the button. Note: To scroll up: press the button. To scroll down: press the button.
-
Page 18: Menu Options
Projector User’s Manual Menu Options The projector is equipped with three types of on-screen display(OSD) menus. Each OSD menu interface you will see on the screen is depending on the type of input signal. Input Signal Type Menu Interface Computer HDTV Input, Picture, Color, PIP, Audio, Misc, Option, Reset S-Video... -
Page 19: Input Menu
Projector User’s Manual Input Menu This menu allows to specify the signal source that you wish to project. This is particularly useful if you have several sources (video and/or computer) connected to your projector. Changing settings procedure (using either the Projector Control Panel or the Remote Controller): 1.Press the MENU button to display OSD menu. - Page 20 Projector User’s Manual Changing settings procedure (using either the Projector Control Panel or the Remote Controller): 1.Press the MENU button to display OSD menu. 2.Press the button to select PICTURE menu. 3.To enter the sub-menu setting, press the MENU button once again. 4.Press the button to select the sub-menu item.
-
Page 21: Color Menu
Projector User’s Manual Color Menu This menu provides precise control of the color settings including: color temperature (preset & user define) and gamma. Changing settings procedure (using either the Projector Control Panel or the Remote Controller): 1.Press the MENU button to display OSD menu. -
Page 22: Pip Menu
Projector User’s Manual PIP Menu This menu enables you to adjust the PIP (additional video image window on the graphics background) settings such its input, size, horizontal position, vertical position, brightness, contrast, saturation, tint and sharpness. Changing settings procedure (using either the Projector Control Panel or the Remote Controller): 1.Press the MENU button to display OSD menu. - Page 23 Projector User’s Manual The following table provides detail of the available sub-menu choices: Sub-Menu Option Description Input Scans the PIP source. Auto Automatically scans the input source. Video PIP source from composite video signal. S-Video PIP source from S-video signal. YCbCr PIP source from component video signal.
-
Page 24: Audio Menu
Projector User’s Manual Audio Menu This menu allows you to control volume and mute(yes/no) the audio. Changing settings procedure (using either the Projector Control Panel or the Remote Controller): 1.Press the MENU button to display OSD menu. 2.Press the button to select AUDIO menu. -
Page 25: Misc Menu
Projector User’s Manual MISC Menu This menu includes projector utilities for keystone(vertical & horizontal), freeze frame (yes/no), blank screen(yes/no), and blank color mode settings. Changing settings procedure (using either the Projector Control Panel or the Remote Controller): 1.Press the MENU button to display OSD menu. -
Page 26: Option Menu
Projector User’s Manual Option Menu This menu includes projector utilities for language, OSD timeout, OSD horizontal position, OSD vertical position, rear mode, ceiling mode, auto off and lamp life indication. Changing settings procedure (using either the Projector Control Panel or the Remote Controller): 1.Press the MENU button to display OSD menu. -
Page 27: Reset Menu
Projector User’s Manual The following table provides detail of the available sub-menu choices: Sub-Menu Option Description Language Selects the language used in the OSD(on-screen display) menus. OSD Timeout Duration OSD menu stays active (at idle state). OSD PosiH Adjusts OSD menu display position (horizontally - left &... -
Page 28: Other Related Osd Menus
Projector User’s Manual 4. Press the to select YES if you want to restore all projector settings to the factory defaults. 5. Press the button to confirm the selection. 6. To exit from the current menu, toggle the MENU button. Other Related OSD Menus Following are the descriptions on the on-screen display menus with video input sources and without input source attached to your projector. -
Page 29: Other Osd Menus
Projector User’s Manual The following table provides detail of the available sub-menu choices: Sub-Menu Option Description Brightness The higher the setting, the brighter the image. The lower the setting, the darker the image. Contrast The higher the setting, the greater the contrast. The lower the setting, the lower the contrast. -
Page 30: No Input Signal
Projector User’s Manual No Input Signal If there is no input signal attached with your projector, if you press the MENU button (on either the Projector Control Panel or the Remote Controller), one of the following on-screen display menus will appear on the screen. Input Menu (refer to page 19) Option Menu... -
Page 31: Maintenance
Projector User’s Manual MAINTENANCE The projector needs little maintenance. You should keep the lens clean as dust, dirt or spots will project on the screen and diminish image quality. You will also need to clean the air filter located at the bottom of the projector periodically. It is important to keep the air filter clean because a clogged air filter prevents proper ventilation which is necessary to cool the projector and prevent it from overheating. -
Page 32: Cleaning The Air Filter
Projector User’s Manual Cleaning the Air Filter The air filter, which is located at the bottom of the projector, should be cleaned after every 100 hours of use. If it is not cleaned periodically, it can become clogged with dust and prevent the projector from being ventilated properly. This can cause overheating and damage the projector. -
Page 33: Replacing The Lamp
Projector User’s Manual Replacing the Lamp The projector lamp used for the light source has a certain life. It is time to replace them lamp when: When lamp dims, the projected image gets darker or starts to deteriorate. The projector lamp LED indicator turns to red (See page 15). Caution: The lamp becomes a high temperature after turning off the projector with the power button. -
Page 34: Technical Specifications
Projector User’s Manual TECHNICAL SPECIFICATIONS Projection System 3 panel 0.7 inch LCD projector Resolution (Pixels) 800 x 600 (480,000 dot x 3) Image Brightness 1100 ANSI Lumen (Typical) Uniformity Lens Manual Zoom (1.3X) Focal Length 21.5~ 28mm Contrast Ratio 400:1 Screen Size 40 ~ 200 inches Projection Type... -
Page 35: Preset Signals
Projector User’s Manual APPENDIX A Preset Signals Preset signal fH (kHz) fV (Hz) Sync Size Video 60 Hz 15.734 59.940 Video 50 Hz 15.625 50.000 Component 60 Hz 15.734 59.940 S on G/Y or Composite Sync Component 50 Hz 15.625 50.000 S on G/Y or Composite Sync... -
Page 36: Hdtv Preset Signals
Projector User’s Manual HDTV Preset Signals Preset Signals Horizontal Vertical Active fH(kHz) fV(Hz) Active Pixel Pixel 480p 31.469 59.940 720p 1280 45.000 60.000 1080i 1920 1080 33.716 29.970 ○ ○ ○ ○ ○ ○ ○ ○ ○ ○ ○ EN-36... - Page 37 Projector User’s Manual Mouse cable (for USB) Computer USB port Mouse Cable Projector Control port Mouse cable (for PS/2) Computer Mouse Cable PS/2 port Projector Control port Monitor OUT cable (for data) Display Set Monitor IN Monitor OUT Cable ○ ○ ○ ○ ○ ○ ○ ○ ○ ○ ○ EN-37...
- Page 38 Projector User’s Manual Connecting the Computer (data) Projector Computer Computer Cable DVI or VGA OUT Connecting the HDTV (data) Audio IN Audio OUT Audio Cable HDTV HDTV to DVI Cable Green,Blue,Red ○ ○ ○ ○ ○ ○ ○ ○ ○ ○ ○ EN-38...
- Page 39 Projector User’s Manual Connecting to a Video Source (S-Video, Component, Composite) Y Cb Cr (Component Video Cable) S-Video Cable DVD Player AV Composite Cable Video out VCR ○ ○ ○ ○ ○ ○ ○ ○ ○ ○ ○ EN-39...