
Related Manuals for Dyson contrarotator CR02


Summary of Contents for Dyson contrarotator CR02
- Page 1 User guide Please read this user guide carefully before use. This user guide also contains tips on effective washing and important safety notes. www.dyson.com...
-
Page 3: Table Of Contents
Maintenance Self clean cycle and cleaning Coin trap Water filter Emergency door release Troubleshooting Troubleshooting Illustrations and some product details may differ from your machine. In doubt, contact the Dyson helpline on 08705 275104 (UK) or 01 475 7109 (ROI) -
Page 4: Overview
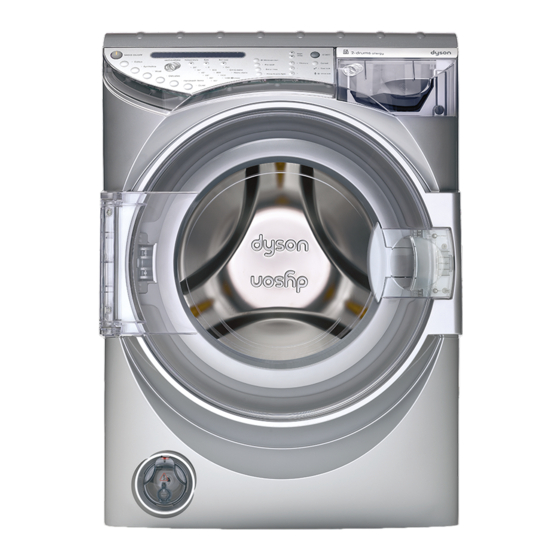
Overview Overview of your Dyson washing machine Hot water inlet Cold water inlet Power cable & plug & & & Control panel Soap tray Rating plate 01 & & Outer door Inner door Drainage hose & adjustable clip Dyson guarantee form... -
Page 5: Contrarotator
Contrarotator The only 2-drum wash action. Conventional washing machines may seem convenient, but their poor performance lets you down. So James Dyson asked his engineers to experiment with every imaginable way of washing to design a better washing machine. Along the way, Dyson engineers made a surprising discovery: washing by hand gave better wash results than single drum machines. -
Page 6: User Instructions
Dyson service • carry out any maintenance work on the machine other than If a problem arises with your Dyson washing machine, or if it that outlined in this guide. is displaying a fault code, please refer to the troubleshooting •... -
Page 7: Before Installation
Before installation Inner transit packaging removal Before installation, check the machine for damage. 7 Using the Dyson spanner remove the four bolts securing the A qualified person should always carry out installation. top transit bracket. All packaging must be removed before the machine is 8 Remove the four screws securing the bracket to the machine connected to power or water supplies. -
Page 8: Installation
01 for location). Water pressure: 0.4-5 bar. Capacity: 7kg dry laundry maximum. Location 600 mm Every Dyson washing machine is tested before it leaves the MAX. factory. As a result, there may be some dampness or water in 450 mm MIN. - Page 9 Installation Drainage Water supply You can alter the direction of the drainage hose to the left • Connect your machine to the water supply by hand, using the or right. hoses supplied. Only tighten by hand, do not use a spanner. •...
- Page 10 Warning: This machine must be earthed • Any electrical work required to install the washing machine • Using the Dyson spanner, adjust the two front feet so that the should be carried out by a qualified electrician. machine is perfectly stable and is touching the ground on all •...
-
Page 11: Operation
Operation Detergent use Loading the washing machine • Ensure the machine is plugged into the mains and switched on • Use only powder suitable for automatic washing machines. at the socket. Check that the water supply is on at the mains. Type of laundry Type of detergent •... -
Page 12: Starting Your Wash
Starting your wash To start your wash cycle using the default settings Switch on the machine Select the programme Select Cotton/Synthetics/Wool/ Delicate/Handwash items or Duvet cycle. Temperature, spin and soil type settings will automatically adjust to the default settings to give the best options for the selected wash. - Page 13 Start your wash cycle Press to start your chosen programme. Pause your wash cycle To pause the wash, for example to add a forgotten item to the wash, press the ‘Start’ button. Press ‘Start’ once more to resume the wash. When a programme is paused, the door may remain locked for safety reasons (see section...
-
Page 14: Optional Settings
Optional settings To personalise the default wash programmes Adjust your programme After selecting the fabric type, press the temperature, spin and soil type buttons to scroll through the options and select your preferred settings. Note: on certain programmes some options are not section available (see... - Page 15 Additional options To activate any of the additional options below after you have Start delay selected your programme, press Selected models only your desired option button once; This allows you to programme press it again to cancel the option. the wash to finish when you want Minimum iron it to.
- Page 16 • refer to care label for wash temperature Laundry with this symbol should not be and drying recommendations. put in a washing machine. • Dyson washing machine will wash most machine washable king size duvets up to 13.5 tog. Dry flat Chlorine-based bleach Note: Different manufacturers’...
- Page 17 Programme table Care label Suggested programme Temperature Spin speed Soil type Options Maximum load Cycle time Cotton 20 – 60˚C 0 –1400 rpm Dirt Pre-wash Pre-wash 3.5 kg 40 mins* 100% cottons For lightly soiled laundry Extra rinse Extra rinse Linen Rinse &...
-
Page 18: Maintenance 10
Maintenance Self clean cycle (on selected models only) • Approximately every 200 cycles, the machine will display ‘Self • The soap tray cavity in the machine should be cleaned out clean cycle due’. This message will be displayed at the end of with a small, soft brush, taking care not to dislodge the a finished wash cycle. - Page 19 1 Place a tray or shallow dish underneath the coin trap. 2 Using the Dyson spanner, lever the plug in the middle of the coin trap. The water will drain from the plug. Side view: lever spanner through 45 •...
- Page 20 • Remove the soap tray as described in section • Turn off the water supply to the machine. • Using the Dyson spanner or a coin, turn the door release • Unscrew both water inlet hoses by hand. screw of a turn clockwise to unlock the door.
-
Page 21: Troubleshooting 11
Troubleshooting Before calling the helpline, please carefully read the following pages. Machine displays “Child lock on” Machine displays “Not filling: check water supply” LCD display is blank Machine displays “Close inner door then press start” Certain spin speeds, temperatures, dirt levels cannot be selected Machine displays “Close outer door then press start”... - Page 22 Burning smell Transit packaging not removed. Remove top, rear and front packaging, (see section 01). Transit packaging is removed Call Dyson helpline. Clothes warm at end of cycle Hot and cold pipes reversed. Check orientation of hot and cold pipes.
- Page 23 Dyson Helpline • The fault code that appears on the LCD display, if applicable. UK 0870 600 2701 A Dyson service engineer will visit you to email service@dyson.com test your machine and repair if necessary. ROI (01) 475 7109 email irelandservice@dyson.com...
- Page 24 For Dyson, call Dyson Made & Tested by Dyson Dyson Call Centre Helpline 8 till 8, every day UK 08705 275104 ROI ( 01 ) 475 7109 service@dyson.co.uk www.dyson.com Dyson Ltd Tetbury Hill Malmesbury Wiltshire SN16 ORP JN.8887 30.10.03 PN.50351-04-01...