
Related Manuals for Dyson contrarotator


Summary of Contents for Dyson contrarotator
- Page 1 All manuals and user guides at all-guides.com User guide Please read this user guide carefully before use. This user guide also contains tips on effective washing and important safety notes. www.dyson.com...
- Page 2 All manuals and user guides at all-guides.com...
-
Page 3: Table Of Contents
All manuals and user guides at all-guides.com Contents Overview Overview of your Dyson Contrarotator The only 2-drum wash action Dyson Contrarotator User Instructions Free registration Important safety notes Before installation Inner transit packaging removal Moving the Contrarotator Installation Specification Location... -
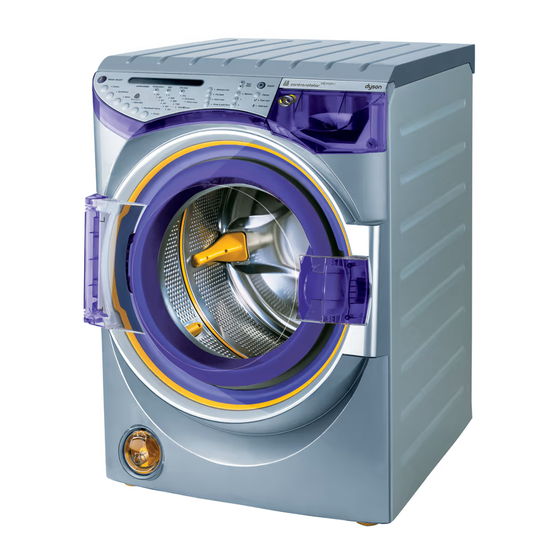
Page 4: Overview
All manuals and user guides at all-guides.com Overview Overview of your Dyson Contrarotator Hot water inlet Cold water inlet Power cable & plug & & & Control panel Soap tray Rating plate 01 & & Outer door Inner door Drainage hose & adjustable clip... -
Page 5: Dyson Contrarotator
Dyson Contrarotator The only 2-drum wash action. Conventional washing machines may seem convenient, but their poor performance lets you down. So James Dyson asked his engineers to experiment with every imaginable way of washing to design a better washing machine. -
Page 6: User Instructions
Dyson service • carry out any maintenance work on the machine other than If a problem arises with your Dyson washing machine, or if it that outlined in this guide. is displaying a fault code, please refer to the troubleshooting •... -
Page 7: Before Installation
Do not push with your foot. 6 Remove the plug inserted into the transit bracket from inside the machine. 7 Using the Dyson spanner remove the four bolts securing the top transit bracket. -
Page 8: Installation
01 for location). Water pressure: 0.4-5 bar. Capacity: 7kg dry laundry (maximum). Location 600 mm Every Dyson washing machine is tested before it leaves the MAX. factory. As a result, there may be some dampness or water in 450 mm MIN. - Page 9 All manuals and user guides at all-guides.com Installation Drainage Water supply You can alter the direction of the drainage hose to the left Always: or right. • connect your machine to the water supply by hand, using the • To change the direction of the machine’s drainage hose, hoses supplied.
- Page 10 Electrical installation Warning: This machine must be earthed • Using the Dyson spanner, adjust the two front feet so that the • Any electrical work required to install the washing machine machine is perfectly stable and will not rock on three of its should be carried out by a qualified electrician.
-
Page 11: Operation
1. there will be more dirt circulating in the wash. • Fabric conditioner can be added to the compartment marked • When using your Dyson washing machine we recommend the to the level indicated. following doses: CRO1 with a half load... -
Page 12: Starting Your Wash
All manuals and user guides at all-guides.com Starting your wash To start your wash cycle using the default settings Switch on the machine Select the programme Select Cotton/Synthetics/Wool/ Delicate/Handwash items or Duvet. Temperature, spin and soil type settings will automatically adjust to the default settings to give the best options for the selected wash. - Page 13 All manuals and user guides at all-guides.com Start your wash cycle Press to start your chosen programme. Pause your wash cycle To pause the wash, press the ‘Start’ button (for example to add a forgotten item to the wash). Press ‘Start’ once more to resume the wash.
-
Page 14: Optional Settings
All manuals and user guides at all-guides.com Optional settings To personalise the default wash programmes Adjust your programme After selecting the fabric type, press the temperature, spin and soil type buttons to scroll through the options and select your preferred settings. - Page 15 All manuals and user guides at all-guides.com Start delay only available on CRO1 Memory This allows you to programme the wash to finish when you want it to. Use the < and > arrows to adjust the settings (eg: if you want Additional options the wash to start in 10 hours time, To activate any of the additional...
- Page 16 Medium iron programme. If you are unsure of the the wash tub. Iron 150ºC Suggested Dyson wash programme - Cotton care label, use a gentle programme such as Wool. Mixed fabric load Cool iron Synthetics •...
- Page 17 All manuals and user guides at all-guides.com Programme table Care label Suggested programme Temperature Spin speed Soil type Options Maximum load Cycle time Cotton 30 – 60˚C 0 –1400 rpm Dirt Pre-wash Pre-wash 3.5 kg 40 mins* Sturdy cottons For lightly soiled laundry Extra rinse Extra rinse Linen...
-
Page 18: Maintenance
All manuals and user guides at all-guides.com Maintenance Cleaning Always: • The soap tray cavity in the machine should be cleaned out • disconnect the machine from the mains before cleaning or with a small, soft brush, taking care not to dislodge the carrying out any maintenance work. - Page 19 1 Place a tray or shallow dish underneath the coin trap. 2 Using the Dyson spanner, lever the plug in the middle of the coin trap. The water will drain from the plug. Side view: lever hand and spanner 45 •...
- Page 20 • Remove the soap tray as described in section 1001. • Unscrew both water inlet hoses by hand. • Using the Dyson spanner or a coin, turn the door release • Using pliers, grip the coloured filters, pull them out and rinse screw of a turn anticlockwise to unlock the door, them under cold water.
-
Page 21: Troubleshooting 11
All manuals and user guides at all-guides.com Troubleshooting Before calling the helpline, please carefully read the following pages. Cancel button does not Machine displays work during a wash “Child lock on” Machine displays “Not filling: check water supply” LCD display is blank Machine displays “Close inner door then press start”... - Page 22 All manuals and user guides at all-guides.com Troubleshooting Some solutions may require you to disconnect the electricity and water supply. Symptom Possible causes Solutions LCD display is blank There is no power to the machine. Ensure the machine is plugged in and switched on.
- Page 23 Dyson Helpline • The fault code that appears on the UK 0870 600 2701 LCD display, if applicable. A Dyson service engineer will visit you to email service@dyson.com test your machine and repair if necessary. ROI (01) 475 7109 NOTE: If an engineer is booked and it is found that the fault could email irelandservice@dyson.com...
- Page 24 All manuals and user guides at all-guides.com UK 0870 600 2701 Open 7 days a week, 8am – 8pm ROI ( 01 ) 475 7109 Dyson Ltd Tetbury Hill Malmesbury Wiltshire SN16 ORP www.dyson.com...