Table of Contents

Related Manuals for Anker Y1010


Summary of Contents for Anker Y1010
- Page 1 For FAQs and more information, please visit: anker.com/support @Anker Deutschland @anker_o cial @Anker O cial @anker_jp @Anker Japan @Anker_JP @Anker Charging Dock for Oculus Quest 2 USER MANUAL Product Number: Y1010 51005002497 V03...
- Page 2 English Deutsch Español Français 日本語 한국어 繁體中文...
-
Page 3: Safety Instructions
Safety Instructions • The batteries (battery pack or batteries installed) shall not be exposed to excessive heat such as sunshine, fire, or the like. • Attention should be drawn to the environmental aspects of battery disposal. Read all the instructions before using the product, refer to the ◦... - Page 4 • Une mauvaise utilisation, une chute ou l'utilisation d'une force excessive entraîner une explosion ou une fuite de liquide ou de gaz inflammable. peuvent endommager le produit. ◦ Une batterie soumise à une pression d'air extrêmement basse peut entraîner • Lors de la mise au rebut de piles ou de batteries secondaires, séparez les piles une explosion ou une fuite de liquide ou de gaz inflammable.
-
Page 5: Using Your Charging Dock
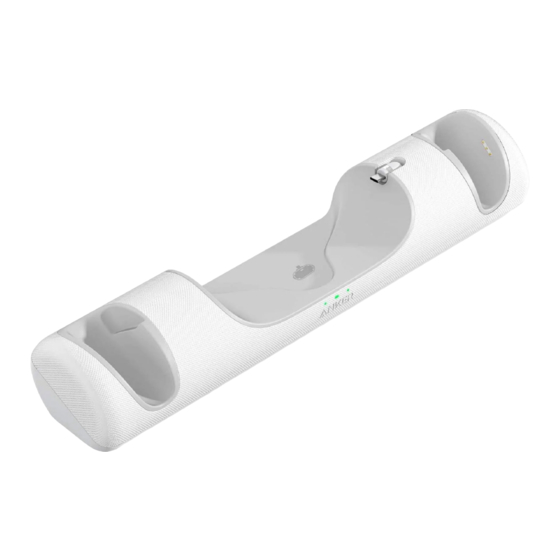
At a Glance Using your Charging Dock 1. Insert the magnetic USB-C plug into the USB-C charging port of your headset. 2. Place your headset into the charging dock and make sure that the magnetic USB-C plug adheres to the magnetic output connector. Charging dock for headset USB-C input port Magnetic output connector... - Page 6 3. Remove the original battery door and alkaline battery from controllers. 5. Connect the charging dock to the power supply by using the provided USB-C charging cable and charger. >>> The power LED indicators will turn on. USB-C 4. Install the rechargeable battery with correct polarity, make sure that the 2 bare metal sheets align with the outer frame of the battery compartment.
-
Page 7: Auf Einen Blick
Auf einen Blick LED Light Guide Solid amber for 5 seconds Connected to power Solid amber Being charged Solid green Fully charged Flashing amber Working improperly Specifications USB-C Input DC 5V/9V Magnetic USB-C Output Max 5.0VDC 3.0A, 9.0VDC 2.0A Left Controller Charging Port 1.5VDC 0.9A Right Controller Charging Port 1.5VDC 0.9A... - Page 8 Verwendung Ihres Ladedocks 3. Entfernen Sie die originale Batterietür und nehmen Sie die Alkaline-Batterien aus den Controllern heraus. 1. Führen Sie den magnetischen USB-C-Stecker in den USB-C-Ladeanschluss Ihres Headsets ein. 2. Setzen Sie Ihr Headset auf das Ladedock und vergewissern Sie sich, dass der 4.
-
Page 9: Technische Daten
5. Verbinden Sie das Ladedock über das mitgelieferte USB-C-Ladekabel und Bedeutung des LED-Lichts Ladegerät mit der Stromversorgung. >>> Die LED-Stromanzeigen werden eingeschaltet. Leuchtet 5 Sekunden lang gelb An Stromversorgung angeschlossen Leuchtet gelb Wird aufgeladen Leuchtet grün Vollständig aufgeladen USB-C Blinkt gelb Funktioniert nicht ordnungsgemäß... -
Page 10: Vista General
Vista general Uso de la base de carga 1. Inserte el enchufe USB-C magnético en el puerto de carga USB-C del visor. 2. Coloque el visor en la base de carga y asegúrese de que el enchufe USB-C magnético se adhiera al conector de salida magnético. Base de carga para el visor Puerto de entrada USB-C Conector de salida magnético... - Page 11 3. Retire la tapa original del compartimento para pilas y la pila alcalina de los 5. Conecte la base de carga al suministro eléctrico mediante el uso del controladores. cargador y el cable de carga USB-C incluidos. >>> Los indicadores LED de alimentación se iluminarán. USB-C 4.
-
Page 12: Especificaciones
Récapitulatif Guía de los indicadores LED Ámbar fijo durante 5 segundos Conectado a la alimentación Ámbar fijo Carga en curso Verde fijo Carga completa Ámbar intermitente Funcionamiento incorrecto Especificaciones Entrada USB-C 5 V/9 V CC Salida máxima del conector USB-C magnético 5.0VCC 3A, 9.0VCC 2A Puerto de carga del controlador izquierdo 1,5VCC 0,9A Puerto de carga del controlador derecho... - Page 13 Utilisation de votre station de charge 3. Retirez le couvercle des piles d'origine et les piles alcalines des manettes. 1. Insérez la fiche USB-C magnétique dans le port de chargement USB-C de votre casque. 4. Installez la batterie avec la bonne polarité, assurez-vous que les 2 feuilles 2.
-
Page 14: Spécifications
5. Connectez la station de charge à l'alimentation en utilisant le câble et le Guide du voyant LED chargeur USB-C fourni. >>> Le voyant LED s'allume. Ambre fixe pendant 5 secondes En tension Ambre fixe En charge Vert fixe Chargement terminé USB-C Ambre clignotant Fonctionnement erroné... - Page 15 外観 充電ドックの使用方法 1. 磁気 USB-C プラグを、 ヘッドセットの USB-C 充電ポートに挿入します。 2. ヘッドセットを充電ドックにセットし、磁気 USB-C プラグが充電ド ックの磁気出力コネクタに接続していることを確認します。 ヘッドセット用の充電ドック USB-C 入力ポート 磁気出力コネクタ コントローラ用の充電ドック LED インジケーター ( 左右:コントローラー、中央:ヘッドセット ) 充電端子 磁気 USB-C プラグ 交換用電池カバー 充電式電池 25 JP JP 26...
- Page 16 3. コントローラーの元の電池カバーと単 3 電池を取り外します。 5. 付属の USB-C ケーブルと充電器を使用して、充電ドックを電源に接 続します。 >>> 正しく接続されると LED インジケーターが点灯します。 USB-C 4. 充電式電池を正しい向きに取り付け、充電式の電池のそれぞれの端子 が電池カバーの端子の位置と揃っていることを確認します。電池カバ ーを閉じ、コントローラーを充電ドックにセットします。 • 5~15の出力の充電器を使用する場合、充電ドックではヘ ッドセットの充電が優先されます。充電器の出力が5W未 満の場合、充電ドックは動作しません。 • 本製品に内蔵されているニッケル水素電池は、一般的に充 電が完了すると電圧が低下します。そのため、コントロー ラーが満充電の状態で6時間以上充電ドックに放置される と、機器またはアプリ上ではバッテリー残量が100%未満 と表示されますが、実際は10時間以上稼働するのに十分な バッテリー残量があります。 27 JP JP 28...
- Page 17 요약 LED インジケーターの表示 オレンジ色で 5 秒間点灯 電源に接続 オレンジ色で点灯 充電中 緑色で点灯 満充電 オレンジ色で点滅 正常に機能していません 製品の仕様 入力 DC 5V/9V 磁気 USB-C の最大出力 5.0VDC 3.0A、9.0VDC 2.0A コントローラー ( 左 ) の充電ポート 1.5VDC 0.9A コントローラー ( 右 ) の充電ポート 1.5VDC 0.9A 充電時間 約 2.5 時間 充電式電池の容量...
- Page 18 충전 도크 사용하기 3. 컨트롤러에서 원래 배터리 도어와 알카라인 배터리를 제거합니다 . 1. 마그네틱 USB-C 플러그를 헤드셋의 USB-C 충전 포트에 삽입합니다 . 2. 헤드셋을 충전 도크에 놓고 마그네틱 USB-C 플러그가 마그네틱 출력 커넥터 4. 충전식 배터리를 올바른 극성으로 설치하고 2 개의 베어 메탈 시트가 배터리 에...
- Page 19 LED 조명 가이드 5. 제공된 USB-C 충전 케이블과 충전기를 사용하여 충전 도크를 전원 공급 장 치에 연결합니다 . >>> 전원 LED 표시등이 켜집니다 . 5 초 동안 황색 점등 전원이 연결됨 황색 점등 충전 중 초록색 점등 완충됨 USB-C 황색 깜박임 動作に異常があります...
- Page 20 概觀 使用您的充電座 1. 將磁性 USB-C 插頭插入您耳機的 USB-C 充電連接埠。 2. 將您的耳機放入充電座,並確定磁性 USB-C 插頭緊附於磁性輸出接頭。 耳機充電座 USB-C 輸入連接埠 磁性輸出接頭 控制器專用充電座 電源 LED 指示燈 ( 左 / 右:控制器;中間:耳機 ) 充電針腳 磁性 USB-C 插頭 更換電池門 可充電電池 35 TW TW 36...
- Page 21 3. 從控制器取下原始電池門和鹼性電池。 5. 使用隨附的 USB-C 充電線和充電器將充電座連接至電源。 >>> 電源 LED 指示燈將會亮起。 USB-C 4. 以正確極性方向安裝可充電電池, 確定 2 個裸金屬片對齊電池室的外框。 關上電池門並將控制器裝回充電座。 • 如果您使用輸出功率 5~15W 的充電器,充電座將會優先為 耳機充電。如果充電器的輸出功率小於 5W,充電座將不 會運作。 • 通常在充飽電後,鎳氫電池的電壓將會降低。在控制器充飽 電並離開充電座超過 6 小時後,Quest 2 或應用程式中顯示 的電池電量將會低於 100%,不過仍能提供充足的電力持續 運作超過 10 小時。 37 TW TW 38...
- Page 22 FCC Statement This device complies with Part 15 of the FCC Rules. Operation is subject LED 指示燈說明 to the following two conditions: (1) This device may not cause harmful interference, and (2) this device must accept any interference received, 穩定亮起琥珀色 5 秒 連接至電源...
-
Page 23: Customer Service
ES: Garantía limitada de 18 meses* | FR: Garantie de 18 mois* Declaration of Conformity JP: 通常保証18ヶ月 (延長あり) | KO: 18개월의 제한 보증이 적용됩니다 Hereby, Anker Innovations Limited declares that the product type Y1010 繁體中文: 18 個月有限保固 is in compliance with Directives 2014/35/EU & 2014/30 /EU & 2011/65/ EU &... - Page 24 JP: テクニカルサポート | KO: 기술 지원이 평생 제공됩니다 繁體中文: 永久技術支援 support@anker.com support.mea@anker.com (For Middle East and Africa Only) (US) +1 (800) 988 7973 Mon-Fri 9:00am - 5:00pm (PT) (UK) +44 (0) 1604 936200 Mon-Fri 6:00 - 11:00 (GMT) (DE) +49 (0) 69 9579 7960 Mo-Fr 6:00 - 11:00 ( 中国...