Moen 9000 Quick Start Manual
Two-handle widespread lavatory rough-in valve
Hide thumbs
Also See for 9000:
- User manual (6 pages) ,
- Specifications (1 page) ,
- Installation manual (12 pages)
Advertisement
Quick Links
PLEASE CONTACT MOEN FIRST
For Installation Help, Missing or Replacement Parts
(USA) 1-800-BUY-MOEN (1-800-289-6636) www.moen.com
(Canada) 1-800-465-6130 www.moen.ca
POR FAVOR, CONTÁCTESE PRIMERO CON MOEN
Para obtener ayuda de instalación, piezas faltantes o de
recambio
(Costa Este) 011 52 (800) 718-4345 www.moen.com.mx
VEUILLEZ D'ABORD CONTACTER MOEN
En cas de problèmes avec l'installation, ou pour obtenir
toute pièce manquante ou de rechange
(Canada) 1-800-465-6130 www.moen.ca
HELPFUL TOOLS
For safety and ease of faucet replacement, Moen
recommends the use of these helpful tools.
HERRAMIENTAS ÚTILES
Para que el cambio de la llave sea fácil y seguro, Moen le
recomienda usar estas útiles herramientas.
OUTILS UTILES
Par mesure de sécurité et pour faciliter l'installation, Moen
suggère l'utilisation des outils suivants.
Adjustable Wrench
Safety Glasses
Llave ajustable
Gafas de seguridad
Clé ajustable
Lunettes de sécurité
Sealant
Sellador
Mastic
Phillips Screwdriver
Destornillador Phillips
Tournevis Phillips
Thread Seal Tape
Cinta para sellar roscas
Ruban pour joints filetés
TWO-HANDLE WIDESPREAD
LAVATORY ROUGH-IN VALVE
VÁLVULA EMPOTRADA DE DOS MANERALES
SOUPAPE DE PLOMBERIE BRUTE DE LAVABO
À DEUX POIGNÉES ÉLOIGNÉES
Models/Modelos/Modèles 9000, 69000
Record Purchased Model Number:
Registro del número de modelo comprado:
Consigner ici le numéro du modèle acheté :
_______________________
(Save instruction sheet for future reference)
(Guarde la hoja de instrucciones para futura referencia)
(Garder ces directives pour référence ultérieure)
Register Online:
Regístrese en línea:
S'enregistrer en ligne :
www.moen.com/product-registration
INS266H - 7/21
Advertisement

Related Manuals for Moen 9000


Summary of Contents for Moen 9000
- Page 1 For safety and ease of faucet replacement, Moen recommends the use of these helpful tools. HERRAMIENTAS ÚTILES Para que el cambio de la llave sea fácil y seguro, Moen le recomienda usar estas útiles herramientas. OUTILS UTILES Par mesure de sécurité et pour faciliter l’installation, Moen suggère l’utilisation des outils suivants.
-
Page 2: Parts List
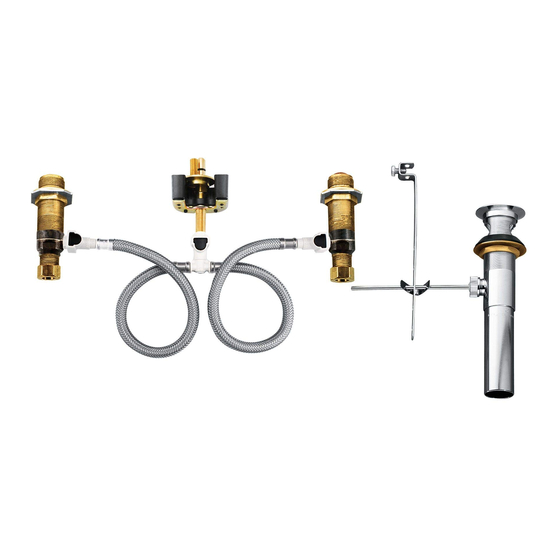
Parts List A. Mounting Shank H. Valve Body (Hot) B. Upper Mounting Washers I. Valve Body (Cold) (x2) J. Mounting Tool C. Mounting Bracket K. Quick Connect Hose D. Mounting Washer (x2) L. Protective Sleeve (x2) E. Mounting Plate F. Mounting Bracket Nut G. -
Page 3: Lista De Piezas
INS266H - 7/21 Parts List M. Waste Cap N. Drain Flange O. Drain Washer P. Drain Nut Q. Pivot Rod Cover R. Pivot Rod S. Pivot Rod Seat Upper Drain Body U. Drain Body Tailpiece Lista de piezas M. Tapón de residuos N. - Page 4 1. Install Mounting Shank (A) into sink deck opening as shown. 1. Apply Sealant to underside of Mounting Shank (A). Flip over to install into sink hole. 2. Instale el vástago de montaje (A) en la abertura de la cubierta del fregadero como se muestra.
- Page 5 INS266H - 7/21 1. Attach Mounting Tool (J) to Mounting Bracket Nut (F) as shown. 1. Insert Screwdriver into hole of Mounting Tool (J). 2. Further tighten Mounting Bracket Nut (F). 2. Hand tighten nut. 1. Conecte la herramienta de montaje (J) a la tuerca del soporte de 1.
- Page 6 1. Insert hot and cold valve bodies (H) and (I) through Mounting 1. Partially install screws from mounting ring into Mounting Ring (G). Washers (B) as illustrated. 1. Instale parcialmente los tornillos del anillo de montaje en el anillo 1. Inserte los cuerpos de las válvulas frío y caliente (H) y (I) a través de montaje (G).
- Page 7 INS266H - 7/21 1. Attach Quick Connect Hose (K) to the bottom of the Spout Shank (A). 1. Remove Protective Sleeves (L) from valve bodies (H) (hot) and (I) Push hose (K) up as far as possible, until a “click” is heard. Tug downward to (cold).
- Page 8 FOR WASTE ASSEMBLY INSTALLATION Thread Seal Tape Cinta de roscas PARA LA INSTALACIÓN DEL Ruban pour joints filetés ENSAMBLAJE DE RESIDUOS POUR INSTALLER L'ASSEMBLAGE DE LA BONDE 1. Apply thread seal tape to threads of Drain Body Tailpiece (U) and insert into Upper Drain Body (Y).
- Page 9 INS266H - 7/21 1. Re-install Pivot Rod Cover (Q) over Pivot Rod (R) and hand tighten 1. From under the sink, push Upper Drain Body (Y), Drain Flange (N) into to Upper Drain Body (Y). sink hole opening. Ensure Drain Flange (N) is snug against sink opening.
- Page 10 Les produits Moen sont fabriqués selon les normes les plus standards of quality and workmanship. Moen warrants to normas de calidad y mano de obra. Moen le garantiza al com- élevées de qualité et de main-d’œuvre. Moen garantit à the original consumer purchaser for as long as the original prador original que durante el tiempo que la tenga su casa (el l’acheteur original, tant qu’il sera propriétaire de la maison (la...