Advertisement
Quick Links
Please Contact Moen First
For Installation Help, Missing or
Replacement Parts
(USA)
1-800-BUY-MOEN (1-800-289-6636)
Mon - Fri 8:00 AM to 7:00 PM, Eastern
Sat. 9:00 AM to 3:00 PM Eastern
WWW.MOEN.COM
(Canada)
1-800-465-6130
Mon - Fri 7:30 AM to 8:00 PM, Eastern
WWW.MOEN.CA
Por favor, contáctese primero con Moen
Para obtener ayuda de instalación, piezas
faltantes o de recambio
01-800-718-4345
Lunes a viernes de 8:00 a 20:00 hs.
(Costa Este)
Sáb. 8:00 a 18:30 hs. (Costa Este)
WWW.MOEN.COM.MX
Veuillez d'abord contacter Moen
en cas de problèmes avec l'installation, ou pour
obtenir toute pièce manquante ou de rechange
1-800-465-6130
Du lundi au vendredi :
de 7 h 30 à 20 h, HE
WWW.MOEN.CA
HELPFUL TOOLS
For safety and ease of faucet replacement,
Moen recommends the use of these
helpful tools.
7 /32"
Installation Guide
Guía de Instalación
Guide d'installation
ioDIGITAL™ ROMAN TUB SPOUT SHANK
WITH DIVERTER
MODEL 4898
TUBO ROSCADO PARA SURTIDOR DE TINA
ROMANA IODIGITAL™ CON DERIVADOR
MODELO 4898
TIGE DE BEC POUR BAIGNOIRE ROMAIRE
IODIGITAL
MODÉLE 4898
HERRAMIENTAS ÚTILES
Para que el cambio de la llave sea fácil y
seguro, Moen le recomienda usar estas
útiles herramientas.
Sizes / Tamaños / Tailles
1 1 /4"
AVEC INVERSEUR
MC
OUTILS UTILES
Par mesure de sécurité et pour faciliter
l'installation, Moen suggère l'utilisation des
outils suivants.
/ 31.75mm
1 3 /8"
/ 34.93mm
INS2014A - 9/14
Advertisement

Related Manuals for Moen ioDIGITAL 4898


Summary of Contents for Moen ioDIGITAL 4898
- Page 1 WWW.MOEN.COM (Canada) 1-800-465-6130 Mon - Fri 7:30 AM to 8:00 PM, Eastern WWW.MOEN.CA Por favor, contáctese primero con Moen Para obtener ayuda de instalación, piezas faltantes o de recambio 01-800-718-4345 Lunes a viernes de 8:00 a 20:00 hs. (Costa Este) Sáb.
-
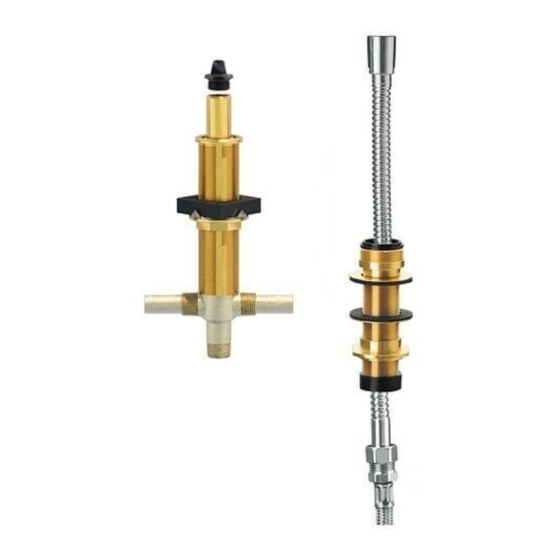
Page 2: Parts List
Parts List A. Protective Tube K. Hose Shank B. Test Plug L. Below Deck Hose Shank Gasket C. Top Mounting Nut M. Below Deck Hose Shank Washer A726 D. Spout Shank N. Shank Adapter Screws (x2) E. Push Fitting O. Threaded Shank Adapter F. - Page 3 INS2014A - 9/14 " (35mm) " (38mm) Assemble Spout Shank Bracket (F), Tapered Bushing (G), Mounting Nut (R) onto Spout Shank (D). Arme la ménsula del tubo roscado del surtidor (F), el buje cónico (G) y la tuerca de montaje (R) en el tubo roscado del surtidor (D).
- Page 4 For unfinished deck, go to: Para cubierta sin terminar, vaya a: Pour une plate-forme non finie, aller à : For finished deck, go to: Para cubierta terminada, vaya a: Pour une plate-forme finie, aller à : 1. Thread Test Plug (B) to Spout Shank (D). 2.
- Page 5 INS2014A - 9/14 Unfinished Deck /Cubierta sin terminar/ Finished Deck / Cubierta terminada / Plate-forme non finie Plate-forme finie 1/8" (3mm) above deck when Center Shank complete. Tubo roscado centra 1/8” (3 mm) sobre la cubierta Tige centrale terminada prevista 3mm (1/8 po) au-dessus de la plateforme lorsque terminé.
- Page 6 Insert Hose Shank (K) into deck from above. Assemble Below Deck Hose Shank Gasket (L), Finished Deck / Cubierta terminada / Below Deck Hose Shank Washer (M), and Threaded Shank Adapter (O) onto Hose Shank (K). Plate-forme finie Rotate counter clockwise. Inserte el espiga de la manguera (K) en la cubierta desde arriba.
- Page 7 INS2014A - 9/14 1. Connect Pull-Out Hose (I) and Washer (Q) to Leader Hose (S). 1. Connect Leader Hose (S) to bottom of Spout Shank (D). 2. Tighten with wrench. 2. Tighten with an adjustable wrench. 1. Conecte la manguera retráctil (I) y la arandela (Q) a la manguera principal (S). 1.
- Page 8 Il suffit d’écrire area code and telephone number. estado a otro o de una provincia o nación a otra. Moen lo à Moen inc. à l’adresse indiquée ci-dessous, pour expli- asesorará en el procedimiento a seguir para hacer válida quer le défaut, d’inclure une preuve d’achat, d’inscrire...