Table of Contents

Related Manuals for Ricoh M049


Summary of Contents for Ricoh M049
- Page 1 M049 (MF-2a) / M048 (MF-2b) M049/M048 Service Training Product Overview MF-2a/MF-2b Slide 1 Most recently updated - January 30th, 2009 (New notes text for Slide #51) Most recently updated - January 29th, 2009 (New photo for Slide #51)
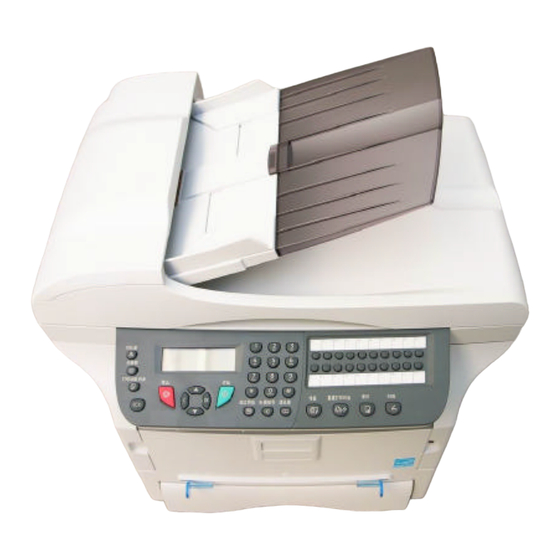
- Page 2 M049 (MF-2a) / M048 (MF-2b) The Machine This is the machine you will study in this training course. Note the following: w Paper tray w Bypass tray » (Manual feed) w ADF (M048 only) w Operation panel Slide 2...
-
Page 3: Machine Details
M049 (MF-2a) / M048 (MF-2b) Machine Details q This product consists of a color scanner with a 600 dpi resolution and a Black and White printer with a 600 dpi resolution. These two components are integrated into a single compact machine. -
Page 4: Operation Panel
M049 (MF-2a) / M048 (MF-2b) Operation Panel - 1/2 Model M048 / MF2b Go to the machine and have a look at the operation panel. w (Depending on the model and production date, the appearance of the control panel may differ slightly from the above image.) - Page 5 M049 (MF-2a) / M048 (MF-2b) Operation Panel - 2/2 Model M049 / MF2a Go to the machine and have a look at the operation panel. w (Depending on the model and production date, the appearance of the control panel may differ slightly from the above image.)
- Page 6 M049 (MF-2a) / M048 (MF-2b) Clearance Machine depth without paper tray and AC cord – 386 mm. Allowing for paper tray, ADF cord, and AC cord clearance – 449 mm. Slide 6 Verify that there is rear clearance for the paper tray, ADF cable, and AC cord when the machine is to be operated in confined spaces.
- Page 7 M049 (MF-2a) / M048 (MF-2b) Interfaces q Model M048 provides Fax connectivity. q For full details, see the Service Manual and the Operating Instructions Slide 7...
-
Page 8: Service Training
M049 (MF-2a) / M048 (MF-2b) M049/M048 Service Training Specifications Slide 8... - Page 9 M049 (MF-2a) / M048 (MF-2b) Changes from Previous Model q Print Speed w 20ppm (A4) (from 16ppm) q Copy Speed w 20cpm (A4) (from 16ppm) q Duplex w Manual setting (from no duplex) q Supported OS w W-2000/XP/Vista/Server-2003 » Vista & Server 2003 new...
-
Page 10: General Specifications
M049 (MF-2a) / M048 (MF-2b) General Specifications - 1/2 q Look over the Specifications section of the Service Manual for the following. w General Specifications w Paper sizes w Machine configuration w Optional Equipment q Note that this is a compact and lightweight machine:... - Page 11 M049 (MF-2a) / M048 (MF-2b) General Specifications - 2/2 q Power supply w Single phase 220-240V 50/60 Hz, 4.5 A q Power consumption w 10/12 W in Power-save mode w 33/35 W in Standby w 450 W during printing (900W peak)
-
Page 12: Printer Specifications
M049 (MF-2a) / M048 (MF-2b) Printer Specifications q Type w Laser (using normal paper) q Resolution w 600 dpi q Output Paper Capacity w 50 sheets (face down) q Zoom range w 25% to 400% Slide 12... -
Page 13: Scanner Specifications
M049 (MF-2a) / M048 (MF-2b) Scanner Specifications q Type w Color scanner q Color depth w 36 bits q Resolution w 600 dpi (optical) w 2400 dpi (interpolated) q Software compatibility w TWAIN q Maximum paper size w A4/Letter Slide 13... - Page 14 M049 (MF-2a) / M048 (MF-2b) M049/M048 Service Training Installation Slide 14...
-
Page 15: Installation Warning
M049 (MF-2a) / M048 (MF-2b) Installation (Warning) q As a safety precaution, the 230 V power cord must be close to the machine and positioned so that power can be quickly cut by unplugging the machine. Slide 15... - Page 16 M049 (MF-2a) / M048 (MF-2b) Installation (ADF Input Tray Extension*) q Install input tray extension for the ADF (Automatic Document Feeder) w Snap on as shown in illustration * M048 only. (Note that the ADF Input Tray Extension may be referred to by different names in the Operating Instructions and Service Manual.)
- Page 17 M049 (MF-2a) / M048 (MF-2b) Installation (Paper Tray) - 1/2 q Installation of the paper tray itself is straightforward – it easily slides in from the front. There are a few points to keep in mind however. w There is no tray heater for this model, so humidity can greatly affect the condition of the paper.
- Page 18 M049 (MF-2a) / M048 (MF-2b) Installation (Paper Tray) - 2/2 q When loading the machine with paper, pull the paper drawer all the way from the machine. q Push the lower plate (with “PUSH” stamped into the metal) all the way down until it locks flat.
- Page 19 M049 (MF-2a) / M048 (MF-2b) Installation (Toner Cartridge) q After removing the toner cartridge from its bag, tilt the cartridge to the right and to the left several times to evenly distribute the toner powder within. w Note: Do not shake it strongly, turn it over, or turn it on its end, as this could cause toner to leak out.
- Page 20 M049 (MF-2a) / M048 (MF-2b) Installation (Output Tray Extension) q To avoid printed pages from tumbling out in front of the machine, extend the Output Tray Extension*, and open the tab within it. w * Note that the Output Tray Extension may be referred to by different names in the Operating Instructions and Service Manual.
- Page 21 M049 (MF-2a) / M048 (MF-2b) M049/M048 Service Training Machine Operation Slide 21...
-
Page 22: Before You Start
M049 (MF-2a) / M048 (MF-2b) Before You Start Examine the following from the Operation Instructions (OI) before you start this training module. w Guide to the components w Control Panel w Turning on the power Slide 22... - Page 23 M049 (MF-2a) / M048 (MF-2b) Lab Work User Tools/System Settings Examine how to access the user tools as well as what you can change with the user tools. Practice making some of these changes if you are not already familiar with them. (See Operating Instructions)
- Page 24 M049 (MF-2a) / M048 (MF-2b) Lab Work Basic Troubleshooting Examine and practice the basic troubleshooting procedures for the following if you are not already familiar with them: General Settings, OI manual w Loading paper w Removing/Inserting Toner Cartridge w Clearing misfeeds...
- Page 25 M049 (MF-2a) / M048 (MF-2b) Lab Work Copy related Troubleshooting Examine troubleshooting techniques and practice the following (reference relevant Operating Instructions) w When a message is displayed w When copies are not clear w How to select various different copy settings...
- Page 26 M049 (MF-2a) / M048 (MF-2b) M049/M048 Service Training Component Layout Slide 26...
-
Page 27: Component Layout
M049 (MF-2a) / M048 (MF-2b) Component Layout Laser Unit q Refer to the Service Manual for more detailed information Slide 27... -
Page 28: Printing Process
M049 (MF-2a) / M048 (MF-2b) Printing Process Refer to the Service Manual for component details Slide 28 -This machine uses a negative toner system. -This machine does not have toner end detection. - Page 29 M049 (MF-2a) / M048 (MF-2b) Charge - 1/2 q Small diameter OPC (Organic Photoconductor) drum allows very compact design. q Charge roller charges the photoconductor, with the advantage of not generating ozone - giving OPC drum surface negative charge. Slide 29 More on Charge q The charge roller is of a design that doesn’t generate ozone.
- Page 30 M049 (MF-2a) / M048 (MF-2b) Charge - 2/2 q Voltage to the charge roller is supplied from the Power Supply Unit board via the terminal indicated above. Slide 30 For more details, see the Service Manual.
-
Page 31: Laser Exposure
M049 (MF-2a) / M048 (MF-2b) Laser Exposure - 1/2 Overview Laser diode produces electrostatic latent image on OPC drum w Optical Laser diode unit converts image data into laser pulses. Slide 31 As a mechanical safety feature, the shutter closes to block the laser beam path whenever the front door is opened. - Page 32 M049 (MF-2a) / M048 (MF-2b) Laser Exposure - 2/2 Block Diagram q Engine Board controls laser diode power (APCSH) and transfers printing data to laser diode (VIDEO). Slide 32 As an electrical safety feature, interlock switch on Engine Board cuts power when front door is open.
- Page 33 M049 (MF-2a) / M048 (MF-2b) Development - 1/2 Mono-component toner utilized, composed of resin and ferrite. Slide 33 q Toner mixing bar stirs and carries toner to toner application roller. Toner application roller supplies toner to development roller. As development roller turns past toner metering blade, only thin coating of negatively charged toner particles stays adhered to development roller.
- Page 34 M049 (MF-2a) / M048 (MF-2b) Development - 2/2 Voltage from Power Supply Unit board powers development roller and toner application roller through terminals. Slide 34 For more details, see the service manual.
- Page 35 M049 (MF-2a) / M048 (MF-2b) Transfer & Separation q Transfer roller touches OPC drum surface. Constant current is applied to transfer roller from power supply unit board. Positively-biased transfer roller pulls negatively-charged toner off drum. Curvature of drum, and antistatic brush, help paper to separate from drum.
-
Page 36: Drum Cleaning
M049 (MF-2a) / M048 (MF-2b) Drum Cleaning Toner Cartridge Cleaning Blade q Cleaning blade & used toner tank are contained in toner cartridge. q A counter blade system is used for drum cleaning. The cleaning blade removes remaining toner on the drum after image is transferred to paper. -
Page 37: Paper Feed And Registration
M049 (MF-2a) / M048 (MF-2b) Paper Feed and Registration - 1/6 Overview Single Sheet Feeder Bottom Plate Feed Roller Friction Spring Paper Feed System: Feed roller and Friction pad Paper Lift Mechanism: Bottom plate with spring Sheet feeder: Single sheet feeder... - Page 38 M049 (MF-2a) / M048 (MF-2b) Paper Feed and Registration - 2/6 Paper Feed Drive Mechanism Upper Tray Bottom Plate Paper Feed Clutch Friction Feed Roller Feed roller is located above upper tray bottom plate and friction pad. This allows only one sheet to feed from the paper tray.
- Page 39 M049 (MF-2a) / M048 (MF-2b) Paper Feed and Registration - 3/6 Paper Feed Operation Paper Feed Drive Gear Paper Feed Clutch Paper feed drive gear always rotates when main motor rotates, since paper feed clutch (magnetic clutch) is energized to turn paper feed roller.
- Page 40 M049 (MF-2a) / M048 (MF-2b) Paper Feed and Registration - 4/6 Registration Registration sensor detects leading edge of paper and synchronizes paper feed with writing of image on drum, enabling image and paper to match up properly. This sensor also detects paper feed jams.
- Page 41 M049 (MF-2a) / M048 (MF-2b) Paper Feed and Registration - 5/6 Paper End Detection Paper End Sensor Built-in paper end sensor detects the presence or absence of paper. Sensor actuator extends through slot in paper tray bottom plate, and sensor is actuated when paper is placed in upper tray.
- Page 42 M049 (MF-2a) / M048 (MF-2b) Paper Feed and Registration - 6/6 Jam Detection q Jam 1 - Paper jam at the paper cassette q Jam 2 - Paper did not pass registration sensor q Jam 3 - Paper did not reach the fusing unit...
- Page 43 M049 (MF-2a) / M048 (MF-2b) FUSING Overview Hot Roller Thermostat Thermistor Pressure Roller After image is transferred, paper enters fusing unit and image is fused to paper by heat and pressure of hot roller and pressure roller. CPU monitors hot roller temperature through thermistor in contact with hot roller surface.
-
Page 44: Cover Switch
M049 (MF-2a) / M048 (MF-2b) Cover Switch q Interlock switch cuts power to the following components when front cover is opened: w power pack w laser diode driver w fan motor w main motor w polygon mirror motor w fusing lamp. - Page 45 M049 (MF-2a) / M048 (MF-2b) Paper Feed Drive Release & Fusing Drive Release The main motor drives the paper feed unit, the transfer roller, the toner cassette, and fusing unit through a series of gears (as explained in the service manual).
-
Page 46: Service Training
M049 (MF-2a) / M048 (MF-2b) M049/M048 Service Training Disassembly & Replacement Slide 46... -
Page 47: General Precautions
M049 (MF-2a) / M048 (MF-2b) General Precautions Releasing Plastic Latches q Many of the parts are held in place with plastic latches which can break easily. Release them carefully, pushing the hook end of the latch away from the part to which it is latched. - Page 48 M049 (MF-2a) / M048 (MF-2b) General Precautions Replacement Worksheet Chart q When you replace a unit, refer to the flowchart as shown above to confirm the steps. Slide 48 For more details, refer to the Service Manual.
-
Page 49: Removing The Operation Panel
M049 (MF-2a) / M048 (MF-2b) Removing the Operation Panel Removal Steps Facing the front of the machine, first unlock the three rear clips of the operation panel ([A], [B] and [C]), then pull the panel towards yourself to release it from the two bottom slots ([D] and [E]). - Page 50 M049 (MF-2a) / M048 (MF-2b) Removing the ADF Motor Cover - 1/2 Releasing Plastic Latches Motor Cover Remove the ADF motor cover from its two slots using a flat screwdriver. Slide 50...
- Page 51 M049 (MF-2a) / M048 (MF-2b) Removing the ADF Motor Cover - 2/2 Releasing Plastic Latches Paper-end Sensor View of the underside of the ADF motor cover and the area it attaches to. Slide 51 The previous model had both a Paper-end Sensor and a Cover-open Sensor. With this model, the Cover-open Sensor has been removed, since when...
- Page 52 M049 (MF-2a) / M048 (MF-2b) ADF Cover Removal Releasing the ADF Cover at the Hinges ADF Scanner Cover Hinges After removing the ground cable, the ADF cover sensor connector and the paper sensor connector from their cable guide, slide them out of the ADF scanner cover.
- Page 53 M049 (MF-2a) / M048 (MF-2b) Discharge Lamp Assembly Removal Discharge Lamp Screws Discharge Lamp Ground Wire Bracket q To remove the Discharge Lamp assembly, remove its two screws, as well as the Discharge Lamp Ground Wire Bracket. Slide 53...
- Page 54 M049 (MF-2a) / M048 (MF-2b) M049/M048 Service Training Troubleshooting Slide 54...
-
Page 55: Paper Jams
M049 (MF-2a) / M048 (MF-2b) Paper Jams - 1/2 Potential spots in the paper path where jams may occur. Slide 55... - Page 56 M049 (MF-2a) / M048 (MF-2b) Paper Jams - 2/2 q Various types of paper jams and their causes are detailed under Paper Jam in the Service Manual. Some causes include: w Use of a non-recommended paper type w End fence set incorrectly...
-
Page 57: Print Quality
M049 (MF-2a) / M048 (MF-2b) Print Quality - 1/2 Print Quality Issues q A variety of print quality issues are dealt with in the Service Manual, under Print Quality such as: w Blank copies w Black copies w Dirty background... - Page 58 M049 (MF-2a) / M048 (MF-2b) Print Quality - 2/2 Actions q Some examples of actions taken to fix print quality issues are as follows. (See Print Quality in the Service Manual.) w (For blank copies) Print a test pattern, and then open the cover in the middle of printing.
-
Page 59: Error Codes
M049 (MF-2a) / M048 (MF-2b) Error Codes Communication (Fax) Error Codes q Communication error codes appear in logs (printed using the key sequence: [down arrow] > "5" > "4") and appear in transmission reports. q Some examples are: w 03 - Stopped by operator... - Page 60 M049 (MF-2a) / M048 (MF-2b) End of Course Slide 60...