Advertisement
Available languages
Available languages
Quick Links
USER MANUAL
SpaceView Pro Baby Monitor
Anker Innovations Limited. All rights reserved. eufy Security and eufy Security Logo are
trademarks of Anker Innovations Limited, registered in the United States and other countries. All
other trademarks are the property of their respective owners.
51005002424 V01
Advertisement

Summary of Contents for Anker eufy Security SpaceView Pro
- Page 1 SpaceView Pro Baby Monitor Anker Innovations Limited. All rights reserved. eufy Security and eufy Security Logo are trademarks of Anker Innovations Limited, registered in the United States and other countries. All other trademarks are the property of their respective owners.
-
Page 2: Table Of Contents
TABLE OF CONTENTS English What’s in the Box Español Feature Introduction Setting Up the Camera and Monitor Adding a New Baby Camera Using the Baby Monitor Placing the Camera (Wall & Corner Mount) Monitor Menu Settings Notice... -
Page 3: What'sin The Box
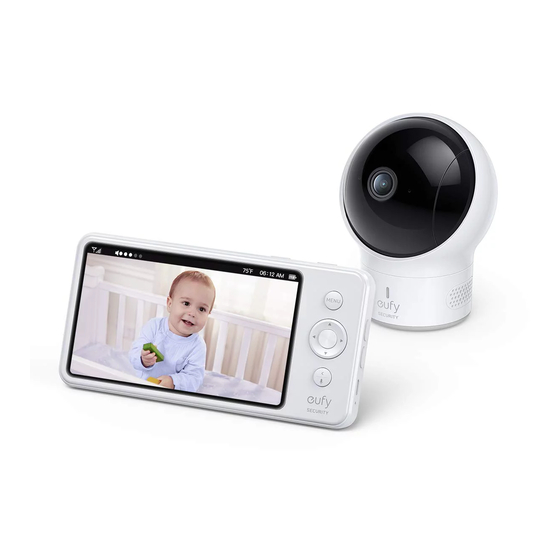
WHAT’S FEATURE IN THE BOX INTRODUCTION Monitor Features 10 11 12 Video Baby Monitor 720P eufy Security SpaceView Wall Mount Model: T8321-M Model: T8301-C FCC ID: 2AOKB-T8321M FCC ID: 2AOKB-T8300C IC: 23451-T8321M Monitor Micro-USB Camera Micro- Camera Adapter Power Cable (1 m) USB Power Cable Screen LED indicator... -
Page 4: Setting Up The Camera And Monitor
SETTING UP Camera Features THE CAMERA AND MONITOR Charge the Monitor Fully charge the monitor before use. To charge: 1. Connect one end of the micro USB cable to the baby monitor, and the other end to the power adapter (5V/2A). Standard camera lens Micro USB port 2. -
Page 5: Addinga New Baby Camera
ADDING Go to “Firmware Updates” section and check whether your firmware version is the latest version. If not, download the “T8300 SpaceView xxx ‘’Firmware under the “Firmware A NEW BABY CAMERA Updates” category. Make sure you download the version in corresponding language. Follow the steps in the “eufy Security Software Upgrade Guide”... -
Page 6: Placing The Camera (Wall & Corner Mount)
MONITOR MENU PLACING THE CAMERA SETTINGS (WALL & CORNER MOUNT) Press and hold the power button to power on the monitor. Press the menu button to open Menu 1. Use the monitor to test the viewing angle from your desired mounting spot. Settings. - Page 7 On-screen Menu Icons Menu Options Description When Auto is enabled, the camera will change the screen color according to the light conditions in the room. When disabled, the camera will Icon Icon Description stick to daylight screen color and will not change when the surrounding Night Vision Mode Wireless signal strength environment is getting dark.
-
Page 8: Notice
2.0 or higher. The connection to so called power USB is prohibited. Anker Technology (UK) Ltd I Suite B, Fairgate House, 205 Kings Road, Tyseley, Birmingham, The adapter shall be installed near the equipment and shall be easily accessible. - Page 9 compliance could void the user's authority to operate the equipment. TABLA Note: This equipment has been tested and found to comply with the limits for a Class B digital device, pursuant to Part 15 of the FCC Rules. These limits are designed to provide reasonable protection against harmful interference in a residential installation.
- Page 10 CARACTER Í STICA CONTENIDO DE LA CAJA INTRODUCCIÓN Características del monitor 10 11 12 Monitor de vídeo para bebés 720p Cámara para bebés Modelo: T8321-M Soporte de Modelo: T8301-C Id. de FCC: 2AOKB-T8321M montaje en pared Id. de FCC: 2AOKB-T8300C IC: 23451-T8321M Cable de alimentación Adaptador de la...
- Page 11 CONFIGURACIÓN Características de la cámara DE LA CÁMARA Y EL MONITOR Carga del monitor Cargue por completo el monitor antes de utilizarlo.Para cargarlo: 1. Conecte un extremo del cable micro-USB al monitor para bebés y el otro al adaptador de alimentación (5 V/2 A). Lente estándar de la cámara Puerto micro-USB 2.
- Page 12 ADICIÓN Para comprobar si la versión es la más reciente: Visite el siguiente sitio web: https:/ /www.eufylife.com/support/5505/spaceview-baby- DE UNA NUEVA CÁMARA monitor PARA BEBÉS Vaya a la sección “Actualizaciones de firmware” y compruebe si la versión del firmware es la más reciente. Si no lo es, descargue “Firmware de T8300 SpaceView xxx” desde la categoría “Actualizaciones de firmware”.
- Page 13 INSTALACIÓN DE LA CÁMARA (SOPORTE DE MONTAJE EN PARED Y ESQUINERO) 1. Utilice el monitor para comprobar el ángulo de visión desde la ubicación de montaje que desee. 2. Marque los orificios para los tornillos con un lápiz. Puede seleccionar cómo desea instalar la cámara 3.
- Page 14 CONFIGURACIÓN Opciones del menú Descripción Cuando se activa el modo Automático, la cámara cambiará el color DEL MENÚ DEL MONITOR de la pantalla en función de las condiciones de iluminación de la Modo de visión habitación. Al desactivarlo, la cámara utilizará el color diurno de la nocturna pantalla y no lo cambiará, aunque el entorno se oscurezca.
- Page 15 CUSTOMER SERVICE Iconos del menú en la pantalla Anker Innovations Limited Icono Descripción del icono Room 1318-19, Hollywood Plaza, 610 Nathan Road, Mongkok, Kowloon, Hong Kong Intensidad de la señal inalámbrica Warranty ƒ Modo de visión nocturna activado 12-month limited warranty Indica qué...