
Related Manuals for Dyson PH01


Summary of Contents for Dyson PH01
- Page 1 Questo manuale d’istruzione è fornito da trovaprezzi.it. Scopri tutte le offerte per Dyson Pure Humidify + Cool o cerca il tuo prodotto tra le migliori offerte di Trattamento Aria Issued December 19...
-
Page 2: Table Of Contents
This manual is written specifically for Dyson trained engineers and covers the full Circulates PH01 and PH02 range. The service instructions assume that the engineer has the approved Air Multiplier technology projects 350 litres of air per second, tools and test equipment with them. -
Page 3: Product Overview Features And Benefits
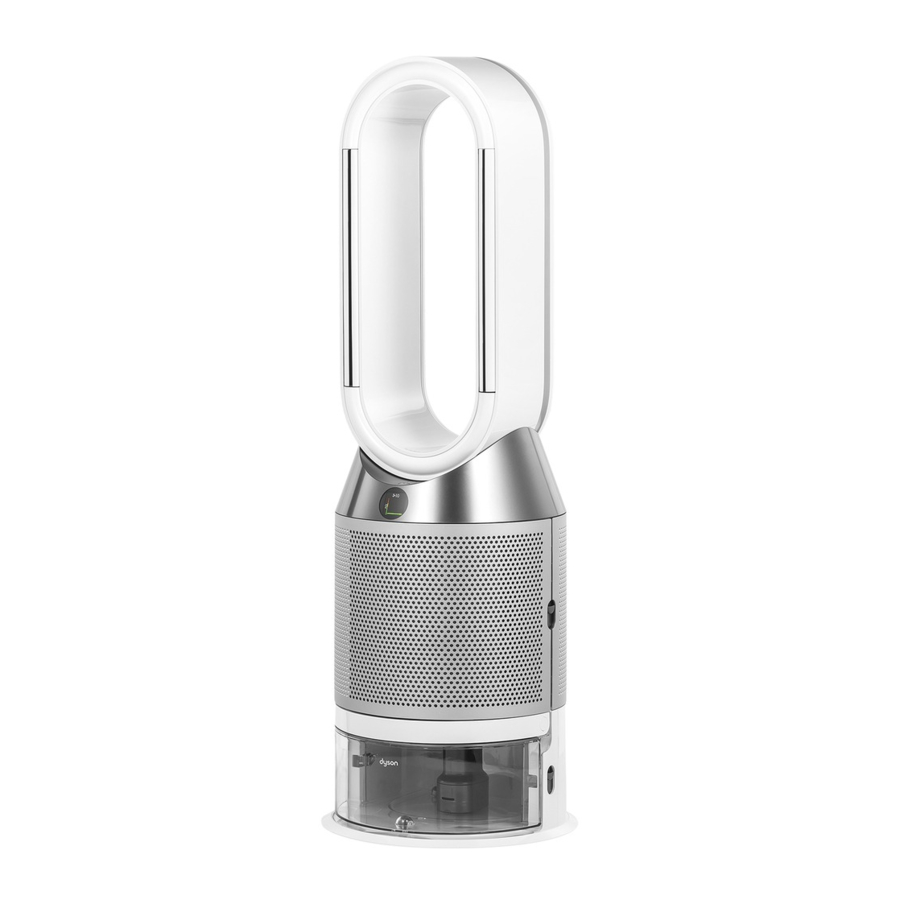
HEPA filter to capture 99.95% of ultra fine particles. 4. Wrong Power Supply Unit (PSU) inserted/PSU fault PH01 machine comes with Combination filters. PH02 comes with permanent Cryptomic filters and Combination filters. -
Page 4: Technical Information
Faults codes will be displayed as per the following format: 00X-0X-0X-X. As well as the UI error symbols, built into PH01 and PH02’s software is an engineers diagnostic In most cases it is only necessary to recognise the first three digits to determine the fault. -
Page 5: Deep Cleaning The Machine
Deep cleaning the machine PH01 and PH02 have a ‘self cleaning’ cycle built in. This is to reduce limescale build up. In normal use the machine will show an alert when it needs to carry out a Deep clean cycle. -
Page 6: Testing And Repair Process
General information Electrical safety testing The following tests must be performed prior to and upon completion of all repairs to Dyson products and before any functional checks. You must ensure that a full visual inspection of the product is completed prior to repair. -
Page 7: Amp Service Assembly - Removal
Repair notes AMP Service Assembly - removal 01 Press the release catches on either side of the filter housings. Remove the filter Housing and Filter assemblies from the product. 04 Carefully lift off the Amp service Note: if the product is a Cryptomic assembly. - Page 8 For removal instructions of these parts continue to the next step. Note: not all PCBs are available as spare parts at launch. Always check Dyson Central for 08 To remove the Power button, lever out the two arms and push out the Button, spring and Foam.
- Page 9 09 Push the three grommets through the 12 Remove the Four T-15 screws. neck plate. 13 Release two of the three looms from 10 Remove the six T-8 screws. the large Grommet. 14 Carefully push the large single grommet through the hole in the 11 Remove the plate from the AMP neck assembly.
-
Page 10: Amp Service Assembly - Fitting
Repair notes AMP Service Assembly - fitting If the Air Amp Neck Service assembly was previously removed, continue to the next step. If the reason for the repair is to replace the entire Amp Service assembly go to page 20 step 23 - 30. 15 Carefully feed the Grommets 16 Feed the three looms through the and looms through the AMP neck... - Page 11 21 Seat the three grommets into the 18 Fit the four T-15 screws. neck plate. 19 Feed the three looms through the neck plate. 22 Locate the foam ring and then the spring into the AMP neck assembly. Ensure the On/Off button is orientated the correct way up. Push the On/Off Button Service assembly 20 Fit the six T-8 screws.
- Page 12 24 Secure the Dust sensor to main controller loom into the retainers provided. 23 Carefully attach the Dust sensor to main controller loom. Locate the Dust Sensor and Dust sensor PCB Service assembly. 25 Reconnect the four Looms. Fit the two long T-8 screws.
- Page 13 26 Secure all Looms into the retainers provided. 27 Line up the LCD with the window on the Neck Service assembly. 28 Fit the eight T-15 screws. Lower the Air Amp Service assembly.
-
Page 14: Lower Body Service Assembly - Removal
Repair notes Lower Body Service Assembly - removal Before continuing the following components will need to be removed as previously shown: Air amp service assembly (Pages 10 - 11, steps 01 - 05) 29 Refit the Evaporator assembly. 31 Remove the Water tank. 32 Remove the two T-8 screws in the top of the Filter release catch service assembly. - Page 15 37 If the Evaporator door needs replacing, remove the two screws in the top hinge cover and remove the 34 Disconnect the Power loom from the cover. Power controller PCB. 35 Remove the two T-15 screws on the right handside from behind the filter release catch holding at the base.
- Page 16 40 To refit the hinge covers, shut the door. Slide the cover from behind 41 Remove the two T-15 screws. the hinge so the lever folds back into the cover. 42 Remove the two T-8 screws from the Slide the cover forward until the screw underside of the Lower body service bosses line up.
-
Page 17: Lower Body Service Assembly - Fitting
Repair notes Lower Body Service Assembly - fitting 44 Release the Power loom from the retainers in the side of the Main body. 45 Lift the Main body away from the 46 Place the Main body on top of the Lower Body Service assembly. Lower body service assembly. - Page 18 49 To refit the hinge covers, shut the door. Slide the cover from behind the hinge so the lever folds back into the cover. 48 Fit the two T-8 screws in the underside of the Lower body, and the four T-15 screws to secure the Main body to the Lower Body.
- Page 19 50 Feed the power loom through the hole in the top right hand side of the main body. 53 Ensure the power loom is positioned as shown to avoid trapping. 54 Slide the bottom of the Filter release catch into the details in the Main 51 Connect the Main power loom to the body.
-
Page 20: Motor And Bucket Service Assembly - Removal
Repair notes Motor and Bucket Service Assembly - removal Before continuing the following components will need to be removed as previously shown: Air amp service assembly (Pages 10 - 11, steps 01 - 05) 59 Feed the Grommet and connector 56 Disconnect the Motor loom from the Main PCB assembly. - Page 21 62 With all three clips released the motor bucket can be removed. Carefully lift the motor bucket up and away from the Main body. 61 Using a blunt screwdriver carefully push the three tabs securing the Motor and Bucket assembly inside the Main body.
-
Page 22: Motor And Bucket Service Assembly - Fitting
Repair notes Motor and Bucket Service Assembly - fitting Cross section view of Upper retention ring and spring positions Important: during shipping/transport the Upper, Lower retention rings and springs can detach. Before fitting the Motor and bucket assembly the Upper and Lower Spring retention rings have to be seated on their corresponding ledges on the motor bucket... - Page 23 66 Feed the motor loom connector through the hole in the Main body. 65 Push the Motor down until three clicks are heard. 67 Securely seat the motor loom grommet into the hole in the main body. 68 Connect the new motor to the Main PCB.
-
Page 24: Connection Shuttle Service Assembly - Removal
Repair notes Connection Shuttle Service Assembly - removal Before continuing the following components will need to be removed as previously shown: Air amp service assembly (Pages 10 - 11, steps 01 - 05) Lower Body Service assembly (page 25 - 30, steps 31 - 35). 70 Remove the Tray Level Harness assembly. -
Page 25: Connection Shuttle Service Assembly - Fitting
Repair notes Connection Shuttle Service Assembly - fitting 76 Slide the new Connection Shuttle Service assembly into place ensuring all the looms are free from trapping 73 Remove the six T-8 screws holding the tray to the Main body. and no seals have folded over. 74 Disconnect the Shuttle Loom from the Power controller PCB and release the loom from the retainers in the side of... - Page 26 79 Position the Connection Shuttle as shown and test it slides freely. 80 Locate the Shuttle Spring and Shuttle Spring Spigot into the hole in the rear of the Connection Shuttle. 78 Firmly locate the two rails on the base of the Water return tray onto the details on the Connection 81 Hold the Spigot firmly whilst carefully Shuttle.
-
Page 27: Internal Power Harness Service Assembly - Removal
Repair notes Internal Power Harness Service Assembly - removal Before continuing the following components will need to be removed as previously shown: Air amp service assembly (Pages 10 - 11, steps 01 - 05) Lower Body Service assembly (page 25 - 30, steps 31 - 35). 82 Locate the tray level sensor into the 85 Remove the two T-8 screws holding water return tray. - Page 28 88 Unclip the retaing detail at the end of 91 Remove the two T-8 screws securing the skirt from the base. the Socket holder. 89 Remove the two countersunk T-8 92 Remove the Holder and Power screws holding the Base plate. harness.
-
Page 29: Internal Power Harness Service Assembly - Fitting
Repair notes Internal Power Harness Service Assembly - fitting 97 Pull the Jack into the holder until it 94 Feed the new Power Harness locks and is flush with the edge as through the right handside of the shown. Lower Body Service assembly. 98 Seat the front of the holder into the 95 Locate the gasket into the hole in the Lower body. - Page 30 101 Place the Base plate onto the Lower body. Fit the two countersunk T-8 screws. 99 Press the holder down and fit the two T-8 screws. IMPORTANT: whilst tightening the screws check that the gasket does not become mishapen or the DC Jack misplaced.
-
Page 31: Parts Diagram Main Body
Parts diagram Main body Motor Bucket Seal Tail Cone Motor & Bucket Service Assy Tray Level Sensor Assy Internal Input Harness Service Assy Clean Cycle PCB Assy 103 Run the left handside of the Base LCD Display Service Assy Skirt anti-clockwise aroun the base. Clip the securing tab in the base. -
Page 32: Amp And Filter Assemblies
Parts diagram Amp and Filter assemblies Screw M3x15-P1 Remote Control Assy Air Amp Neck Service Assy Dust Sensor Assy Filter Housing Singular Glass Hepa & Inner Carbon Filter MO...