Advertisement
Quick Links
Istruzioni e avvertenze
IT
di installazione
KIT ESPANSIONE
SMARTECH PLUS
per gestione Zone
immergas.com
Immergas S.p.A. 42041 Brescello (RE) - Italy
Tel. 0522.689011 Fax 0522.680617
Cod. 1.044745 - Rev. ST.005020/001 - 09/2020
Il fabbricante Immergas S.p.A., dichiara che il tipo di
apparecchiatura radio "Smartech Plus" è conforme alla
direttiva 2014/53/UE.
Il testo completo della dichiarazione di conformità UE è dis-
ponibile al segunete indirizzo Internet: www.immergas.com
PREMESSA.
Il "Kit espansione Smartech Plus" è stato concepito per
essere abbinato ad uno Smartech Plus per consentire
all'utente la gestione della temperatura ambiente di un
impianto suddiviso in più zone (fino a un massimo di tre
contemporaneamente).
La sua installazione richiede pochi minuti: il Cronoter-
mostato, con alimentazione indipendente a batteria, non
necessita di nessun collegamento elettrico ed è dotato
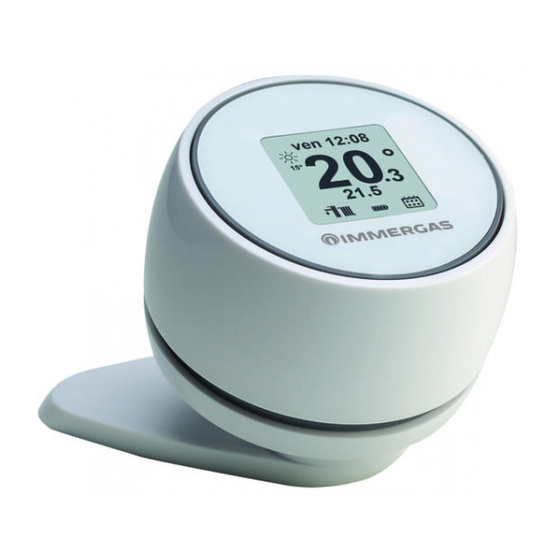
di un display con tenclogia e-ink per la visualizzazione
delle informazioni: temperatura ambiente, modalità, ecc.
Viene fornito con la sua base per installazione a muro o
eventualmente in alternativa si può richiedere tramite
ordinazione la sua base da tavolo.
Il Cronotermostato deve essere collegato tramite sistema
Bluetooth al Gateway dello Smartech Plus e tramite relè
Wi-Fi Sonoff fornito nel kit, anch'esso da abbinare al
Gateway, controlla l'attuatore di zona.
L'applicazione "Smartech" dovrà essere scaricata dallo
Store (iOS e/o Android) e installata su dispositivo mobile
(smartphone).
Terminata l'installazione, seguire le procedure di associ-
azione spiegate nel presente foglio istruzioni.
AVVERTENZE GENERALI.
Il presente manuale è stato redatto per: l'Installatore.
• Assicurarsi di avere completato tutte le operazioni di
installazione del "kit Smartech Plus" prima di procedere
all'installazione del "kit espansione Smartech Plus".
• Leggere attentamente le avvertenze contenute nel pre-
sente documento che danno indicazioni sull'utilizzo
del "Kit espansione Smartech Plus", le caratteristiche
tecniche, le istruzioni di installazione, montaggio,
programmazione, regolazione e uso.
• L' e secuzione dell'impianto deve essere rispondente alle
norme vigenti.
• Il manuale istruzioni è da considerare parte del crono-
termostato "Smartech Plus" e deve essere "conservato
per futuri riferimenti".
• Dopo aver tolto l'imballaggio, assicurarsi dell'integrità
del Kit. In caso di dubbio, non utilizzarlo e rivolgersi
al Rivenditore o al Costruttore.
• Il "Kit espansione Smartech Plus" è destinato soltanto
all'uso per il quale è stato espressamente concepito.
Ogni altro uso è da considerarsi improprio e quindi
pericoloso.
• I Nostri prodotti sono realizzati in conformità alle
vigenti normative di sicurezza per cui si raccomanda
l'uso di tutti quei dispositivi o attenzioni in modo che
l'utilizzo non rechi danno a persone o a cose.
• Non smontare parti del "Kit espansione Smartech Plus"
quando queste sono in funzione.
• Non usare il "Kit espansione Smartech Plus" esposti a
fonti di calore o sotto il sole cocente.
• Il costruttore si ritiene sollevato da eventuali respon-
sabilità nei seguenti casi:
a) Installazione non corretta.
b) Difetti di funzionamento della caldaia alla quale è
applicato il "Kit espansione Smartech Plus".
c) Modifiche o interventi non autorizzati.
d) Inosservanza totale o parziale delle istruzioni.
e) Eventi eccezionali ecc.
PULIZIA DEL RIVESTIMENTO.
Per pulire il rivestimento del cronotermostato usare un
panno asciutto. Non usare detersivi abrasivi o in polvere.
AVVERTENZA.
Immergas si riserva la facoltà, ferme restando le caratte-
ristiche essenziali del modello qui descritto ed illustrato,
di apportare miglioramenti e modifiche a particolari ed
accessori.
1. INSTALLAZIONE.
1.1 Avvertenze di installazione.
L'installazione del "Kit espansione Smartech Plus", deve
essere eseguita da personale specializzato.
Attenzione: dalle operazioni di verifica gratuita della
caldaia sono escluse la posa in opera del "Kit espansione
Smartech Plus", di competenza della ditta installatrice.
1.2 Contenuto della confezione.
Rif
Descrizione
1
1 Foglio istruzioni per l'Installatore
2
1 cronotermostato
3
1 relè Wi-Fi Sonoff
1 supporto di installazione a muro dotato di
5
livella a bolla, viti e tasselli
6
2 pile AAA da 1,5V
1.3 Dimensioni principali Cronotermostato Kit
espansione Smartech Plus.
71.5
35.5
54
1.4 Operazioni di installazione Cronotermostato.
Installare il supporto da muro (2) fissandolo alla parete
tramite i tasselli ad espansione (1) e le viti in dotazione
(3). Inserire le 2 batterie tipo AAA da 1.5V (fornite) (Fig.
3); il Cronotermostato (4) poi, si aggancia (o si rimuove) a
pressione sopra al supporto (2).
1
2
3
4
N.B.: assicurarsi che la zona di installazione riceva ade-
guatamente il segnale Bluetooth del cronotermostato.
N.B.: fare riferimento ai collegamenti elettrici del relè di
zona riportati nel capitolo 4.
Instructions and warnings
EXPANSION KIT
SMARTECH PLUS
for zone management
immergas.com
Immergas S.p.A. 42041 Brescello (RE) - Italy
Tel. 0522.689011 Fax 0522.680617
Code 1.044745 - Rev. ST.005020/001 - 09/2020
Hereby Immergas S.p.A., declares that the radio equip-
ment type "Smartech Plus" is in compliance with Directive
2014/53/EU.
The full text of the EU declaration of conformity is available
at the following Internet adress: www.immergas.com
FOREWORD.
The "Smartech Plus expansion kit" has been designed
to be combined with a Smartech Plus to allow the user to
manage the room temperature of a system divided into
several zones (up to a maximum of three at the same time).
Its installation takes a few minutes: the Chrono-thermo-
stat, with independent battery power supply, does not
require any electrical connection and is equipped with an
e-ink technology display for displaying information: room
temperature, mode, etc. It is supplied with its base for wall
1
installation or alternatively you can order its table base.
The Chrono-thermostat must be connected via Bluetooth
system to the Smartech Plus Gateway and via the Wi-Fi
Sonoff relay, also to be paired with the Gateway and sup-
plied in the kit, it controls the zone actuator .
The "Smartech" application must be downloaded from the
Store (iOS and/or Android) and installed on the mobile
device (smartphone).
After installation, follow the pairing procedures explained
in this instruction sheet.
GENERAL WARNINGS.
This manual was intended for: the Installer.
• Make sure you have completed all installation steps
of the "Smartech Plus kit" before proceeding with the
installation of the "Smartech Plus expansion kit".
• Carefully read the warnings contained in this docu-
ment as they provide indications on how to use the
"Smartech Plus expansion kit", the technical features,
the installation, assembly, programming, adjustment
and use instructions.
• The system must be compliant with applicable stan-
2
dards.
• The instruction manual must be considered a part of
the "Smartech Plus" chrono-thermostat and must be
"kept for future reference".
• After having removed the packaging, check the inte-
grity of the Kit. If in doubt, do not use it and contact
the Dealer or Manufacturer.
• The "Smartech Plus expansion kit" is intended only for
the use for which it has been expressly designed. Any
other use must be considered improper and therefore
dangerous.
• Our products are manufactured in compliance with the
Safety Standards in force. It is, therefore, recommen-
ded to use all devices and attention in such a way that
injury/damage is not caused to persons or objects.
3
• Do not disassemble parts of the "Smartech Plus expan-
sion kit" when these are in operation.
• Do not use the "Smartech Plus expansion kit" exposed
to sources of heat or under the scorching sun.
• The manufacturer will not be held responsible in the
following cases:
a) Incorrect installation.
b) Operating defects of the boiler to which the "Smar-
tech Plus expansion kit" is applied.
c) Unauthorised changes or tampering.
d) Total or partial failure to comply with instructions.
e) Exceptional events etc.
CLEANING THE CASE.
Use a dry cloth to clean the cover of the chrono-thermo-
stat. Never use abrasive or powder detergents.
WARNING.
Immergas reserves the right to make improvements and
changes to details and accessories, excepting the essential
features of the model described and illustrated herein.
1. INSTALLATION.
1.1 Installation recommendations.
The installation of the "Smartech Plus expansion kit" must
be carried out by specialized personnel.
IE
Attention: laying the Wi-Fi module cables is excluded
from the free boiler checks; it is the responsibility of the
installer company.
1.2 Package contents.
Ref
Description
1
1 Instruction sheet for the installer
2
1 chrono-thermostat
3
1 Wi-Fi Sonoff relay
1 wall-mounted installation support equipped
5
with spirit level, screws and plugs
6
2 AAA 1.5V batteries
1.3 Main dimension expansion
kit Chrono-thermostat Smartech Plus.
71.5
35.5
1.4 Chrono-thermostat module installation opera-
tions.
install the wall-mounted support (2) fix it to the wall by
means of expansion plugs (1) and the supplied screws (3).
Insert the 2 AAA 1.5V batteries (supplied) (Fig. 3); the
chrono-thermostat (4) then press-couples (or removes)
onto the support (2).
1
2
3
4
N.B.: make sure that the installation area receives the
Bluetooth signal of the chrono-thermostat properly.
Note: refer to the electrical connections of the zone relay
stated in chapter 4.
54
1
2
3
1
Advertisement

Related Manuals for Immergas SMARTECH PLUS EXPANSION KIT


Summary of Contents for Immergas SMARTECH PLUS EXPANSION KIT
- Page 1 Dealer or Manufacturer. • Dopo aver tolto l’imballaggio, assicurarsi dell’integrità • The “Smartech Plus expansion kit” is intended only for del Kit. In caso di dubbio, non utilizzarlo e rivolgersi the use for which it has been expressly designed. Any al Rivenditore o al Costruttore.
- Page 2 N.B.: only in the: "Off "mode or "Winter" mode, the main Ogni “Kit espansione Smartech Plus” è dotato di un Relè Each "Smartech Plus Expansion Kit" is equipped with a mostato Zona 1 principale è l'unico nel caso di più Zone...
- Page 3 4. SCHEMI ELETTRICI 4. WIRING DIAGRAMS 4.1 Collegamento rele Wi-Fi Sonoff. 4.1 Sonoff Wi-Fi relay connection. SCHEMA ELETTRICO COLLEGAMENTO ALIMEN- GATEWAY POWER SUPPLY AND VOLT FREE TAZIONE E CONTATTO PULITO GATEWAY RELAY CONNECTION DIAGRAM Max. 0.1A Max. 0.1A 230 Vac 230 Vac Alimentazione MAX.