Table of Contents
Advertisement
Advertisement
Table of Contents

Related Manuals for TP-Link Archer GX90


Summary of Contents for TP-Link Archer GX90
- Page 1 User Guide AX6600 Wi-Fi 6 Tri-Band Gaming Router Archer GX90 REV1.0.0 1910012816...
- Page 2 Chapter 5. TP-Link Cloud Service ........20...
- Page 3 7. 1. 1. Access the USB Device Locally ........30 7.
- Page 4 14. 3. TP-Link Router Skill for Alexa........
- Page 5 *Use of MU-MIMO and 1024-QAM requires clients to also support those functions. More Info The latest software, management app and utility can be found at Download Center https://www.tp-link.com/support/download/. The Quick Installation Guide can be found where you find this guide or inside the package of the router.
- Page 6 Specifications can be found on the product page at https://www.tp-link.com. TP-Link Community is provided for you to discuss our products and share knowledge at https://community.tp-link.com. Our Technical Support contact information can be found at the Contact Technical Support page at https://www.tp-link.com/support/.
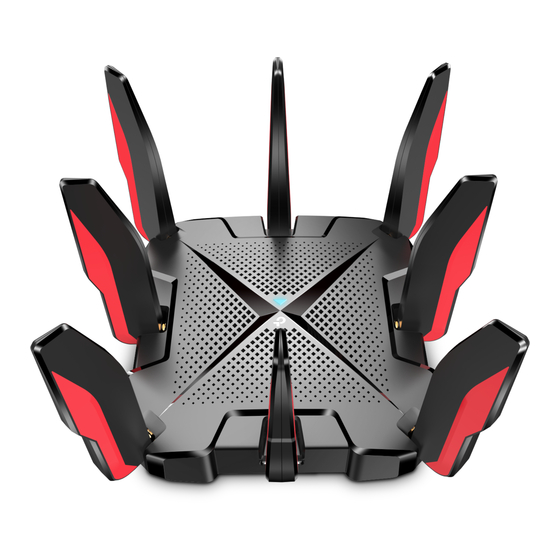
- Page 7 Chapter Get to Know About Your Router This chapter introduces what the router can do and shows its appearance. It contains the following sections: • Product Overview • Panel Layout...
- Page 8 Powerful gaming features ensure your gaming stays immersive, and keep your network as fast as your reaction speed Moreover, it is simple and convenient to set up and use the TP-Link router due to its intuitive web interface and the powerful Tether app.
- Page 9 Chapter 1 Get to Know About Your Router Item Description Use a pin to press and hold this button until the LED blinks to reset the router Reset Button to its factory default settings. Ethernet Ports For connecting your PC or other wired devices to the router. 1 Gbps WAN/LAN + 2.5 For connecting to a DSL/Cable modem, or an Ethernet jack.
- Page 10 Chapter Connect the Hardware This chapter contains the following sections: • Position Your Router • Connect Your Router...
- Page 11 Chapter 2 Connect the Hardware 2. 1. Position Your Router • The router should not be located in a place where it will be exposed to moisture or excessive heat. • Place the router in a location where it can be connected to multiple devices as well as to a power source.
- Page 12 Chapter 2 Connect the Hardware 1 ) Find the SSID (Network Name) and Wireless Password printed on the label at the bottom of the router. 2 ) Click the network icon of your computer or go to Wi-Fi Settings of your smart device, and then select the SSID to join the network.
- Page 13 Chapter Log In to Your Router...
- Page 14 • If the login window does not appear, please refer to the Section. • If you have registered a TP-Link ID and bound your cloud router to it, the login password you created here will be invalid. Please log in to the cloud router using your TP-Link ID.
- Page 15 Furthermore, you can also set up an IPv6 connection if your ISP provides IPv6 service. It contains the following sections: • Use Quick Setup Wizard • Quick Setup via Bluetooth with TP-Link Tether App • Manually Set Up Your Internet Connection • Set Up the Router as an Access Point •...
- Page 16 • To learn more about the TP-Link Cloud service, please refer to the TP-Link Cloud Service section. • If you do not want to register a TP-Link ID now, you may click SKIP to proceed. • If you have changed the preset wireless network name (SSID) and wireless password during the Quick Setup process, all your wireless devices must use the new SSID and password to connect to the router.
- Page 17 ISP. Follow the steps below to check or modify your internet connection settings. 1. Visit http://tplinkwifi.net, and log in with your TP-Link ID or the password you set for the router.
- Page 18 Chapter 4 Set Up Internet Connection 2 ) If you choose Static IP, enter the information provided by your ISP in the corresponding fields. 3 ) If you choose PPPoE, enter the Username Password provided by your ISP. PPPoE users usually have DSL cable modems. 4 ) If you choose L2TP, enter the Username Password...
- Page 19 Chapter 4 Set Up Internet Connection parameters are needed according to the secondary connection you have chosen. 5 ) If you choose PPTP, enter the Username and Password, and choose the secondary connection (Dynamic IP or Static IP) provided by your ISP. Different parameters are needed according to the secondary connection you have chosen.
- Page 20 Set Up the Router as an Access Point The router can work as an access point, transforming your existing wired network to a wireless one. 1. Visit http://tplinkwifi.net, and log in with your TP-Link ID or the password you set for the router. 2. Go to Advanced >...
- Page 21 Chapter 4 Set Up Internet Connection 1. Visit http://tplinkwifi.net, and log in with your TP-Link ID or the password you set for the router. 2. Go to Advanced > IPv6. 3. Enable IPv6 and select the internet connection type provided by your ISP.
- Page 22 Chapter 4 Set Up Internet Connection PPPoE: By default, the router uses the IPv4 account to connect to the IPv6 server. Click Advanced Settings to input further information if your ISP requires. Click SAVE and then click CONNECT. Note: If your ISP provides two separate accounts for the IPv4 and IPv6 connections, please untick the PPPoE same session with IPv4 connection checkbox and manually enter the username and password for the IPv6...
- Page 23 Chapter 4 Set Up Internet Connection 5. Configure LAN ports. Windows users are recommended to choose from the first two types. Fill in Address Prefix provided by your ISP, and click SAVE. 6. Click Status to check whether you have successfully set up an IPv6 connection. Tips: Visit the section if there is no internet connection.
- Page 24 TP-Link Cloud service provides a better way to manage your cloud devices. Log in to your router with a TP-Link ID, and you can easily monitor and manage your home network when you are out and about via the Tether app. To ensure that your router stays new and gets better over time, the TP-Link Cloud will notify you when an important firmware upgrade is avaliable.
- Page 25 IDs. • Once the router is bound to your TP-Link ID, you need to log in to the router with the TP-Link ID. • Once you have registered a TP-Link ID on the web management page, you can only register another TP-Link ID via the Tether APP.
- Page 26 Chapter 5 TP-Link Cloud Service • To change your password: 1. Click behind the Password. 2. Enter the current password, then a new password twice. And click Save.
- Page 27 TP-Link Cloud Service 5. 3. Manage the User TP-Link IDs The TP-Link ID used to log in to the router for the first time will be automatically bound as the Admin account. An admin account can add or remove other TP-Link IDs to or from the same router as Users.
- Page 28 Chapter 5 TP-Link Cloud Service 3. Tick the checkbox(es) of the TP-Link ID(s) you want to remove and click Unbind. 5. 4. Manage the Router via the TP-Link Tether App The Tether app runs on iOS and Android devices, such as smartphones and tablets.
- Page 29 Chapter Guest Network This function allows you to provide Wi-Fi access for guests without disclosing your main network. When you have guests in your house, apartment, or workplace, you can create a guest network for them. In addition, you can customize guest network options to ensure network security and privacy.
- Page 30 Chapter 6 Guest Network 6. 1. Create a Network for Guests 1. Visit http://tplinkwifi.net, and log in with your TP-Link ID or the password you set for the router. 2. Go to Advanced > Wireless > Guest Network or click...
- Page 31 Chapter 6 Guest Network 6. 2. Customize Guest Network Options 1. Visit http://tplinkwifi.net, and log in with your TP-Link ID or the password you set for the router. 2. Go to Advanced > Wireless > Guest Network. Locate the Guest Permissions section.
- Page 32 Chapter 6 Guest Network • Allow guests to access my local network Tick this checkbox if you want to allow the wireless clients on your guest network to communicate with the devices connected to your router’s LAN ports or main network via methods such as network neighbors and Ping.
- Page 33 Chapter USB Settings This chapter describes how to use the USB ports to share files and media from the USB storage devices over your home network locally, or remotely through the internet. The router supports USB external flash drives and hard drives. It contains the following sections: •...
- Page 34 Chapter 7 USB Settings 7. 1. Access the USB Storage Device Insert your USB storage device into the router’s USB port and then access files stored there locally or remotely. Tips: • If you use USB hubs, make sure no more than 4 devices are connected to the router. •...
- Page 35 Chapter 7 USB Settings Open the Windows Explorer (or go to Computer) and type the server address \\tplinkwifi.net ftp://tplinkwifi.net in the address bar, then press Enter. Windows computer 1 ) Select > Connect to Server. 2 ) Type the server address smb://tplinkwifi.net. 3 ) Click Connect.
- Page 36 Note: If your ISP assigns a private WAN IP address (such as 192.168.x.x or 10.x.x.x), you cannot use this feature because private addresses are not routed on the Internet. Follow the steps below to configure remote access settings. 1. Visit http://tplinkwifi.net, and log in with your TP-Link ID or the password you set for the router. 2. Go to Advanced >...
- Page 37 1. Visit http://tplinkwifi.net, and log in with your TP-Link ID or the password you set for the router.
- Page 38 Chapter 7 USB Settings 2. Now you can access the USB disk by visiting \\MyShare (for Windows) or smb:// MyShare (for Mac). • To only share specific content: Focus on the File Sharing section and specify sharing folders and click SAVE. •...
- Page 39 Chapter 7 USB Settings Note: For Windows users, do not set the sharing username the same as the Windows username. Otherwise, Windows credential mechanism may cause the following problems: • If the sharing password is also the same as the Windows password, authentication will not work since the Windows will automatically use its account information for USB access.
- Page 40 Time Machine backs up all files on your Mac computer to a USB storage device connected to your router. 1. Visit http://tplinkwifi.net, and log in with your TP-Link ID or the password you set for the router. 2. Go to Advanced >...
- Page 41 Chapter 7 USB Settings 4. Click SELECT to select a location for Time Machine backups. 5. Set the Storage Limit for Backups. Note: 0 means no limit for the space. 6. Click SAVE.
- Page 42 Chapter HomeCare – Parental Controls, QoS, Antivirus TP-Link HomeCare powered by Trend Micro provides a kit of features to help you create a personalized network that caters for the whole family. You can ensure appropriate internet access for everyone with Parental Controls, save bandwidth for the things that matter with QoS and keep your network secure with built-in Antivirus.
- Page 43 2 hours every day and block internet access during bed time (10 PM to 7 AM) on school nights (from Thunday to Thursday). How can I do that? 1. Visit http://tplinkwifi.net, and log in with your TP-Link ID or the password you set for the router. 2. Go to Advanced >...
- Page 44 Chapter 8 HomeCareTM – Parental Controls, QoS, Antivirus 1 ) Select a filter level based on the age of the family member this profile belongs to. Blocked content will then be displayed in the Category Filter list. 2 ) If needed, you can edit the blocked content by selecting the categories in the Category Filter list.
- Page 45 Chapter 8 HomeCareTM – Parental Controls, QoS, Antivirus 1 ) Enable Time Limits on Monday to Friday and Saturday & Sunday then set the allowed online time to 2 hours each day. 2 ) Enable Bed Time on School Nights and use the up/down arrows or enter times in the fields.
- Page 46 Chapter 8 HomeCareTM – Parental Controls, QoS, Antivirus How can I do that? 1. Visit http://tplinkwifi.net, and log in with your TP-Link ID or the password you set for the router. 2. Go to Advanced > HomeCare >Parental Controls Game Center >...
- Page 47 Ensure a fast connection while I play online games with friends on my computer for the next 2 hours. How can I do that 1. Visit http://tplinkwifi.net, and log in with your TP-Link ID or the password you set for the router. 2. Go to Advanced >...
- Page 48 Chapter 8 HomeCareTM – Parental Controls, QoS, Antivirus and download bandwidth to be a little bit lower than the value measured through Speedtest®. 5. Click Gaming to prioritize this online activity. The default is Standard, with no application prioritized. 6. Go to Game Center >...