
Related Manuals for Ricoh Antares-PJ1 Series


Summary of Contents for Ricoh Antares-PJ1 Series
- Page 1 Antares-PJ1Training Y020/Y021/Y022 Service Training Antares-PJ1 Version 1.0 Slide 1 This training course provides service technician training for the Antares-PJ1 series.
-
Page 2: Service Training
Antares-PJ1Training Y020/Y021/Y022 Service Training Product Overview Slide 2 This section provides an overview of the machine, and the options that can be installed. - Page 3 Antares-PJ1Training What Models are there in the Series? Antares-PJ1 cw (Y020): PJ WX2130 2500 lumens, WXGA resolution Antares-PJ1 cx (Y021): PJ X2130 2500 lumens, XGA resolution Antares-PJ1 cs (Y022): PJ S2130 2500 lumens, SVGA resolution These are compact entry-level models with standard features.
-
Page 4: Main Specifications
Antares-PJ1Training Main Specifications Antares-PJ1 cw Antares-PJ1 cx Antares-PJ1 Type Color wheel type 6 segments Brightness 2500lm Lamp type 200W OSRAM E20.8 SVGA Resolution WXGA For SVGA/XGA: F# 2.41 ~ 2.55, f=21.79 ~ 23.99 mm, 1.1X Mechanical Zoom Lens Projection lens For WXGA: F# 2.50 ~ 2.67, f=21.86 mm ~ 24 mm, 1.1X Mechanical Zoom Lens 286.3 ×... - Page 5 Antares-PJ1Training Features This product can be installed by users, except when mounted on a ceiling. This product is designed for user maintenance. Regular on-site maintenance is not needed. There is no display panel, but LEDs show the symptoms for troubleshooting (blinking/lit, number of times the LEDs blink, etc).
- Page 6 Antares-PJ1Training Low Energy Consumption 4,000 hour lamp life and lower power consumption in Eco mode 0.5W power consumption in standby mode Slide 6 Note that in the service mode menu, Eco Mode is referred to as ‘Low Mode’.
-
Page 7: Consumables And Options
Antares-PJ1Training Consumables and Options Replacement lamp (Y207) 200W mercury lamp Life: 3000 hours (normal mode), 4000 hours (Eco mode) » There may be a 50% decrease in brightness at the end of the lamp’s life. 3D glasses (Y107) Will also be usable with other DLP-type projector models to be released in the near future. -
Page 8: Reliability Information
Antares-PJ1Training Reliability Information Average monthly projection time: 44.0 hrs/month 2.00 hrs/day x 22 working days/month Failure Rate 1st year: 0.0025 cases/unit/month 2nd year: 0.0029 cases/unit/month 3rd year: 0.0037 cases/unit/month The failure rate of a projector increases with its total power-up time. This is due in part to the failure characteristics of optical engines in projectors. - Page 9 Antares-PJ1Training Lamp Near-end/End Alerts There is no near-end alert. The lamp end alert occurs when the machine calculates that the life time has expired. If used in Normal Mode only, the alert appears after 3,000 hrs projection time If used in Eco Mode only, the alert appears after 4,000 hrs projection time If the user switches between modes, the machine calculates when to display the alert based on...
- Page 10 Antares-PJ1Training Disposal of Broken Lamps Projector lamps normally contain mercury vapour. These lamps can rupture due to impact or being used longer than their life expectancy. The time that the breakage will occur differs widely for each lamp and its circumstances of use.
-
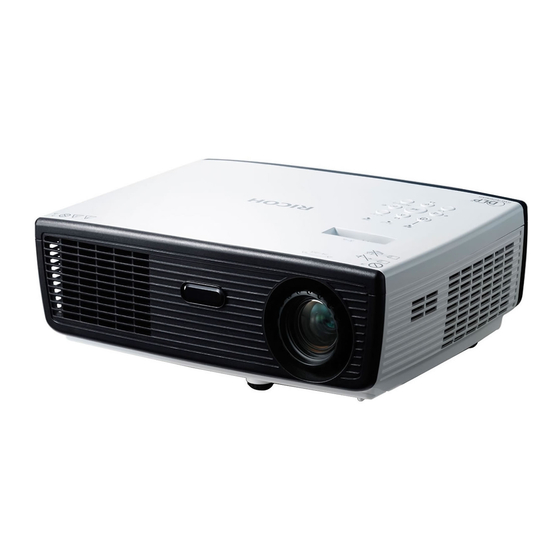
Page 11: External View
Antares-PJ1Training Overview Overview External View External View 1. Operation panel 1. Operation panel 2. Zoom 2. Zoom 3. Ventilation (inlet) 3. Ventilation (inlet) 4. Speaker 4. Speaker 5. Focus ring 5. Focus ring 6. Ventilation (outlet) 6. Ventilation (outlet) 7. IR receiver 7. -
Page 12: Operation Panel
Antares-PJ1Training Operation Panel The three LEDs are used to show symptoms for troubleshooting. Remote Controller Slide 12 No additional notes... -
Page 13: Connection Ports
Antares-PJ1Training Overview Connection Ports Interface HDMI COMPUTER IN/COMPONENT IN S-VIDEO IN VIDEO IN Service port MONITOR OUT AUDIO IN Power in Anti-theft lock Slide 13 1. HDMI Connector: Input for digital signals from a HDMI (High-Definition Multimedia Interface) compatible digital source. 2. -
Page 14: Optical Components
Antares-PJ1Training Optical Components The DMD chip is the central part of this type of projector. A DMD chip consists of many small pixel-sized mirrors laid out on a semi- conductor chip. Light shone on the DMD chip is reflected by all these tiny mirrors. - Page 15 Antares-PJ1Training DMD Chip R, G, and B signals from the image generating device are sent to the DMD chip, and timed so that the red signal arrives at the same time that the red part of the wheel is in the beam path, and similarly for the green and blue signals.
-
Page 16: System Block Diagram
Antares-PJ1Training System Block Diagram System Block Diagram Keypad Keypad Speaker Speaker board board Optical Engine Optical Engine Lens Lens Main board Main board Signal Signal DMD board DMD board DMD Chip DMD Chip Power Power LVPS LVPS Photosensor Photosensor 380VDC 380VDC Color Color... - Page 17 Antares-PJ1Training Boards Main board (MB): Power/signal control and processing DMD board (DMD BD): Image signal processing and DMD control LVPS (DC-DC): Power supply, passes signals between boards LVPS means Low Voltage Power Supply Lamp driver (Ballast): Starts the lamp When the lamp is being lit, the voltage is over 10,000V.
-
Page 18: Board Layout
Antares-PJ1Training Board Layout DMD Board Photo Lamp J17 3P J7 4P J9 3P J12 2P DMD BD to Main board Keypad board MB to KB J22 24P Main Board Blower LAMP J6 3P J8 5P J5 3P S- V IDEO Computer in Computer Out AUDIO... -
Page 19: Main Board Block Diagram
Antares-PJ1Training Main Board Block Diagram Projection Lamp Lens CHIP CW Motor Photo sensor BD driver CW index 1000 Lamp driver Audio AMP Speaker 2000 TAP0172 Video Main Decoder LVPS AC in TVP5147 AD9983 Board 3.3V, 5V, 12V Source in Fans Slide 19 No additional notes... -
Page 20: Service Training
Antares-PJ1Training Y020/Y021/Y022 Service Training Basic Points about Service Slide 20 This section explains the basic points about servicing the machine. - Page 21 Antares-PJ1Training Swap and Repair This product is intended for ‘swap-and-repair’. If the projector needs repairs, it is taken away from the customer site and a temporary replacement is provided to the customer. Slide 21 No additional notes...
- Page 22 Antares-PJ1Training Antistatic Clothing To protect the components from damage, wear anti-static clothing when you disassemble the machine. Slide 22 No additional notes...
-
Page 23: Entering Service Mode
Antares-PJ1Training Entering Service Mode Press "Power", "Left", "Left" and "Menu" sequentially to get into service mode. Note: You can use the remote controller for this. For a list of functions in the service menu, see ‘System Maintenance - Service Mode - Service Mode Settings’... -
Page 24: Led Display
Antares-PJ1Training LED Display LEDs The status of the three LEDs on the front panel indicate the machine’s condition. See the table ‘LED Display’ in the Troubleshooting section of the service manual. Slide 24 No additional notes... -
Page 25: Parts Replacement
Antares-PJ1Training Parts Replacement After replacing parts, some adjustments may be needed. See the table below. This table and the procedures are in the following section of the service manual: Replacement and Adjustment - Electrical Adjustment - Adjustment Points vs Part Replaced Whenever you replace a component, check this table to see if you have to do any of these procedures. -
Page 26: Replacing The Lamp
Antares-PJ1Training Replacing the Lamp To replace the lamp, unplug the power cord and then wait for 60 minutes. Slide 26 No additional notes... -
Page 27: Replacing The Mainboard
Antares-PJ1Training Replacing the Main Board The main board contains a record of the lamp usage hours. If you have to change the main board, make a note of the lamp hours before you remove the board. Then use ‘Rewrite Lamp Hours’ after you install the new board, to store this number in the new board. - Page 28 Antares-PJ1Training Optics Engines These are not the same for each model. The lenses are different, for a start. Make sure that you have the correct assembly for the model that you are working on. The optics engine contains the DMD board, DMD chip, lens, and rod.
-
Page 29: Replacing The Color Wheel
Antares-PJ1Training Replacing the Color Wheel Avoid touching the glass parts of the color wheel. Slide 29 No additional notes... -
Page 30: Color Wheel Index Adjustment
Antares-PJ1Training Color Wheel Index Adjustment Do this after replacing the color wheel. Also, do this adjustment if color appears abnormal after changing the main board. Slide 30 The adjustment is in service mode. Note that the adjustment appears in two different menus. -
Page 31: Rod Adjustment
Antares-PJ1Training Rod Adjustment Adjust if there are yellowish or bluish parts in the image. Slide 31 No additional notes... -
Page 32: Osd Reset
Antares-PJ1Training OSD Reset (1) Main Menu Menu Settings To access the OSD menu, press the Menu button (operation panel or remote controller). The orange square on the left side of the display shows which section of the main menu is selected. - Page 33 Antares-PJ1Training OSD Reset (2) In the main menu, select Default Settings 2. Then select Reset All and Execute. This returns all adjustments and settings to the factory settings. Slide 33 No additional notes...
-
Page 34: Burn-In Test
Antares-PJ1Training Burn-in Test After repairing each unit, a burn-in test is necessary. In a burn-in test, the lamp is turned on for a set period of time (such as 50 minutes), then off for another set period of time (such as 10 minutes). This can be accessed in the service mode. - Page 35 Antares-PJ1Training Y020/Y021/Y022 Service Training Updating Firmware Slide 35 This section explains the basic points about updating the firmware.
-
Page 36: Updating The System Firmware
Antares-PJ1Training Updating the System Firmware - 1 Equipment needed Software » DLP Composer Lite » Firmware (*.img) » Library file Hardware » Projector » Power Cord » USB Cable mini USB to USB (A) » PC or Laptop Slide 36 The detailed procedure is in the System Maintenance - Firmware Update section of the service manual. - Page 37 Antares-PJ1Training Updating the System Firmware - 2 Preparation Install DLP Composer Lite Install a USB driver for the DLP device Enter the Firmware Update Mode » Hold the "Power" button and plug in the power cord. » The Power/Lamp/Temp LEDs will light red after around 10 seconds, then release the "Power"...
-
Page 38: Background Information
Antares-PJ1Training Background Information Types of Projectors Slide 38 This section briefly explains the various projector technologies on the market. - Page 39 Antares-PJ1Training Types of Projectors There are 4 main types. CRT projectors: These use three cathode ray tubes (blue, green, and red). LCD projectors: These use three LCD filters to create red, green, and blue images. DLP projectors: DLP (Digital Light Processing) was developed by Texas Instruments.
- Page 40 Antares-PJ1Training CRT Projectors These use three cathode ray tubes (blue, green, and red). They have better contrast than LCD and DLP projectors. They also have good resolution. But they are bulky, heavy, and difficult to adjust. Slide 40 No additional notes...
- Page 41 Antares-PJ1Training LCD Projectors LCD projectors appeared during the early 1990s, and are now the main type of projector. Three LCDs receive electrical signals from an image- generating device. One receives signals for the red part of the image, one the green, and one the blue. In this way, each LCD holds a pattern of pixels.
- Page 42 Antares-PJ1Training DLP Projectors (1) Projector Lens DLP Chip Lens Lamp Lens Color Wheel The DLP chip is the central part of this type of projector. A DLP chip consists of many small pixel-sized mirrors laid out on a semi- conductor chip. Light shone on the DLP chip is reflected by all these tiny mirrors.
- Page 43 Antares-PJ1Training DLP Projectors (2) R, G, and B signals from the image generating device are sent to the DLP chip, and timed so that the red signal arrives at the same time that the red part of the wheel is in the beam path, and similarly for the green and blue signals.
- Page 44 Antares-PJ1Training LCOS Projectors In LCoS, a liquid crystal cover is applied to the surface of a semiconductor chip that has a highly reflective coating. There R, G, or B Light Polarized Light are one of these assemblies for red, green, and blue. The RGB images are sent to these semiconductors, and beams of light are reflected off...
- Page 45 Antares-PJ1Training Background Information Polarization Slide 45 No additional notes...
- Page 46 Antares-PJ1Training What is Polarization? Vertical Horizontal Component Component Light Polarization refers to the orientation of the electric field. It is convenient to think in terms of up-down (vertical), and left-right (horizontal). If the polarization is at an angle, then this polarization can be thought of as having up-down and left-right components.
- Page 47 Antares-PJ1Training Polarizing Filter In a polarizing filter, the arrangement of the molecules allows (for example) the up-down component to pass through, but not the left-right component. Think of a rope passing through a picket fence (with vertical slits). If you vibrate the rope in a horizontal direction, the fence will block the vibrations.
- Page 48 Antares-PJ1Training S- and P- Polarization P-polarized Unpolarized Light Light Plane of Incidence If the electrical field is polarized parallel to the plane of incidence (in other words, horizontal), it is said to be p- polarized. If the field is polarized perpendicularly to the plane of incidence (vertical), it is said to be s-polarized.
- Page 49 Antares-PJ1Training Polarization by Reflection Unpolarized S-polarized Light Light Reflection off certain non-metallic substances can polarize light. If the angle is correct (different for each mineral, depends on the arrangement of molecules in the mineral), the reflected light will be completely s-polarized. The refracted light will be at least partially p-polarized.
- Page 50 Antares-PJ1Training Background Information Terms and Definitions Slide 50 Some details in this section may not apply to this model.
-
Page 51: Terms And Definitions
Antares-PJ1Training Terms and Definitions - 1 Aspect Ratio This is the ratio of the horizontal to vertical dimensions of the screen. For a normal television, the aspect vratio is 4:3. For HDTV, it is 16:9. For SXGA, it is 5:4. Resolution This is expressed as the number of dots across the image versus the number of dots down the image. - Page 52 Antares-PJ1Training Terms and Definitions - 2 Dichroic Mirror A dichroic mirror reflects light of a certain frequency range and allows all other light to pass through. LCD projectors contain two of these mirrors, to split the light up into three beams. Polarized Light Light waves oscillate in the same way as sound waves.
- Page 53 Antares-PJ1Training Terms and Definitions - 3 Air Filter Air is drawn into the projector to cool its internal components. The air filter prevents dust from being pulled into the projector with this air. If the filter becomes dirty, air cannot pass through properly, and it will become hot inside the projector.
- Page 54 Antares-PJ1Training Terms and Definitions - 4 Suspension from the Ceiling This machine can be suspended from the ceiling, if the required metal supports are fitted. These metal supports are not supplied with the projector. Changing the Lamp The first time that the power is turned on after the lamp has been used for 3000 hours, a message is displayed for the user.
- Page 55 Antares-PJ1Training Terms and Definitions - 5 Lux, Lumen, Candela The brightness of a lamp is generally measured in lumens, and ambient brightness and light reflected from a screen is generally expressed in lux. Lumen » This ANSI unit is used to measure the amount of light emitted from a light source.
- Page 56 Antares-PJ1Training Terms and Definitions - 6 Uneven colour This term is used when the contrast and color of the image is not constant. There are many possible causes for this. Gradation Between white and black, there are shades of grey. The number of levels between white and black are called gradations.
- Page 57 Antares-PJ1Training Terms and Definitions - 7 Contrast In general, this is the ratio between the bright and dark parts of an image. A high contrast gives a clear image. A projector with an internal light source is unaffected by external light sources gives a high contrast image that is clear.
- Page 58 Antares-PJ1Training Terms and Definitions - 8 Floor or table, normal projection: Image Adjustments Reverse - off, Ceiling - off If the projected image is flickering or blurred, in the wrong position, and so on, the horizontal position, vertical position, and synchronization Floor or table, reverse projection: can be adjusted.
- Page 59 Antares-PJ1Training Terms and Definitions - 9 Gamma correction This adjusts the signal level to get the correct VT response characteristics (V: input voltage, T: amount of transmitted light). Trapezoidal image correction (Keystone correction) Depending on the angle of projection, the projected image will be distorted into a trapezoidal shape, instead of a rectangular shape.
- Page 60 Antares-PJ1Training Terms and Definitions - 10 Screen Gain A measure of how brightly a screen displays an image. The higher the screen gain, the brighter the screen. Relation between Screen Gain and Brightness Generally, the larger the screen, the darker it is. If you choose a screen with a higher gain, the brightness is preserved to some extent.
- Page 61 Antares-PJ1Training Terms and Definitions - 11 Ad hoc mode and Infrastructure mode There are two ways to connect to a PC using W-LAN. Ad hoc mode is used to connect to a PC without using a W-LAN access point. Infrastructure mode is used to connect to a PC through a W-LAN access point.
-
Page 62: Throw Ratio
Antares-PJ1Training Throw Ratio Throw Ratio = PD/SW Slide 62 No additional notes... - Page 63 Antares-PJ1Training Projection Lens Offset Projection Screen Optical Axis DMD Active Area Offset = [(A+B)/B]x100% =[(a+b)/b]x100% Slide 63 No additional notes...
- Page 64 Antares-PJ1Training Slide 64 No additional notes...