
Related Manuals for Anker Nebula Apollo


Summary of Contents for Anker Nebula Apollo
- Page 1 English Deutsch Español Français Italiano 日本語 لع َ ر َ ب ِ ية User Manual Nebula Apollo...
-
Page 2: Table Of Contents
Settings carpets, otherwise the device could be a fire hazard. • Do not place this device in areas susceptible to excessive dust and Using the Nebula Apollo dirt or near any appliance generating a strong magnetic field. Specifications • To prevent overheating, do not block or clog the ventilation openings. - Page 3 Power Supply • The remote control contains batteries which can be swallowed. Keep the remote control out of the reach of children. • Use only the provided power adapter. • Risk of explosion! Keep batteries away from heat, direct sunlight, or •...
-
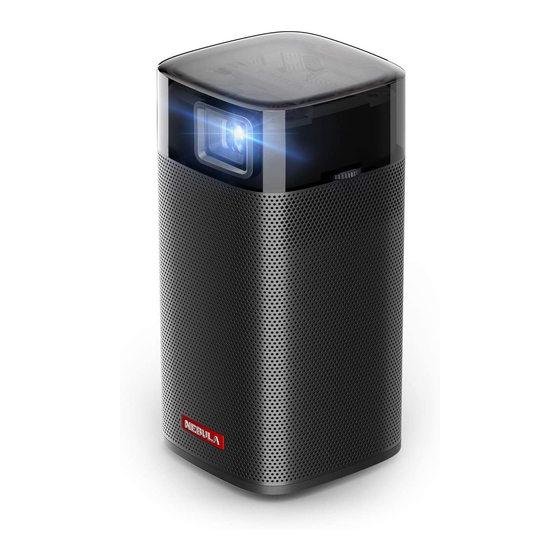
Page 4: What's Included
What’s Included 2. Rear View Air ventilation (outlet) Infrared receiver • Press to switch between Bluetooth speaker mode and projector mode Power button Overview • Press and hold for 2 seconds to power on / off Speaker HDMI port 1. Front View •... - Page 5 3. Top View 5. Remote Control • Touch to return to the previous • Press to select an option: menu shutdown, standby, reboot, or enter Bluetooth speaker mode • Touch to open the home menu • Press to enter / exit mouse key mode •...
-
Page 6: Getting Started
Button LED Status Description Power on / operating in projector Place Nebula Apollo on a stable, flat surface in front of the projection Solid blue mode surface. For the best results, the projection surface should be white and flat. The distance between Nebula Apollo and the projection surface... - Page 7 2. Prepare the Remote Control 3. Get Started ① For first-time use, fully charge the built-in battery using the provided The remote control comes with two coin batteries. adapter. ① For first-time use, remove the battery insulation tabs to activate the remote control batteries.
-
Page 8: Nebula App
Nebula App To easily control Nebula Apollo, we recommend downloading the Nebula Connect app. With this app, you can operate your mouse using the screen. ① Download the Nebula Connect app from the App Store (iOS devices) or Google Play (Android devices). -
Page 9: Settings
② Enable Bluetooth on your smartphone and select [Nebula-XXXXXX] Settings as the device to be connected. Go through the setup process when you power on Nebula Apollo for the first time. 1. Network This projector can be connected to the Internet via a wireless (Wi-Fi) connection. - Page 10 5. Others [Front Projection]: The projector is located in front of the projection surface. On the home menu, select [Settings] to find more setting options. [Rear Projection]: The projector is located behind the projection surface. [General] [Inverted Front Projection]: The projector [Language] Select an on-screen display language.
-
Page 11: Using The Nebula Apollo
Using the Nebula Apollo 2. Play from a USB Storage Device With Nebula Apollo, you can enjoy music, video, and pictures, or install 1. Play from HDMI Playback Devices apps that are stored on a USB 2.0 storage device. Nebula Apollo can be connected to various HDMI playback devices such as a TV box, TV stick, DVD player, set-top box (STB), gaming consoles, or other devices. - Page 12 [Settings] > [General] > [Screen Mirroring], and press ② Follow the on-screen instructions to complete the process. • Nebula Apollo will mirror the screen of your smartphone phone or tablet. Certain content cannot be cast on Nebula Apollo due to copyright restrictions.
-
Page 13: Specifications
Specifications Troubleshooting ① Could not turn on projector with the remote control? Specifications and design are subject to change without notice. • Hold for 2 seconds on the projector to turn it on. • When powered off, you cannot use the remote control to turn it on. ②... -
Page 14: Notice
Proper disposal and recycling of the European Community. helps protect natural resources, human health and the Hereby, Anker Innovations Limited. declares that this device environment. For more information on disposal and recycling is in compliance with the essential requirements and of this product, contact your local municipality, disposal service, or the shop where you bought this product. -
Page 15: Trademarks
® The Bluetooth word mark and logos are registered trademarks owned by the Bluetooth SIG, Inc. and any use of such marks by Anker IC Statement Innovations Limited is under license. Other trademarks and trade This device complies with Industry Canada licence-exempt RSS names are those of their respective owners. - Page 16 • Stellen Sie das Gerät nicht auf weiche Oberflächen wie Tischdecken Einstellungen oder Teppiche, weil dies eine Brandgefahr darstellen könnte. • Platzieren Sie das Gerät nicht in übermäßig staubigen oder Verwenden des Nebula Apollo schmutzigen Umgebungen und nicht in der Nähe anderer Geräte, die ein starkes Magnetfeld erzeugen. Technische Daten •...
- Page 17 autorisiertes Servicecenter. • Vermeiden Sie extreme Vibrationen, da sonst interne Komponenten beschädigt werden könnten. • Die Fernbedienung enthält Batterien, die verschluckt werden könnten. Bewahren Sie die Fernbedienung außerhalb der Reichweite Stromversorgung von Kindern auf. • Verwenden Sie ausschließlich das mitgelieferte Netzteil. •...
-
Page 18: Im Lieferumfang
Im Lieferumfang 2. Rückseite Belüftung (Auslass) Infrarotempfänger • Zum Wechsel zwischen den Modi „Bluetooth-Lautsprecher“ und „Projektor“ drücken Ein- / Aus-Taste Übersicht • Zum Ein- / Ausschalten 2 Sekunden lang gedrückt halten Lautsprecher HDMI 1. Vorderseite • Mit einem Wiedergabegerät mit HDMI-Ausgang verbinden DC-IN •... - Page 19 3. Oberseite 5. Fernbedienung • Tippen, um zum vorherigen • Zum Wählen einer Option Menü zurückzukehren drücken: Ausschalten, Standby oder Wechsel in den Modus • Tippen, um das Home-Menü zu „Bluetooth-Lautsprecher“ öffnen • Zum Aktivieren / Deaktivieren des Maustasten-Modus • Tippen, um den Maustasten- drücken Modus zu aktivieren •...
-
Page 20: Erste Schritte
1. Platzierung Taste LED-Status Beschreibung Eingeschaltet/Betrieb im Projektor- Platzieren Sie den Nebula Apollo auf einer stabilen, ebenen Oberfläche Leuchtet blau Modus vor der Projektionsfläche. Die besten Ergebnisse erzielen Sie mit einer weißen und ebenen Projektionsfläche. Der Abstand zwischen dem Leuchtet gelb Standby im Projektor-Modus Nebula Apollo und der Projektionsfläche muss mindestens 0,58 m und... - Page 21 3. Erste Schritte 2. Vorbereiten der Fernbedienung ① Für die erste Verwendung, muss der integrierte Akku vollständig Die Fernbedienung wird mit zwei Knopfzellen-Batterien geliefert. mithilfe des mitgelieferten Adapters aufgeladen werden. ① Entfernen Sie vor der ersten Verwendung den Isolierstreifen der Batterien, um die Batterien der Fernbedienung zu aktivieren.
-
Page 22: Nebula-App
Nebula-App Für die einfache Steuerung des Nebula Apollo empfehlen wir, die Nebula Connect-App herunterzuladen. Mit dieser App können Sie Ihre Maus über den Bildschirm navigieren. ① Laden Sie die Nebula Connect-App aus dem App Store (iOS-Geräte) oder bei Google Play (Android) herunter. -
Page 23: Einstellungen
② Aktivieren Sie Bluetooth auf Ihrem Smartphone und wählen Sie Einstellungen [Nebula-XXXXXX] als zu verbindendes Gerät aus. Nehmen Sie nach dem erstmaligen Einschalten des Nebula Apollo die Einrichtung vor. 1. Netzwerk Sie können mit diesem Projektor über ein WLAN eine Verbindung zum Internet herstellen. - Page 24 5. Sonstiges Wenn die Autom. Keystone-Korrektur [Vertikale Keystone- deaktiviert ist, müssen Sie den vertikalen Korrektur] Wählen Sie im Home-Menü [Einstellungen] aus, um weitere Keystone-Wert manuell einstellen. Einstellungsoptionen zu finden. [Frontprojektion]: Der Projektor befindet sich vor der Projektionsfläche. [Allgemein] [Rückprojektion]: Der Projektor befindet Wählen Sie eine Sprache für die sich hinter der Projektionsfläche.
-
Page 25: Verwenden Des Nebula Apollo
Verwenden des Nebula Apollo 2. Abspielen von einem USB-Speichermedium Sie können mit dem Nebula Apollo über ein USB-Kabel (nicht im 1. Abspielen über HDMI-Wiedergabegeräte Lieferumfang enthalten) Musik, Videos und Bilder von einem USB 2.0-Speichergerät genießen oder darauf gespeicherte Apps installieren. - Page 26 [Allgemein] > [Bildschirmspiegelung] auswählen und drücken. ② Befolgen Sie die Bildschirmanweisungen, um den Vorgang abzuschließen. • Der Nebula Apollo spiegelt anschließend den Bildschirm Ihres Smartphones oder Tablets. Bestimmte Inhalte können aufgrund von Urheberrechtsbeschränkungen nicht über den Nebula Apollo ausgegeben werden. In diesem Fall können Sie diese Inhalte jedoch über dieselbe, auf Ihrem Nebula Apollo installierte...
-
Page 27: Technische Daten
Technische Daten Fehlerbehebung ① Der Projektor lässt sich nicht mit der Fernbedienung einschalten? Änderungen der technischen Daten und des Designs ohne Vorankündigung vorbehalten. • Halten Sie 2 Sekunden auf dem Projektor gedrückt, um ihn einzuschalten. • Wenn er ausgeschaltet ist, können Sie ihn nicht mit der Netzteil: 15V GS Fernbedienung einschalten. -
Page 28: Garantie
Nebula Produkte sind für einen Zeitraum von 12 Monaten ab dem Configuración Kaufdatum gegen Material- und Verarbeitungsfehler garantiert. Innerhalb dieses Zeitraums stellt Nebula Ersatz bereit und trägt die Uso de Nebula Apollo Versandkosten für die Rücksendung, wenn ein Produkt bei normaler Verwendung ausfallen sollte. Especificaciones Bitte beachten: Versandaufkleber, die durch den Nebula Support bereitgestellt werden, müssen innerhalb von 20 Tagen ab... -
Page 29: Instrucciones De Seguridad
Instrucciones de seguridad • Evite vibraciones extremas, ya que podrían dañar los componentes internos. Fuente de alimentación Lea todas las instrucciones antes de utilizar el dispositivo. No realice cambios ni cree ajustes que no estén descritos en este manual. En •... -
Page 30: Contenido
Contenido Batería • No sustituya la batería integrada. Póngase en contacto con un centro de servicio autorizado para sustituirla. • El mando a distancia incluye pilas que podrían ingerirse. Mantenga el mando a distancia fuera del alcance de los niños. •... - Page 31 2. Vista posterior 3. Vista superior • Tocar para volver al menú anterior • Tocar para acceder al menú de inicio • Tocar para activar o desactivar el modo de tecla del ratón Ventilación de aire (salida) • Tocar para subir o bajar el volumen Receptor de infrarrojos Botones de navegación...
- Page 32 5. Mando a distancia 6. Indicación led Botón Estado led Descripción • Pulsar para seleccionar una Encendido/Modo de proyector opción: apagar, suspender, Azul fijo activo reiniciar o activar el modo de altavoz Bluetooth. Amarillo fijo En espera en modo de proyector Rojo fijo Carga en curso •...
-
Page 33: Primeros Pasos
• La distancia entre el dispositivo Nebula Apollo y la superficie de proyección determina el tamaño de la imagen proyectada. Para obtener los mejores resultados, coloque el dispositivo Nebula Apollo a una distancia de entre 1 y 2 metros de la superficie de proyección. - Page 34 ⑤ Cuando utilice el dispositivo por primera vez, siga las instrucciones que aparecen en pantalla para completar la configuración básica. Para que el dispositivo Nebula Apollo se cargue de la forma más rápida y segura posible, utilice únicamente el cargador suministrado.
-
Page 35: Aplicación Nebula
Configuración Aplicación Nebula Para controlar fácilmente el dispositivo Nebula Apollo, le recomendamos Cuando encienda por primera vez el dispositivo Nebula Apollo, descargar la aplicación Nebula Connect. Esta aplicación le permite complete el proceso de configuración. controlar el ratón a través de la pantalla. - Page 36 Modo de proyector Puede conectar un altavoz Bluetooth o emparejar unos auriculares 4. Administrador de aplicaciones con el dispositivo Nebula Apollo cuando el modo de proyector está ① Pulse para acceder al menú de inicio, seleccione [Configuración] activado.
-
Page 37: Uso De Nebula Apollo
Para reproducir contenido desde dispositivos de reproducción HDMI: [Tono del teclado] Active o desactive el tono del teclado. ① Conecte el dispositivo Nebula Apollo a un dispositivo de [Intervalo de suspensión 5 min / 15 min / 30 min reproducción HDMI con un cable HDMI (no incluido). - Page 38 Puede proyectar la pantalla de su smartphone o tableta en la superficie de proyección de forma inalámbrica. Nebula Apollo le permite disfrutar de música, vídeos e imágenes, o instalar aplicaciones guardadas en un dispositivo de almacenamiento USB 2.0 mediante un cable USB (no incluido).
-
Page 39: Especificaciones
Capacidad: 9750 mAh, 3,85 V Es posible que ciertos contenidos no se puedan transmitir en Nebula Apollo debido a restricciones de copyright. Cuando Tiempo de reproducción de vídeos: aproximadamente 4 horas en esto suceda, puede transmitir los contenidos mediante la modo batería... -
Page 40: Resolución De Problemas
Garantía Resolución de problemas ① ¿No puede encender el proyector con el mando a distancia? Garantía de devolución del dinero de 30 días por cualquier motivo Puede devolver el producto y el embalaje intactos en un plazo de 30 • Mantenga pulsado durante 2 segundos en el proyector para días desde la compra para recibir un REEMBOLSO COMPLETO por encenderlo. - Page 41 • Ne pas placer l'appareil sur des surfaces souples telles que des nappes ou des tapis, car cela pourrait constituer un risque Utilisation de Nebula Apollo d'incendie. • Ne pas placer l'appareil dans des zones exposées à la poussière et Spécifications...
- Page 42 • Utiliser uniquement des accessoires ou pièces de rechange Batterie spécifiés par le fabricant. • Ne pas remplacer la batterie intégrée vous-même. Contacter un • Éviter les vibrations extrêmes, car elles pourraient endommager les centre de service agréé pour la remplacer. composants internes.
-
Page 43: Contenu
Contenu 2. Vue arrière Ventilation (sortie d'air) Récepteur infrarouge • Appuyer pour basculer entre le mode Bluetooth et le mode de projection Bouton d'alimentation • Maintenir appuyé pendant 2 secondes pour allumer / éteindre Présentation Haut-parleur HDMI 1. Vue avant •... - Page 44 3. Vue de dessus 5. Télécommande • Toucher pour revenir au menu • Appuyer pour sélectionner une précédent option : mise hors tension, veille, redémarrer ou activer le • Toucher pour accéder au menu mode enceinte Bluetooth d'accueil • Appuyer pour entrer/sortir du mode souris •...
-
Page 45: Démarrer
Bouton État LED Description Allumer / fonctionnement en Placer le Nebula Apollo sur une surface stable et plate, en face de Bleu fixe mode de projection la surface de projection. Pour de meilleurs résultats, la surface de projection doit être de couleur blanche et plane. La distance entre le... - Page 46 2. Préparer la télécommande 3. Pour démarrer ① Pour la première utilisation, procéder à une charge complète de la La télécommande est livrée avec deux piles bouton. batterie intégrée en utilisant l’adaptateur fourni. ① Pour la première utilisation, retirer la languette isolante pour activer les piles de la télécommande.
-
Page 47: Application Nebula
⑤ Pour la première utilisation, suivre les instructions à l'écran pour effectuer les réglages de base. Pour permettre une charge du Nebula Apollo la plus rapide et la plus sécurisée possible, utiliser uniquement l’adaptateur ② Activer le Bluetooth sur votre smartphone. -
Page 48: Paramètres
① Appuyer sur pour passer en mode enceinte Bluetooth. Vous pouvez connecter une enceinte Bluetooth ou une paire d’écouteurs au Nebula Apollo lorsque celui-ci est en mode projecteur. ① Appuyer sur pour accéder au menu d'accueil, sélectionner [Settings] > [Bluetooth] (Paramètres > Bluetooth) et appuyer sur ②... - Page 49 5. Autres [Auto Keystone Correction] Activer / désactiver la correction (Correction trapézoïdale trapézoïdale automatique. Dans le menu d'accueil, sélectionner [Settings] (paramètres) pour automatique) trouver plus d'options de configuration. Lorsque la correction trapézoïdale [Vertical Keystone automatique est désactivée, permet de [General] (Général) Correction] (Correction procéder à...
-
Page 50: Utilisation De Nebula Apollo
Ies récepteurs TV, les clés TV, les lecteurs DVD, les boîtiers décodeurs, les consoles de jeux ou autres appareils. Pour lire des contenus depuis des dispositifs de lecture HDMI : ① Connecter Nebula Apollo à un dispositif de lecture HDMI avec un câble HDMI (non fourni). ① Appuyer sur pour accéder au menu d'accueil. - Page 51 [Settings] > [General] > [Screen Mirroring] (Paramètres > Général > Écran miroir) et appuyer sur ② Suivez les instructions à l'écran pour achever le processus. • Le Nebula Apollo miroitera l'écran de la tablette ou du téléphone portable connecté. Il est possible que certains contenus ne puissent pas être diffusés, en raison de restrictions de droit d'auteur.
-
Page 52: Spécifications
Spécifications Dépannage ① Impossible d'allumer le projecteur avec la télécommande ? Les spécifications et la conception sont susceptibles d’être modifiées sans préavis. • Appuyer sur pendant 2 secondes pour mettre sous tension le projecteur. • Lorsqu'il est éteint, vous ne pouvez pas utiliser la télécommande Alimentation : DC 15V 3A CC pour allumer l'appareil. -
Page 53: Garantie
Impostazioni d’expédition de retour pour les produits qui s’avéreraient défectueux lors de leur utilisation normale. Utilizzo di Nebula Apollo Veuillez noter ce qui suit : Les étiquettes d’expédition fournies doivent Specifiche être utilisées dans les 20 jours suivant la date à laquelle elles ont été... -
Page 54: Informazioni Sulla Sicurezza
Informazioni sulla sicurezza Alimentazione • Utilizzare solo l'adattatore di alimentazione in dotazione. Leggere tutte le istruzioni prima di utilizzare il dispositivo. Non • Spegnere il dispositivo prima di rimuovere l'alimentatore dalla presa apportare modifiche, né creare impostazioni che non siano descritte nel di corrente. -
Page 55: Contenuto Della Confezione
Contenuto della confezione • Il telecomando contiene batterie che potrebbero essere accidentalmente ingerite. Tenere il telecomando lontano dalla portata dei bambini. • Rischio di esplosione. Tenere le batterie lontano da fonti di calore, luce solare diretta o fiamme. Non smaltire mai le batterie mediante incenerimento. - Page 56 2. Vista posteriore 3. Vista dall’alto • Toccare per tornare al menu precedente • Toccare per aprire il menu Home • Toccare per accedere alla modalità di controllo puntatore o per uscirne Aerazione (uscita aria) • Toccare per alzare/abbassare il Ricevitore a infrarossi volume Pulsanti di navigazione...
- Page 57 5. Telecomando 6. Indicazione LED Pulsante Stato LED Descrizione • Premere per selezionare Accensione/Funzionamento in Blu fisso un'opzione: spegnimento, modalità proiettore standby, riavvio o attivazione Giallo fisso Standby in modalità proiettore della modalità altoparlante Bluetooth Rosso fisso In carica Verde fisso Ricarica completata •...
-
Page 58: Introduzione
Per risultati ottimali, la superficie di proiezione deve essere bianca e piana. Per ottenere un'immagine di proiezione da 20 a 100 pollici, la distanza tra Nebula Apollo e la superficie di proiezione deve essere di minimo 0,58 metri (23 pollici) e massimo 3,08 metri (121 pollici). - Page 59 ⑤ Per il primo utilizzo, seguire le istruzioni visualizzate sullo schermo per completare la configurazione base. Utilizzare esclusivamente l'adattatore in dotazione per caricare Nebula Apollo nel modo più rapido e sicuro. ② Tenere premuto sul proiettore per 2 secondi per accenderlo.
-
Page 60: App Nebula
App Nebula Impostazioni Quando si accende Nebula Apollo per la prima volta, eseguire tutti i Per controllare Nebula Apollo in tutta semplicità, raccomandiamo passaggi della procedura di configurazione. di eseguire il download dell'app Nebula Connect. Mediante l'app, è possibile operare il mouse usando lo schermo. - Page 61 ① Premere In modalità proiettore, è possibile connettere un altoparlante Bluetooth per accedere al menu Home, selezionare [Impostazioni] o un paio di cuffie a Nebula Apollo. > [Gestione app], quindi premere ① Premere per accedere al menu Home, selezionare [Impostazioni] ②...
-
Page 62: Utilizzo Di Nebula Apollo
1. Riproduzione da dispositivi di riproduzione HDMI [Generale] Per selezionare una lingua di visualizzazione Nebula Apollo può essere collegato a vari dispositivi di riproduzione [Lingua] sullo schermo. HDMI, ad esempio TV box, TV stick, lettori DVD, decoder digitali, console per videogiochi o altri dispositivi. - Page 63 È possibile trasmettere in modalità wireless lo schermo del proprio smartphone o tablet sulla superficie di proiezione. Con Nebula Apollo è possibile riprodurre musica, video e foto o installare app memorizzate su un dispositivo di archiviazione USB 2.0 utilizzando un cavo USB (non in dotazione).
-
Page 64: Specifiche
Durata di riproduzione film: circa 4 ore in modalità batteria In tal caso, sarà possibile riprodurre i suddetti contenuti in Durata di riproduzione musica: circa 30 ore in modalità altoparlante streaming, tramite la stessa app installata su Nebula Apollo. Bluetooth Batterie telecomando: CR 2032 x 2 Temperatura ambiente consigliata: da 5 °C a 35 °C / da 41 °F a 95 °F... -
Page 65: Risoluzione Dei Problemi
Garanzia Risoluzione dei problemi ① Non si riesce ad accendere il proiettore con il telecomando? 30 giorni di garanzia “soddisfatti o rimborsati” per qualsiasi motivo È possibile restituire il prodotto integro e la sua confezione entro 30 • Tenere premuto sul proiettore per 2 secondi per accenderlo. - Page 66 従わなかったことが原因で怪我、データの損失、破損が発生しても、 保証の対象になりません。 概要 セットアップ はじめに 利用時の準備 • 火災および / または感電のリスクを軽減するため、本製品を雨や 湿気にさらさないでください。また、花びんなど液体の入った物 Nebula アプリ を本製品の上に置かないでください。 • 火災が発生する危険があるため、本製品をテーブルクロスやカー 設定 ペットなど、柔らかい表面の上に置かないでください。 Nebula Apollo の使用 • 本製品を、埃の多い場所や、汚れが付きやすい場所、強い磁場を 発生する機器の付近に置かないでください。 仕様 • 過熱を防ぐため、換気を妨げたり換気口をふさいだりしないでく ださい。 トラブルシューティング • 本製品は決して狭い場所に置かないでください。本製品の周囲に 通気のためのスペースを常に十分に確保してください。 保証 • 本製品が直射日光、 熱、 大きな温度変化、 湿気にさらされないよう、 保護してください。極端な温度を避けてください。このデバイス とアクセサリの適正な動作温度および保管温度は 5 ~ 35° C です。...
- Page 67 電源 • リモコンの電池は、誤って飲み込んでしまう恐れがあります。リ モコンはお子様の手が届かない場所に置いてください。 • 付属の電源アダプター以外は使用しないでください。 • 内蔵バッテリーは爆発の危険性があります。 内蔵バッテリーを熱、 • ソケットから電源を取り外す前に本製品の電源をオフにしてくだ 直射日光、火気から遠ざけてください。また、内蔵バッテリーは さい。 絶対に焼却処分にしないでください。 • プラグやコンセント付近や、本製品から電源コードが出る位置で • リモコンを長期間使用しない場合は、 電池を取り外してください。 は、コードが踏まれたり挟まったりしないように保護してくださ い。 • リモコンの電池は、同じタイプまたは同等品とのみ交換してくだ さい。 • 雷雨発生時や長期間使用しない場合は、本製品を電源から取り外 してください。 • 内蔵バッテリーには化学物質が含まれており、適切に廃棄する必 要があります。 • 電源プラグまたは電源接続器を電源遮断装置として使用する場合、 すぐに遮断操作ができる状態を維持してください。 • 本製品は定期的に充電してください。本製品は、内蔵バッテリー が完全に放電された状態では保管しないでください。 • 接続を行う前または変更する前に、すべての機器がコンセントか ら外されていることを確認してください。 クリーニング •...
- Page 68 パッケージ内容 2. 背面図 換気口 ( 出口 ) 赤外線レシーバー • 押すと、Bluetooth スピーカーモードとプロジェクターモー ドが切り替わります 電源ボタン 概要 • 2 秒間押し続けると、電源のオン / オフが可能です スピーカー HDMI 1. 正面図 • HDMI 出力を介して再生デバイスに接続します DC-IN • 電源に接続します レンズ • USB フラッシュドライブに接続します フォーカス調整ノブ スピーカー...
- Page 69 5. リモコン 3. 上面図 • 前のメニューに戻ります • オプションを選択します。対象 となるオプションは、シャッ トダウン、 スタンバイ、 再起動、 • ホームメニューを表示します Bluetooth スピーカーモードへ の切り替えです。 • マウスキーモードを開始 / 終了 します • マウスキーモードを開始 / 終了 します • 音量を調節します • 選択または入力を確定します ナビゲーションボタン • 再生を一時停止 / 再開します • 上下左右にスライドしてナビゲ ートします • タップして選択内容を確認し •...
- Page 70 ルの範囲内で調整してください。これにより、20 ~ 100 インチの投 影画像が得られます。 赤色の点灯 充電中 緑色の点灯 満充電 赤色の点滅 低バッテリー ペアリング準備完了、Bluetooth ペ 青色の点滅 アリング中、Bluetooth で接続済み (Bluetooth スピーカーモード ) Bluetooth で接続済み (Bluetooth スピ 青色の点灯 ーカーモード ) • Nebula Apollo を投影面に向けて傾ける必要はありませ ん。内蔵のキーストーン補正機能を使用して、投影画像 を補正できます。 • 投影画像の大きさは、Nebula Apollo と投影面の距離で決 まります。最もきれいに画像を映すには、Nebula Apollo と投影面の距離を 40 ~ 80 インチの範囲にしてください。...
- Page 71 3. 使い始める 2. リモコンの利用準備 ① 初めて使用するときは、付属のアダプターを使用して、内蔵バッ リモコンにはコイン電池が 2 本付属しています。 テリーを満充電してください。 ① 初めて使用する時は、 プラスチック製の電池装着タブをはずして、 リモコンの電池を通電させてください。 ② プロジェクターの を 2 秒間長押しして、電源をオンにします。 ② 電池を交換するには、スライドして電池ケースを開き、正しい向 き(プラス / マイナス)に新しい電池を挿入して、電池ケースを 閉じてロックします。 ③ プロジェクターを適切な投影面または壁に向けます。 ④ フォーカス調整ノブを回転させて、フォーカスを調整します。...
- Page 72 Nebula アプリ Nebula Apollo を容易に操作するには、Nebula Connect アプリをダウ ンロードすることをおすすめします。このアプリでは、画面を使用し てマウスを操作できます。 ① App Store(iOS 機器 の場合 ) または Google Play(Android 機器の場合 ) から Nebula Connect アプリをダウンロードします。 ⑤ 初回使用時は、画面の指示に従って基本設定を完了します。 Nebula Apollo を最も高速かつ安全に充電するため、付属の アダプターのみを使用してください。 ② お使いのスマートフォンで Bluetooth を有効にします。 ③ Nebula Connect アプリを開いて、接続機器として [Nebula- XXXXXX] を選択します。...
- Page 73 ② 画面の指示に従って、ネットワーク接続を完了します。 2. Bluetooth Bluetooth スピーカーモード 本製品は、Bluetooth スピーカーとして使用できます。 ① を押して、Bluetooth スピーカーモードに切り替えます。 プロジェクターモード プロジェクターモードでは、Bluetooth スピーカーまたはヘッドフォ ンを Nebula Apollo に接続できます。 ① を押してホームメニューにアクセスし、[ 設定 ] > [Bluetooth] を選択した後、 を押します。 ② 画面の指示に従って、Bluetooth 接続を完了します。 3. プロジェクター を押してホームメニューにアクセスし、 [ 設定 ] > [ プロジェクター ] を選択した後、...
- Page 74 5. その他 [ 前面投影 ]:プロジェクターが投影面の 前にある設定です。 ホームメニューで [ 設定 ] を選択し、その他の設定オプションを表示 [ 背面投影 ]:プロジェクターが投影面の します。 背後にある設定です。 [ 反転前面投影 ]:プロジェクターが天井 [ 一般 ] [ プロジェクターモード ] から逆さまに吊り下がっている設定です。 [ 言語 ] 画面表示の言語を選択します。 画像が 180 度回転します。 [ 反転背面投影 ]:プロジェクターが投影 キーパッド操作音のオン / オフを切り替えま [ キーパッド操作音 ] 面の背後で天井から逆さまに吊り下がっ...
- Page 75 Nebula Apollo の使用 2. USB ストレージデバイスからの再生 本製品では、OTG ケーブル ( 別売り ) を使用して、音楽、ビデオ、写 1. HDMI 再生機器に接続する 真を楽しんだり、USB 2.0 ストレージ機器に保存されたアプリをイン ストールしたりできます。 本製品は、TV ボックス、TV スティック、DVD プレーヤー、セットト ップボックス (STB)、ゲーム機など、さまざまな HDMI 再生機器との 接続に対応しています。 HDMI 再生デバイスからコンテンツを再生するには: ① 本製品を HDMI 再生機器に HDMI ケーブル ( 別売り ) で接続します。 ① を押してホームメニューにアクセスします。...
- Page 76 4. 画面ミラーリング iOS 搭載機器の場合: スマートフォンやタブレットの画面を投影面にワイヤレスで投影でき ます。 Android 搭載機器の場合: 画面ミラーリングを使用するには: を押してホームメニューにアクセスし、[ 設定 ] > [ 一般 ] > [ 画 ① 面ミラーリング ] を選択した後、 を押します。 ② 画面の指示に従って、プロセスを完了します。 • Nebula Apollo に、スマートフォンまたはタブレットの画面がミ ラーリングされます。 コンテンツによっては、著作権上の制限により、Nebula Apollo に投影できない場合があります。その場合は、 Nebula Apollo にインストールされている同じアプリで、 該当するコンテンツをストリーミングできます。...
- Page 77 仕様 トラブルシューティング ① リモコンでプロジェクターを起動できない 仕様およびデザインは予告なく変更されることがあり ます。 • プロジェクターの を 2 秒間長押しして、電源をオンにしてく ださい。 電源:DC 15V ② リモコンが機能しない 消費電力:10 W 未満 • リモコンに電池が入っていることを確認してください。 スタンバイ時消費電力:0.5 W 未満 • 電池を交換してください。 表示技術:0.2 インチ 854 x 480p DLP ③ 画像がぼやけている 光源:RGB LED 投影画像サイズ:20 ~ 100 インチ •...
- Page 78 إرشادات السالمة 理由を問わない 30 日間返金保証 損傷のない商品とパッケージを購入後 30 日以内にご返送いただけれ ば、理由を問わず全額を返金いたします。ただし、返品理由が品質に اللوازم المض م ّ نة 関係しない場合は、返送料はお客様の負担になります。 نظرة عامة 品質に関係する問題に対する十八か月保証 Nebula 製品は、購入日から十八か月間、材料や仕上がりに欠陥のな いことが保証されます。この期間中、Nebula は交換品を提供し、通 بدء االستخدام 常の使用で障害が発生した商品について返送費用を負担します。 注意:ご用意する発送ラベルは、Nebula サポートによる発行日から Nebula تطبيق 20 日以内に使用する必要があります。 اإلعدادات Nebula Apollo استخدام المواصفات استكشاف األخطاء وإصالحها الضمان...
- Page 79 إرشادات السالمة مصدر اإلمداد بالطاقة .ا تستخدم إال مهايئ الطاقة المرفق اقرأ كل اإلرشادات قبل استخدام هذا الجهاز. ال تجر ِ أي تغييرات أو إعدادات غير موضحة في هذا .أوقف تشغيل الجهاز قبل إزالة مصدر اإلمداد بالطاقة من المقبس ،الدليل. في حالة وقوع إصابة جسدية أو فقدان بيانات أو حدوث ضرر بسبب عدم اتباع اإلرشادات احم...
- Page 80 اللوازم المض م ّ نة خطر االنفجار! حافظ على وجود البطاريات بعي د ً ا عن الحرارة أو أشعة الشمس المباشرة أو .النار. تجنب التخلص من البطاريات عن طريق الحرق .في حالة عدم استخدام جهاز التح ك ّ م عن ب ُعد لفترة طويلة، يجب إزالة البطاريات منه .استبدل...
- Page 81 2. المنظر الخلفي 3. المنظر العلوي المس للعودة إلى القائمة السابقة المس لفتح القائمة الرئيسية / المس للدخول في وضع مفتاح الماوس .الخروج منه .المس لرفع مستوى الصوت / خفضه )التهوية (منفذ أزرار التنقل مستقبل األشعة تحت الحمراء مرّ ر ألعلى، أو ألسفل، أو يسارً ا، أو يمي ن ً ا للتن...
- Page 82 5. جهاز التح ك ّ م عن ب ُ عد LED 6. مؤشر الوصف LED حالة مؤشر الزر اضغط لتحديد خيار: إيقاف التشغيل، أو تشغيل الطاقة / التشغيل في وضع ضوء أزرق ثابت االستعداد، أو إعادة التشغيل، أو دخول البروجيكتور Bluetooth وضع...
- Page 83 ، على سطح ثابت ومستو ِ أمام سطح اإلسقاط. للحصول على أفضل النتائجNebula Apollo ضع Nebula Apollo يجب أن يكون سطح اإلسقاط أبيض اللون ومسط ّ حً ا. يجب أن تبلغ المسافة بين وسطح اإلسقاط 85,0 مترً ا (32 بوصة) كحد أدنى و80,3 مترً ا (121 بوصة) كحد أقصى...
- Page 84 .① لالستخدام للمرة األولى؛اشحن البطارية المض م ّنة بالكامل باستخدام المهايئ المرفق .⑤ عند االستخدام ألول مرة، اتبع اإلرشادات التي تظهر على الشاشة إلكمال اإلعداد األساسي الخاص بك الشحنNebula Apollo استخدم المهايئ ال م ُرافق فقط لمنح جهاز .األسرع واألكثر أما ن ً ا...
- Page 85 Nebula تطبيق اإلعدادات . عن طريقNebula Connect بسهولة، نوصي بتنزيل تطبيقNebula Apollo للتح ك ّ م في . ألول مرةNebula Apollo استكمل عملية اإلعداد عند تشغيل .هذا التطبيق، يمكنك تشغيل الماوس الخاص بك باستخدام الشاشة 1. الشبكة ) أوiOS (لألجهزة التي تعمل بنظامApp Store منNebula Connect ① نز ّ ل تطبيق...
- Page 86 ] ليتم اتصالهNebula-XXXXXX[ على هاتفك الذكي، وحددBluetooth ② قم بتمكين 3. جهاز اإلسقاط .بالجهاز للوصول إلى القائمة الرئيسية، حدد [اإلعدادات] >[جهاز اإلسقاط] واضغط اضغط على ][عادي] / [فاتح] / [غامق ][وضع الصورة .لتمكين / تعطيل ميزة تصحيح المحور التلقائي ][درجة...
- Page 87 .من القائمة الرئيسية، حدد [اإلعدادات] للعثور على مزيد من خيارات اإلعداد HDMI 1. التشغيل من أجهزة التشغيل المزو ّ دة بـ ][عام TV ، أوTV box مثلHDMI بع د ّ ة أجهزة تشغيل مزوّ دة بـNebula Apollo مكن توصيل .لتحديد لغة العرض على الشاشة ][اللغة...
- Page 88 .يمكنك عرض شاشة هاتفك الذكي أو الكمبيوتر اللوحي على سطح اإلسقاط السلك ي ًا USB 2. التشغيل من جهاز تخزين يمكنك االستمتاع بالموسيقى، ومقاطع الفيديو، والصوّ ر، أو تثبيت التطبيقاتNebula Apollo مع .) (غير مرفقUSB باستخدام كبلUSB 2.0 التي يتم تخزينها على جهاز تخزين...
- Page 89 تردد مزدوج 4,2 جيجاهرتز/5 جيجاهرتزWi-Fi: IEEE802.11a/b/g/n اتصال Bluetooth: V4.2 إصدار جرّ اء القيود المتعلقةNebula Apollo ال يمكن عرض بعض المحتويات على USB: FAT32 نظام ملفات بحقوق النشر. في هذه الحالة، يمكنك تشغيل المحتوى عبر التطبيق نفسه الذي تم تثبيته...
- Page 90 استكشاف األخطاء وإصالحها الضمان ① هل تعذ ّ ر عليك تشغيل جهاز اإلسقاط بواسطة جهاز التح ك ّ م عن ب ُعد؟ ضمان مع إمكانية استرداد المال مهما كانت األسباب لمدة 03 يو م ً ا يمكنك إرجاع منتجك وعبوته غير التال ف َ ين في غضون 03 يو م ًا من تاريخ الشراء واسترداد المال .لثانيتين...
- Page 91 +81 03 4455 7823 ( 日本 ) 月 - 金 9:00-17:00 ©Anker Innovations Limited. All rights reserved. NEBULA and the NEBULA logo are trademarks of Anker Innovations Limited, registered in the United States and other countries. All other trademarks are the property of their respective owners.