Table of Contents
Advertisement
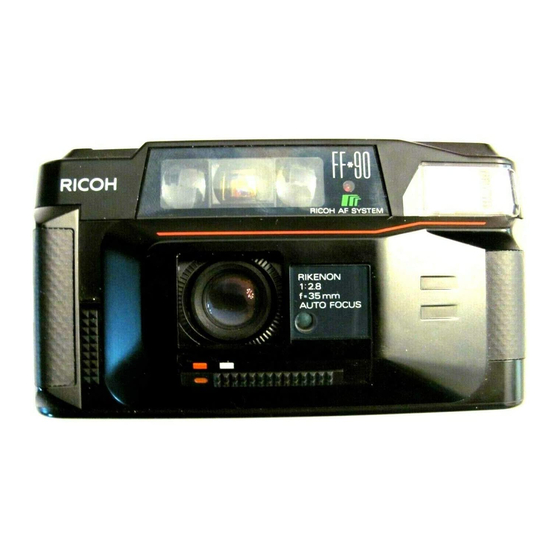
Ricoh FF-90
This camera manual library is for reference and historical purposes, all rights reserved.
This page is copyright by
, M. Butkus, NJ.
This page may not be sold or distributed without the expressed permission of the producer
I have no connection with Chinon Co., Japan
On-line camera manual library
This is the full text and images from the manual. This may take 3 full minutes for all images to appear.
If they do not all appear. Try clicking the browser "refresh" or "reload button" or right click on the image, choose "view image" then go back. It should now appear.
To print, try printing only 3 or 4 pages at a time.
Back to main on-line manual page
If you find this manual useful, how about a donation of $3 to:
M. Butkus, 29 Lake Ave., High Bridge, NJ 08829-1701
and send your e-mail address so I can thank you. Most other places would charge you
$7.50 for a electronic copy
or $18.00 for a hard to read Xerox copy.
This will allow me to continue to buy new manuals and pay their shipping costs.
It'll make you feel better, won't it?
If you use Pay Pal, use the link below. Use the above address for a check, M.O. or cash.
www.PayPal.me/butkus
Advertisement
Table of Contents

Related Manuals for Ricoh FF-90


Summary of Contents for Ricoh FF-90
- Page 1 Ricoh FF-90 This camera manual library is for reference and historical purposes, all rights reserved. This page is copyright by , M. Butkus, NJ. This page may not be sold or distributed without the expressed permission of the producer I have no connection with Chinon Co., Japan On-line camera manual library This is the full text and images from the manual.
- Page 2 1. Flash Button 8. Strap Eyelet 2. Display Mode Button 9. Lens Shield 3. Back Light Control Button 10. Lens Shield Switch 4. Self-Timer Button 11. Photocell 5. Manual Film Speed Set Button 12. Distance Measuring Windows 6. LCD Control Panel 13.
-
Page 3: Inserting The Batteries
16. Viewfinder Eyepiece 21. Film Chamber 17. Flash Ready Lamp 22. Film Guides 18. Film Rewind Shaft 23. Tripod Socket 19. Back Cover Lever 24. Sprocket 20. Battery Compartment Cover 25. Manual Film Rewind Switch . 4www.butkus.org 26. Film Take-up Spool 27. -
Page 4: Checking The Batteries
* Do not use Nickel Cadmium batteries. "Use of rechargeable Ni-cad batteries is not recommended. Due to higher internal amperage, the electronics in your Ricoh camera/flash unit may be damaged. If damage due to use of Ni-cad batteries occurs, the warranty will be considered null and void". -
Page 5: Loading The Film
d. The batteries have been in the camera for more than one year. (Even without using the camera, the batteries will lose power naturally.) * Generally in cold conditions, the capacity of the batteries decreases, and in some cases, the camera may not operate correctly. - Page 6 5. If the film has not advanced correctly and has not been taken up onto the Film Take-up Spool, the cartridge symbol on the right and "O" in the Exposure Counter blinks. So please reload the film. * Always avoid direct sunlight when loading the film. * Whether film is loaded or not can be confirmed by the Film Loaded Window or the cartridge symbols in the LCD Control Panel.
-
Page 7: Setting The Film Speed
SETTING THE FILM SPEED Please check whether the film has a DX code system or not. A film with a DX code 1. Setting the film speed is not necessary. The camera automatically makes the correct film speed setting. The film speed as well as "DX AUTO" is displayed on the LCD Control Panel. -
Page 8: Auto-Focus Shooting
VIEWFINDER (Fig. 17) 1. Field of View Frame The subject (such as people or scenery) that you wish to take should be set within this frame. 2. Parallax Correction Marks When taking a picture of subject that is between 0.8m--1.2m (2.6 - 4 A.) away from the camera, the subject should be positioned within these marks. -
Page 9: Pre-Focus Shooting
* There may be rare cases where the subject cannot be well-focused. ( For instance, dark subject that do not reflect light well, glossy subjects, or sub jects taken through glass.) In these cases, it is best to use the pre-focus to "lock" the focus on a more "normal" subject at the same distance. While holding focus, turn the camera to the original subject and shoot, (Also see PRE-FOCUS SHOOTING.) Shooting Distance:... - Page 10 When the subject is difficult to focus on 1. When you take subjects that are difficult to focus on, find another subject at about the same distance from the camera. You can pre focus on that subject in the same way as described above. 4www.butkus.org * When you remove your finger from the Shutter Release Button, the prefocused condition is cleared, so that you can pre-focus again as many times as you wish.
-
Page 11: Flash Photography
* If you wish to rewind the film before the end of roll is reached, push the Manual Film Rewind Switch in the direction of the arrow. * You can close the Lens Shield when the film is being rewound. FLASH PHOTOGRAPHY When flash is required, the Flash Button automatically pops up as the Shutter Release Button is pressed halfway and the power source will be on. -
Page 12: Using The Self-Timer
* Be careful not to put your finger in front of the flash window, * If the Shutter Release Button is pressed before the Flash Ready Lamp lights up, the shutter will not release. * You can use the Flash Unit as a fill-in light for daytime photography too. Cover the photocell with your hand and press the Shutter Release Button in halfway. -
Page 13: Display Mode
1. Press the Back Light Control Button (BLC/ +2) and the ~ mark will be displayed in the LCD Control Panel. * If you wish to clear the back light control once it is activated, press the Back Light Control Button again. * Once the camera is fired, back light control is cleared. - Page 14 Film Speed Range: ISO 25 ~ ISO 1600 (in 1/3 steps). Compatible with the DX-code system Film Advance/Rewind: By a built-in motor. Automatic 1st frame setting. Automatic film reverse at the end of film Film Loading: RICOH Auto-Load system Exposure Counter: Additive, counts down during film reverse...