Advertisement
Advertisement

Related Manuals for TP-Link Kasa Spot Pan Tilt KC110


Summary of Contents for TP-Link Kasa Spot Pan Tilt KC110
- Page 1 User Guide Kasa Spot Pan Tilt KC110 1910012567 REV1.0.0...
-
Page 2: Table Of Contents
Contents About This Guide ···················································· 1 Introduction ······························································· 2 Appearance ······························································· 3 Set Up Your Camera ·············································· 4 Main Device Controls ·········································· 6 Use Your Camera ···················································· 7 Authentication ························································10... -
Page 3: About This Guide
• Specifications can be found on the product page at https://www.tp-link.com. • Our Technical Support and troubleshooting information can be found at https://www.tp-link.com/support/. • A TP-Link Community is provided for you to discuss our products at https://community.tp-link.com. • Frequently Asked Questions (FAQs) can be found at https://www.tp-link.com/support/faq/. -
Page 4: Introduction
Introduction With the Kasa Spot Pan Tilt connected to your home network, you can get the full picture of any space in your apartment, dorm or home. With a 360° horizontal view and 118° vertical view, the Pan Tilt has everything covered. With Motion Tracking and Patrol Mode, track activity from beginning to end and set multiple distinct viewpoints for your camera to monitor at set intervals. -
Page 5: Appearance
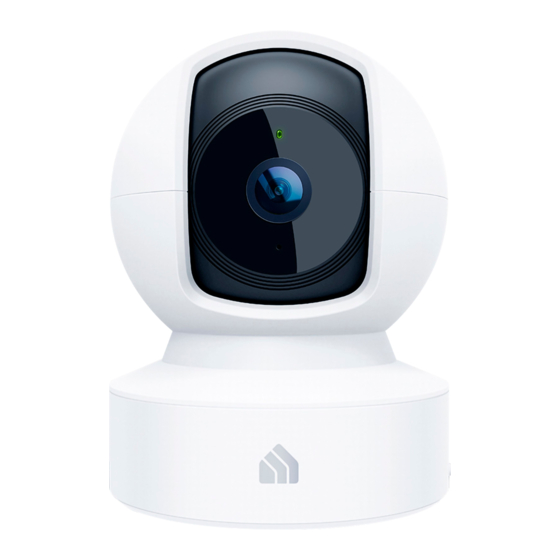
Appearance Kasa Spot Pan Tilt has a system LED that changes color according to its status, a lens, microphone, speaker, micro USB port and a RESET button. Refer below for details. System LED • Solid amber: Lens Rebooting • Alternating amber and green: Ready for setup •... -
Page 6: Set Up Your Camera
Step 3. Start Setup Get the Kasa Smart app from the Apple App Open the app, and log in with your TP-Link ID. Tap the button in the Kasa app and select Store or Google Play, or by scanning the QR If you don't have an account, create one first. - Page 7 Step 4. Configure Camera Step 5. Place Camera Follow app instructions to configure your Place your camera on a flat surface, or install it camera and add it to your home network. on a wall or ceiling with the provided indicator label and mounting screws.
-
Page 8: Main Device Controls
Main Device Controls After you successfully set up your camera, you will see the home page of the Kasa app and the camera page. Home Page Camera Page This page lists your cameras and other smart home devices if any. You This page lists all your cameras and you can view all cameras directly can instantly turn on or off the recording function of the camera. -
Page 9: Use Your Camera
Use Your Camera Tap a camera, then view and manage it with the Kasa app. View the Live Video Check Activities You can view your camera from anywhere at any time. Use Pan/Tilt to When you receive an instant alert, you can view live video immediately rotate your camera to monitor every angle of your room. - Page 10 Change Camera Settings Set Schedules Change the settings of your camera to meet various needs, such as Create schedules to automatically turn alerts, activity clips and camera change your camera name, set activity notifications, enable Motion privacy on and off, or customize when to turn Patrol Mode on and off. Tracking function, and customize Patrol Mode.
- Page 11 Work with Other Smart Home Productss Get automatic alerts when it detects motion. You can view all video clips Tap the button on the home page, and add more TP-Link devices or and activity notifications on each date in Activity Center.
-
Page 12: Authentication
No part of the specifications may be reproduced in any form or by any means or used to make any derivative such as translation, transformation, or adaptation without permission from TP-Link Technologies Co., Ltd. Copyright © 2019 TP-Link Technologies Co., Ltd. All rights reserved. - Page 13 Component Name Model FCC Identifier number AC ADAPTER A8A-050200U-US1 Responsible Party: TP-Link USA Corporation, d/b/a TP-Link North America, Inc. Address: 145 South State College Blvd. Suite 400, Brea, CA 92821 Website: http://www.tp-link.com/us/ Tel: +1 626 333 0234 Fax: +1 909 527 6803 E-mail: sales.usa@tp-link.com...
- Page 14 We, TP-Link USA Corporation, has determined that the equipment shown as above has been shown to comply with the applicable technical standards, FCC part 15. There is no unauthorized change is made in the equipment and the equipment is properly maintained and operated.
- Page 15 We, TP-Link USA Corporation, has determined that the equipment shown as above has been shown to comply with the applicable technical standards, FCC part 15. There is no unauthorized change is made in the equipment and the equipment is properly maintained and operated.
- Page 16 2412MHz—2472MHz (20dBm) EU Declaration of Conformity TP-Link hereby declares that the device is in compliance with the essential requirements and other relevant provisions of directives 2014/53/EU, 2009/125/EC, 2011/65/EU and (EU)2015/863. The original EU declaration of conformity may be found at https://www.tp-link.com/en/ce RF Exposure Information This device meets the EU requirements (2014/53/EU Article 3.1a) on the limitation of exposure of the general public to electromagnetic fields by way...
- Page 17 Radiation Exposure Statement: This equipment complies with IC radiation exposure limits set forth for an uncontrolled environment. This equipment should be installed and operated with minimum distance 20cm between the radiator & your body. Déclaration d’exposition aux radiations: Cet équipement est conforme aux limites d’exposition aux rayonnements IC établies pour un environnement non contrôlé. Cet équipement doit être installé...
- Page 18 限用物質含有情況標示聲明書 限用物質及其化學符號 產品元件名稱 鉛 鎘 汞 六價鉻 多溴聯苯 多溴二苯醚 CrVI PBDE ○ ○ ○ ○ ○ ○ 外殼 ○ ○ ○ ○ ○ ○ 電源供應器 — ○ ○ ○ ○ ○ 備考 1. " 超出 0.1 wt %" 及 " 超出 0.01 wt %" 系指限用物質之百分比含量超出百分比含量基準值。 備考...
- Page 19 • Use only power supplies which are provided by manufacturer and in the original packing of this product. If you have any questions, please don’t hesitate to contact us. Please read and follow the above safety information when operating the device. We cannot guarantee that no accidents or damage will occur due to improper use of the device.