TP-Link RE200 User Manual
Ac750 wi-fi range extender
Hide thumbs
Also See for RE200:
- User manual (61 pages) ,
- Quick installation manual (19 pages) ,
- User manual (56 pages)
Table of Contents
Advertisement
Advertisement
Table of Contents

Related Manuals for TP-Link RE200


Summary of Contents for TP-Link RE200
-
Page 1: User Guide
User Guide AC750 Wi-Fi Range Extender RE200 / RE220 REV3.0.0 1910012376... -
Page 2: Table Of Contents
2. 2. 1. Method 1: Via the TP-Link Tether App....... . -
Page 3: About This Guide
The Quick Installation Guide can be found where you find this guide or inside the package of the extender. Specifications can be found on the product page at http://www.tp-link.com. A Technical Support Forum is provided for you to discuss our products at http://forum.tp-link.com. -
Page 4: Chapter 1 Get To Know About Your Extender
Chapter Get to Know About Your Extender This chapter introduces what the extender can do and its appearance. It contains the following sections: • Product Overview • Appearance... -
Page 5: Product Overview
Get to Know About Your Extender Product Overview Bring Dead Zones Back to Life Tired of Wi-Fi “dead zones”? The TP-Link extender is connected to your router wirelessly, strengthening its signal and expanding its coverage into areas that could not otherwise be reached. -
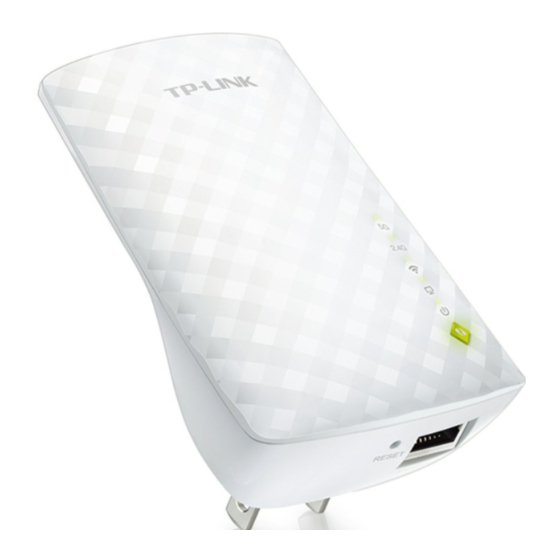
Page 6: Led Explanation
Chapter 1 Get to Know About Your Extender 1 2 1 LED Explanation You can check the extender’s working status by following the LED Explanation table. Name Status Indication The extender is connected or not connected to the 5GHz 5GHz On/Off wireless network of your host router. -
Page 7: Chapter 2 Set Up Internet Connection
Chapter Set Up Internet Connection This chapter introduces how to boost your host wireless coverage. Please follow the step-by-step instructions to set up the internet connection. It contains the following sections: • Power On the Extender • Set Up the Extender... -
Page 8: Power On The Extender
Note: For safety, we suggest that you plug the extender in upright directions as shown below. Set Up the Extender There are three ways to set up the extender: via the TP-Link Tether app, via a web browser, or via the WPS button. -
Page 9: Method 2: Via A Web Browser
Chapter 2 Set Up Internet Connection 4. Create a password to log 5. Follow app instructions to set up and relocate your extender. Tips: For more intuitive location assistant, access extender settings via Tether and go to Tools > Location Assistant. - Page 10 Chapter 2 Set Up Internet Connection Connections are available Wireless Network Connection TP-Link_Extender Connect automatically √ Connect • For Mac OS X Users 1 ) Unplug the Ethernet cable from your computer (if any). 2 ) Click the Wi-Fi icon in the top right corner of the screen, and connect to the extender’s network: TP-Link_Extender.
- Page 11 Chapter 2 Set Up Internet Connection 3 ) Select your host router’s 5GHz SSID (network name), enter its password (NOT the password you just created for management), and click Next. Tips: If your host router does not support 5GHz wireless network, please click Skip to continue.
- Page 12 Chapter 2 Set Up Internet Connection 6 ) Follow web instructions to relocate your extender for optimal Wi-Fi coverage and performance, and then click Done. Enjoy! Connect to the extended network and enjoy the internet.
-
Page 13: Method 3: Via The Wps Button
Note: If the LED does not turn solid on, try again or refer to Method 1: Via the TP-Link Tether App Method 2: Via a Web Browser. 3. If the extender connects to a dual band router, repeat steps 1 and 2 above to connect to the other band. - Page 14 Chapter 2 Set Up Internet Connection Extended Network Names: Router’s network name with _EXT at the end Passwords: Same as your router Solid On Note: If you want to customize the extended network name, refer to Configure Wireless Network. 5. Relocate your extender for optimal Wi-Fi coverage and performance. 1 ) Plug in the extender about halfway between your router and the Wi-Fi dead zone.
-
Page 15: Chapter 3 Customize Your Network
Chapter Customize Your Network This chapter guides you on how to configure network settings that are available for this extender. It contains the following sections: • Check Internet Status • Configure Wireless Network • Change LAN Settings • Specify DHCP Server Settings •... -
Page 16: Check Internet Status
Chapter 3 Customize Your Network Check Internet Status You can view the internet status of your extender to check whether you have successfully set up the extended network(s). 1. Visit http://tplinkrepeater.net, and log in with the password you set for the extender. 2. -
Page 17: Configure Wireless Network
Chapter 3 Customize Your Network Configure Wireless Network If you want to extend another host network after Quick Setup, you can refer to this section. Moreover, you can change the wireless settings for your extended networks. Visit http://tplinkrepeater.net, and log in with the password you set for the extender. Note: Here we take the configuration of the 2.4GHz network as an example. -
Page 18: Change Lan Settings
Chapter 3 Customize Your Network 1. Go to Settings > Wireless > Extended Network. 2. Extended networks are enabled by default. If you want to disable the wireless function of a certain band, just clear the Enable checkbox. In this case, all the wireless settings of this band will be invalid. -
Page 19: Specify Dhcp Server Settings
Chapter 3 Customize Your Network 5. Click Save. Specify DHCP Server Settings By default, the DHCP (Dynamic Host Configuration Protocol) Server is enabled and the extender acts as a DHCP server; it dynamically assigns TCP/IP parameters to client devices from the IP Address Pool. You can change the settings of the DHCP Server if necessary. -
Page 20: Adjust Wi-Fi Coverage
Chapter 3 Customize Your Network ¾ To view the DHCP Client List: You can view the information of the DHCP clients connected to the extender in the DHCP Client List. Adjust Wi-Fi Coverage You can set the extender’s Wi-Fi coverage depending on how large you want your Wi-Fi area to be. -
Page 21: Set Access Control
Chapter 3 Customize Your Network Set Access Control Access Control allows you to permit or block specific devices from accessing the internet for a specific period. 1. Visit http://tplinkrepeater.net and log in with the password you set for the extender. 2. - Page 22 Chapter 3 Customize Your Network 5. Click OK. ¾ To permit specific device(s): 1. Select Whitelist and click Save. 2. Click in the Devices in Whitelist table. Enter the Device Name Address. And you can set the Effective Time for a certain entry as needed. 3.
-
Page 23: Set High Speed Mode
Chapter 3 Customize Your Network Set High Speed Mode The High Speed feature switches off one of the wireless bands to leave one high- performance, super-fast network, ideal for HD streaming and gaming applications. If most of your devices are connected to one wireless band, this feature can increase the overall performance of your wireless network. -
Page 24: Chapter 4 More Features Of Your Extender
Chapter More Features of Your Extender This chapter explains how to use the extender as a wireless adapter and as an access point . It contains the following sections: • Use Your Extender as a Wireless Adapter • Transform Your Existing Wired Network to a Wireless One... -
Page 25: Use Your Extender As A Wireless Adapter
Chapter 4 More Features of Your Extender Use Your Extender as a Wireless Adapter The extender can be used as a wireless adapter to connect any wired-only device, such as a Blu-ray player, game console, DVR, or smart TV, to your wireless network. After configuration, you can connect an Ethernet-enabled device to the extender via an Ethernet cable. - Page 26 Chapter 4 More Features of Your Extender 3. After rebooting, connect the extender to your modem or wired router via an Ethernet cable. 4. Visit http://tplinkrepeater.net, and log in with the password you set for the extender. 5. Go to Quick Setup to configure your extender.
-
Page 27: To Connect Your Wireless Devices To The Extender Via Wps
Chapter 4 More Features of Your Extender 4 2 2 To Connect Your Wireless Devices to the Extender via WPS Wi-Fi Protected Setup (WPS) provides an easier way to set up a secure Wi-Fi connection. Wireless devices that support WPS, including Android phones, tablets, and most USB network cards, can be connected to your extender through this method (not supported by iOS devices). - Page 28 Chapter 4 More Features of Your Extender • PIN code: Enter the client’s PIN, and click Connect.
-
Page 29: Chapter 5 Manage Your Extender
Chapter Manage Your Extender This chapter presents how to manage and maintain your extender. It includes the following sections: • Set System Time • Control LEDs • Set Power Schedule • Upgrade the Firmware • Backup and Restore Configuration Settings •... -
Page 30: Set System Time
Chapter 5 Manage Your Extender Set System Time The System Time of the extender will be used for time-based function such as the Power Schedule function. If you have enabled the Daylight Saving Time feature, the system time will be sychronized with the daylight saving time you configure. 1. -
Page 31: Set Power Schedule
Chapter 5 Manage Your Extender 2. Go to Settings > System Tools > Control. ¾ To turn off the LEDs: Disable Status. ¾ To specify a time period when LEDs are off: 1. Select Night Mode. 2. Specify the LED off time period. 3. -
Page 32: Upgrade The Firmware
Chapter 5 Manage Your Extender 3. Click Save. Upgrade the Firmware TP-Link is committed to improving product features, giving you a better network experience. You can download the latest firmware file from the Support page at our website www.tp-link.com and upgrade the extender to the latest firmware version. -
Page 33: Backup And Restore Configuration Settings
Chapter 5 Manage Your Extender 5. Wait a few minutes for the firmware upgrade to complete and the extender to reboot. Backup and Restore Configuration Settings The configuration settings are stored as a configuration file in the extender. You can backup the configuration file and restore the extender to the previous settings from the backup file when needed. -
Page 34: Change Login Password
Chapter 5 Manage Your Extender 1. Click Factory Restore to reset the extender. 2. Wait a few minutes for the reset and reboot. Note: 1. During the reset process, do not power off or reset the extender. 2. We strongly recommend you backup the current configuration settings before resetting the extender. Change Login Password The account management feature allows you to change your login username and password of the web management webpage. - Page 35 Chapter 5 Manage Your Extender...
-
Page 36: Faq
Q1 How to reset the extender to its factory default settings? • With the extender powered on, use a pin to press the RESET button for 1 second. The extender will reboot. • Log in to the extender’s web management page. Go to System Tools >... - Page 37 Q5 I have enabled wireless MAC filter, wireless access control, or access control list (ACL) on my router What should I do before configuring the extender? When a device connects through the extender to your router, the MAC address of the device shown on the router is translated to another MAC address.
- Page 38 Specifications are subject to change without notice. is a registered trademark of TP-Link Technologies Co., Ltd. Other brands and product names are trademarks or registered trademarks of their respective holders. No part of the specifications may be reproduced in any form or by any means or used to make any derivative such as translation, transformation, or adaptation without permission from TP-Link Technologies Co., Ltd.
- Page 39 FCC compliance information statement Product Name: AC750 Wi-Fi Range Extender Model Number: RE200 / RE220 Responsible Party: TP-Link USA Corporation, d/b/a TP-Link North America, Inc. Address: 145 South State College Blvd. Suite 400, Brea, CA 92821 Website: http://www.tp-link.com/us/ Tel: +1 626 333 0234 Fax: +1 909 527 6803 E-mail: sales.usa@tp-link.com...
- Page 40 This device is restricted in indoor environment only. We, TP-Link USA Corporation, has determined that the equipment shown as above has been shown to comply with the applicable technical standards, FCC part 15. There is no unauthorized change is made in the equipment and the equipment is properly maintained and operated.
- Page 41 5470 MHz -5725 MHz (30dBm) EU Declaration of Conformity TP-Link hereby declares that the device is in compliance with the essential requirements and other relevant provisions of directives 2014/53/EU, 2009/125/EC and 2011/65/EU. The original EU declaration of conformity may be found at http://www.tp-link.com/en/ce RF Exposure Information This device meets the EU requirements (2014/53/EU Article 3.1a) on the limitation of...
- Page 42 The high-power radars are allocated as primary users (i.e. priority users) of the bands 5250-5350 MHz and 5650-5850 MHz and that these radars could cause interference and/or damage to LE-LAN devices. DFS (Dynamic Frequency Selection) products that operate in the bands 5250- 5350 MHz, 5470-5600MHz, and 5650-5725MHz.
- Page 43 於5.25GHz至5.35GHz區域內操作之無線設備的警告聲明 工作頻率5.250~5.350GHz該頻段限於室內使用。 安全諮詢及注意事項 • 請使用原裝電源供應器或只能按照本產品注明的電源類型使用本產品。 • 清潔本產品之前請先拔掉電源線。請勿使用液體、噴霧清潔劑或濕布進行清潔。 • 注意防潮,請勿將水或其他液體潑灑到本產品上。 • 插槽與開口供通風使用,以確保本產品的操作可靠並防止過熱,請勿堵塞或覆蓋 開口。 • 請勿將本產品置放於靠近熱源的地方。除非有正常的通風,否則不可放在密閉位 置中。 • 請不要私自打開機殼,不要嘗試自行維修本產品,請由授權的專業人士進行此項 工作。 限用物質含有情況標示聲明書 限用物質及其化學符號 鉛 鎘 汞 六價鉻 多溴聯苯 多溴二苯醚 產品元件名 CrVI PBDE 稱 ○ ○ ○ ○ ○ ○ 外殼 ○ ○ ○ ○...
- Page 44 Please read and follow the above safety information when operating the device. We cannot guarantee that no accidents or damage will occur due to improper use of the device. Please use this product with care and operate at your own risk. This product can be used in the following countries: Explanations of the symbols on the product label Symbol...