Table of Contents
Advertisement
Contents
1
What is the Purpose of the Micropump
System?
1.1
1.2
1.3
1.4
1.5
1.6
1.7
2
2.1
2.2
2.3
2.4
2.5
3
3.1
3.2
man_07866364001_A_en.indb 1
4
1
4.1
1
4.2
Recommended Infusion Sites
2
5
Testing Your Blood Glucose
2
3
5.1
Checking the Unit of Measurement
4
5.2
Performing a Blood Glucose Test
6
5.3
Adding Information
7
5.4
Evaluating Test Results
11
6
Delivering a Bolus
11
6.1
Manual Bolus Delivery
14
6.2
Bolus Input Display
17
6.3
Bolus Types
20
6.4
Programming a Bolus
21
6.5
Quick Bolus
6.6
Delivering the Bolus with a Pen or Syringe
31
6.7
Cancelling a Bolus
31
6.8
Delaying Bolus Delivery
36
57
57
61
85
85
86
91
96
103
103
104
105
107
117
121
123
126
28.07.2017 12:15:42
Advertisement
Table of Contents

Related Manuals for Accu-Chek Solo


Summary of Contents for Accu-Chek Solo
- Page 1 Contents What is the Purpose of the Micropump Putting the Micropump Into Operation System? Overview Intended Use Recommended Infusion Sites Contraindications Testing Your Blood Glucose Risks and Benefits General Warnings Checking the Unit of Measurement Components of the Micropump System Performing a Blood Glucose Test Characteristics of the Micropump System Adding Information...
- Page 2 Bolus Advice 10.4 Standard Week 10.5 Target Range Overview 10.6 BG Averages Table Setting Up Bolus Advice Using Bolus Advice 11 Changing Settings Turning Off Bolus Advice 11.1 Making Settings Basal Rate Profiles and Temporary 11.2 Travelling and Flight Mode Basal Rates 12 Reminders Basal Rate Profiles...
- Page 3 15 Messages and Troubleshooting 18.4 Supplies and Accessories 18.5 Disposing of the Micropump System 15.1 Information Messages 18.6 Bolus Calculation 15.2 Warning Messages 15.3 Maintenance Messages 19 Glossary 15.4 Error Messages 15.5 Troubleshooting 20 Index 16 Technical Data 16.1 Micropump System 16.2 Diabetes Manager 16.3 Micropump 16.4 Infusion Assembly...
- Page 4 Read this User’s Manual carefully before using your Accu-Chek ® Also consult the instructions for use enclosed with the Solo micropump system for the first time. This User’s Manual components of the Accu-Chek Solo micropump system. provides you with the information you need to safely operate the micropump system.
- Page 5 Read these chapters or of damage to your health or the health of others. Not before using the Accu-Chek Solo micropump system. heeding the warnings can lead to life-threatening situations. Chapters highlighted in...
- Page 6 Illustrated handling instructions Handling instructions with display images Instructions for handling system components are shown as in the Instructions referring to displays on the diabetes manager screen following example: are shown as in the following example: Step number within a sequence of Step number within a sequence of actions actions...
- Page 7 Quick navigation in the User’s Manual Some handling instructions in this User’s Manual are summarised into a quick navigation path. At the beginning of some chapters or sections, for example, you will find the following information: Main menu > Settings > Time blocks This quick navigation path represents the following steps: “In the Main menu tap the Settings menu and then tap Time blocks”.
- Page 8 Accu-Chek Solo cannula assemblies and Accu-Chek Solo Only use supplies from Roche. micropump holders Note To perform blood glucose tests and control tests with the Accu-Chek Aviva Solo diabetes manager, you need the Accu-Chek Aviva test strips and the Accu-Chek Aviva control solution. VIII man_07866364001_A_en.indb 8...
-
Page 9: What Is The Purpose Of The Micropump
What is the Purpose of the Micropump System? 1.1 Intended Use The Accu-Chek Solo micropump system is a prescription medical The micropump system can support you in calculating the device intended for the subcutaneous continuous delivery of recommended insulin or carbohydrate amounts based on your rapid-acting U100 insulin with variable delivery quantities and for blood glucose values and your personal data. -
Page 10: Risks And Benefits 2
What is the Purpose of the Micropump System? 1.2 Contraindications 1.3 Risks and Benefits Your healthcare professional must decide whether insulin pump Talk to your healthcare team about the benefits and potential therapy is suitable for the treatment of your diabetes mellitus. risks that are associated with using the micropump system. - Page 11 General Warnings 1.4 General Warnings WARNING WARNING The micropump system may only be used by a single Check your blood glucose level at least four times a day. person for insulin therapy. Used devices and supplies carry a risk of infection. Dispose All objects which can come into contact with human blood of used system components according to local regulations.
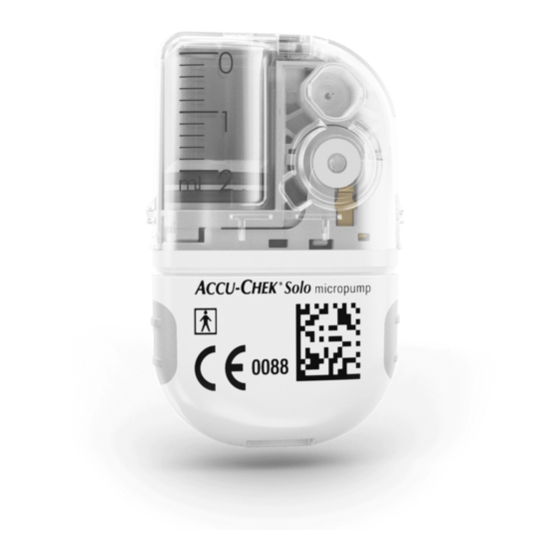
- Page 12 Accu-Chek Solo micropump system part of the micropump. It contains the mechanical parts as well as the The Accu-Chek Solo micropump system is a system that electronics to control and monitor primarily consists of a tubeless micropump and a diabetes the operation of the pump.
- Page 13 Components of the Micropump System Accu-Chek Solo reservoir Accu-Chek Solo micropump holder The Accu-Chek Solo reservoir is the second part of the micropump in addition to the pump base. The The Accu-Chek Solo micropump reservoir is a sterile container for...
- Page 14 What is the Purpose of the Micropump System? 1.6 Characteristics of the Functional support when temporarily using a syringe or pen Micropump System Support for therapy decisions Built-in bolus advice feature Visual representation of therapy trends and logbook features Tubeless insulin pump Interface to common data management software of different Small, light and removable micropump (28 g) providers on the PC...
- Page 15 Using the Micropump System in Daily Life 1.7 Using the Micropump System in needle (grey protective cap) if you are not using the micropump Daily Life temporarily. Exercise The micropump system is intended to be used continuously, You can wear the micropump during a variety of physical every day in any everyday situation.
- Page 16 What is the Purpose of the Micropump System? Air pressure and altitude comply with these regulations. Rapid and significant changes in air pressure or temperature can influence insulin delivery, especially if there are air bubbles in the Communication between micropump and diabetes manager reservoir.
- Page 17 Using the Micropump System in Daily Life example, mobile phones. It cannot be completely ruled out that a WARNING device of this kind could affect your micropump system. It is therefore recommended that you keep your micropump system Do not use the micropump system close to sources of at least 30 cm away from these devices while they are turned on.
- Page 18 What is the Purpose of the Micropump System? man_07866364001_A_en.indb 10 28.07.2017 12:15:45...
-
Page 19: Overview
Getting to Know the Micropump System 2.1 Diabetes manager overview The Accu-Chek Aviva Solo diabetes manager is a remote control with an integrated blood glucose meter that is used to control the Note micropump. The diabetes manager supports you in your diabetes Always have the diabetes manager with you. - Page 20 Getting to Know the Micropump System man_07866364001_A_en.indb 12 28.07.2017 12:15:46...
- Page 21 Diabetes manager overview Name Description Power button Turns the diabetes manager on or off. Lanyard eyelet Used to attach a lanyard. Earphone socket Socket for connecting passive earphones. LED to signalise error, maintenance and warning messages as well as reminders. Socket for connecting the USB cable (micro-B plug) in order to recharge the battery or establish a Micro USB connector connection to a PC.
-
Page 22: Status Screen
Getting to Know the Micropump System 2.2 Status Screen 2.2.1 Overview On the Status screen, you can see the most important, current and most common therapy information on blood glucose result, basal rate, ongoing boluses and reservoir level at a glance. You can access other information and menus from the Status screen. -
Page 23: Bolus Types
Status Screen Name Description Name Description Shows the most recent blood glucose Remaining Shows the amount of time remaining result with the time and date of the bolus time of an extended or multiwave bolus. Blood test. The background colour indicates glucose Bolus Shows the amount and duration of... - Page 24 Getting to Know the Micropump System 2.2.2 Shortcuts on the Status screen The touch-sensitive areas on the Status screen allow you to quickly access important menus and features. When you tap the areas, the corresponding menus or features are opened. Logbook entries menu Replace system components...
- Page 25 Main Menu 2.3 Main Menu Name Description Tap the menu icon to open the The main menu is an overview of the most important features of Menu desired menu or turn on the desired the diabetes manager. From here, you can open the basic menus feature.
- Page 26 Getting to Know the Micropump System The status bar at the top edge of the screen shows the current time. In addition, the following symbols may be displayed. Symbol Name Description Status of rechargeable Shows the current level of the rechargeable battery in the diabetes manager. battery Is displayed when communication between the diabetes manager and the micropump is No communication...
-
Page 27: Basal Rate Profiles
Main Menu Menus of the Main menu Menu icon Description Menu icon Description Deliver manual bolus, use bolus advice, cancel Connect diabetes manager to PC in order to bolus transfer data Select or set basal rate profiles, set and Turn flight mode on or off cancel Temporary Basal Rates (TBR) Start micropump Set signals... -
Page 28: Logbook
Getting to Know the Micropump System 2.4 Information Screen The information screen is a representation of important device, If you slide the upper screen edge downwards, the information status and therapy information as well as system events. When screen is shown. The bar on the sliding pane lights up blue while you tap the events, the respective menus with detailed it is being moved. - Page 29 Navigation and Operation 2.5 Navigation and Operation 2.5.1 Navigation buttons Navigation and operation of the diabetes manager is done by You can use the navigation buttons below the screen to move means of the touchscreen and navigation buttons. forwards and backwards or to go to the Status screen. Button Function The insulin button is an exception.
-
Page 30: Micropump System
Getting to Know the Micropump System 2.5.2 Insulin button 2.5.3 Entries The insulin button is only used to confirm a previously set insulin There are various methods of making entries in order to execute delivery. When the diabetes manager is ready to deliver basal or commands, select values, set features and select display bolus insulin, the button lights up green. - Page 31 Navigation and Operation Executing commands Switching a feature on or off Whenever you tap a command on the screen, the background By tapping a switch, you can turn a feature on or off. Inactive colour changes. function buttons and switches are greyed out. Example Example Not selected...
-
Page 32: Micropump
Getting to Know the Micropump System Simple lists or menus Lists with checkboxes No element is preselected in simple lists or menus. You can In these lists, you can select either one or more elements select an element. simultaneously or no element. Example Example Tap the element you want to select. - Page 33 Navigation and Operation Lists with radio buttons Editing an element In these lists, one element is always selected, for example, by the To edit the desired element, it must be selected. factory settings. By tapping the desired element, you can change the selection.
- Page 34 Getting to Know the Micropump System Scrolling lists Slider In long menus and lists, you can scroll the list to display the You can make the desired setting by moving the slider. elements that are not visible. Example Example Scroll the list upwards to view additional list elements or Move the slider to the desired position.
-
Page 35: Symbols
Navigation and Operation 2.5.4 Entering Numbers Numeric keypad You can either use a numeric keypad to enter numbers or use the You can enter numeric values such as the carbohydrate amount minus/plus buttons to set them. using the numeric keypad. Some numbers and values, for example, for carbohydrates, can be set using the minus/plus buttons or be entered by means of the numeric keypad. - Page 36 Getting to Know the Micropump System 2.5.5 Entering Text Minus/plus buttons allow you to switch between entering data using the Text is entered using a keyboard. Depending on the language, minus/plus buttons and the numeric keypad. key assignments may differ. Explanation/Example Explanation/Example Symbol for...
- Page 37 Navigation and Operation 2.5.6 Screen Lock Unlocking the screen If the diabetes manager has been inactive for approx. 60 seconds, the screen is automatically locked. You can also lock the screen by pressing the power button. A locked screen is indicated by the symbol.
- Page 38 Getting to Know the Micropump System man_07866364001_A_en.indb 30 28.07.2017 12:15:51...
-
Page 39: Recharging The Battery
Setting Up the Micropump System 3.1 Recharging the Battery Before you start using the diabetes manager, you must charge WARNING the battery. Use only the supplied charger with the appropriate USB Connect the diabetes manager to a PC or charger using the USB cable. - Page 40 Setting Up the Micropump System 3.1.1 Inserting the Battery into the Diabetes Manager Have the diabetes manager, Open the battery compartment Place the rechargeable battery Close the battery compartment rechargeable battery, charger by pushing the battery door up into the battery compartment by pushing the battery door in and USB cable ready.
- Page 41 Recharging the Battery 3.1.2 Charging the Battery Using a Wall Socket Note The blue LED lights up to indicate that the battery is being charged. If the rechargeable battery of the diabetes manager has been run right down, it may take up to 15 minutes until the blue LED of the diabetes manager lights up.
- Page 42 Setting Up the Micropump System 3.1.3 Charging the Battery Using a Computer The Status screen or Main menu displays the symbol in the Plug the smaller end (Micro-B Plug the larger end (USB-A status bar. It indicates that the battery is being charged. plug) of the USB cable into the plug) of the USB cable into a USB socket of the diabetes...
- Page 43 Recharging the Battery Note The computer must usually be turned on in order for the battery to be charged. With some PC models, the computer must not be in sleep or standby mode if you want to charge the battery. The USB port on a PC that is suitable for charging is often marked with a lightning symbol.
- Page 44 Setting Up the Micropump System 3.2 Setting Up the System You can set up the diabetes manager manually, directly on the WARNING device with the help of the setup wizard, or you can use the configuration software to do so on your PC. Discuss your individual settings for insulin dose, warning limits, time blocks and bolus advice with your healthcare 3.2.1 Setup Wizard...
- Page 45 Setting Up the System Caching the setup Turning on the diabetes manager The data and settings you enter are cached at specific points Press and hold the power The diabetes manager during setup. If you want to resume setup after an interruption, button on the top of the vibrates, issues a signal and Continue setup...
- Page 46 Setting Up the Micropump System Setting the language Entering the PIN Note If you have forgotten the PIN you chose, you can unlock the diabetes manager with a PIN unlock code. You can find the label with the 8-digit PIN unlock code on the back cover of the User’s Manual.
- Page 47 Setting Up the System Selecting Setup mode Note If you tapped Manual setup, proceed with the section Time and date settings. If you tapped Set up on proceed with the section Configuration on the PC. Tap the Setup mode you want to use.
- Page 48 Setting Up the Micropump System Time and date information Setting the time and date Times and time periods are always displayed or entered in the following format HH:MM (HH=hours, MM=minutes). 24-hour time 01:07 HH:MM format 16:15 12-hour time 01:07 am HH:MM am or pm format 04:15 pm...
- Page 49 Setting Up the System Tap Time. The hours field is selected Tap the minutes field. Tap Date. (dark background). to set the to set the hours. minutes. Tap Save. man_07866364001_A_en.indb 41 28.07.2017 12:15:57...
- Page 50 Setting Up the Micropump System The day field is highlighted. Tap the month field. Tap the year field. Once you have entered all settings for time and date, tap to set the day. to set the to set the year. Save.
- Page 51 Abbreviation Unit of measurement Gram equivalent Gram 1 gram Subsequent changes to the carbohydrate unit can only be Broteinheit made with the Accu-Chek 12 grams (bread equivalent) 360° configuration software. Kohlenhydrateinheit 10 grams (carbohydrate unit) Tap the carbohydrate unit you Carbohydrate choice 15 grams...
- Page 52 Setting Up the Micropump System Setting warning limits You can set warning limits for hyperglycaemia (hyper) and hypoglycaemia (hypo) that best fit your needs. Whenever your blood glucose result is above the hyper warning limit or below the hypo warning limit, the diabetes manager displays a warning.
- Page 53 Setting Up the System Lower warning limit. to set the lower The warning limits currently If you want to set up bolus warning limit. set are displayed. advice now, tap Yes. In Chapter 7, Setting Up Bolus Advice, you Tap Save. Tap Done.
- Page 54 Setting Up the Micropump System Setting time blocks The diabetes manager allows you to define blood glucose target ranges for certain times of day. For this purpose, the day is divided into time blocks. By dividing the day into time blocks, you can adjust the blood glucose target range to your specific needs.
- Page 55 Setting Up the System to set the start to set the end Tap Done. Upper limit value. time. time. Tap Save. Tap Save. man_07866364001_A_en.indb 47 28.07.2017 12:16:00...
- Page 56 Setting Up the Micropump System to set the upper Lower limit value. to set the lower Tap Done. limit value. limit value. Tap Save. Tap Save. man_07866364001_A_en.indb 48 28.07.2017 12:16:01...
- Page 57 Setting Up the System Note You can set one blood glucose target range for all time blocks or different ones for the various time blocks. The settings for the first time block are used in all copied time blocks. Tap the appropriate time blocks to change these settings.
- Page 58 Setting Up the Micropump System 3.2.2 Programming the Basal Rate Profile The aim of insulin pump therapy is to reproduce the natural Note biorhythm of insulin delivery of a healthy pancreas as far as The factory settings provide possible. 24 time blocks with one hour each.
- Page 59 Setting Up the System The basal rate profile with the Enter a name for the basal rate Define the end time for the to set the name Profile 1 is displayed. profile using the keyboard. first time block. time for the first time block. Tap the element with the Tap Done.
- Page 60 Setting Up the Micropump System Define the insulin units per to set the Repeat Steps 4 to 7 for each time block you want to edit. hour for the first time block. insulin units for the first time block. Scroll the screen upwards or downwards to display all time To do so, tap the top entry field blocks.
- Page 61 Setting Up the System Next, you must prepare the micropump. to confirm the message, and see Chapter 4 to read how to prepare the micropump when using it for the first time. man_07866364001_A_en.indb 53 28.07.2017 12:16:04...
- Page 62 3.2.3 Configuration Software The configuration software can be downloaded from the following web address on the Internet: You can use the Accu-Chek 360° configuration software to set up the micropump system on the PC. You can make all settings on www.###.com the monitor of your PC in a clear, graphical representation.
- Page 63 Setting Up the System Configuration on the PC Note For more information on up on PC, see the User’s Manual of the Accu-Chek 360° configuration software. If you selected Set up on Start the configuration This display shows that data...
- Page 64 Setting Up the Micropump System man_07866364001_A_en.indb 56 28.07.2017 12:16:04...
- Page 65 Putting the Micropump Into Operation 4.1 Overview This chapter explains all steps necessary to prepare the Cannula assembly 6 mm Cannula assembly 9 mm micropump before using it for the first time. To put the (orange) (blue) micropump into operation, you need the following: Diabetes manager Pump base Reservoir assembly...
- Page 66 Putting the Micropump Into Operation Infusion assembly Reservoir assembly Micropump holder Filling aid Hook for attaching the micropump Opening for safety release of the insertion device Protective film for battery Opening for cannula with cannula support Flap for detaching the Handle for piston rod micropump Reservoir needle...