
Related Manuals for Drive Heavy Duty Suction Device

Summary of Contents for Drive Heavy Duty Suction Device
- Page 1 USER’S MANUAL MANUAL DEL USUARIO GUIDE DE L’UTILISATEUR 18600 Rev3.07.27.15...
-
Page 2: Table Of Contents
index Safety Information............3 AC Power Source..............4 Electrical................3-4 Introduction................5 Illustration of Important Parts........6 Set-Up...................7 How to Operate Your Heavy Duty Suction Pump ..7-8 Cleaning Instructions............8 Maintenance...............9-10 Troubleshooting..............10 Specifications/Classifications........11 Warranty................12 CAUTION Federal law restricts this device to sale by or on order of a physician, or any other practitioner licensed by the law of the State in which he practices to use or order the use of this device. -
Page 3: Safety Information
It is not working properly. c. It has been dropped or damaged. d. It has been dropped into water. 4. Return the product to an authorized Drive medical equipment service center for examination and repair. 5. Keep the power cord away from heated surfaces. -
Page 4: Ac Power Source
safety information SPECIFIC WARNINGS TO REDUCE THE RISK OF ELECTRICAL SHOCK OR INJURY TO PERSONS, DO NOT DISASSEMBLE THIS UNIT. DISASSEMBLY OR ATTEMPTED REPAIRS IF ACCOMPLISHED INCORRECTLY CAN CREATE ELECTRICAL SHOCK HAZARD. ONLY QUALIFIED TECHNICIANS SHOULD PERFORM SERVICING OF THIS SUCTION UNIT. DANGER The Heavy Duty Suction Pump is a vacuum suction device designed for the collection of nonflam- mable fluid materials in medical applications only. -
Page 5: Introduction
safety information WARNING Proper operation of this product is necessary to avoid physical harm. Improper use can cause personal injury and/or tissue damage. This product should not be used unless the operator has been instructed by a physician or other qualified health care professional. 1. -
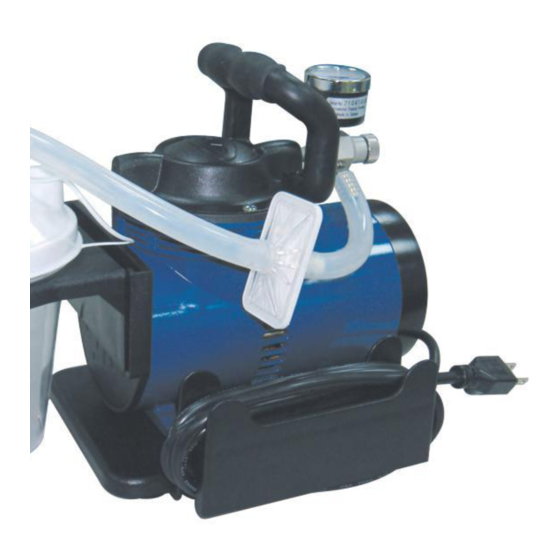
Page 6: Illustration Of Important Parts
illustration of important parts Item # 18600 1. Vacuum Gauge 2. Vacuum Adjust Knob 3. Bacteria Filter 4. Cord Caddy 5. Base 6. 800cc Collection Bottle 7. Patient Tubing 8. Cover 9. Connection Tubing 10. Power Switch 11. Power Cord 12. -
Page 7: Set-Up
set up & operation 1. Connect either end of the connecting tubing (item# 9) to the top of collection bottle connector then connect the other end to the bacteria filter. 2. The patient tubing should be connected to collection bottle at the outlet labeled (patient). Please assure that all connections are secure and without leaks before using. -
Page 8: Cleaning Instructions
set up & operation 4. Place the patient tubing to the appropriate position of patient and start to suck sputum. 5. When the sputum reaches the safe full level of collection bottle (800cc), the suctioning will stop sucking automatically (float shut-off). 6. -
Page 9: Maintenance
2. Remove filter by disconnecting it from tubing connected to pressure adjusting valve and tubing connected to collection bottle lid assembly. 3. Replace with a new Drive bacteria filter and connect to above two tubing. Additional filters can be purchased from an authorized dealer. -
Page 10: Maintenance
NOTE Use only Drive filters. Do not substitute any other material for this bacteria filter. Improper substitution may lead to contamination or poor performance; Fuse Change: 1. Use only the same type of fuse to replace the broken fuse. -
Page 11: Specifications/Classifications
specifications/classifications Dimensions (L) 375 x (W) 175 x (H) 250 mm (14.8 x 6.8 x 9.8 in) Weight. 5.5 kg (12.1 lb) Maximum Vacuum 560 +/- 3% mmHg (56 cmHg +/- 3%) Flow Range > 40 LPM Sound Level < 58 dBA Electrical Requirements AC 115 V 60Hz Power Consumption... -
Page 12: Warranty
If you have a question about your Drive device or this warranty, please contact an authorized Drive dealer. www.drivemedical.com... - Page 13 indice 1. Información de seguridad………………………………………….….....14 2. Fuente de alimentación de CA…………………………..…………...15 3. Sistema eléctrico…………………………………………………………....15-16 4. Introducción………………………………………………………………....16 5. Diagrama de partes importantes…………………….…………....17 6. Configuración………………………………………………………..……....18 7. Cómo operar su bomba de succión de uso pesado……….….…...18 8. Instrucciones para limpiar su unidad..........19-20 9. Mantenimiento…………………………………………….…………………....21 10.
-
Page 14: Información De Seguridad
Se ha caído o dañado. d. Se ha caído dentro del agua. 4. Regrese el producto a un centro autorizado de servicio de equipo médico Drive para exami- narlo y repararlo. 5. Mantenga el cable eléctrico alejado de superficies calientes. -
Page 15: Fuente De Alimentación De Ca
información de seguridad ADVERTENCIAS ESPECÍFICAS NO DESARME LA UNIDAD PARA REDUCIR EL RIESGO DE DESCARGA ELÉCTRICA O LE- SIONES A PERSONAS. SI SE DESARMA O REALIZAN REPARACIONES INCORRECTAMENTE SE PUEDE CREAR UNA DESCARGA ELÉCTRICA. SOLO TÉCNICOS CALIFICADOS DEBERÁN REALIZAR REPARACIONES A LA UNIDAD DE SUCCIÓN. PELIGRO La bomba de succión de uso pesado es un dispositivo de succión a vacío diseñado para recolec- tar fluidos no inflamables y solamente es para aplicaciones médicas. -
Page 16: Introducción
información de seguridad ADVERTENCIA El equipo necesita operarse adecuadamente para evitar el daño físico. El uso inadecuado puede ocasionar lesiones personales y/o daño al tejido. Este producto no debe utilizarse a menos que el operador haya sido instruido por parte de un médico u otro personal de cuidado de salud cali- ficado. -
Page 17: Diagrama De Partes Importantes
diagramas de partes importantes Artículo # 18600 1. Manómetro de vacío 2. Perilla de ajuste de vacío 3. Filtro bacteriano 4. Bandeja para el cable 5. Base 6. Botella de recolección de 800cc 7. Tubería para el paciente 8. Cubierta 9. -
Page 18: Configuración
configuración & operación 1. Conecte cualquier extremo de la tubería de conexión (artículo # 9) al conector de la parte su- perior de la botella de recolección, luego conecte el otro extremo al filtro bacteriano. 2. La tubería del paciente debe ser conectada a la botella de recolección en la tubería de salida que tiene la etiqueta "paciente". -
Page 19: Instrucciones Para Limpiar Su Unidad
configuración & operación 4. Coloque la tubería del paciente en la posición adecuada del paciente y empiece a succionar esputo. 5. Cuando el esputo alcanza el nivel seguro de llenado en la botella de recolección (800cc) la suc- ción se apagará automáticamente (el flotador la apaga). 6. - Page 20 2. Para quitar el filtro, desconéctelo de la tubería conectada a la válvula de ajuste de presión y a la tubería conectada al montaje de la tapa de la botella de recolección. 3. Coloque un filtro bacteriano nuevo Drive y conéctelo a las dos tuberías anteriores. Puede comprar filtros adicionales con un distribuidor autorizado.
-
Page 21: Mantenimiento
NOTA Solamente use filtros Drive. No sustituya ningún otro tipo de material para el filtro bacteriano. Las sustituciones inadecuadas pueden conducir a la contaminación o un pobre rendimiento; Cambio de fusibles: 1. Utilice sólo el mismo tipo de fusible para reemplazar un fusible roto. -
Page 22: Especificaciones/Clasificaciones
especificaciones/clasificaciones Dimensiones (L) 375 x (Ancho) 175 x (Altura) 250 mm (14.8 x 6.8 x 24.89 pulgadas) Peso. 5.5 kg (12.1 lb) Máximo vacío 560 +/- 3% mmHg (56 cmHg +/-3%) Rango de flujo > 40 LPM Nivel de ruido <... -
Page 23: Garantía
Si usted tiene preguntas acerca de su aparato Drive o esta garantía, por favor contacte a un representante autorizado de Drive. - Page 24 table des matières 1. Renseignement concernant la sécurité......25 2. Alimentation électrique............26 3. Électricité................26-27 4. Introduction................27 5. Diagramme des principales pièces........28 6. Installation................29 7. Utilisation votre pompe aspiratrice robuste....29 8. Instructions de nettoyage...........30-31 9. Entretien..................32 10. Dépannage................32 11. Spécifications / classification..........33 12.
-
Page 25: Renseignement Concernant La Sécurité
; d. s'il est tombé dans l'eau. 4. Rapportez l’appareil à un centre de service Drive autorisé pour qu’il soit examiné et réparé. 5. Éloignez le cordon d’alimentation des sources de chaleur. 6. Cet appareil ne doit jamais être utilisé par une personne endormie ou somnolente. -
Page 26: Alimentation Électrique
renseignements concernant la sécurité AVERTISSEMENTS SPÉCIFIQUES POUR DIMINUER LES RISQUES D’ÉLECTROCUTION OU DE BLESSURES, NE TENTEZ PAS DE DÉMONTER CET APPAREIL. SI VOUS TENTEZ DE DÉMONTER OU DE RÉPARER L’ A PPAREIL, VOUS AUGMENTEZ SENSIBLEMENT LES RISQUES D’ÉLECTROCUTION. SEULS DES TECH- NICIENS QUALIFIÉS PEUVENT EFFECTUER L’ENTRETIEN DE CET POMPE ASPIRATRICE DANGER Cette pompe aspiratrice robuste est un appareil d’aspiration à... -
Page 27: Introduction
renseignements concernant la sécurité AVERTISSEMENT Vous devez utiliser cet appareil comme prescrit pour éliminer les risques de blessures. Un usage inadéquat peut causer des blessures ou des lésions. Cet appareil ne doit être utilisé que par des personnes qui ont reçu une formation d’un médecin ou d’un personnel médical qualifié. Apprenez d’abord le fonctionnement de l’appareil. -
Page 28: Diagramme Des Principales Pièces
diagramme des principales pièces Article No. 18600 1. Manomètre 2. Bouton d’ajustement de l’aspiration 3. Filtre antibactérien 4. Porte-cordon 5. Base 6. Contenant collecteur de 800cc 7. Tube d’aspiration 8. Couvercle 9. Tube de liaison 10. Interrupteur 11. Cordon d’alimentation 12. -
Page 29: Installation
installation et fonctionnement 1. Branchez n’importe quel des deux extrémités du tube (No. 9) sur le dessus du contenant collec- teur et branchez l’autre extrémité au filtre antibactérien. 2. Le tube de prélèvement doit être branché au contenant collecteur, à la prise étiquetée « Patient ». -
Page 30: Instructions De Nettoyage
installation et fonctionnement 4. Positionnez le tube adéquatement sur le patient et aspirez les sécrétions. 5. Lorsque les sécrétions atteignent le niveau maximal du contenant collecteur (800cc), l’aspiration cessera automatiquement (interrupteur à flotteur). 6. Mettez l’appareil hors tension (O ou OFF) pour éteindre l’appareil. 7. - Page 31 2. Retirez le filtre en le débranchant des tubes qui relient à la vanne d’ajustement de la pres- sion et au couvercle du contenant collecteur. 3. Installez un nouveau filtre antibactérien Drive et rebranchez les deux tubes. Vous pouvez vous procurer des filtres de rechange chez un revendeur autorisé.
-
Page 32: Entretien
NOTA N’utilisez que des filtres Drive. N’utilisez aucun autre matériau en lieu et place du filtre au risque de créer un site de contamination ou de nuire à l’efficacité du système. Remplacement du fusible : 1. Ne remplacez le fusible que par un fusible neuf du même type. -
Page 33: Spécifications / Classification
spécifications / classification Dimensions (L) 375 x (L) 175 x (H) 250 mm (14,8 x 6,8 x 9,8 po) Poids 5,5 kg (12,1 lb) Aspiration maximale 560 +/- 3% mmHg (56 cmHg +/-3%) Débit > 40 LPM Niveau acoustique < 58 dBA Alimentation électrique CA 115 V 60 Hz Consommation d’électricité... -
Page 34: Garantie
Ce produit Drive est garanti exempt de tout défaut de maté- riau, de fabrication ou de main d’oeuvrepour deux années pour l’acheteur de consommateur original. Cet appareil a été fabriqué selon des normes de qualité rigoureuses et inspecté avant de qui ter l’usine. Cette garan- tie de deux ans, est un témoignage de la confiance que nous... - Page 36 99 Seaview Boulevard Port Washington NY, 11050 Phone: 516-998-4600 Fax: 516-998-4601 www.drivemedical.com Rev2.07.17.14...