
Related Manuals for Teledyne Lecroy 280


Summary of Contents for Teledyne Lecroy 280
- Page 1 280 Test Set – Quick Start Guide Page 1 280 Test Set Video Generator / Analyzer Quick Start Guide Rev: 5 May 11, 2018 Revision 5...
-
Page 2: Table Of Contents
Testing an HDMI Source Devices Response to an EDID Loading additional EDIDs for testing 6 Using the 280 Test Set to Verify a Video Distribution Network End to End 6.1 End to End Verification Testing Configurations for Running an End to End Network Verification Test... -
Page 3: 280 Test Set - Quick Start Guide
Configuration for Running an HDBaseT Cable Test 7 Generating Reports with the Reports File Creation Feature 7.1 Report File Creation Feature Description 7.2 Procedures for Creating Reports 8 Upgrading the Software on Your 280 Units May 11, 2018 Revision 5... -
Page 4: Overview Of The 280G & 280A Test Set
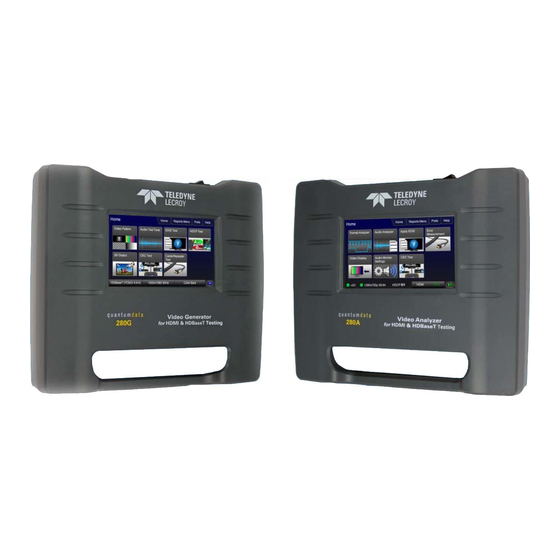
Quick Start Guide. The 280 Test Set is a battery-powered, portable Video Generator and Analyzer set that enables you to conduct quick, on- site verification testing of your HDMI and HDBaseT devices, cables and entire distribution networks. The 280 Test Set is comprised of: ... -
Page 5: Updates To This Guide
280 Test Set – Quick Start Guide Page 5 Updates to This Guide This 280 Test Set Quick Start Guide has been updated to depict support for the HDMI HDR mode and the HDBaseT Long Reach mode. What is in the 280 Test Set Shipping Box... -
Page 6: Physical Interfaces Of The 280 Test Set For Hdmi & Hdbaset
This Chapter describes the administration, video and audio interfaces on the 280 Test Set units:. Video Interfaces Tables 2-1 and 2-2 below describes the video interfaces on the 280 Test Set, these interfaces are used to test consumer electronic devices. -
Page 7: Administrative Interfaces
Page 7 Administrative Interfaces Each 280 unit is equipped with a micro USB interface and a micro SD card slot. These interfaces are located on the bottom edge of the 280G and the 280A as indicated in the illustration below: SD Slot The functions of the micro USB and the Micro SD card slot are described in the table below. -
Page 8: Audio Jacks
280 Test Set – Quick Start Guide Page 8 Audio Jacks There is a 3.5 mm analog audio jack on both the 280G and the 280A units. These audio jacks are located on the same place on the bottom edge of the 280G and 280A chassis as shown below. The description and function of these jacks are provided in the table below. -
Page 9: General Operation
This section describes power up, power usage and general operation. Power Considerations The 280 Test Set has a rocker style power switch on the back panel. Refer to the photo below. The 280G and 280A are portable battery powered test instruments. They are equipped with rechargeable batteries. -
Page 10: Convenient Handle
280 Test Set – Quick Start Guide Page 10 The following example shows a low battery condition. Convenient Handle The 280 units have a handle for convenient carrying. This is depicted in the illustration below. May 11, 2018 Revision 5... -
Page 11: Touch Screen User Interface
Note: Teledyne LeCroy recommends using a stylus or suitable plastic item with a blunt end to activate the buttons on the 280 screen. Selecting with your finger is sufficient however a stylus is preferable. You should not expect a similar touch response that you have with a mobile phone. -
Page 12: 280A User Interface
280 Test Set – Quick Start Guide Page 12 Format Provides the status of the current format being transmitted. The active horizontal and vertical pixels, progressive or interlaces (p or i) and the frame rate, e.g. 59.94, 30, 24, etc. are given. This is also an activation button that will navigate to the Signal Type screen to enable you to set the format resolution. - Page 13 280 Test Set – Quick Start Guide Page 13 Resolution The active horizontal and vertical pixels, progressive or interlaces (p or i) and the frame rate, e.g. 59.94, 30, 24, etc. HDCP Status Either Off, 1.x or 2.2 Active Interface Either HDMI or HDBaseT Hot Plug toggle.
-
Page 14: Using The 280G To Run Video And Audio Tests On Displays And Tvs
280 Test Set – Quick Start Guide Page 14 4 Using the 280G to Run Video and Audio Tests on Displays and TVs This Chapter provides procedures for using the 280G to run video and audio tests on high definition sink devices such as HDTVs and projectors but you can also run tests downstream on entire distribution networks. - Page 15 280 Test Set – Quick Start Guide Page 15 280G connected to an HDBaseT Extender via HDBaseT then to a UHD TV 280G connected to an HDMI network of devices 280G connected to an HDMI/HDBaseT distribution network May 11, 2018...
-
Page 16: Selecting A Signal Type And Resolution
280 Test Set – Quick Start Guide Page 16 Selecting a Signal Type and Resolution After making the physical connections between the 280G and the display device under test you will need to select the Signal Type, Resolution and Frame Rate for the sink device under test. -
Page 17: Selecting An Hdmi Resolution And Frame Rate
280 Test Set – Quick Start Guide Page 17 Example shows HDBaseT being selected. HDBaseT has “Long Reach” mode which enables transmission of a 1080p60 signal to go 170 meters on Cat7 cabling. 4. Touch select the options for the Signal Type such as the Color Space, Sampling, Bit Depth and Format Type in accordance with your requirements. - Page 18 280 Test Set – Quick Start Guide Page 18 The procedures below describe how to select the resolution. When you make a physical connection to an HDMI HDTV (or an HDBaseT input port), a hot plug event will occur. There...
- Page 19 280 Test Set – Quick Start Guide Page 19 3. Touch select the resolution and frame rate (middle button on the bottom panel). Refer to the figures below. The following is an example with a 4K format selected. The following is an example when Hot Plug formats is turned on for 720p formats.
- Page 20 280 Test Set – Quick Start Guide Page 20 May 11, 2018 Revision 5...
-
Page 21: Rendering Test Patterns On A Uhdtv
280 Test Set – Quick Start Guide Page 21 Rendering Test Patterns on a UHDTV This section describes how to render test patterns on an HDTV. Rendering Test Patterns on an HDTV After you have set the Signal Type and Resolution, you use the procedure below to select a test pattern. - Page 22 280 Test Set – Quick Start Guide Page 22 May 11, 2018 Revision 5...
-
Page 23: Testing Digital Audio On An Hdtv Or A/V Receiver
280 Test Set – Quick Start Guide Page 23 Testing Digital Audio on an HDTV or A/V Receiver This section provides procedures for testing digital audio on an HDTV or A/V Receiver. Connecting the 280G to the Audio Rendering Device Use the following procedures to make the physical connections from the 280G to the audio rendering device under test. - Page 24 280 Test Set – Quick Start Guide Page 24 2. Touch select the PCM Sine Wave item (shown in the screen above). The PCM Sine Wave Options menu appears as shown below: 3. Touch select the values for the Bits per Sample using the three buttons provided. (24 bits is selected in the example above.)
- Page 25 280 Test Set – Quick Start Guide Page 25 7. Select external audio as shown in the screen shot example below. May 11, 2018 Revision 5...
-
Page 26: Testing Hdcp On An Hdmi Hdtv Or Hdmi Repeater Device
280 Test Set – Quick Start Guide Page 26 Testing HDCP on an HDMI HDTV or HDMI Repeater Device This section provides procedures for testing HDCP on an HDMI equipped HDTVs or HDBaseT devices. The HDCP authentication test initiates and HDCP authentication with the sink device (with or without a repeater) and displays certain HDCP register values and provides a pass/fail indication. - Page 27 280 Test Set – Quick Start Guide Page 27 The following example shows HDCP 2.2 test results: 5. Touch select Auto-Restart to restart HDCP authentication. The Pass/Fail results and the key values exchanged during the authentication are presented on the display as shown below.
-
Page 28: Verifying The Edid On An Hdmi Hdtv Or Hdmi Repeater Device
280 Test Set – Quick Start Guide Page 28 Verifying the EDID on an HDMI HDTV or HDMI Repeater Device This section provides procedures for verifying and viewing the EDID of an HDMI HDTV or an HDMI repeater device such as an A/V receiver or an HDBaseT sink device such as a projector. - Page 29 280 Test Set – Quick Start Guide Page 29 The screen example below shows the colorimetry supported in the CEA block. The following example shows the HDR data in the HDR Static Metadata Data Block. 5. Run a comparison between a two EDIDs by touch selecting the Compare activation button. This feature will compare the last EDID read with the current EDID of the connected sink.
- Page 30 280 Test Set – Quick Start Guide Page 30 May 11, 2018 Revision 5...
-
Page 31: Using The 280A Video Analyzer To Test Hdmi And Hdbaset Source Devices
280 Test Set – Quick Start Guide Page 31 5 Using the 280A Video Analyzer to Test HDMI and HDBaseT Source Devices This Chapter provides procedures for testing HDMI and HDBaseT source devices such as DVD players, set top boxes and outputs on repeater devices with the 280A Video Analyzer. -
Page 32: Viewing The Video And Video Parameters From An Hdmi Or Hdbaset Source Device
4. Touch select the Start Fullscreen activation button on the Video Display menu to view the incoming video without viewing the metadata from the source device under test. The video from the source is shown on the 280 Test Set LCD as depicted below. May 11, 2018... - Page 33 280 Test Set – Quick Start Guide Page 33 5. Touch select Format Analyzer from the Home menu shown below. 6. Touch select the Refresh activation button to view the results (below). The following example shows a 4K format coming in without HDCP active.
-
Page 34: Testing Audio Of An Hdmi Source Device
280 Test Set – Quick Start Guide Page 34 Testing Audio of an HDMI Source Device This subsection describes how to test the audio from an HDMI source device. You can view the audio metadata and also connect a speaker or earphone set to the audio jack on the bottom edge of the 280A. - Page 35 280 Test Set – Quick Start Guide Page 35 5. Select the Audio Monitor Settings from the Home menu as shown below. 6. Configure the audio volume to your preference on the screen below. May 11, 2018 Revision 5...
-
Page 36: Testing An Hdmi Source's Response To An Edid
280 Test Set – Quick Start Guide Page 36 Testing an HDMI Source’s Response to an EDID The 280A HDMI or HDBaseT IN ports emulate an HDMI or HDBaseT sink device. Part of that emulation function is presenting an EDID to a source or an entire upstream distribution network to verify proper response to specific EDIDs. -
Page 37: Testing An Hdmi Source Devices Response To An Edid
280 Test Set – Quick Start Guide Page 37 Testing an HDMI Source Devices Response to an EDID Use the following procedures to test the EDID response from an HDMI source device. 1. Touch select Apply EDID to access the EDID selection screen. -
Page 38: Loading Additional Edids For Testing
280 Test Set – Quick Start Guide Page 38 A summary page of the selected EDID will appear as shown below. The selected EDID is then applied to the 280A HDMI or HDBaseT Rx port. Loading additional EDIDs for testing You can add additional EDIDs through the micro SDHC or micro SD card interface. - Page 39 280 Test Set – Quick Start Guide Page 39 3. Touch select the Read activation button from the EDID Test menu shown above. The EDID is listed as shown below. 4. Verify that there is a micro SD card in the 280G SD card slot. If there is no card in the slot insert a micro SD card into the 280G micro SD card slot.
- Page 40 280 Test Set – Quick Start Guide Page 40 7. Insert the micro SD card into the 280A SD card slot. Be sure to insert the micro SD card in the 280A as shown below. 8. From the 280A, load the EDID stored on the 280A from the Load File button.
- Page 41 280 Test Set – Quick Start Guide Page 41 9. Connect the 280A HDMI IN port to the HDMI output of a source device you wish to test with the new EDID as shown in the illustration below. This will cause a hot plug event and the source device under test should read the EDID of the 280A HDMI IN port.
-
Page 42: Using The 280 Test Set To Verify A Video Distribution Network End To End
280 Test Set – Quick Start Guide Page 42 6 Using the 280 Test Set to Verify a Video Distribution Network End to End This Chapter provides procedures for testing an HDMI/HDBaseT video distribution network end to end. For these tests you will use both the 280G and 280A. -
Page 43: Selecting Video Formats
280 Test Set – Quick Start Guide Page 43 Testing distinct HDMI components Selecting Video Formats The procedures below describe how to run an end to end test. 1. Power up the 280G and 280A units using the rocker switches on the back panels. -
Page 44: Verifying The Video Through The Network
280 Test Set – Quick Start Guide Page 44 The following is an example with a 4K format selected. Verifying the video through the network Use the procedures below to verify the video and audio through the distribution network. 1. Verify the +5V and the format resolution on the 280A lower status bar. - Page 45 280 Test Set – Quick Start Guide Page 45 4. Touch select Format Analyzer from on the 280A Home menu shown below. 5. Touch select the Refresh activation button (shown on the screen below) to view the results. The Format Analyzer screen shows the essential video parameters such as the format resolution, timing parameters, bits per component, colorimetry, etc.
-
Page 46: Verifying Hdcp Through The Network
280 Test Set – Quick Start Guide Page 46 Verifying HDCP through the network Optionally you can run an end to end HDCP test through the network. 1. Select HDCP Test from the 280G Home page shown below. 2. Touch select Enable from the HDCP Output Tests menu shown below. -
Page 47: Verifying The Edid Through The Network
280 Test Set – Quick Start Guide Page 47 Verifying the EDID through the network You can also run an end to end EDID test through the network. 1. Select the EDID file from the 280A Apply EDID screen. The EDID summary page will appear as shown below. -
Page 48: Verifying Audio Through The Distribution Network
280 Test Set – Quick Start Guide Page 48 Verifying audio through the distribution network You can also run an end to end audio test through the network. This enables you to monitor the HDMI stream remotely by connecting a speaker to the 280A audio output jack. - Page 49 280 Test Set – Quick Start Guide Page 49 7. Optionally to use the 280A audio input jack to monitor audibly. Use a cable with a 3.5 mm analog audio jack connected to the speaker. 8. Touch select Audio Monitor Setting on the 280A screen below.
-
Page 50: Running An Hdmi Cable Test
This subsection provides procedures for performing an HDMI cable test. Use the configuration below. Testing an HDMI cable segment 1. Connect one end of the HDMI cable to the 280 Test Set HDMI OUT connect and the other end to the 280 Test Set HDMI IN connector. -
Page 51: Hdbaset Cable Test
HDBaseT cables that have been installed in a facility. Testing an HDBaseT cable segment 1. Connect one end of the HDMI cable to the 280 Test Set HDMI OUT connect and the other end to the 280 Test Set HDMI IN connector. - Page 52 280 Test Set – Quick Start Guide Page 52 3. Access the Cable/Repeater Test option. 4. Touch select Cable Test activation button. The HDBaseT cable test provides quality measurements of the cable run. Refer to the table below. May 11, 2018...
- Page 53 280 Test Set – Quick Start Guide Page 53 5. Repeat the test at other format resolutions. May 11, 2018 Revision 5...
-
Page 54: Generating Reports With The Reports File Creation Feature
Use the procedure below to run a report on a series source tests. This procedure assumes that you have powered up the source device(s) and connected it (them) to the 280 HDMI In port. 1. From the Main screen, touch select the Reports Menu item from the top menu. Refer to the screen example below. - Page 55 280 Test Set – Quick Start Guide Page 55 3. Touch select Start Report to initiate the report as shown below. The other selections will become visible as shown below. 4. Touch select the Add Comment button to enter a comment about the report such as a project number. You will be prompted with a keyboard to enter comments to the report as shown below.
- Page 56 280 Test Set – Quick Start Guide Page 56 The Reports Menu screen will again appear. 5. Touch select Add Time Info to set the time the report was initiated. The following screen will appear. 6. Set the time and date with the arrow buttons and then touch select the Enter key.
- Page 57 280 Test Set – Quick Start Guide Page 57 The Reports Menu screen will again appear. 7. Touch select the Set Save Dir button (below) to create a directory for the report. 8. Enter the directory name when prompted with the keyboard and touch select the Enter key.
- Page 58 280 Test Set – Quick Start Guide Page 58 11. Enter the name for the report when prompted with the keyboard and touch select the Enter key. The report is now saved on the micro SD card. Procedures for Accessing Reports Once you have run the tests and added them to a report you can access the report from the micro SD card where you saved them.
- Page 59 280 Test Set – Quick Start Guide Page 59 3. Select User to access the reports created by the Report File Creation feature. 4. Open the report in a standard browser. An example of the composite source report is shown below.
- Page 60 280 Test Set – Quick Start Guide Page 60 You can print the reports or disseminated them as a series of files to your customer or contracting agency. May 11, 2018 Revision 5...
-
Page 61: Upgrading The Software On Your 280 Units
280 Test Set – Quick Start Guide Page 61 8 Upgrading the Software on Your 280 Units Please refer to the release notes on the quantumdata website downloads page for instructions on upgrading the 280G and 280A: www.quantumdata.com/downloads.html. END OF USER GUIDE...