Table of Contents
Advertisement
General Settings Guide
Getting Started
Combined Function Operations
User Tools (System Settings)
Troubleshooting
Other Functions
Entering Text
Security
Specifications
For safe and correct use of this machine, please be sure to read the Safety Information in the
"Copy Reference" before you use it.
Operating Instructions
Advertisement
Chapters
Table of Contents
Troubleshooting

Related Manuals for Ricoh 2015


Summary of Contents for Ricoh 2015
-
Page 1: Operating Instructions
General Settings Guide Getting Started Combined Function Operations User Tools (System Settings) Troubleshooting Other Functions Entering Text Security Specifications For safe and correct use of this machine, please be sure to read the Safety Information in the "Copy Reference" before you use it. Operating Instructions... - Page 2 Introduction This manual describes detailed instructions on the operation and notes about the use of this machine. To get maximum versatility from this machine all operators are requested to read this manual carefully and follow the instructions. Please keep this manual in a handy place near the machine. Important Contents of this manual are subject to change without prior notice.
-
Page 3: Manuals For This Machine
Manuals for This Machine The following manuals describe the operational procedures of this machine. For particular functions, see the relevant parts of the manual. Note ❒ Manuals provided are specific to machine type. ❒ Adobe Acrobat Reader is necessary to view the manuals as a PDF file. ❒... - Page 4 ❖ ❖ ❖ ❖ Manuals for DeskTopBinder V2 Lite DeskTopBinder V2 Lite is a utility included on the CD-ROM labeled “Scanner Driver & Document Management Utilities”. • DeskTopBinder V2 Lite Setup Guide (PDF file - CD-ROM2) Describes the installation of, and the operating environment for DeskTop- Binder V2 Lite in detail.
-
Page 5: Machine Types
Machine Types This machine comes in three models which vary by copy speed and available op- tions. Type 1 Copy speed 15 copies/minute (A4K, 8 Fax unit Option Printer unit Option Scanner unit Option Duplex unit ❍: Can be used with this type —: Cannot be used with this type Type 2 18 copies/minute... -
Page 6: What You Can Do With This Machine
What You Can Do with This Machine The following introduces the functions of this machine, and the relevant manu- als containing detailed information about them. Products marked with * are optional. For details about optional products, see p.13 “Options”, or contact your local dealer. Copier, Facsimile, Printer, and Scanner Functions This machine provides copier, fac-... -
Page 7: Fax Transmission And Reception Through The Internet
Fax Transmission and Reception through the Internet xxx@xxx.com • You can send fax documents through e-mail by specifying the recipient's e-mail address (Trans- mitting Internet Fax). You can receive sent documents via Internet Fax, or from comput- ers (Receiving Internet Fax). See Facsimile Reference<Basic Fea- tures>. -
Page 8: Monitoring The Machine Using A Computer
Monitoring the Machine Using a Computer You can monitor machine status and change settings using a computer. • Using SmartDeviceMonitor Admin, SmartDeviceMonitor for Client, or a Web browser, you can use a computer to view the ma- chine's status, such as to check on paper quantities, or misfeeds, etc. -
Page 9: Table Of Contents
TABLE OF CONTENTS Manuals for This Machine ...i Machine Types ...iii What You Can Do with This Machine...iv Copier, Facsimile, Printer, and Scanner Functions... iv Paperless Fax Transmission... iv Fax Transmission and Reception through the Internet ... v Using the Scanner in a Network Environment ... v Administrating the Machine (Security Functions)... - Page 10 Address Book...43 Registering Destination Information ...44 Registering Sender Information ... 44 User Code (MFP) ...45 Registering a New User Code... 45 Changing a User Code...46 Deleting a User Code...49 Displaying the Counter for Each User Code ... 52 Printing the Counter for Each User Code...53 Clearing the Counter ...54 Fax Destination ...
- Page 11 7. Security Security... 97 Primary Security Functions ...97 Extended Security Function ... 97 Operating Environment and Notes... 99 Operating Environment ...99 For Administrator...99 For User ...99 8. Specifications Main Unit... 101 Options ... 105 Exposure Glass Cover ...105 Auto Document Feeder (ADF) ... 105 Auto Document Feeder capable of scanning both sides of a sheet (ARDF)...106 Internal Tray 2 (1 bin tray)...
-
Page 13: Copyrights And Trademarks
Acrobat rated. Bluetooth™ is a trademark of the Bluetooth SIG, Inc. (Special Interest Group) and is used by RICOH Company Limited under license. Copyright ©2001 Bluetooth SIG, Inc. The Bluetooth Trademarks are owned by Bluetooth SIG, Inc. USA. Other product names used herein are for identification purposes only and might be trademarks of their respective companies. -
Page 14: Information About Installed Software
Information about Installed Software expat • The software including controller, etc. (hereinafter “software”) installed on this product uses the expat Version 1.95.2 (hereinafter “expat”) under the con- ditions mentioned below. • The product manufacturer provides warranty and support to the software of the product including the expat, and the product manufacturer makes the in- itial developer and copyright holder of the expat, free from these obligations. - Page 15 Redistribution and use in source and binary forms, with or without modifica- tion, are permitted provided that the following conditions are met: Redistributions of source code must retain the above copyright notice, this list of conditions and the following disclaimer. Redistributions in binary form must reproduce the above copyright notice, this list of conditions and the following disclaimer in the documentation and/or other materials provided with the distribution.
- Page 16 • This product includes software developed by Jonathan Stone and Jason R. Thorpe for the NetBSD Project. • This product includes software developed by the University of California, Lawrence Berkeley Laboratory and its contributors. • This product includes software developed by Christos Zoulas. •...
- Page 17 e) The source code of the Sablotron software is available at: http://www.ginger- all.com. f) MPL 1.1 is available at: http://www.mozilla.org/MPL/MPL-1.1.html. JPEG LIBRARY • The software installed on this product is based in part on the work of the In- dependent JPEG Group. SASL CMU libsasl Tim Martin...
- Page 18 Copyright (C) 1990-2, RSA Data Security, Inc. All rights reserved. License to copy and use this software is granted provided that it is identified as the “RSA Data Security, Inc. MD4 Message-Digest Algorithm” in all material mentioning or referencing this software or this function. License is also granted to make and use derivative works provided that such works are identified as “derived from the RSA Data Security, Inc.
-
Page 19: How To Read This Manual
How to Read This Manual Symbols The following set of symbols is used in this manual. R WARNING: This symbol indicates a potentially hazardous situation that might result in death or serious injury when you misuse the machine without following the in- structions under this symbol. -
Page 20: Energy Star Program
ENERGY STAR Program The ENERGY STAR Guidelines intend to establish an international energy-saving system for developing and introducing energy-efficient office equipment to deal with environmental is- sues, such as global warming. When a product meets the ENERGY STAR Guidelines for energy efficiency, the Partner shall place the ENERGY STAR logo onto the machine model. - Page 21 • Duplex Priority (Type 3 only) To conserve paper, the Duplex function (1-Sided → 2-Sided) can be selected preferentially when you turn on the operation switch or the main power switch, press the { { { { Clear Modes} } } } key, or the machine resets itself automatically. To change Duplex Priority mode, see Copy Reference.
-
Page 23: Getting Started
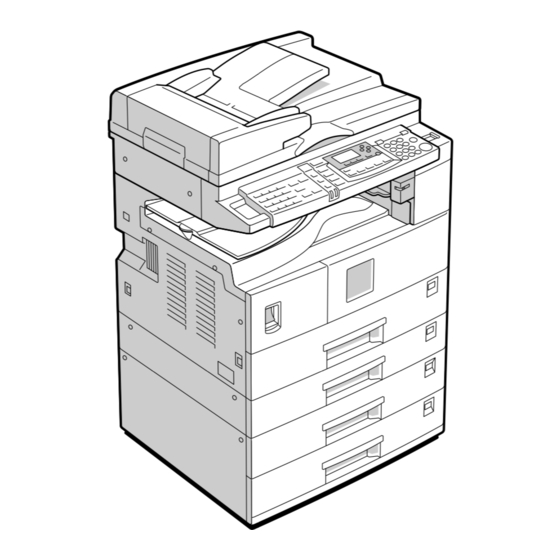
Guide to Components Exposure glass cover (optional), ADF (optional), or ARDF (optional). See p.13 “External Options” (The illustration shows the ARDF.) Exposure glass Place originals here face down. Internal tray 2 (1 bin tray) (option- The indicator lights when paper is deliv- ered to internal tray 2. - Page 24 Getting Started Main power switch If the machine does not operate after turning on the operation switch, check the main power switch is turned on. If it is off, turn it on. Main power indicator Lights when the main power switch is turned on, and goes off when the switch is turned off.
-
Page 25: Options
Options External Options Exposure glass cover Lower this cover over originals. Place stacks of originals here. They will feed in automatically. ARDF Place stacks of originals here. They will feed in automatically. This doc- ument feeder can be used for two-sided originals. -
Page 26: Internal Options
Getting Started Internal Options Fax unit Allows you to use the facsimile function. Printer/Scanner unit Allows you to use the printer and scanner functions. Parallel port IEEE 1284 interface board Allows you to connect to an IEEE 1284 cable. IEEE 1394 interface board Allows you to connect to an IEEE 1394 cable. -
Page 27: Control Panel
Control Panel This illustration shows the control panel of the machine with options fully in- stalled. Search Check Destination Destination Information Commu- Receive File nicating Immediate Trans. Start Manual Memory Reception Trans. Switch RX Mode Standard @. _ @. _ - &... - Page 28 Getting Started { { { { Clear/Stop} } } } key. • Clear: Clears an entered numeric value. • Stop: Stops a job in progress, such as scan- ning, faxing, or printing. Main power indicator and On indicator The main power indicator lights when the main power switch is turned on.
-
Page 29: Display
Display The display panel shows machine status, error messages, and function menus. Important ❒ A force or impact of more than 30 N (about 3 kgf) will damage the display. The copy display is set as the default screen when the machine is turned on. When you select or specify an item on the display, it is highlighted like Reading the Display and Using Keys This section explains how to read the display and use the Selection keys. - Page 30 Getting Started Common key operations The following keys are common to all screens: ❖ ❖ ❖ ❖ Key list [Cancel] [Exit] [Stop] [Yes] [Stop] Deletes a selected function or entered values, and then the previous display returns. The previous display returns. Stops a job in progress.
-
Page 31: Combined Function Operations
2. Combined Function Changing Modes Note ❒ You cannot switch modes in any of the following situations: • When scanning a fax message for transmission • During immediate transmission • When accessing User Tools • During On hook dialing for fax transmission •... -
Page 32: System Reset
Combined Function Operations - System Reset The machine returns automatically to its initial condition when the job is fin- ished, after a certain period of time has elapsed. This function is called “System Reset”. Note ❒ You can change the System Reset time. See p.32 “System Auto Reset Timer”. -
Page 33: Multi-Access
Multi-Access You can carry out another job using a different function while the current job is being performed. Performing multiple functions simultaneously like this is called “Multi-accessing”. This allows you to handle jobs efficiently, regardless of how the machine is being used. -
Page 34: Function Compatibility
Combined Function Operations - Function compatibility The chart shows function compatibility when print priority is set to “Interleave”. See p.28 “Print Priority”. Mode after you select Copy Mode before you select Using the control panel Copying Transmission Operation Scanning An Original for Memory Transmission Memory Transmission Immediate Transmission... - Page 35 3. User Tools (System Settings) User Tools Menu (System Settings) Reference For details about Interface Settings and File Transfer, see Network Guide. For details about parallel interface, see Printer Reference 2. ❖ ❖ ❖ ❖ General Features (See p.28 “General Features”.) Panel Tone Copy Count Display Function Priority...
-
Page 36: User Tools (System Settings)
User Tools (System Settings) Paper Type:Tray 2 Paper Type:Tray 3 Paper Type:Tray 4 Ppr Tray Priority: Copier Ppr Tray Priority: Printer Ppr Tray Priority: Fax ❖ ❖ ❖ ❖ Timer Settings (See p.32 “Timer Settings”.) Auto Off Timer Energy Saver Timer System Auto Reset Timer Copier Auto Reset Timer Facsimile Auto Reset Timer... -
Page 37: User Tools Menu (System Settings)
❖ ❖ ❖ ❖ Key Operator Tools (See p.34 “Key Operator Tools”.) User Code Management Key Counter Management Key Operator Code Extended Security Display/Print Counter Counter per User Code Address Book Management Prgrm./Change/Delete Group Program/Change User Code Program Address Book:Print List AOF (Always On) User Tools Menu (System Settings) Default... -
Page 38: Accessing User Tools (System Settings)
User Tools (System Settings) Accessing User Tools (System Settings) This section is for key operators in charge of this machine. User Tools allow you to change or set defaults. Note ❒ Operations for system settings dif- fer from normal operations. Al- ways quit User Tools when you have finished. -
Page 39: Quitting User Tools
Quitting User Tools A A A A Press the { { { { User Tools/Counter} } } } key. On Hook Dial On Hook Dial Pause/ Redial Accessing User Tools (System Settings) AAH011S... -
Page 40: Settings You Can Change With User Tools
User Tools (System Settings) Settings You Can Change with User Tools Reference To access User Tools, see p.26 “Accessing User Tools (System Settings)”. General Features ❖ ❖ ❖ ❖ Panel Tone The beeper (key tone) sounds when a key is pressed. Note ❒... - Page 41 ❖ ❖ ❖ ❖ Output: Copier (copier) You can specify a tray to which documents are delivered. Note ❒ Default: Internal tray 1 ❖ ❖ ❖ ❖ Output: Facsimile (facsimile) You can specify a tray to which documents are delivered. Note ❒...
-
Page 42: Tray Paper Settings
User Tools (System Settings) Tray Paper Settings ❖ ❖ ❖ ❖ Tray Paper Size: Tray 1–4 Select the size of the paper loaded in the paper tray. • Type 1 • The paper sizes you can set for Tray 1 are as follows: A3L, B4JIS (Japanese Industrial Standard)L, A4KL, B5JISKL, A5K, 11"... - Page 43 Reference p.88 “Changing the Paper Size” ❖ ❖ ❖ ❖ Paper Type:Bypass tray Set the display so you can see what type of paper is loaded in the bypass tray. • The paper types you can set for the bypass tray are as follows: •...
-
Page 44: Timer Settings
User Tools (System Settings) Timer Settings ❖ ❖ ❖ ❖ Auto Off Timer After a specified period has passed, following job completion, the machine automatically turns off, in order to conserve energy. This function is called “Auto Off”. The machine status after the Auto Off operation is referred to as “Off mode”, or “Sleep mode”. - Page 45 ❖ ❖ ❖ ❖ Copier Auto Reset Timer Specify the time to elapse before copier modes reset. Note ❒ If [Off] is selected, the machine does not automatically switch to the user code entry screen. ❒ Default: On, 60 sec. ❒...
-
Page 46: Key Operator Tools
User Tools (System Settings) Key Operator Tools The key operator must set the following items. For settings or more information, contact the key operator. It is recommended that the key operator program a key operator code when per- forming the settings. See p.34 “Key Operator Code”. ❖... -
Page 47: Print Counter List
❖ ❖ ❖ ❖ Extended Security Specify whether or not to use the security function. Note ❒ Default : Off ❒ You have to set a 6-digit key operator code to enable Extended Security. See p.34 “Key Operator Code”. Reference For details about security, see p.97 “Security”. - Page 48 User Tools (System Settings) Select [Display/Print Counter] using { { { { U U U U } } } } or { { { { T T T T } } } } , and then press the { { { { OK} } } } key.
- Page 49 ❖ ❖ ❖ ❖ Address Book Management You can add, change, or delete user information in the Address Book, and fac- simile/scanner functions destinations. For details about these operations, see p.45 “User Code (MFP)”, p.55 “Fax Destination”, and p.64 “E-mail Destination”. •...
-
Page 50: Destination List
User Tools (System Settings) ❖ ❖ ❖ ❖ Address Book: Print List You can print the destination list registered in the Address Book. • Destination List Prints the destination list registered in the Address Book. • Group Destination List Prints the group destination list registered in the Address Book. •... -
Page 51: User Code (For Machine With Copier Function Only)
User Code (For machine with copier function only) Register user codes to restrict copier functions to certain users, and check on their use of copier functions: Registering a New User Code A A A A Press the { { { { User Tools/Counter} } } } key. On Hook Dial On Hook Dial Pause/... -
Page 52: Changing A User Code
User Tools (System Settings) Changing a User Code Note ❒ Even if you change a user code, the counter value will not be cleared. A A A A Press the { { { { User Tools/Counter} } } } key. B B B B Select [System Settings] using { { { { U U U U } } } } or { { { { T T T T } } } } , and then press the { { { { OK} } } }... -
Page 53: Displaying The Counter For Each User Code
F F F F Select [Per User Code] or [All User Codes] using { { { { U U U U } } } } or { { { { T T T T } } } } , and then press the { { { { OK} } } } key. -
Page 54: Printing The Counter For Each User Code
User Tools (System Settings) Printing the Counter for Each User Code You can print out the counter for each user code. A A A A Press the { { { { User Tools/Counter} } } } key. B B B B Select [System Settings] using { { { { U U U U } } } } or { { { { T T T T } } } } , and then press the { { { { OK} } } } key. -
Page 55: Address Book
Address Book Registering user information, such as fax numbers and e-mail addresses, in the Address Book allows you to man- age them together. Important ❒ Address Book data is stored in memory. It can be lost if there is some kind of memory failure. The manufacturer shall not be respon- sible for any damage resulting from data loss. -
Page 56: Registering Destination Information
User Tools (System Settings) Registering Destination Information ❖ ❖ ❖ ❖ Registering the destination name • User Name Register the destination name. This is the basic information re- quired for managing destina- tions. Reference p.45 “User Code (MFP)” ❖ ❖ ❖ ❖ When using the fax function •... -
Page 57: User Code (Mfp)
User Code (MFP) Register user codes to restrict the fol- lowing functions to certain users, and check their use of each function: • Copier • Facsimile • Scanner • Printer Note ❒ The number of copies scanned in using the scanner function is counted for each user code. -
Page 58: Changing A User Code
User Tools (System Settings) E E E E Select [Program/Change] using { { { { U U U U } } } } or { { { { T T T T } } } } , and then press the { { { { OK} } } } key. - Page 59 F F F F Enter the registration number of t he d e s ti n a tio n y ou w a n t t o change using the number keys or the Quick Dial keys, and then press the { { { { OK} } } } key. Searching to select a registered user code by name A Press [Search].
- Page 60 User Tools (System Settings) C Enter the registration number of the destination you want to change using the number keys, and then press the { { { { OK} } } } or { { { { #} } } } key.
-
Page 61: Deleting A User Code
C Enter the e-mail address of the destination you want to change using the number keys and the Quick Dial keys, and then press the { { { { OK} } } } key. Reference For details about entering t ex t , s ee p . 95 “ E n t e r i n g Text”. - Page 62 User Tools (System Settings) F F F F Enter the registration number you want to delete using the number keys or the Quick Dial keys, and then press the { { { { OK} } } } key. Searching to select a registered user code by name A Press [Search].
- Page 63 C Enter the user code of the desti- nation you want delete using the number keys, and then press the { { { { OK} } } } or { { { { #} } } } key. D Press the{ { { { OK} } } } or { { { { #} } } } key. E Press the { { { { OK} } } } key.
-
Page 64: Displaying The Counter For Each User Code
User Tools (System Settings) E Select the destination you want to delete using { { { { U U U U } } } } or { { { { U U U U } } } } , and then press the { { { { OK} } } } key. -
Page 65: Printing The Counter For Each User Code
Printing the Counter for Each User Code You can print out the counter made under each user code using [Print Counter], [Transmission Counter], or [Scanner Counter]. A A A A Press the { { { { User Tools/Counter} } } } key. B B B B Select [System Settings] using { { { { U U U U } } } } or { { { { T T T T } } } } , and then press the { { { { OK} } } }... -
Page 66: Clearing The Counter
User Tools (System Settings) Clearing the Counter A A A A Press the { { { { User Tools/Counter} } } } key. B B B B Select [System Settings] using { { { { U U U U } } } } or { { { { T T T T } } } } , and then press the { { { { OK} } } } key. -
Page 67: Fax Destination
Fax Destination Register fax destinations, so you do not need to enter them each time, and can send documents scanned in using the fax function. • It is easy to select the fax destina- tion if you register a “User (Desti- n a t i o n ) N a m e ”... - Page 68 User Tools (System Settings) E E E E Select [Program/Change] using { { { { U U U U } } } } or { { { { T T T T } } } } , and then press the { { { { OK} } } } key.
-
Page 69: Changing A Registered Fax Destination
To set label insertion When Label Insertion is set to On, the receiver's name is printed on the fax message when it is received at the other end. A Select [On] or [Off] using { { { { U U U U } } } } or { { { { T T T T } } } } , and then press the { { { { OK} } } } key. - Page 70 User Tools (System Settings) B Select [Search by Name] using { { { { U U U U } } } } or { { { { T T T T } } } } , and then press the { { { { OK} } } } key.
- Page 71 Searching to select a registered fax destination by user code A Press [Search]. B Select [Search by User Code] us- ing { { { { U U U U } } } } or { { { { T T T T } } } } , and then press the { { { { OK} } } } key.
-
Page 72: Deleting A Registered Fax Destination
User Tools (System Settings) D Press the { { { { OK} } } } key. E Select the destination you want to change, and then press the { { { { OK} } } } key. G G G G Press the { { { { OK} } } } key. - Page 73 C Enter the characters of the des- tination you want to delete us- ing the number keys and the Quick Dial keys, and then press the { { { { OK} } } } key. Reference For details about entering t ex t , s ee p .
- Page 74 User Tools (System Settings) C Enter the user code of the desti- nation you want delete using the number keys, and then press the { { { { OK} } } } or { { { { #} } } } key. D Press the { { { { OK} } } } or { { { { #} } } } key.
- Page 75 E Select the destination you want to delete using { { { { U U U U } } } } or { { { { T T T T } } } } , and then press the { { { { OK} } } } key.
-
Page 76: E-Mail Destination
User Tools (System Settings) E-mail Destination Register e-mail destinations, so you do not need to enter e-mail addresses every time, and can send scan files by e-mail, or send fax documents by In- ternet Fax. • It is easy to select the e-mail desti- nation if you register “User (Desti- nation) Name”... - Page 77 G G G G Enter the user (destination) name using the number keys and the Quick Dial keys, and then press the { { { { OK} } } } key. Note ❒ You can use the user name when selecting an address to send to.
-
Page 78: Changing A Registered E-Mail Destination
User Tools (System Settings) A Select [On] using { { { { U U U U } } } } or { { { { T T T T } } } } , and then press the { { { { OK} } } } key. B Enter the sender's password using the number keys, and then press the { { { { OK} } } } key. - Page 79 D Press the { { { { OK} } } } key. E Select the destination you want to change using { { { { U U U U } } } } or { { { { T T T T } } } } , and then press the { { { { OK} } } } key.
- Page 80 User Tools (System Settings) Searching to select a registered e-mail destination by fax number A Press [Search]. B Select [Search by Fax No.] using { { { { U U U U } } } } or { { { { T T T T } } } } , and then press the { { { { OK} } } } key.
-
Page 81: Deleting A Registered E-Mail Destination
I I I I Select [E-mail Settings] using { { { { U U U U } } } } or { { { { T T T T } } } } , and then press the { { { { OK} } } } key. J J J J Enter the new e-mail address us- ing the number keys and the... - Page 82 User Tools (System Settings) C Enter the characters of the des- tination you want to delete us- ing the number keys and the Quick Dial keys, and then press the { { { { OK} } } } key. Reference For details about entering t ex t , s ee p .
- Page 83 Searching to select a registered e-mail destination by user code A Press [Search]. B Select [Search by User Code] us- ing { { { { U U U U } } } } or { { { { T T T T } } } } , and then press the { { { { OK} } } } key.
- Page 84 User Tools (System Settings) D Press the { { { { OK} } } } key. E Select the destination you want to delete using { { { { U U U U } } } } or { { { { T T T T } } } } , and then press the { { { { OK} } } } key.
-
Page 85: Registering Destinations To A Group
Registering Destinations to a Group Register destinations to a group to easily control registered fax, e-mail and folders for each group. To group destinations, the groups must be registered beforehand. Note ❒ You can register up to 10 groups. Registering a New Group A A A A Press the { { { { User Tools/Counter} } } } key. -
Page 86: Registering A Destination To A Group
User Tools (System Settings) H H H H Press the { { { { OK} } } } key. The “ Programmed pears, and then the “Group” dis- play returns. I I I I Press the { { { { User Tools/Counter} } } } key. Registering a Destination to a Group A A A A... -
Page 87: Deleting A Destination From A Group
L L L L Press the { { { { OK} } } } key. The “ ” message ap- Programmed pears, and then the “Address Book” display returns. M M M M Press the { { { { User Tools/Counter} } } } key. Deleting a Destination from a Group A A A A... - Page 88 User Tools (System Settings) Searching to select a destination registered in a group from Destination List A Press [Search]. B Select [Display Destination List] using { { { { U U U U } } } } or { { { { T T T T } } } } , and then press the { { { { OK} } } } key.
- Page 89 D Press the { { { { OK} } } } key. E Select the destination you want to delete using { { { { U U U U } } } } or { { { { T T T T } } } } , and then press the { { { { OK} } } } key.
-
Page 90: Displaying The Destinations Registered In Groups
User Tools (System Settings) Displaying the Destinations Registered in Groups A A A A Press the { { { { User Tools/Counter} } } } key. B B B B Select [System Settings] using { { { { U U U U } } } } or { { { { T T T T } } } } , and then press the { { { { OK} } } } key. -
Page 91: Changing A Group Name
C Select the group you want to display using { { { { U U U U } } } } or { { { { T T T T } } } } , and then press the { { { { OK} } } } key. Searching to select a registered group by registration number A Press [Search]. - Page 92 User Tools (System Settings) C Enter the characters of the des- tination you want to change us- ing the number keys and the Quick Dial keys, and then press the { { { { OK} } } } key. Reference For details about entering t ex t , s ee p .
-
Page 93: Deleting A Group
Deleting a Group A A A A Press the { { { { User Tools/Counter} } } } key. B B B B Select [System Settings] using { { { { U U U U } } } } or { { { { T T T T } } } } , and then press the { { { { OK} } } } key. - Page 94 User Tools (System Settings) C Select the group you want to delete using { { { { U U U U } } } } or { { { { T T T T } } } } , and then press the { { { { OK} } } } key.
-
Page 95: Troubleshooting
If Your Machine Does Not Operate As You Want The following chart gives explanations of common problems and messages. If other messages appear, follow the instructions displayed. Note ❒ For further “Troubleshooting”, refer to the other manuals for this machine. See p.i “Manuals for This Machine”. - Page 96 Troubleshooting Problem The main power indicator continues blinking and does not turn off when pressed. Original images are print- ed on the reverse side of the paper. Misfeeds occur frequently. An error message remains, even if misfed paper is re- moved.
-
Page 97: Clearing Misfeeds
x Clearing Misfeeds R CAUTION: • The fusing section of this machine might be very hot. Caution should be tak- en when removing misfed paper. Important ❒ When clearing misfeeds, do not turn off the power switch. If you do, your copy settings are cleared. - Page 98 Troubleshooting...
- Page 99 x Clearing Misfeeds...
-
Page 100: Changing The Paper Size
Troubleshooting Changing the Paper Size Preparation Be sure to select the paper size with User Tools and the paper size selector. If you do not, misfeeds might occur. See p.30 “Tray Paper Size: Tray 1–4”. Reference For details about paper sizes and types, see p.109 “Copy Paper”. - Page 101 E E E E While pressing the release lever, adjust the side fences. F F F F Push the metal plate down. G G G G Square the paper and set it in the tray. Important ❒ Be sure to set the paper under the roller.
-
Page 102: Changing The Paper Size In The Optional Paper Tray Unit
Troubleshooting Changing the Paper Size in the Optional Paper Tray Unit A A A A Make sure the paper tray is not in use. B B B B Pull out the paper tray until it stops. Note ❒ Remove any remaining copy paper. - Page 103 Important ❒ When setting small quantities of copy paper, be careful not to squeeze in the side fence too much or paper will not feed in properly. H H H H Press down the lock button. I I I I Adjust the tray size to the new pa- per size using the paper size se- lector.
- Page 104 Troubleshooting...
-
Page 105: Other Functions
Other Functions Displaying the Total Counter You can display the total counter val- ue used for all functions. A A A A Press the { { { { User Tools/Counter} } } } key. On Hook Dial On Hook Dial Pause/ Redial B B B B... - Page 106 Other Functions...
-
Page 107: Entering Text
Entering Text This section describes how to enter characters. When you enter a charac- ter, it appears at the cursor position. If there is a character already at the cur- sor position, the newly entered char- acter appears before it. Available Characters •... -
Page 108: Entering Letters
Entering Text Entering letters A A A A Press the { { { { Shift} } } } key to switch be- tween uppercase and lowercase. Search Check Destination Destination @. _ @. _ Shift Space B B B B Press a Quick Dial keys. -
Page 109: Security
Security Confidential information is always at risk of being copied without permission or subject to unauthorized access through the network. To protect documents from such intrusion, not only can passwords be set, but also the Extended Security function can be used to strengthen security. For those who require increased document protection, we recommend the Ex- tended Security function. - Page 110 Security A A A A Press the { { { { User Tools/Counter} } } } key. On Hook Dial On Hook Dial Pause/ Redial B B B B Select [System Settings] using { { { { U U U U } } } } or { { { { T T T T } } } } , and then press the { { { { OK} } } } key. C C C C Select [Key Operator Tools] using { { { { U U U U } } } } or { { { { T T T T } } } } , and then press the { { { { OK} } } } key.
-
Page 111: Operating Environment And Notes
Operating Environment and Notes Security for this machine is assured on the premises that the machine is used un- der the following conditions: Operating Environment • The condition of the machine is normal. (For example, it is not damaged, modified, or lacking components.) •... - Page 112 Security...
-
Page 113: Specifications
Main Unit ❖ ❖ ❖ ❖ Configuration: Desktop ❖ ❖ ❖ ❖ Photosensitivity type: OPC drum ❖ ❖ ❖ ❖ Original scanning: One-dimensional solid scanning system through CCD ❖ ❖ ❖ ❖ Copy process: Dry electrostatic transfer system ❖ ❖ ❖ ❖ Development: Dry two-component magnetic brush development system ❖... - Page 114 Specifications • Bypass (custom size): Vertical: 90 – 305 mm, 3.5" – 12.0" Horizontal: 148 – 1,260 mm, 5.8" – 49.6" • Duplex unit: A3L – A5KL, 11" × 17"L – 8 ❖ ❖ ❖ ❖ Copy paper weight: • Paper trays (Standard size): 60 – 90 g/m •...
- Page 115 ❖ ❖ ❖ ❖ Copy paper capacity: Type 1: • Tray 1: 250 sheets (80 g/m • Bypass: 100 sheets (80 g/m Type 2, 3: • Tray 1, 2: 250 sheets (80 g/m • Bypass: 100 sheets (80 g/m ❖ ❖ ❖ ❖ Power consumption: Main unit only Warm up Less than 1,280 W...
- Page 116 Specifications ❖ ❖ ❖ ❖ Duplex unit (Type 3 only) • Paper size: A3L, B4JISL, A4KL, B5JISKL, A5KL, 11" × 17"L, 8 " × 13"L, 8 KL, 8KL, 16KKL • Paper weight: 64 – 90 g/m " × 13"L, 8" × 13"L, 8 (20 –...
-
Page 117: Options
Options Exposure Glass Cover Lower this over originals. Auto Document Feeder (ADF) ❖ ❖ ❖ ❖ Mode: • ADF mode ❖ ❖ ❖ ❖ Original size: • A3L – A5KL • 11" × 17"L – 5 " × 8 ❖ ❖ ❖ ❖ Original weight: •... -
Page 118: Auto Document Feeder Capable Of Scanning Both Sides Of A Sheet (Ardf)
Specifications Auto Document Feeder capable of scanning both sides of a sheet (ARDF) ❖ ❖ ❖ ❖ Original size: • A3L – A5KL • 11" × 17"L – 5 ❖ ❖ ❖ ❖ Original weight: • One-sided originals: 40 – 128 g/m •... -
Page 119: Paper Tray Unit (1-Tray Type)
❖ ❖ ❖ ❖ Dimension (W × × × × D × × × × H) Unit: 222 × 478 × 104 mm Tray: 335 × 390 × 26 mm ❖ ❖ ❖ ❖ Weight: 2 kg (4 lb) or less Note ❒... -
Page 120: Paper Tray Unit (2-Tray Type)
Specifications Paper Tray Unit (2-tray type) ❖ ❖ ❖ ❖ Paper weight: 60 – 105 g/m (16 – 28 lb.) ❖ ❖ ❖ ❖ Paper size: A3L, B4 JISL, A4KL, B5 JISKL, A5L, 11" × 17"L, 8 " × 11"KL, 8 13"L, 8 "... -
Page 121: Copy Paper
Copy Paper Recommended Paper Sizes and Types The following limitations apply to each tray: Metric version Paper tray 1 (Type 1) A3L, B4JISL, A4KL, B5JISKL, A5K, 11" × 17"L, 8 Paper tray 1, 2 (Type 2 " × 13"L, 8 or 3) 13"L, 8"... - Page 122 Specifications Bypass Standard tray Sizes Custom sizes Paper weight: 80 g/m When you set custom size paper in the bypass tray, You can specify the size. See Copy Reference. 8K(Ba-Kai) = 267 × 390 mm, 10.6" × 15.4" 16K(Shi-Lui-Kai) = 195 × 267 mm, 7.7" × 10.6" Set one sheet at a time for your needs.
-
Page 123: Unusable Paper
Reference To add paper, see Copy Reference. To change the paper size, see p.88 “Changing the Paper Size”. Unusable Paper R CAUTION: • Do not use aluminum foil, carbon paper, or similar conductive paper to avoid a fire or machine failure. Important ❒... -
Page 124: Paper Storage
Specifications Paper Storage Note ❒ When storing paper, the following precautions should always be followed: • Do not store paper where it will be exposed to direct sunlight. • Avoid storing paper in humid areas (humidity: 70% or less). • Store on a flat surface. ❒... -
Page 125: Index
INDEX Accessing user tools (System Settings) , 26 Address Book Print List , 38 Program/Change/Delete Group , 37 Address book , 43 Address Book Management , 37 ADF , 13 AOF (Always On) , 38 ARDF , 13 , 106 Auto Document feeder (ADF) , 105 Auto off timer , 32 Auto reset timer , 32... - Page 126 If your machine does not operate as you want , 83 Internal options , 14 Internal tray , 11 Internal Tray 2 (1 bin tray) , 106 Key Counter Management , 34 Key Operator Code , 34 Key Operator Tools , 34 Key Repeat , 29 Letters , 96 Lower right cover , 12...
- Page 127 Unusable paper , 111 User code (for machine with copier function only) , 39 User Code Management , 34 User code (MFP) , 45 User Tools Menu (System Settings) , 23 Ventilation holes , 11...
- Page 129 Declaration of Conformity “The Product complies with the requirements of the EMC Directive 89/336/EEC and its amending di- rectives and the Low Voltage Directive 73/23/EEC and its amending directives.” In accordance with IEC 60417, this machine uses the following symbols for the main power switch: a means POWER ON.
- Page 130 GB GB B121-6500...
- Page 131 2015/2018/2018D Placing Originals Copying Troubleshooting User Tools (Copier Features) Remarks Specifications For safe and correct use of this machine, please be sure to read the Safety Information in this manual before you use it. Operating Instructions Copy Reference...
- Page 132 For good copy quality, Ricoh recommends that you use genuine Ricoh toner. Ricoh shall not be responsible for any damage or expense that might result from the use of parts other than genuine Ricoh parts with your Ricoh office products.
- Page 133 Manuals for This Machine The following manuals describe the operational procedures of this machine. For particular functions, see the relevant parts of the manual. Note ❒ Manuals provided are specific to machine type. ❒ Adobe Acrobat Reader is necessary to view the manuals as a PDF file. ❒...
- Page 134 ❖ ❖ ❖ ❖ Manuals for DeskTopBinder V2 Lite DeskTopBinder V2 Lite is a utility included on the CD-ROM labeled "Scanner Driver & Document Management Utilities". • DeskTopBinder V2 Lite Setup Guide (PDF file - CD-ROM2) Describes installation of, and the operating environment for DeskTop- Binder V2 Lite in detail.
- Page 135 TABLE OF CONTENTS Manuals for This Machine ... i Notice ...1 How to Read This Manual ...2 Names of Major Options ...2 Safety Information ...3 Safety During Operation...3 Positions of Labels and Hallmarks for R Machine Types ...6 Control Panel...7 Display ...9 Reading the Display and Using Keys...9 Turning On the Power ...
- Page 136 3. Troubleshooting If Your Machine Does Not Operate As You Want... 39 When a Message Is Displayed... 39 If You Cannot Make Clear Copies... 40 If You Cannot Make Copies As You Want ... 41 When Memory Is Full ... 42 B Loading Paper ...
- Page 137 6. Specifications Combination Chart... 63 Supplementary Information ... 64 INDEX... 67...
-
Page 139: Notice
The CE Declaration of Conformity is available on the Internet at URL: http://www.ricoh.co.jp/fax/ce_doc/ This product is only for use in EEA or other authorized countries. Outdoor use of this product in Belgium, France, Germany, Italy, or the Netherlands is prohib-... -
Page 140: How To Read This Manual
How to Read This Manual Symbols The following set of symbols is used in this manual. R WARNING: This symbol indicates a potentially hazardous situation that might result in death or serious injury when you misuse the machine without following the in- structions under this symbol. -
Page 141: Safety Information
Safety Information When using this machine, the following safety precautions should always be fol- lowed. Safety During Operation In this manual, the following important symbols are used: R WARNING: Indicates a potentially hazardous situation which, if instructions are not followed, could result in death or serious injury. R CAUTION: Indicates a potentially hazardous situation which, if instructions are not followed, may result in minor or moderate injury or damage to property. - Page 142 R CAUTION: • Protect the machine from dampness or wet weather, such as rain and snow. • Unplug the power cord from the wall outlet before you move the machine. While moving the machine, you should take care that the power cord will not be damaged under the machine.
-
Page 143: Positions Of Labels And Hallmarks For R
Positions of Labels and Hallmarks for R WARNING and R This machine has labels for RWARNING and RCAUTION at the positions shown below. For safety, please follow the instructions and handle the machine as indicated. R CAUTION Labels AAI029S... -
Page 144: Machine Types
Machine Types This machine comes in three models which vary by copy speed. To make sure which model you have, see the inside front cover of this manual. Copy Speed Duplex unit ❍: Can be used with this type. —: Cannot be used with this type. Type 1 Type 2 15 copies/minute... -
Page 145: Control Panel
Control Panel Note ❒ These illustrations show Type 3. ❖ ❖ ❖ ❖ Copier only ❖ ❖ ❖ ❖ Options fully installed Search Check Destination Destination Information Commu- Receive File nicating Immediate Trans. Start Manual Memory Reception Trans. Switch RX Mode Standard @. -
Page 146: Main Power Indicator
Main power indicator Lights when the main power switch is turned on. Reference p.11 “Turning On the Power” On indicator Lights when the operation switch is on. Reference p.11 “Turning On the Power” Operation switch Press to turn the power on. The On indi- cator lights. -
Page 147: Display
Display This section explains how to read the display and use the Selection key for the initial copy display. Note ❒ The copy display is set as the default screen when the machine is turned on. ❖ ❖ ❖ ❖ Initial copy display Operational status or messages Messages and the selected tray appear here. - Page 148 { { { { Cancel} } } } key Press to cancel an operation or return to the previous display. { { { { OK} } } } key Press to set a selected item or entered nu- meric value. Scroll keys Press to move the cursor to each direction one by one.
-
Page 149: Turning On The Power
Turning On the Power This machine has two power switch- ❖ ❖ ❖ ❖ Operation switch (right side of the control panel) Press to activate the machine. When the machine has finished warming up, you can operate the machine. ❖ ❖ ❖ ❖ Main power switch (left side of the ma- chine) Turning off this switch makes the main power indicator on the right... -
Page 150: Turning Off The Power
Turning Off the Power A A A A Make sure the exposure glass cov- er, ADF, or ARDF is in the right position. B B B B Press the operation switch. The On indicator goes off. Note ❒ Even if you press the operation switch, the indicator does not go out, but blinks in the follow- ing cases:... -
Page 151: Saving Energy
Saving Energy - Auto Off / Low Power The machine automatically turns it- self off when the job is finished, after a certain period of time has elapsed. This function is called “Auto Off”. Note ❒ You can change the Auto Off time. See General Settings Guide. -
Page 153: Placing Originals
Originals Sizes and Weights of Recommended Originals ❖ ❖ ❖ ❖ Metric version Original location Original size Exposure glass Up to A3 ADF or ARDF One-sided originals: A3L – A5KL Two-sided originals: A3L – A5KL ❖ ❖ ❖ ❖ Inch version Original location Original size Up to 11"... -
Page 154: Sizes Detectable With Auto Paper Select
Placing Originals • Originals with any kind of coating, such as thermal fax paper, art paper, alu- minum foil, carbon paper, or conductive paper • Originals with perforated lines • Originals with indexes, tags, or other projecting parts • Sticky originals such as translucent paper •... -
Page 155: Missing Image Area
❖ ❖ ❖ ❖ Exposure glass Positioning mark Maximum scanning area ❖ ❖ ❖ ❖ ADF or ARDF Maximum scanning area Note ❒ When you copy custom size originals, make sure you specify the size of the originals. If not, the image may not be copied properly. See p.20 “Placing cus- tom size originals”. -
Page 156: Placing Originals
Placing Originals Placing Originals Note ❒ Take care to place originals only af- ter any correction fluid and ink has completely dried. Not taking this precaution could cause marks on the exposure glass that will be cop- ied onto paper. Reference For original sizes you can set, see p.15 “Originals”... -
Page 157: Placing Originals In The Adf Or Ardf
Placing Originals in the ADF or ARDF Settings should be made in the fol- lowing situations: ❖ ❖ ❖ ❖ When placing custom size originals: p.20 “Placing custom size origi- nals” Note ❒ Do not stack originals over the lim- it mark on the side fence of the ADF or ARDF. - Page 158 Placing Originals Placing custom size originals When placing custom size originals in the ADF, or ARDF, specify the size of the originals. Note ❒ Paper that has a vertical length of 105–297 mm (4.2"–11.6") and a hor- izontal length of 128–1260 mm (5.1"–49.6") can be placed with this function.
-
Page 159: Copying
Basic Procedure A A A A If the machine has user codes set, enter a user code (up to eight dig- its) using the number keys, and then press the { { { { OK} } } } or { { { { #} } } } key. The machine is ready to copy. -
Page 160: Copying From The Bypass Tray
Copying Copying from the Bypass Tray Use the bypass tray to copy onto OHP transparencies, thick paper, enve- lopes and copy paper that cannot be loaded in the paper trays. Important ❒ Paper longer than 433 mm may be- come wrinkled, may not feed in, and may jam. - Page 161 C C C C Insert the paper with the side you want to copy facing down, and then adjust the paper guide with the paper size. Horizontal size Vertical size Extender Paper guides Note ❒ If the guides are not flush against the copy paper, images might be skewed or paper mis- feeds might occur.
-
Page 162: When Copying Onto Custom Size Paper
Copying When copying onto custom size paper Important ❒ You should specify the size of copy paper to avoid paper mis- feeds. A Select [Paper Size] using { { { { U U U U } } } } or { { { { T T T T } } } } , and then press the { { { { OK} } } } key. - Page 163 B Select [Regular Size] using { { { { U U U U } } } } or { { { { T T T T } } } } , and then press the { { { { OK} } } } key.
-
Page 164: Copier Functions
Copying Copier Functions Adjusting Image Density You can adjust copy image density to match your originals. If you require darker or lighter cop- ies, adjust image density accordingly. A A A A Press the { { { { Lighter} } } } or { { { { Darker} } } } key to adjust the density. -
Page 165: Rotated Copy
Auto Paper Select A A A A Make sure [Auto Paper Select] is se- lected. Manual Paper Select A A A A Select the paper tray or bypass tray using { { { { U U U U } } } } or { { { { T T T T } } } } . The selected tray and the paper size appear. -
Page 166: Zoom
Copying ❖ ❖ ❖ ❖ Base Point The base point of Reduce/Enlarge differs depending on how the orig- inal is scanned. When the original is placed on the exposure glass, the upper left corner is the base point. When placed in the ADF or ARDF, the bottom left corner is the base point. -
Page 167: Auto Reduce/Enlarge
C C C C Enter the ratio. To select the ratio using { { { { U U U U } } } } and { { { { T T T T } } } } A Adjust the ratio using { { { { U U U U } } } } or { { { { T T T T } } } } . -
Page 168: Sort
Copying A A A A Press [Auto R/E]. B B B B Select the paper tray using { { { { U U U U } } } } or { { { { T T T T } } } } . C C C C Place your originals, and then press the { { { { Start} } } } key. -
Page 169: Duplex (Type 3 Only)
B B B B Select [Sort] or [Rotate Sort], and then press the { { { { OK} } } } key. C C C C Enter the number of copy sets us- ing the number keys. D D D D Place your originals. - Page 170 Copying Original orientation and completed copies The resulting copy image will differ according to the orientation in which you place the originals (vertical K or horizontal L ). The table shows the orientation of im- ages on the front and back of copies, not the orientation of delivery.
-
Page 171: One-Sided Combine
D D D D When selecting two-sided copy- ing, select the orientation [Top to Top] or [Top to Bottom] using { { { { U U U U } } } } or { { { { T T T T } } } } , and then press the { { { { OK} } } } key. Note ❒... - Page 172 Copying ❖ ❖ ❖ ❖ 2 Sided 2 Pages → → → → Combine 1 Side (Optional ARDF is required) Copies 2 two-sided originals onto one side of a sheet. ❖ ❖ ❖ ❖ Orientation of the original and image position of combine Open to left R originals Open to top S originals...
-
Page 173: Two-Sided Combine (Type 3 Only)
C C C C Select the orientation using { { { { U U U U } } } } or { { { { T T T T } } } } , and then press the { { { { OK} } } } key. - Page 174 Copying A A A A Press the { { { { Combine/Series} } } } key. B B B B Select the combine mode using { { { { U U U U } } } } or { { { { T T T T } } } } , and then press the { { { { OK} } } } key.
-
Page 175: Series Copies
Series Copies You can separately copy the front and back of a two-sided original or two facing pages of a bound original onto two sheets. ❖ ❖ ❖ ❖ 2 Sided→ → → → 1 Sided (Optional ARDF is required) Copies each side of a two-sided original onto two separate pages. - Page 176 Copying C C C C When selecting [Series:2Sided Orig.], select the orientation using { { { { U U U U } } } } or { { { { T T T T } } } } , and then press the { { { { OK} } } } key. Note ❒...
-
Page 177: Troubleshooting
If Your Machine Does Not Operate As You Want When a Message Is Displayed The following chart contains explanations for common messages. If other mes- sages appear, follow the instructions as they are displayed. Note ❒ For messages not listed here, see General Settings Guide. Message Cannot detect original size... -
Page 178: If You Cannot Make Clear Copies
Troubleshooting If You Cannot Make Clear Copies Problem Copies appear dirty. The reverse side of an orig- inal image is copied. A shadow appears on cop- ies if you use pasted origi- nals. The same copy area is dirty whenever making copies. Copies are too light. -
Page 179: If You Cannot Make Copies As You Want
If You Cannot Make Copies As You Want This section explains causes and remedies when copy results are not as expect- ❖ ❖ ❖ ❖ Basic Problem Causes You cannot combine sever- Selected functions cannot al functions. be used together. ❖... -
Page 180: When Memory Is Full
Troubleshooting ❖ ❖ ❖ ❖ Duplex (Type 3 only) Problem Order of copies is not cor- rect. In Duplex Margin mode, parts of the original image are not copied. When using Duplex, copy is made Top to Top even though Top to Bottom is se- lected. -
Page 181: B Loading Paper
B Loading Paper Reference For paper types and sizes, see Gen- eral Settings Guide. Loading Paper Note ❒ You can change the paper size, see General Settings Guide. ❒ This illustration shows the paper trays (1 or 2). A A A A Pull the paper tray out slowly un- til it stops. -
Page 182: Orientation-Fixed Paper Or Two-Sided Paper
Troubleshooting Orientation-Fixed Paper or Two-Sided Paper Orientation-fixed (top to bottom) or two-sided paper (for example, letterhead paper, prepunched paper, or copied paper) might not print correctly, depending on how the originals and paper are placed. Reference p.55 “Letterhead Setting” Note ❒... - Page 183 B Loading Paper ❖ ❖ ❖ ❖ Loaded paper orientation • For machine with copier function only AAI035S...
- Page 184 Troubleshooting • For MFP AAI023S...
-
Page 185: D Adding Toner
D Adding Toner When D appears, it is time to add toner. Handling Toner R WARNING: • Do not incinerate used toner or toner containers. Toner dust might ig- nite when exposed to an open flame. Dispose of used toner containers in accordance with local regulations. -
Page 186: Removing Toner
Troubleshooting Removing Toner • 1: Open the front cover of the machine. • 2: Lift the green lever. • 3: Push the green lever, and then gently pull out the holder. • 4: Press the toner bottle back to raise its top, and then gently pull it out. -
Page 187: Inserting Toner
Inserting Toner • 1: Hold the new bottle horizontally and shake it from side to side five or six times. 2: Remove the black cap. Note ❒ Do not remove the black cap before shaking. ❒ Do not remove the inner cap. •... - Page 188 Troubleshooting...
-
Page 189: User Tools (Copier Features)
4. User Tools (Copier Features) Accessing User Tools (Copier Features) This section is for key operators in charge of this machine. Key operators can change or make default settings. Note ❒ Be sure to quit User Tools and re- turn to the initial copy display when all settings are complete. -
Page 190: Quitting User Tools
User Tools (Copier Features) Note ❒ To cancel changes made to set- ting and return to the initial dis- p l a y , p r e s s Tools/Counter} } } } key. Quitting User Tools A A A A Press the { { { { User Tools/Counter} } } } key. -
Page 191: Settings You Can Change With User Tools
Settings You Can Change with User Tools APS/ Auto R/E Priority You can select [Auto Paper Select Priori- ty] (APS Priority) or [Auto R/E Priority] (Auto Reduce/Enlarge Priority). When you cancel this setting, select [Off]. Note ❒ Default: Auto Paper Select Priority Auto Tray Switching If you load same size paper in two or more trays, the machine automatical-... -
Page 192: Duplex Mode Priority
User Tools (Copier Features) Duplex Mode Priority You can select the type of Duplex function effective when the machine is turned on, reset, or modes are cleared. Limitation ❒ Available only for Type 3. Note ❒ Default: 1 Sided → 1 Sided Orientation •... -
Page 193: Preset R/E Priority
Preset R/E Priority You can set the ratio with priority when [R/E] is selected. Note ❒ Default: • Metric version: 71% • Inch version: 65% Duplex Margin You can specify left margin on the back side of copies, and top margin on the front side. - Page 194 User Tools (Copier Features)
-
Page 195: Remarks
Do's and Don'ts R CAUTION: • Unplug the power cord from the wall outlet before you move the machine. While moving the ma- chine, you should take care that the power cord will not be dam- aged under the machine. Important ❒... -
Page 196: Where To Put Your Machine
Remarks Where to Put Your Machine Machine Environment Choose your machine's location care- fully. Environmental conditions greatly affect its performance. Optimum environmental conditions R CAUTION: • Keep the machine away from hu- midity and dust. Otherwise a fire or an electric shock might occur. •... -
Page 197: Moving
Moving R CAUTION: • Unplug the power cord from the wall outlet before you move the machine. While moving the ma- chine, you should take care that the power cord will not be dam- aged under the machine. R CAUTION: •... -
Page 198: Access To The Machine
Remarks Access to the Machine Place the machine near the power source, providing the clearance areas shown. Rear: 5 cm (2") or more Right: 25 cm (10") or more Front: 75 cm (29.6") or more Left: 15 cm (6") or more Note ❒... -
Page 199: Maintaining Your Machine
Maintaining Your Machine If the exposure glass, exposure glass cover, ADF belt, or ARDF belt is dirty, copy clarity may be reduced. Clean these parts if they are dirty. ❖ ❖ ❖ ❖ Cleaning the machine Wipe the machine with a soft, damp cloth. - Page 200 Remarks...
-
Page 201: Combination Chart
Combination Chart The combination chart below shows which functions can be used together. When you read the chart, see the following table: ❍ These functions can be used together. These functions cannot be used together. The first function selected will be the ×... -
Page 202: Supplementary Information
Specifications Supplementary Information ❖ ❖ ❖ ❖ Bypass Tray Copy • The following paper sizes can be selected as standard sizes: A3L, A4KL, A5KL, B4 JISL, B5 JISKL, B6 JISL, 11"×17"L, "×14"L, 8 "×13"L, 8 EnvL, C6 EnvL, DL EnvL •... - Page 203 ❖ ❖ ❖ ❖ Inch version Ratio (%) 200 (enlarge area by 4) 155 (enlarge area by 2) 50 (reduce area by ❖ ❖ ❖ ❖ Zoom • The reproduction ratios you can specify are 50–200%. • You can select a ratio regardless of the size of an original or copy paper. With some ratios, parts of the image might not be copied or margins will appear on copies.
- Page 204 Specifications ❖ ❖ ❖ ❖ Combine • When using this function, the machine selects the reproduction ratio auto- matically. This reproduction ratio depends on copy paper sizes and the number of originals. • The reproduction ratios you can specify are 50–200%. •...
- Page 205 INDEX 1 Sided → 2 Sided , 31 2 Sided → 1 Sided , 37 2 Sided → 2 Sided , 31 Accessing user tools copier features , 51 Adding toner , 47 Adjusting image density , 26 Auto paper select , 26 reduce/enlarge , 29 tray switching , 53 Auto Off / Low Power , 13...
- Page 206 Lighter and Darker , 8 Loading paper , 43 Machine environment , 58 Main power indicator , 8 Main power switch , 11 Maintaining , 61 Manual paper select , 27 Messages , 39 Missing image area , 17 Moving , 59 Non-compatible originals for the ADF or ARDF , 15 Number keys , 8...
- Page 207 storage , 47 used , 47 Toner storage , 47 Troubleshooting , 39 memory is full , 42 you cannot make clear copies , 40 you cannot make copies as you want , 41 your machine does not operate as you want , 39 Turning Off main power , 12...
- Page 208 MEMO B121-6600...
- Page 209 Adobe Systems Incorporated. Other product names used herein are for identification purposes only and might be trademarks of their respective companies. We disclaim any and all rights in those marks. Copyright © 2003 Ricoh Co., Ltd.
- Page 210 Via della Metallurgia 12, 37139 Verona Phone: +39-045-8181500 China RICOH CHINA CO.,LTD. 29/F., Lippo Plaza, No.222 Huai Hai Zhong Road, Lu Wan District, Shanghai P.C.:200021 Phone: +86-21-5396-6888 Singapore RICOH ASIA PACIFIC PTE.LTD. 260 Orchard Road, #15-01/02 The Heeren, Singapore 238855 Phone: +65-6830-5888...
- Page 211 Printer/Scanner Unit Scanner Reference Network Scanner Preparations for Use as a Network Scanner Setting Originals Sending Scan Files by E-mail Using the Network Delivery Scanner Function Using the Network TWAIN Scanner Function Appendix For safe and correct use of this machine, please be sure to read the Safety Information in the "Copy Reference"...
- Page 212 Introduction This manual describes detailed instructions on the operation and notes about the use of this machine. To get maximum versatility from this machine all operators are requested to read this manual carefully and follow the instructions. Please keep this manual in a handy place near the machine. The scanner function is available when the Printer/Scanner option is installed in the machine.
- Page 213 Manuals for This Machine The following manuals describe the operational procedures of this machine. For particular functions, see the relevant parts of the manual. Note ❒ The manuals provided are specific to machine type. ❒ Adobe Acrobat Reader is necessary to view the manuals as a PDF file. ❒...
- Page 214 ❖ ❖ ❖ ❖ Manuals for DeskTopBinder V2 Lite DeskTopBinder V2 Lite is a utility included on the CD-ROM labeled "Scanner Driver & Document Management Utilities". • DeskTopBinder V2 Lite Setup Guide (PDF file - CD-ROM2) Describes the installation of DeskTopBinder V2 Lite, and the operating en- vironment for DeskTopBinder V2 Lite in detail.
- Page 215 TABLE OF CONTENTS Manuals for This Machine ...i How to Read This Manual ...1 Symbols ... 1 Names of Major Options ... 2 1. Network Scanner Outline... 3 E-mail ... 3 Network Delivery Scanner... 4 Network TWAIN Scanner ... 5 Control Panel...
- Page 216 5. Using the Network Delivery Scanner Function Preparation for Delivering...51 Network Delivery Scanner Screen ... 52 Delivering Scan Files... 54 Delivery Procedure...54 Checking the Status of Delivery ... 64 6. Using the Network TWAIN Scanner Function Preparation for Using the Network TWAIN Scanner...65 Network TWAIN Scanner Screen...65 Scanning Originals ...66 Functions of the TWAIN Driver ...68...
-
Page 217: How To Read This Manual
How to Read This Manual Symbols In this manual, the following symbols are used: Important If this instruction is not followed, paper might be misfed, originals might be damaged, or files might be lost. Be sure to read this. Preparation This symbol indicates the prior knowledge or preparations required before op- erating. -
Page 218: Names Of Major Options
Names of Major Options Major options of this machine are referred to as follows in this manual: • Exposure Glass Cover • Auto Document Feeder → ADF • Auto Document Feeder capable of scanning both sides of a sheet → ARDF •... -
Page 219: Network Scanner
Outline By installing the printer/scanner controller, the machine can be used as a net- work scanner. As a network scanner, the machine can send scan files by e-mail, operate as a net- work delivery scanner, and operate as a network TWAIN scanner. E-mail Scan files that are attached to an e-mail can be sent using the e-mail system through a LAN or the Internet. -
Page 220: Network Delivery Scanner
Network Scanner Network Delivery Scanner The machine is used as a delivery scanner with ScanRouter V2 Lite/Profession- al. Scan files are stored in the delivery server and delivered to the folders of cli- ent computers on the same network. Reference p.51 “Using the Network Delivery Scanner Function”... -
Page 221: Network Twain Scanner
Reference For more information about ScanRouter V2 Lite, DeskTopBinder V2 Lite, or Auto Document Link, see p.i “Manuals for This Machine”. Network TWAIN Scanner The scanning function of this machine can be used from a client computer via a network (Ethernet, IEEE 1394 (IP over 1394) [optional], or IEEE 802.11b (Wire- less LAN) [optional]). -
Page 222: Control Panel
Network Scanner Control Panel This illustration shows the control panel when options are installed. Search Destination Commu- Receive File nicating Immediate Trans. Start Manual Memory Reception Trans. Switch RX Mode Standard Detail Transmission Fine Stamp Shift { { { { Search Destination} } } } key Press to search for the destination from the Destination List. - Page 223 Quick Dial keys Press to select the registered destination with a single touch, or to enter letters and symbols. Reference For more information, see General Settings Guide. Note ❒ You can register up to 32 destinations using the Quick Dial keys. Quick Dial Flip Plate Flip this plate down to access Quick Dial keys 01 through 16;...
-
Page 224: Reading The Display And Using Keys
Network Scanner Reading the Display and Using Keys This section explains how to read the display and use the selection key. Note ❒ The copy screen is set as the default screen when the machine is turned on. You can change the settings in [ System Settings ]. See General Setting Guide. Selection keys Correspond to items at the bottom line on the display. -
Page 225: Preparations For Use As A Network Scanner
2. Preparations for Use as a To use the machine as a network scanner, you must make settings required for use as a scanner as well as basic settings for use in a network. Reference First, see General Settings Guide for details about how to make basic settings, and then make scanner settings. - Page 226 Preparations for Use as a Network Scanner ❖ ❖ ❖ ❖ Destination List Settings For explanations of settings, see p.14 “Destination List Settings”. Settings Destina- Destination List Pri- tion List ority Settings Update Server Dest. List ❖ ❖ ❖ ❖ Send Settings For explanations of settings, see p.14 “Send Settings”.
- Page 227 B B B B Select [Scanner Features] using { { { { U U U U } } } } or { { { { T T T T } } } } , and then press the { { { { OK} } } } key. C C C C Select a menu using { { { { U U U U } } } } or { { { { T T T T } } } } , and then press the { { { { OK} } } } key.
-
Page 228: Scan Settings
Preparations for Use as a Network Scanner G G G G C C C C Repeat steps H H H H Press the { { { { Cancel} } } } key. The main menu appears. Scan Settings This section explains how to set the defaults for scan settings. - Page 229 ❖ ❖ ❖ ❖ Orig. Orientation Priority Select the default for original placement orientation. When orig- inals are always positioned the same way, select that orientation as the default to make operation easier. Reference p.31 “Original Orientation and Scan Area” ❖...
-
Page 230: Destination List Settings
Preparations for Use as a Network Scanner Destination List Settings This section explains how to set the defaults for the destination list dis- played. The destination list settings consist of the following. For the list about set- tings and defaults, see p.9 “Scanner Features”. - Page 231 Note ❒ When [On] is selected, all records are deleted after print- ing. When [Off] is selected, records that exceed the limit are automatically deleted from the oldest records. ❖ ❖ ❖ ❖ Max. E-mail Size Select whether the size of an e-mail with a scan file attached is limited or not.
- Page 232 Preparations for Use as a Network Scanner Important ❒ It is recommended that a send- er's password be set to prevent the sender's name from being misused. ❒ When [On] is selected for [Key Operator Code] in [Key Operator Tools] of [System Settings] and [On: Partial] is set for the range, enter the key operator code when [Sender's Name Default] in...
-
Page 233: Installing Software
Installing Software The machine comes with three CD-ROMs containing various software. The CD-ROM labeled“Scanner Driver & Document Management Utilities” con- tains the necessary software to use the machine as a network scanner. The CD- ROM labeled “Printer Driver & Utilities” contains the necessary software to use the machine as a printer. - Page 234 Preparations for Use as a Network Scanner The installing sequence using Auto Run is as follows. Installation Sequence Insert the CD-ROM. The installer starts up. Select the software. installation complete message is displayed. Restart your PC. For information about the software that can be installed by Auto Run, see p.21 “Software Supplied on CD-ROM”.
-
Page 235: Software For Using A Network Twain Scanner
Software for Using a Network TWAIN Scanner To use the machine as a network TWAIN scanner, it is essential to install the TWAIN driver. If you do not have applications that work with TWAIN, it is necessary to also install DeskTopBinder V2 Lite. For information about the installation of Desk- TopBinder V2 Lite, see p.21 “DeskTopBinder V2 Lite”. -
Page 236: Software For Using The Network Delivery Scanner Function
Preparations for Use as a Network Scanner Software for Using the Network Delivery Scanner Function To use the machine as a network delivery scanner, it is essential to install Scan- Router V2 Lite on the delivery server. To check an in-tray or retrieve files, it is necessary to install DeskTopBinder V2 Lite on the client computer. -
Page 237: Desktopbinder V2 Lite
DeskTopBinder V2 Lite Use Auto Run for installation. Preparation Before installation, check the system requirements for DeskTopBinder V2 Lite. See p.22 “DeskTopBinder V2 Lite”. A A A A Start Windows, and then insert the supplied CD-ROM labeled “Scanner Driver & Document Management Utilities” into the CD-ROM drive of the client computer. - Page 238 Preparations for Use as a Network Scanner \DRIVERS\TWAIN ❖ ❖ ❖ ❖ System requirements Limitation ❒ Under Windows NT with RISC-based processors (MIPS R series, Alpha AXP, or PowerPC), this driver is not available. • Hardware PC/AT compatible • CPU Pentium or faster (Pentium 150 MHz or faster recommended) •...
- Page 239 \UTILITY\DESKV2 ❖ ❖ ❖ ❖ System requirements • Hardware PC/AT compatible • CPU Pentium 133 MHz or faster (Pentium II 266 MHz or faster recommended) • Operating system Microsoft Windows 95 (OSR 2 or later) Microsoft Windows 98 Microsoft Windows Millennium Edition Microsoft Windows 2000 Professional (Service Pack 1 or later) Microsoft Windows 2000 Server (Service Pack 1 or later) Microsoft Windows XP Home Edition...
- Page 240 Preparations for Use as a Network Scanner ScanRouter V2 Lite ScanRouter V2 Lite is to be installed on the delivery server. Scan files can be sort- ed in the delivery server, stored in specified in-trays, or saved in folders of client computers on the same network.
- Page 241 ❖ ❖ ❖ ❖ Software installed with ScanRouter V2 Lite • ScanRouter V2 Administration Utility ScanRouter V2 Administration Utility manages the delivery system run by ScanRouter V2 Lite. You can register destination and sender information for the scan files in the delivery server.
- Page 242 Preparations for Use as a Network Scanner...
-
Page 243: Setting Originals
This chapter explains the procedure for placing originals on the exposure glass and in the ADF, and setting the original scan area and orientation according to the placement method. To correctly display the top/bottom orientation of the scanned original on a cli- ent computer, the placement of the original and the settings made on the control panel and scanner driver must match. -
Page 244: Placing On The Exposure Glass
Setting Originals When scanning using the e-mail function or Speci- the delivery scanner fy the function orien- (Specified on the con- tation. trol panel screen) When scanning using the TWAIN scanner function (Specified in the Scan- ner Control dialog box) The original displayed on a computer Placing on the Exposure Glass... -
Page 245: Placing In The Auto Document Feeder
❖ ❖ ❖ ❖ When placing the original so that the top edge touches the top left of the exposure glass When using the machine as a network TWAIN scanner, this orientation is the standard set- ting for the TWAIN driver. Nor- mally, use this orientation for placing originals. - Page 246 Setting Originals ❖ ❖ ❖ ❖ When placing the originals so that the top edges touch the back of the ❖ ❖ ❖ ❖ When placing the top edges of the originals first When using the machine as a network TWAIN scanner, this orientation is the standard set- ting for the TWAIN driver.
-
Page 247: Original Orientation And Scan Area
Original Orientation and Scan Area To correctly display the top/bottom orientation of a scanned original on a client computer, original orientation must be set when placing the original. When using the e-mail function or the network delivery scanner function, settings are made on the control panel of the machine. - Page 248 Setting Originals ❒ The duplex function is available only when you have installed the optional ADF capable of scanning both sides of a sheet (ARDF). Orientation selection A Select [Original Orientation] using { { { { U U U U } } } } or { { { { T T T T } } } } , and then press the { { { { OK} } } } key.
-
Page 249: For A Network Twain Scanner
B When originals of the same width and different length are placed, select [On] using { { { { U U U U } } } } or { { { { T T T T } } } } , and then press the { { { { OK} } } } key. -
Page 250: Scanning Originals In Several Times Using The Exposure Glass
Setting Originals Scanning Originals in Several Times using the Exposure Glass A A A A Place the originals. Reference p.27 “Placing Originals” Note ❒ Originals are scanned in order. Place them from the first page. B B B B Make settings for scanning area and original orientation. -
Page 251: Preparation For Sending By E-Mail
4. Sending Scan Files by E-mail Scan files can be sent from this machine to a specified destination using e-mail. This chapter explains the preparation for sending scan files by e-mail, various display screens, procedures for sending, and how to check the sending result when this function is used. -
Page 252: E-Mail Screen
Sending Scan Files by E-mail E-mail Screen These screens are shown when using the machine for e-mail . ❖ ❖ ❖ ❖ Main display ❖ ❖ ❖ ❖ When a destination is selected. E-mail icon ( ) Indicates that the E-mail screen is dis- played. -
Page 253: Procedure For Sending By E-Mail
Sending Scan Files by E-mail Procedure for Sending by E- mail Scan files are sent after specifying scan settings and destinations. A A A A Press the { { { { Scanner} } } } key. Search Check Destination Destination Information @. - Page 254 Sending Scan Files by E-mail Using a Quick Dial key to select a destination A Press the Quick Dial key in which the destination is regis- tered. Search Check Destination Destination @. _ @. _ Shift Space Reference For more information about how to register the destina- tion, see General Settings Guide.
- Page 255 D Select the destination using { { { { U U U U } } } } or { { { { T T T T } } } } , and then press the { { { { OK} } } } key. E To select more destinations, re- peat steps A A A A to D D D D .
- Page 256 Sending Scan Files by E-mail C Enter a 3-digit registration number that has been assigned to a destin ation using the number keys, and then press the { { { { OK} } } } key. D Press the { { { { OK} } } } key. E To select more destinations, re- peat steps A A A A to D D D D .
- Page 257 Manual entry of an e-mail address A Press [Manual]. B Enter the e-mail address. Note ❒ Letters, number, and periods can be used. The symbols ()\,;:” cannot be used. Reference For information about how to enter characters, see Gener- al Settings Guide. C Press the { { { { OK} } } } key.
- Page 258 Sending Scan Files by E-mail H H H H Specify the e-mail sender. To specify a sender, you can select it using the Quick Dial key, search for and select it from the Destina- tion List, or select it by specifying a registration number.
- Page 259 C For receiving a return receipt confirmation, select [On] using { { { { U U U U } } } } or { { { { T T T T } } } } , and then press the { { { { OK} } } } key.
- Page 260 Sending Scan Files by E-mail Note ❒ When a sender's password is set, a screen for entering the sender's password appears. Enter the sender's password using the number keys, and then press the { { { { OK} } } } or { { { { #} } } } key.
- Page 261 D Press the { { { { OK} } } } key. The “ ” message ap- Accepted pears, and then the Return Re- ceipt screen returns. E For receiving a return receipt confirmation, select [On] using { { { { U U U U } } } } or { { { { T T T T } } } } , and then press the { { { { OK} } } } key.
- Page 262 Sending Scan Files by E-mail Note ❒ When a sender's password is set, a screen for entering the sender's password appears. Enter the sender's password using the number keys, and then press the { { { { OK} } } } or { { { { #} } } } key.
- Page 263 D Select the sender using { { { { U U U U } } } } or { { { { T T T T } } } } , and then press the { { { { OK} } } } key.
- Page 264 Sending Scan Files by E-mail Manual entry of a subject A Select [Manual Input] using { { { { U U U U } } } } or { { { { T T T T } } } } , and then press the { { { { OK} } } } key.
-
Page 265: Checking The Status Of E-Mail
Checking the Status of E-mail The status of the last 50 sendings can be checked. For every new sending record after 50, the oldest record is deleted. Important ❒ When the main power switch is turned off, all records are deleted. Note ❒... - Page 266 Sending Scan Files by E-mail...
-
Page 267: Using The Network Delivery Scanner Function
5. Using the Network Delivery Scan files can be sent to a specified destination using the network delivery scan- ner function. This chapter explains the preparation sequence, various display screens, delivery procedures, and how to check the delivery result when this function is used. -
Page 268: Network Delivery Scanner Screen
Using the Network Delivery Scanner Function Install Client Computer Software Network Delivery Scanner Screen These screens are shown when using the machine as a network delivery scanner. ❖ ❖ ❖ ❖ Main display ❖ ❖ ❖ ❖ When a destination is selected Network Delivery Scanner icon Indicates that the Network Delivery Scanner screen is displayed. - Page 269 [Add Dest] When selecting multiple destinations after a manual entry of a e-mail ad- dress, press [Add Dest], and then enter the e-mail address of the destination. [EditDest] When changing the e-mail address that has been entered, press [EditDest], and then re-enter the e-mail address. Preparation for Delivering...
-
Page 270: Delivering Scan Files
Using the Network Delivery Scanner Function Delivering Scan Files Delivery Procedure Scan files are delivered after scan set- tings and destinations are specified. If necessary, you can select a sender and a subject. A A A A Press the { { { { Scanner} } } } key. Search Check Destination... - Page 271 Note ❒ When using ScanRouter V2 Lite/Professional , the Destina- tion List is updated automati- cally. Using a Quick Dial key to select a destination A Press the Quick Dial key in which the destination is regis- tered. Search Check Destination Destination Information...
- Page 272 Using the Network Delivery Scanner Function D Select the destination using { { { { U U U U } } } } or { { { { T T T T } } } } , and then press the { { { { OK} } } } key.
- Page 273 C Enter a 3-digit registration number that has been assigned to a destin ation using the number keys, and then press the { { { { OK} } } } key. D Press the { { { { OK} } } } key. E To select more destinations, re- peat steps A A A A to D D D D .
- Page 274 Using the Network Delivery Scanner Function Manual entry of a destination Note ❒ When using ScanRouter V2 Pro- fessional, it is possible to enter the e-mail address of the desti- nation directly. However, set- tings for sending e-mail must be made in advance.
- Page 275 Note ❒ When a sender is selected, the sender name is automati- cally placed in the From field of the e-mail so that the send- er can be identified by the re- cipient. Using a Quick Dial key to select a sender A Press the Quick Dial key in which the sender is registered.
- Page 276 Using the Network Delivery Scanner Function C Enter the beginning of the sender name, and then press the { { { { OK} } } } key twice. Note ❒ Enter the first character or ch arac ters of th e s en der name.
- Page 277 B Select [Display Destination List] using { { { { U U U U } } } } or { { { { T T T T } } } } , and then press the { { { { OK} } } } key. C Select the sender using { { { { U U U U } } } } or { { { { T T T T } } } } , and then press the { { { { OK} } } } key.
- Page 278 Using the Network Delivery Scanner Function C Enter a 3-digit registration number that has been assigned to a sender using the number keys, and then press the { { { { OK} } } } key twice. D Press the { { { { OK} } } } key. The “...
-
Page 279: When Selecting A Subject From The List
B Enter a subject, and then press the { { { { OK} } } } key. The “ ” message ap- Accepted pears, and then the Send Op- tions screen returns. Note ❒ When the subject to be en- tered exceeds 64 characters, “U”... -
Page 280: Checking The Status Of Delivery
Using the Network Delivery Scanner Function Checking the Status of Delivery The status of the last 50 deliveries can be checked. For every new delivery record after 50, the oldest record is deleted. Important ❒ When the main power switch is turned off, all records are deleted. -
Page 281: Using The Network Twain Scanner Function
6. Using the Network TWAIN This chapter describes the operations for scanning originals with the network TWAIN scanner using DeskTopBinder V2 Lite. In addition, the preparation for using the network TWAIN scanner and some functions of the TWAIN driver are introduced. -
Page 282: Scanning Originals
Using the Network TWAIN Scanner Function Scanning Originals This section explains how to scan originals using the network TWAIN scanner function. A A A A Start DeskTopBinder V2 Lite, and then select the scanner driver. A On the [Start] menu, point to [Program], point to [DeskTop- Binder V2], and then click [Desk- TopBinder V2]. - Page 283 Note ❒ For advanced settings, click [Detail] to display the Detail window. For information about the Detail window, see TWAIN driver Help. C According to the settings of [Document] and [Orientation:], change the other setting of the [Document] group. Reference p.33 “For a Network TWAIN Scanner”...
-
Page 284: Functions Of The Twain Driver
Using the Network TWAIN Scanner Function Functions of the TWAIN Driver The following is an introduction to the various functions of the TWAIN driver: ❖ ❖ ❖ ❖ Automatic Tilt Correction This function automatically cor- rects character strings that were scanned slanted. -
Page 285: Appendix
Relationship between Resolution and File Size Resolution and scan area are inversely related. The higher the resolution is set, the smaller the area that can be scanned. Conversely, the larger the scan area, the lower the resolution that can be set. The relationship between the scanning resolution and the file size is shown be- low. -
Page 286: Max. Number Of Addresses Which Can Be Specified
Appendix Max. Number of Addresses Which Can Be Specified The number of addresses which can be specified at a time when sending The number of addresses which can be registered in the list The max. number of files which can be scanned The max. -
Page 287: Troubleshooting
Troubleshooting This section contains advice on what to do if you have problems scanning an original, or if the network delivery scanner or e-mail function does not work. Various messages that may appear on the control panel or client computer are listed, along with causes and solutions. -
Page 288: When An Error Message Appears On The Control Panel
Appendix When an Error Message Appears on the Control Panel Note ❒ If an error message that is not included in this section appears, turn off the main power switch of the machine, and then turn it on again. If the message still appears, note the content of the message and the error number (if listed in the table), and contact your service representative. - Page 289 Message Exceeded max. page capacity. Do you want to send the scanned data? Scanned data will be cleared when selecting [No]. Exceeded max.memory capa. Scanning will be cancelled. Scanned data will be cleared. Exceeded max. memory capacity. Do you want to send the scanned data? Scanned data will be cleared when selecting [No].
-
Page 290: When An Error Message Appears On The Client Computer
Appendix Message Specified group contains some invalid dest. Do you want to select only valid dest.? Updating destination list. Reselect destination(s) or sender's name lat- Updating destination list has failed. Try again? When an Error Message Appears on the Client Computer This section describes the main possible causes and actions for error messages displayed on the client computer when the TWAIN driver is used. - Page 291 Message [Clear Misfeed(s) in ADF.] [Communication error has occurred on the network.] [Error has occurred in the scanner.] [Error has occurred in the scanner driver.] [Fatal error has occurred in the scanner.] [Insufficient memory. Close all other applications, then restart scanning.] [Insufficient memory.
- Page 292 Appendix Message [Scanner is in use for other function. Please wait.] [Scanner is not available. Check the scanner connec- tion status.] [Scanner is not ready. Check the scanner and the op- tions.] [The name is already in use. Check the registered names.] Causes and solutions A function of the machine other than the...
-
Page 293: Specifications
Specifications Scan method Scan speed Maximum power consumption Image sensor type Scan types Interface Maximum scan size Scan sizes that can be detected au- tomatically Resolution Variable range of scan resolution File formats that can be sent by e- mail Compression method Protocol Scanning speeds vary according to machine operating conditions, computer (speci-... -
Page 294: Index
INDEX Automatic Tilt Correction , 68 Auto run program , 17 Checking the status of delivery , 64 Checking the Status of E-mail , 49 Compression , 14 Control Panel , 6 Default Scan Settings , 12 Delivering Scan Files , 54 Delivery Procedure , 54 Checking selected destinations , 58 Manual entry of a destination , 58... - Page 295 Placing Originals , 27 Placing on the exposure glass , 28 Placing original in the Auto Document Feeder (ADF) , 29 Preparation for Delivering , 51 Preparation for Sending by E-mail , 35 Preview , 67 Print & Del. Scanner Journal , 14 Printing to the image , 68 Procedure for Sending by E-mail , 37 Checking selected destinations , 41...
- Page 296 B622-8581...
- Page 297 In accordance with IEC 60417, this machine uses the following symbols for the main power switch: a means POWER ON. c means STAND BY. Declaration of Conformity “The Product complies with the requirements of the EMC Directive 89/336/EEC and its amending di- rectives and the Low Voltage Directive 73/23/EEC and its amending directives.”...
- Page 298 GB GB B622-8581...
- Page 299 Printer/Scanner Unit Printer Reference 1 Getting Started Preparing to Print For safe and correct use of this machine, please be sure to read the Safety Information in the "Copy Reference" before you use it. Type 2018 Operating Instructions...
- Page 300 UNIX is a registered trademark in the United States and other countries, licensed exclusively through X/Open Company Limited. Bluetooth is a Trademark of the Bluetooth SIG, Inc. (Special Interest Group) and licensed to RICOH company limited. Copyright © 2001 Bluetooth SIG, Inc.
- Page 301 Manuals for This Machine The following manuals describe the operational procedures of this machine. For particular functions, see the relevant parts of the manual. Note ❒ Manuals provided are specific to machine type. ❒ Adobe Acrobat Reader is necessary to view the manuals as a PDF file. ❒...
- Page 302 ❖ ❖ ❖ ❖ Manuals for DeskTopBinder V2 Lite DeskTopBinder V2 Lite is a utility included on the CD-ROM labeled “Scanner Driver & Document Management Utilities”. • DeskTopBinder V2 Lite Setup Guide (PDF file - CD-ROM2) Describes installation of, and the operating environment for DeskTop- Binder V2 Lite in detail.
- Page 303 TABLE OF CONTENTS Manuals for This Machine ... i How to Read This Manual ...1 1. Getting Started Control Panel...3 Reading the Display and Using Keys...4 2. Preparing to Print Preparing the Machine ...5 Connecting the Machine ...5 Setting Paper on the Bypass Tray ...7 Installing the Software...
-
Page 305: How To Read This Manual
How to Read This Manual Symbols In this manual, the following symbols are used: R WARNING: This symbol indicates a potentially hazardous situation which, if instructions are not followed, could result in death or serious injury. R CAUTION: This symbol indicates a potentially hazardous situation which, if instructions are not followed, may result in minor or moderate injury, or damage to proper- * The statements above are notes for your safety. - Page 306 Names of Major Options The following software products are referred to using a general name: • DeskTopBinder V2 Lite and DeskTopBinder V2 professional→ DeskTop- Binder V2 Lite/professional • ScanRouter V2 Lite and ScanRouter V2 professional (optional)→ ScanRouter V2 Lite/professional...
-
Page 307: Getting Started
Control Panel Search Check Destination Destination Information Commu- Receive File nicating Immediate Trans. Start Manual Memory Reception Trans. Switch RX Mode Standard @. _ @. _ - & Detail Transmission Fine Stamp Shift Space Symbols 10 11 12 { { { { Printer} } } } key Press to activate the printer function. -
Page 308: Reading The Display And Using Keys
Getting Started { { { { OK} } } } key Press to set a selected item or entered nu- meric value. Number keys Press to enter numeric values. Reading the Display and Using Keys This section explains how to read the display and using the selection key for the initial display. -
Page 309: Preparing To Print
This section gives instructions for connecting the machine and computer, config- uring the machine, and installing software. ❖ ❖ ❖ ❖ When operating the machine with a USB connection, parallel connection, or IEEE 1394 (SCSI print) connection • Connect the machine and computer using a USB cable, a parallel cable, or an IEEE 1394 (SCSI print) cable. - Page 310 Preparing to Print Connecting the machine to the host using a USB cable You can connect the machine to the host computer using a USB interface cable. This machine does not come with a USB interface cable. Make sure you purchase the appropriate cable for the machine and your computer.
-
Page 311: Setting Paper On The Bypass Tray
A A A A Turn off the main power switches of the machine and computer. Important ❒ Before turning off the main power switch, see “Turning Off the Power”, Copy Reference. B B B B Plug the cable into the connector on the machine’s interface. - Page 312 Preparing to Print ❒ Be sure to set the paper with the side you want to print facing down in the bypass tray. ❒ When loading OHP transparencies or thick paper in the bypass tray, make the paper setting using the control panel or printer driver.
- Page 313 ❒ Fan the paper to get air between the sheets to avoid a multi-sheet feed. ❒ When setting an OHP transpar- ency, make sure that its front and back sides are properly po- sitioned. ❒ Select paper type when printing onto OHP transparencies or thick paper (over 105g/m details, see p.11 “Setting thick...
-
Page 314: The Printer Driver
Preparing to Print Setting custom size paper Note ❒ Custom sizes can also be set using the printer driver. The following procedures are not necessary when setting custom sizes using the printer driver. ❒ Custom size settings set using the printer driver have priority over those set using the machine's con- trol panel. - Page 315 Setting thick paper or OHP transparencies Note ❒ Paper settings can also be set using the printer driver. The following procedures are not necessary when setting paper sizes using the printer driver. ❒ Paper size settings set using the printer driver have priority over those set using the machine's con- trol panel.
- Page 316 Preparing to Print C C C C Select [Tray Paper Settings] using { { { { U U U U } } } } or { { { { T T T T } } } } , and then press the { { { { OK} } } } key.
-
Page 317: Installing The Software
Installing the Software This manual assumes you are familiar with general Windows procedures and practices. If you are not, see the operating instructions that come with Windows for details. The procedure for installing the print- er driver depends on the connection with the computer. -
Page 318: Quick Install
Preparing to Print The following table shows the printer drivers and software that can be in- stalled using Auto Run: Auto Run Quick Install Net- work connec- tion with TCP/IP PCL 6 ❍ printer driver PCL 5e printer driver RPCS™ ❍... - Page 319 Important ❒ If your system is Windows NT 4.0, we recommend that you upgrade the Windows NT 4.0 operating system to Service Pack 4 or later before installing the PCL 6/5e or RPCS™ printer drivers. Contact your Windows retailer for more in- formation about latest versions.
-
Page 320: Installing The Pcl 6/5E And Rpcs™ Printer Driver
Preparing to Print • Windows XP Professional and Windows Server 2003 On the [Start] menu, click [Printers and Faxes]. The [Print- ers and Faxes] window ap- p e a r s . R i g h t - c l i c k t h e machine icon, and then click [Rename]. - Page 321 • Windows NT 4.0 PCL 6: \DRIVERS\PCL6\NT4\ (Language)\DISK1\ PCL 5e: \DRIVERS\PCL5E\NT4\ (Language)\DISK1\ RPCS™: \DRIVERS\RPCS\NT4\ (Language)\DISK1\ A A A A Quit all applications running. B B B B Insert the CD-ROM into the CD- ROM drive. Auto Run will start the installer. C C C C Select a language for the interface language, and then click [OK].
- Page 322 Preparing to Print ❖ ❖ ❖ ❖ NetBEUI Click [NetBEUI], and then click [Search]. A list of machines that can be used with NetBEUI ap- pears. Select the machine you want to use, and then click [OK]. Note ❒ NetBEUI cannot be used under Windows XP or Windows Server 2003.
- Page 323 ❖ ❖ ❖ ❖ User Code User codes are eight digit codes that allow you to keep track of printing done under each code. To use this feature, the network administrator should assign user codes and inform users of them before they install the printer driver.
-
Page 324: Setting Up Options - Pcl 6/5E And Rpcs
Preparing to Print Click [Cancel] to close the [Port Settings] dialog box. Start SmartDeviceMonitor for Client, and then right- click the SmartDevice- Monitor for Client icon on the taskbar. Click [Extended Features Settings], and then select the [Set Recovery/Parallel Printing for each port] check box. - Page 325 RPCS™ printer driver A A A A On the [Start] menu, point to [Set- tings], and then click [Printers]. The [Printers] window appears. Note ❒ If using Windows XP Profes- sional or Windows Server 2003, click the [Printers and Faxes] win- dow on the [Start] menu.
-
Page 326: Installing The Postscript 3 Printer Driver
Preparing to Print Note ❒ The printer driver with the se- lected language will be in- stalled. ❒ The printer driver will be in- stalled in English if you select the following languages: Cesti- na, Magyar, Polski, Portugues, Suomi, and Russian. D D D D Click [PostScript 3 Printer Driver]. - Page 327 ❒ When prompted for the additional driver (alternate driver) location, select the following folders on the CD-ROM: • Windows 95/98/Me: \DRIVERS\ PS\WIN9X_ME\(Language)\ DISK1\ • Windows NT 4.0: \DRIVERS\ PS\NT4\(Language)\DISK1\ A A A A Quit all applications that are run- ning. B B B B Insert the CD-ROM into the CD- ROM drive.
- Page 328 Preparing to Print Windows 2000/XP and Windows Server 2003 - Setting up options If the machine has options installed, you should make settings for them using the printer driver. Limitation ❒ Changing the printer settings re- quires Manage Printers permission. Members of the Administrators and Power Users groups have Man- age Printers permission by default.
- Page 329 C C C C Select a language for the interface language, and then click [OK]. The following languages are avail- able: Cestina (Czech), Dansk (Dan- ish), Deutsch (German), English (English), Espanol (Spanish), Fran- cais (French), Italiano (Italian), Magyar (Hungarian), Nederlands (Dutch), Norsk (Norwegian), Pol- ski (Polish), Portugues (Portu- guese), Russian (Russian), Suomi...
- Page 330 Preparing to Print D D D D Click the [Device Settings] tab. E E E E Select the options you have in- stalled under [Installable Options]. F F F F Click [OK]. - Bidirectional transmission When bidirectional transmission is enabled, information such as paper size and feed orientation is automati- cally sent to the computer.
-
Page 331: Mac Os - Installing The Postscript 3 Printer Driver And Utilities
Note ❒ [SCSI print (SBP-2)] must be set to Active and [Bidirectional SCSI print] must be set to ON in [IEEE 1394] on the [Interface Settings] tab in the machine's System Set- tings. ❒ In Windows Me, [Enable bi-direc- tional support for this printer] must be selected in [Spool Settings] on the [Details] tab in RPCS™... - Page 332 Preparing to Print K K K K Double-click the [Printer Descrip- tions] folder in the [Mac OS 8 and 9] folder. L L L L Double-click [Disk 1] in the folder of the language you use. M M M M Drag the PPD file into [Printer De- scriptions] in [Extensions] in [System Folder].
-
Page 333: Mac Os X - Installing The Postscript 3 Printer Driver
D D D D Double-click the [Mac OS 8 and 9] folder. E E E E Double-click the [ATM] folder. F F F F Double-click the [ATM 4.6.2 install- er] icon. G G G G Follow the instructions on screen. H H H H Restart the Macintosh. -
Page 334: Installing The Printer Driver Using Usb
Preparing to Print Setting up the PPD file A A A A Run [Print Center]. B B B B Click [Add Printer]. Note ❒ Select [AppleTalk] in the first pop-up menu. ❒ If the zone has been set, select the zone in the second pop-up menu. - Page 335 D D D D Insert the CD-ROM provided into the CD-ROM drive. Note ❒ When Auto Run starts, click [Ex- it]. ❒ If you want to disable Auto Run, press { { { { Shift} } } } when insert- ing the CD-ROM into the drive and keep it pressed until the computer completes transmis-...
-
Page 336: Installing The Printer Driver Using Ieee 1394
Preparing to Print A A A A Install the printer driver by refer- ring to the instructions for instal- lation. Note ❒ Each printer driver is stored in the following folders on the CD- ROM: • PCL 6: \DRIVERS\PCL6\ WIN2K_XP\(Language)\ DISK1 •... - Page 337 ❒ SCSI print must be enabled using the control panel. See "Interface Settings/IEEE 1394", Network Guide. ❒ SCSI print using the optional IEEE 1394 interface board is not sup- ported by Windows 95/98/Me, or Windows NT 4.0. If the “plug and play”...
- Page 338 Preparing to Print G G G G Select the printer driver you want to install. Each printer driver is stored in the following folders: • PCL 6: \DRIVERS\PCL6\ WIN2K_XP\(Language)\ DISK1 • PCL 5e: \DRIVERS\PCL5E\ WIN2K_XP\(Language)\ DISK1 • RPCS™: \DRIVERS\RPCS\ WIN2K_XP\(Language)\ DISK1 •...
- Page 339 ❖ ❖ ❖ ❖ If you do not want to install the printer when [Found New Hardware Wizard] starts when using an operating sys- tem that supports SCSI print, disable the device with the following proce- dure: • Windows 2000 In the [Found New Hardware Wizard] dialog box, click [Next].
-
Page 340: Installing Smartdevicemonitor For Client/Admin
Preparing to Print Installing SmartDeviceMonitor for Client/Admin Limitation ❒ If your operating system is Win- dows 2000/XP, Windows Server 2003, or Windows NT 4.0, install- ing software using Auto Run re- quires Administrator permission. When you install a printer driver using Auto Run, log on using an account that has Administrator permission. -
Page 341: Using Adobe Pagemaker Version 6.0, 6.5, Or 7.0
D D D D Click [Font Manager 2000]. E E E E Follow the instructions on the screen. Using Adobe PageMaker Version 6.0, 6.5, or 7.0 If you use the machine under Win- dows 95/98/Me, Windows 2000/XP, Windows Server 2003, or Windows NT 4.0 with Adobe PageMaker, you need to copy the PPD file to the Page- Maker folder. -
Page 342: Software And Utilities Included On The Cd-Rom
Preparing to Print Software and Utilities Included on the CD- There are two CD-ROMs that come with the printer option of this ma- chine. ❖ ❖ ❖ ❖ The Printer/Scanner Unit Type 2018 package contains the following CD- ROMs: • Printer Drivers and Utilities •... -
Page 343: Software And Utilities
❖ ❖ ❖ ❖ PCL printer drivers Two kinds of PCL printer drivers: PCL 6 and PCL 5e, are included on the CD-ROM that comes with this machine. These drivers allow the computer to communicate with the machine via a printer lan- guage. - Page 344 Preparing to Print ❖ ❖ ❖ ❖ USB Printing Support This utility is for the USB 2.0 inter- face. Install this to use USB on computers running Windows 98 SE/Me. For information about in- stallation, see p.30 “Installing the Printer Driver Using USB”. ❖...
-
Page 345: Index
INDEX 1394 Utility , 39 Acrobat Reader , 40 Macintosh, installing , 28 Bidirectional transmission , 26 Bypass tray , 7 CD-ROM , 38 Connection Ethernet board connection , 5 IEEE 1394 interface board connection , 5 Parallel interface connection , 5 USB connection , 5 Control Panel , 3 Control panel , 4... - Page 346 Screen fonts Macintosh, installing , 29 SCSI print , 32 SmartDeviceMonitor for Admin , 36 , 39 SmartDeviceMonitor for Client , 36 , 39 Software Quick Install , 14 Thick Paper printing, bypass tray , 11 USB connection printer driver, installing , 30 USB Printing Support , 40 Windows 2000/XP and Windows Server 2003...
- Page 347 MEMO...
- Page 348 MEMO B622-8500...
- Page 349 Declaration of Conformity “The Product complies with the requirements of the EMC Directive 89/336/EEC and its amending di- rectives and the Low Voltage Directive 73/23/EEC and its amending directives.” Caution: Network interface cables with ferrite core must be used for RF interference suppression. Copyright ©...
- Page 350 Printed in The Netherlands GB GB B622-8500...
- Page 351 Printer/Scanner Unit Printer Reference 2 Setting Up the Printer Driver and Canceling a Print Job Troubleshooting Printer Features Appendix For safe and correct use of this machine, please be sure to read the Safety Information in the "Copy Reference" before you use it. Type 2018 Operating Instructions...
- Page 352 UNIX is a registered trademark in the United States and other countries, licensed exclusively through X/Open Company Limited. Bluetooth is a Trademark of the Bluetooth SIG, Inc. (Special Interest Group) and licensed to RICOH company limited. Copyright © 2001 Bluetooth SIG, Inc.
- Page 353 Manuals for This Machine The following manuals describe the operational procedures of this machine. For particular functions, see the relevant parts of the manual. Note ❒ Manuals provided are specific to machine type. ❒ Adobe Acrobat Reader is necessary to view the manuals as a PDF file. ❒...
- Page 354 ❖ ❖ ❖ ❖ Manuals for DeskTopBinder V2 Lite DeskTopBinder V2 Lite is a utility included on the CD-ROM labeled “Scanner Driver & Document Management Utilities”. • DeskTopBinder V2 Lite Setup Guide (PDF file - CD-ROM2) Describes installation of, and the operating environment for DeskTop- Binder V2 Lite in detail.
- Page 355 TABLE OF CONTENTS Manuals for This Machine ...i How to Read This Manual ...1 1. Setting Up the Printer Driver and Canceling a Print Job Accessing Printer Properties... 3 Windows 95/98/Me - Accessing Printer Properties ... 3 Windows 2000/XP and Windows Server 2003 - Accessing Printer Properties ... 4 Windows NT 4.0 - Accessing Printer Properties ...
-
Page 357: How To Read This Manual
How to Read This Manual Symbols In this manual, the following symbols are used: R WARNING: This symbol indicates a potentially hazardous situation which, if instructions are not followed, could result in death or serious injury. R CAUTION: This symbol indicates a potentially hazardous situation which, if instructions are not followed, may result in minor or moderate injury, or damage to proper- * The statements above are notes for your safety. - Page 358 Names of Major Options Major options of this machine are referred to as follows in this manual: • IEEE 1394 Interface Board Type B→ IEEE 1394 interface board • IEEE 802.11b Interface Unit Type D→ IEEE 802.11b interface unit • IEEE 1284 Interface Board Type A→ IEEE 1284 interface board •...
-
Page 359: Setting Up The Printer Driver And Canceling A Print Job
1. Setting Up the Printer Driver and Canceling a Print Job Accessing Printer Properties Windows 95/98/Me - Accessing Printer Properties Changing default settings A A A A On the [Start] menu, point to [Set- tings], and then click [Printers]. The [Printers] window appears. B B B B Click the icon of the machine whose default you want to change. -
Page 360: Windows 2000/Xp And Windows Server 2003 - Accessing Printer Properties
Setting Up the Printer Driver and Canceling a Print Job Windows 2000/XP and Windows Server 2003 - Accessing Printer Properties Changing default settings - Printer properties Limitation ❒ Changing machine settings re- quires Manage Printers permis- sion. Members of Administrators and Power Users groups have Manage Printers permission by de- fault. -
Page 361: Windows Nt 4.0 - Accessing Printer Properties
C C C C On the [File] menu, click [Printing Preferences...]. The [Printing Preferences] dialog box appears. D D D D Make the settings you require, and then click [OK]. Note ❒ Settings you make here are used as default for all applications. Making settings from an application To make settings for a specific appli- cation, open the [Print] dialog box... - Page 362 Setting Up the Printer Driver and Canceling a Print Job Changing the default settings - Default document properties Limitation ❒ Changing machine settings requires Full Control access permission. Members of the Administrators, Server Operators, Print Operators, and Power Users groups have Full Control permission by default.
-
Page 363: Macintosh - Setting Up For Printing
Macintosh - Setting Up for Printing Making paper settings from an application A A A A Open the file you want to print. B B B B On the [File] menu, click [Page Set- up]. The [AdobePS Page Setup] dialog box appears. -
Page 364: Canceling A Print Job
Setting Up the Printer Driver and Canceling a Print Job Canceling a Print Job Windows - Canceling a Print A A A A Double-click the printer icon on the Windows taskbar. A window appears, showing all print jobs currently queued for printing. -
Page 365: Macintosh - Canceling A Print Job
Macintosh - Canceling a Print Mac OS A A A A Double-click the printer icon on the desktop. A window appears, showing all print jobs currently queued for printing. Check the current status of the job you want to cancel. B B B B Select the name of the job you want to cancel. - Page 366 Setting Up the Printer Driver and Canceling a Print Job F F F F Press [JobReset]. G G G G Press [Current]. • [Current]: cancels the print job currently being processed. • [Resume]: resumes printing jobs. A confirmation message appears. H H H H Press [Yes] to cancel the print job.
-
Page 367: Troubleshooting
Error & Status Messages on the Display This section describes the principal messages that appear on the display. If a message not described here appears, act according to the message. Reference Before turning the main power off, see ‘Turning On the Power’, Copy Refer- ence. - Page 368 Troubleshooting ❖ ❖ ❖ ❖ Alert messages Messages/Second messages Add toner Out of toner. Follow instructions inside and replace toner Change Tray # to the follow- ing settings: xxx yyy Connect failed: IEEE802.11b Turn power off, check card Collate cancelled. Collate: Page max Cover open Cover is open as shown.
- Page 369 Messages/Second messages Duplex mode is in off posi- The selected paper tray has tion for Tray # not been configured for du- plex printing. # indicates the tray number. Ethernet Board Error An error has occurred in the Ethernet interface. Exceeded max.
- Page 370 Troubleshooting Messages/Second messages Print overrun. Problem:IEEE1394 board Problem:IEEE802.11b card Problem:IEEE802.11b board Paper Tray is in use. Reset paper tray correctly. DToner is almost empty Add toner Tray # Error Unauthorized user access. USB Error Causes The image data has been Increase memory capacity.
-
Page 371: The Machine Does Not Print
The Machine Does Not Print Possible Cause Is the power on? Check the cable is securely plugged into the power outlet and the machine. Turn on the main power switch. If not, press { { { { f Is the machine online? Does the printer function If so, check the error message on the display and take required ac- status indicator stay red? - Page 372 Troubleshooting Possible Cause When using wireless LAN, is the LED on the wireless LAN card lit or blinking? Is the wireless LAN being used in ad hoc mode? Did you change the option settings on the machine? Solutions Confirm the orange LED is lit, and the green LED is lit or blinks during transmission.
- Page 373 Problem Is the Data In indicator If not, data is not being sent to the machine. blinking or lit after starting ❖ ❖ ❖ ❖ When the machine is connected to the computer using the print job? the interface cable Check the machine port settings are correct.
- Page 374 Troubleshooting Problem Solutions ❖ ❖ ❖ ❖ Network connection Is the Data In indicator blinking or lit after starting Contact your network administrator. the print job?
-
Page 375: Other Printing Problems
Other Printing Problems Problem The print on the If [Toner Saving] is selected on the [Print Quality] tab in the printer driver, the entire page is fad- entire page will be faded when printed. Note ❒ In PostScript 3, click [Advanced...] on the [Paper/Quality] tab, and then se- lect [Toner Saving 1] or [Toner Saving 2] in [Print Mode] in the [Advanced] di- alog box. - Page 376 Troubleshooting Problem When using Win- Make sure the application's paper size and orientation settings match those dows 95/98/Me, of the printer driver. Windows If a different paper size and orientation are set, select the same size and ori- 2000/XP, or Win- entation.
- Page 377 Problem It takes a long Photographs and other data intensive pages take a long time for the ma- time to complete a chine to process, so simply wait when printing such data. print job. Changing the following settings with the printer driver may help speed up printing: •...
- Page 378 Troubleshooting Problem It takes too much The data is so large or complex that it takes time to process. If the Data In time to resume indicator is blinking, data is being processed. Simply wait until printing printing. resumes. The machine was in Energy Saver mode. To resume from Energy Saver mode, it has to warm up, and this takes time.
-
Page 379: Printer Features
Reference For more information about copier features and system settings, see Copy Ref- erence and General Settings Guide. Printer Features Menu There are seven menu items in the Printer Features menu: • Paper Input • List/Test Print • Maintenance • System •... - Page 380 Printer Features Menu System See p.31 “System”. Host Interface See p.33 “Host Interface”. PCL Menu See p.34 “PCL Menu”. PS Menu (optional) See p.35 “PS Menu”. Appears when the PostScript 3 unit (optional) is installed. Appears on Type 3 machine only. Check your machine type. Default Print Error Report Auto Continue...
-
Page 381: Adjusting Printer Features
Adjusting Printer Features Printer Features allows basic adjustment of operations when using the machine as a printer. Although factory default settings are suitable for most printing jobs, Printer Fea- tures gives you access to a number of settings that control basic printer opera- tions. -
Page 382: Printer Features Parameters
Printer Features Printer Features Parameters Paper Input ❖ ❖ ❖ ❖ Bypass Paper Size The size of the paper set in the by- pass tray. Reference For more information about pa- per sizes that can be set in the bypass tray, see General Settings Guide. - Page 383 D D D D Select [Config. Page] using { { { { U U U U } } } } or { { { { T T T T } } } } , and then press the { { { { OK} } } } key. The configuration page is printed.
- Page 384 Printer Features Paper Input Displays the settings made under the Paper Input menu. Reference p.26 “Paper Input” System Displays the settings made under the System menu. Reference p.31 “System” PCL Menu Displays the settings made under PCL Menu. Reference p.34 “PCL Menu” PS Menu Displays the settings made under PS Menu.
-
Page 385: Maintenance
Maintenance ❖ ❖ ❖ ❖ Menu Protect This procedure lets you protect menu settings from accidental change. It makes it impossible to change menu settings with normal procedures unless you perform the required key operations. In a net- work environment, only adminis- trators can make changes to menu settings. - Page 386 Printer Features Canceling Menu Protect A A A A Press the { { { { User Tools/Counter} } } } key. B B B B Select [Printer Features] using { { { { U U U U } } } } or { { { { T T T T } } } } , and then press the { { { { OK} } } } key.
-
Page 387: System
System ❖ ❖ ❖ ❖ Print Error Report Select this to have an error report printed when a printer or memory error occurs. • On • Off Note ❒ Default: Off ❖ ❖ ❖ ❖ Auto Continue You can select this to enable Auto Continue. - Page 388 Printer Features ❖ ❖ ❖ ❖ Printer Language Normally, the machine should be set to Auto. If the printer language cannot be detected in Auto, the language specified by Default Printer Lang. is selected. • Auto • PCL • PS Note ❒...
-
Page 389: Host Interface
❖ ❖ ❖ ❖ Edge-Edge Print Select this to maximize the printa- ble area by minimizing the white space along the edges, to approxi- mately 0.04 inches (1 mm). • Off • On Note ❒ Default: Off ❖ ❖ ❖ ❖ Default Printer Lang. You can set the default printer lan- guage if the machine cannot find the printer language automatical-... -
Page 390: Pcl Menu
Printer Features PCL Menu ❖ ❖ ❖ ❖ Orientation You can set the page orientation. • Portrait • Landscape Note ❒ Default: Portrait ❖ ❖ ❖ ❖ Form Lines You can set the number of lines per page. • 5 to 128 by 1 Note ❒... -
Page 391: Ps Menu
❖ ❖ ❖ ❖ Ext. A4 Width You can extend the printing area width (when printing on A4 sheet with PCL). • Off • On Note ❒ Default: Off ❒ When the setting is On, the width will be 8/ inches. ❖... - Page 392 Printer Features...
-
Page 393: Appendix
User Defined Pages Using this function, you can specify the page numbers for each input tray. Reference For printing methods, see the printer driver Help. Limitation ❒ This function is available with the PCL printer driver only. ❒ If [User Defined Pages] in [Paper Selection:] is selected on the [Paper] tab, [Layout:] cannot be selected. -
Page 394: System Settings (Parallel Connection)
Appendix System Settings (Parallel Connection) Interface Settings/Parallel Interface ❖ ❖ ❖ ❖ Parallel Timing Specifies the timing for the parallel interface. Normally, you do not need to change this setting. • ACK inside • ACK outside • STB down Note ❒... -
Page 395: Specifications
Specifications This section contains the machine's electrical and hardware specifications, in- cluding information about its options. Component Specifications Resolution PCL 6 : 600 dpi PCL 5e: 300 dpi, 600 dpi RPCS™ : 300 dpi, 600 dpi PostScript 3 : 300 dpi, 600 dpi Printing speed 15 ppm/18 ppm (A4K, 8/"... -
Page 396: Options
Appendix Options Limitation ❒ Only one optional interface can be installed in the machine at a time. There- fore, the optional IEEE 1394 interface board, the optional IEEE 802.11b inter- face unit (wireless LAN board), the optional IEEE 1284 interface board and the optional Bluetooth interface unit cannot be installed concurrently. - Page 397 IEEE 802.11b Interface Unit Type D ❖ ❖ ❖ ❖ Transmission spec.: Based on IEEE 802.11b (wireless LAN) ❖ ❖ ❖ ❖ Protocol: TCP/IP, NetBEUI, IPX/SPX, AppleTalk Note ❒ SmartDeviceMonitor and Web browser are supported. ❖ ❖ ❖ ❖ Data transfer speed: Auto select from below speed 1Mbps, 2Mbps, 5.5Mbps, 11Mbps ❖...
- Page 398 Appendix BlueTooth Unit Type 2238 This Bluetooth interface unit supports BIP if the optional PostScript 3 unit is in- stalled. Reference See the manual that comes with optional Bluetooth interface unit.
-
Page 399: Index
INDEX BlueTooth Unit Type 2238 , 42 Canceling a job Macintosh , 9 Windows , 8 Configuration page , 26 Control panel printer features, adjusting , 23 Data In indicator , 17 , 21 , 22 Display error messages , 11 Error messages , 11 Fonts , 39 Host Interface , 33... - Page 400 Windows canceling a job , 8 Windows 2000/XP and Windows Server 2003 printer properties, printer driver , 4 Windows 95/98/Me printer properties, printer driver , 3 Windows NT 4.0 printer properties, printer driver , 5 B622-8518...
- Page 401 Copyright © 2003...
- Page 402 GB GB B622-8518...
-
Page 403: Fax Option Type
FAX Option Type 2018 Facsimile Reference Getting Started Faxing Using Internet Fax Functions Programming Troubleshooting For safe and correct use of this machine, please be sure to read the Safety Information in the Copy Reference before you use it. Operating Instructions <Basic Features>... - Page 404 Introduction This manual describes detailed instructions on the operation and notes about the use of this machine. To get maximum versatility from this machine all operators are requested to read this manual carefully and follow the instructions. Please keep this manual in a handy place near the machine. Notes Some illustrations in this manual might be slightly different from the machine.
- Page 405 NOTICE NOTICE TO USERS (NEW ZEALAND) The grant of a Telepermit for any item of terminal equipment indicates only that Telecom has accepted that the item complies with minimum conditions for connection to its network. It indicates no endorsement of the product by Telecom, nor does it provide any sort of warranty.
- Page 406 Manuals for This Machine The following manuals describe the operational procedures of this machine. For particular functions, see the relevant parts of the manual. Note ❒ Manuals provided are specific to machine type. ❒ Adobe Acrobat Reader is necessary to view the manuals as a PDF file. ❒...
- Page 407 ❖ ❖ ❖ ❖ Manuals for DeskTopBinder V2 Lite DeskTopBinder V2 Lite is a utility included on the CD-ROM labeled “Scanner Driver & Document Management Utilities”. • DeskTopBinder V2 Lite Setup Guide (PDF file - CD-ROM2) Describes installation of, and the operating environment for DeskTop- Binder V2 Lite in detail.
- Page 408 TABLE OF CONTENTS NOTICE ... i Manuals for This Machine ...ii How to Read This Manual ...1 Symbols ...1 Names of Major Option ... 2 1. Getting Started Control Panel...3 Reading the Display ...5 Reading the display and using keys ...5 Standby display ...6 Communication display ...7 User code entry display ...8...
- Page 409 Entering an E-mail Address ... 31 Using the Destination List ... 31 Specifying a destination using the Quick Dial key ... 32 Specifying a group of destinations using the Quick Dial key ... 32 Checking the Specified Destination ... 33 Searching for a Destination ...
-
Page 411: How To Read This Manual
How to Read This Manual Symbols In this manual, the following symbols are used: R WARNING: This symbol indicates a potentially hazardous situation that might result in death or serious injury when you misuse the machine without following the in- structions under this symbol. -
Page 412: Names Of Major Option
Names of Major Option Major options of this machine are referred to as follows in this manual: • Auto Document Feeder → ADF • Auto Document Feeder capable of scanning both side of a sheet → ARDF... -
Page 413: Getting Started
Control Panel The illustration shows the control panel when options are installed. Search Check Destination Destination Information Scanner Facsimile Commu- Receive File nicating Immediate Trance. Start Manual Memory Reception Trance. Switch RX Mode Standard @. _ @. _ - & Detail Transmission Fine... - Page 414 Getting Started { { { { On Hook Dial} } } } key Use to dial a number while hearing tone. { { { { User Tools/Counter} } } } key Use to change default or operation pa- rameters according to the operating con- ditions.
-
Page 415: Reading The Display
Number keys Use to enter numeric values. Reading the Display The display shows you the machine status, messages, and guides you through operations. Note ❒ This machine automatically returns to standby mode if you do not use the machine for a certain period of time. You can select the period using "Facsim- ile Auto Reset Timer". -
Page 416: Standby Display
Getting Started Machine status or currently se- lected function Message ❖ ❖ ❖ ❖ When Internet Fax Settings is ON Switches the destination be- tween fax number and e-mail ad- dress. Standby display While the machine is in standby mode (immediately after the { { { { Facsimile} } } } key is pressed or after the { { { { Clear Modes} } } } key is pressed), the following display appears. -
Page 417: Communication Display
Control Panel Communication display While communicating, the machine status is displayed. ❖ ❖ ❖ ❖ Memory Transmission (fax transmission) ❖ ❖ ❖ ❖ Reception ❖ ❖ ❖ ❖ Immediate Transmission ❖ ❖ ❖ ❖ TX Mode When a function is set to on, a “clip” mark is attached to that function name. Note ❒... -
Page 418: User Code Entry Display
Getting Started User code entry display When the following message appears on the display, User Code Management is active. Enter a user code to deactivate User Code Management. The machine can be set up so that no one can use it without entering a user code. This prevents unauthorized people from sending fax messages and helps track the activity of each user or department. -
Page 419: Faxing
Transmission Modes There are two types of transmission: • Memory Transmission • Immediate Transmission Note ❒ You can use Parallel Memory Transmission that dials while the original is being scanned. See p.31 “Parallel Memory Transmission”, Facsimile Reference <Advanced Fea- tures> . ❖... -
Page 420: Switching Between Memory Transmission And Immediate Transmission
Faxing Switching between Memory Transmission and Immediate Transmission Check the indicators on the operation panel to check which mode is current- ly active and press the { { { { Transmission Mode} } } } key to toggle between them. Immediate Trance. -
Page 421: Placing Originals
Placing Originals You can place the originals either in the optional ADF or ARDF or on the exposure glass. Some types of origi- nals are unsuitable for the ADF or ARDF, so they must be placed on the exposure glass. Place to scan by portrait orientation for the original of A4, 8 larger size, landscape orientation for... -
Page 422: Placing A Single Original On The Exposure Glass
Faxing ❒ When sending a fax, the image out- put at the other end depends on the size and orientation of paper used in the receiver's terminal. If the receiver does not use paper of the same size and orientation as that of the origi- nal, the fax image may be reduced in size, trimmed at both edges, or di- vided into two or more sheets. -
Page 423: Placing Originals In The Optional Adf Or Ardf
Placing Originals in the Optional ADF or ARDF Use the ADF or ARDF to scan in a stack of originals in one operation. The ARDF can handle both one-sided and two-sided originals. Limitation ❒ Place all the originals to be sent in a single stack. -
Page 424: If The Machine Cannot Detect The Size Of Your Original
Faxing • Curled, folded, or creased origi- nals • Pasted originals • Originals with any kind of coating, such as thermosensitive paper, art paper, aluminum foil, carbon pa- per, or conductive paper • Originals with index tabs, tags, or other projecting parts •... -
Page 425: Original Sizes Difficult To Detect
Original sizes difficult to detect The machine finds it difficult to detect the size of the following kinds of origi- nals. If this happens, the receiving machine may not select print paper of the cor- rect size. • Documents placed on the exposure glass of sizes other than those listed in the table below •... -
Page 426: Memory Transmission
Faxing Memory Transmission In Memory Transmission mode, after you press the { { { { Start} } } } key, the machine does not dial the destination until all pages of your fax message have been scanned into memory (in contrast to Immediate Transmission, where the number is dialed first and pages are scanned and sent one by one). - Page 427 A A A A Make sure that Memory Trans. indicator lights. Immediate Trance. Start Manual Memory Reception Trance. Switch RX Mode Standard Detail Transmission Fine Stamp Shift Note ❒ If it is not, press the { { { { Transmis- sion Mode} } } } key.
-
Page 428: Broadcasting Sequence
Faxing F F F F Specify a destination. Note ❒ Press [ ] to switch the des- tination between fax number and e-mail address. ❒ If you want to specify another destination, repeat steps ❒ Entered destinations can be checked using { { { { U U U U } } } } or { { { { T T T T } } } } . ❒... -
Page 429: Canceling A Memory Transmission
Canceling a Memory Transmission Even when fax number and e-mail address are simultaneously specified, or only e-mail address is specified, you can cancel the mode using the same procedure. However, you can- not cancel the transmission of a sent Internet Fax document. Before the Original Is Scanned Use this procedure to cancel a trans- mission before pressing the { { { { Start} } } }... - Page 430 Faxing C C C C Press [Stop TX]. D D D D Press [Delete]. The standby display appears. Note ❒ If you want to cancel stopping, press [No].
-
Page 431: Immediate Transmission
Immediate Transmission With Immediate Transmission, when you press the { { { { Start} } } } key, the fax number is dialed immediately. The message is scanned and transmitted page by page without being stored in memory. This contrasts with Memory Transmission which scans all pages into memory before dialing the desti- nation. - Page 432 Faxing Reference p.11 “Placing Originals”. C C C C Select the scan settings you re- quire. Reference p.25 “Scan Settings” p.26 “Original Type” p.27 “Image Density (Con- trast)” D D D D Specify a destination. Note ❒ If you make a mistake, press the { { { { Clear/Stop} } } } key, and then enter the correct number.
- Page 433 - Sending originals using the exposure glass Make sure that Immediate Trans. indicator lights. If it is not, press the { { { { Transmission Mode} } } } key. Place the first page face down on the exposure glass. Specify a destination.
-
Page 434: Canceling An Immediate Transmission
Faxing Canceling an Immediate Transmission Before You Have Pressed { { { { Start} } } } Key A A A A Press the { { { { Clear Modes} } } } key. User Tools/ Counter On Hook Dial On Hook Dial Note ❒... -
Page 435: Scan Settings
Scan Settings You may want to send many different types of fax messages. Some of these may be difficult to reproduce at the receiver's end. However, your ma- chine has three settings that you can adjust to help you transmit your doc- ument with the best possible image quality. -
Page 436: Original Type
Faxing A A A A Press the { { { { Resolution} } } } key to switch between resolutions. The indicators above the key shows the current selection. Immediate Trance. Start Manual Memory Reception Trance. Switch RX Mode Standard Detail Transmission Fine... -
Page 437: Image Density (Contrast)
Image Density (Contrast) The text and diagrams in your origi- nal should stand out clearly from the paper they are written on. If your original has a darker background than normal (for example, a newspa- per clipping), or if the writing is faint, adjust the image density. -
Page 438: When Placing Originals In The Optional Adf Or Ardf
Faxing When placing originals in the optional ADF or ARDF Note ❒ Depending on what time the scan settings are adjusted, the settings may not be reflected in the result- ing operation. A A A A Check which pages you want to scan with different settings. -
Page 439: Specifying A Destination
Specifying a Destination You can specify the destination using one of three methods. ❖ ❖ ❖ ❖ Fax number p.29 “Entering a Fax Number” ❖ ❖ ❖ ❖ E-mail address p.31 “Entering an E-mail Address” ❖ ❖ ❖ ❖ Destination list p.31 “Using the Destination List”... -
Page 440: Pause
Faxing Pause Press the { { { { Pause/Redial} } } } key when di- aling or storing a number to insert a pause of about two seconds. On Hook Dial On Hook Dial Pause/ Redial Note ❒ You cannot insert a pause before the first digit of a fax number. -
Page 441: Entering An E-Mail Address
Entering an E-mail Address When using Internet Fax transmis- sion, specify the e-mail address in place of the fax number. Note ❒ You can enter up to 128 characters. A A A A Make sure that is displayed in the destination display column. Note ❒... -
Page 442: Specifying A Destination Using The Quick Dial Key
Faxing Limitation ❒ Group Dial can be used for Memo- ry Transmission only; not Immedi- ate Transmission. If you specify Immediate Transmission in Group Dial, the " Tr y again aft er switching to memory trans- " message appears. m is s i o n. When this happens, press [Exit], and then switch to Memory Trans- mission. -
Page 443: Checking The Specified Destination
Note ❒ If you make a mistake, press the { { { { Clear/Stop} } } } key and try again. ❒ If you want to specify other des- tinations, press [Add Dest]. C C C C Press the { { { { Start} } } } key. Note ❒... -
Page 444: Searching For A Destination
Faxing Searching for a Destination Use this procedure to search through the destination lists for a particular destination. ❖ ❖ ❖ ❖ Search by Destination Name p . 3 4 “Se arch b y D e st in at i o n Name”... -
Page 445: Selecting From Destination List
F F F F Press the { { { { OK} } } } key. A search progress starts, then search result appears. Note ❒ If no destination is matched for specified text, " Spe cified destination is not pro- "... -
Page 446: Specifying A Registration Number
Faxing E E E E Select the destination you want to specify using { { { { T T T T } } } } or { { { { U U U U } } } } . F F F F Press the { { { { OK} } } } key. -
Page 447: Search By Fax Number
F F F F Press the { { { { OK} } } } key. T h e d e s t i n a t i o n w h i c h y o u searched is specified for the desti- nation. -
Page 448: Search By E-Mail Address
Faxing G G G G Press the { { { { OK} } } } key. Search result appears. Note ❒ If no destination is matched for specified fax number, " fied destination is not programmed. Press [Exit] to return to step C. H H H H Select the number to specify us- ing { { { { U U U U } } } } or { { { { T T T T } } } } . - Page 449 E E E E Enter an e-mail address to search for. Reference "Entering Text", General Settings Guide Note ❒ You can search with a part of the e-mail address. However, you must enter a number from top for beginning matching. ❒...
-
Page 450: Reception
Faxing Reception There are two ways you can set up your machine to handle incoming calls: • Manual Reception (external tele- phone required) • Auto Reception ❖ ❖ ❖ ❖ Manual Reception When a telephone call comes in, the machine rings. If the call is a fax message, you must switch manual- ly to facsimile mode. -
Page 451: Using Internet Fax Functions
3. Using Internet Fax Functions Internet Fax Functions The optional printer/scanner unit is required. This machine converts scanned document images to e-mail format and transmits the data over the Internet. The e-mail sent by this machine can be received by another Internet Fax ma- chine. -
Page 452: Internet Fax Precautions
Using Internet Fax Functions Internet Fax Precautions • Internet Fax communicates with a server over a LAN. It cannot communicate directly with other parties. • If a transmission is not successful, this machine usually receives an e-mail er- ror notification. See p.103 “Server-Generated Error E-mail”, Facsimile Refer- ence <Advanced Features>... -
Page 453: T.37 Full Mode
T.37 Full Mode This machine is T.37 full mode compatible. T.37 full mode is an international standard for Internet Fax transmission. (ITU-T announcement, RFC2532) When an Internet Fax communication is made between T.37 full mode compat- ible machines, the receiver side sends the return receipt (dispatched) in response to the reception confirmation request attached to the sent e-mail. - Page 454 Using Internet Fax Functions Note ❒ If the receiver is programmed as the simple mode machine or not pro- grammed in the Address Book, the receiver's reception capability cannot be registered. ❒ If you know the receiver's reception capability, you can set it manually. How- ever, this setting will be overwritten when the machine receives the return re- ceipt.
-
Page 455: Transmitting Internet Fax
Transmitting Internet Fax Preparation You need to make System Settings beforehand. See “Setting Up the Machine on a Network”, Network Guide. This section describes how to scan a document into the memory and send it as e-mail. Specify the destination's e-mail address instead of fax number. - Page 456 Using Internet Fax Functions ❒ You can limit the size of transmit- ted e-mail messages. See p.73 “E- mail Settings”, Facsimile Reference <Advanced Features> . ❒ See p.54 “Received Images” for how e-mail is actually received by the computer when it is sent with mail options selected.
- Page 457 D Press the { { { { OK} } } } key. The display returns to that of step A. Note ❒ If you press the { { { { Clear/Stop} } } } key, entering a subject is can- celed.
- Page 458 Using Internet Fax Functions ❒ Note that you cannot place pag- es on the exposure glass after you have started using the ADF or ARDF. ❒ The original can be placed ei- ther in the ADF or ARDF or on the exposure glass, until the { { { { Start} } } } key is pressed.
- Page 459 J J J J Press the { { { { Start} } } } key. This machine starts scanning the document into memory. The e- mail send operation starts after the scanning operation is complete. When scanning is complete, the Communicating indicator lights and transmission starts.
-
Page 460: Confirming Reception
Using Internet Fax Functions Confirming Reception When Return Receipt is set under “E- mail Options”, the receiver sends back a return receipt message. Once the return receipt message has been received, "OK" appears in the Result column of Journal, allowing the origi- nator to verify that the transmission has been received. -
Page 461: Canceling Internet Fax Transmission
Canceling Internet Fax Transmission When fax and Internet Fax destina- tions are specified simultaneously, you can cancel sending using the same method. Note ❒ You cannot cancel a transmission once scanning is complete. Before the Original Is Scanned Use this procedure to cancel a trans- mission before pressing the { { { { Start} } } } key. -
Page 462: Receiving Internet Fax
Using Internet Fax Functions Receiving Internet Fax You can receive e-mail documents by Internet Fax. There are two methods of receiving e- mail: Auto E-mail Reception and Manual E-mail Reception. Limitation ❒ E-mail with attachments other than TIFF-F format files cannot be received. - Page 463 B B B B Press the { { { { Start} } } } key. On Hook Dial On Hook Dial Pause/ Redial Accesses the server to check for e- mail. E-mail is in the server A Start printing and receiving in the memory.
-
Page 464: Received Images
Using Internet Fax Functions Received Images Here is an example of an Internet Fax message sent from this machine and re- ceived on a computer using Outlook e-mail software. The received image varies according to e-mail software. This E-mail was sent from "Head Office" (XXXX). Queries to: aaaa@abc.company.com E-mail transmitted without speci- fying a subject in “E-mail Options”. -
Page 465: Programming
Initial Settings and Adjustments You can send information to the other party when transmitting or receiving a fax message. This information is shown on the display of the other ma- chine and printed as a report. The fol- lowing information can be sent. Important ❒... -
Page 466: Programming
Programming Programming A A A A Press the { { { { User Tools/Counter} } } } key. User Tools/ Counter On Hook Dial On Hook Dial B B B B Select [Fax Features] using { { { { U U U U } } } } or { { { { T T T T } } } } , and then press the { { { { OK} } } } key. -
Page 467: Editing
B Enter an own name, and then press the { { { { OK} } } } key. Reference "Entering Text", General Set- tings Guide. Programming an Own Fax Number A Select [Own Fax Number] using { { { { U U U U } } } } or { { { { T T T T } } } } , and then press the { { { { OK} } } } key. -
Page 468: Deleting
Programming D D D D Select [Program Fax Information] us- ing { { { { U U U U } } } } or { { { { T T T T } } } } , and then press the { { { { OK} } } } key. - Page 469 D D D D Select [Program Fax Information] us- ing { { { { U U U U } } } } or { { { { T T T T } } } } , and then press the { { { { OK} } } } key.
-
Page 470: Programming Fax Numbers And E-Mail Addresses
Programming Programming Fax Numbers and E-mail addresses You can program fax destinations using Address Book Management in the Key Operator Tools menu under System Settings. You can also register the programmed fax numbers and e-mail addresses in a Group. Note ❒... -
Page 471: Troubleshooting
Adjusting the Volume You can change the volume of the fol- lowing sounds that the machine makes. ❖ ❖ ❖ ❖ On Hook Mode Heard when the { { { { On Hook Dial} } } } key is pressed. ❖... - Page 472 Troubleshooting G G G G You can adjust the volume using { { { { W W W W } } } } or { { { { V V V V } } } } . Note ❒ You can adjust the volume by seven levels.
-
Page 473: When { { { { Facsimile} } } } Key Is Lit In Red
When { { { { Facsimile} } } } Key Is Lit in Red If this key is lit, press the key to enter the facsimile mode. Then, refer to the table below and take the appropriate action. Search Destination Destination Facsimile Commu-... -
Page 474: When Toner Runs Out
Troubleshooting When Toner Runs Out When the machine has run out of ton- er, the symbol appears on the display. Note that even if there is no toner left, you can still send fax messages. Important ❒ The number of communications, that have been executed after the toner has run out and that auto- matically-output Journal has not... -
Page 475: Error Messages And Their Meanings
Error Messages and Their Meanings If there is an error, one of the following messages may appear on the display. If other message appears, follow the message. Message Put original back, check it and press Start key. Error occurred, and trans. was cancelled. - Page 476 Troubleshooting Message Check whether there are any network problems. [14-01] Check whether there are any network problems. [14-09] Check whether there are any network problems. [14-33] Check whether there are any network problems. [15-01] Causes and solutions Cannot find the DNS server or SMTP server. •...
- Page 477 Message Check whether there are any network problems. [15-02] Check whether there are any network problems. [15-03] Check whether there are any network problems. [15-11] Check whether there are any network problems. [15-12] Error Messages and Their Meanings Causes and solutions No account name is programmed.
- Page 478 Troubleshooting - Out of paper display message If the paper tray runs out of paper, “ ” appears on the display, asking you to add more paper. [Exit]. Note ❒ If there is paper left in the other paper trays, you can receive messages as usu- al, even if the message appears on the display.
-
Page 479: Solving Problems
Solving Problems This table lists some common problems and their solutions. Problem Image background appears dirty when received at the other end. Images from the back page appear. Printed or sent image contains spots. Received image is too light. The machine failed to print re- ceived fax messages. - Page 480 Troubleshooting Problem When using On Hook Dial or Manual Dial, " Receiving appears and transmission is not allowed. All fax messages stored in memory have been lost. Those messages include ones stored through Memory Transmis- sion/Reception or Substitute Reception. Transmission failed due to "Exceeded max.
-
Page 481: When Things Don't Go As Expected
When Things Don't Go as Expected I Want... to cancel a Memory Transmis- sion. to cancel an Immediate Trans- mission. to cancel Internet Fax trans- mission. Limitation ❒ Canceling Internet Fax transmission is possible only during scanning. It is impossible during com- munication. - Page 482 INDEX Adjusting the Volume , 61 At Dialing , 61 At Printing , 61 At Reception , 61 At Transmission , 61 On Hook Mode , 61 Attach Subject , 45 Authorized Reception , 42 Auto E-mail Reception , 52 Batch Transmission , 42 Broadcasting , 16 Broadcasting Sequence , 18...
- Page 483 On Hook Dial , 42 Original Type , 26 Out of paper , 68 Own Fax Number , 55 Deleting , 58 Editing , 57 Programming , 56 Own Name , 55 Deleting , 58 Editing , 57 Programming , 56 Pause , 30 Photo , 26 Placing Originals , 11...
- Page 484 MEMO B620-8608...
- Page 485 Copyright © 2003...
- Page 486 Printed in China B620-8608...
-
Page 487: Advanced Features
FAX Option Type 2018 Facsimile Reference <Advanced Features> Transmission Mode Communication Information Other Transmission Features Reception Features Using Fax with Computers Facsimile Features Key Operator Setting Solving Operation Problems Appendix For safe and correct use of this machine, please be sure to read the Safety Information in the Copy Reference before you use it. - Page 488 Introduction This manual describes detailed instructions on the operation and notes about the use of this machine. To get maximum versatility from this machine all operators are requested to read this manual carefully and follow the instructions. Please keep this manual in a handy place near the machine. Notes Some illustrations in this manual might be slightly different from the machine.
- Page 489 Manuals for This Machine The following manuals describe the operational procedures of this machine. For particular functions, see the relevant parts of the manual. Note ❒ Manuals provided are specific to machine type. ❒ Adobe Acrobat Reader is necessary to view the manuals as a PDF file. ❒...
- Page 490 ❖ ❖ ❖ ❖ Manuals for DeskTopBinder V2 Lite DeskTopBinder V2 Lite is a utility included on the CD-ROM labeled “Scanner Driver & Document Management Utilities”. • DeskTopBinder V2 Lite Setup Guide (PDF file - CD-ROM2) Describes installation of, and the operating environment for DeskTop- Binder V2 Lite in detail.
- Page 491 TABLE OF CONTENTS Manuals for This Machine ... i How to Read This Manual ...1 Symbols ...1 Names of Major Options ...2 1. Transmission Mode Sending at a Specific Time (Send Later) ... 3 User Transmission...5 Two-Sided Transmission (Double-Sided Transmission) ... 7 E-mail Options...9 Fax Header Print ...
- Page 492 More Transmission Functions... 31 If Memory Runs Out While Storing an Original ... 31 Parallel Memory Transmission... 31 Checking the Transmission Result... 32 Automatic Redial ... 32 Batch Transmission... 32 ECM (Error Correction Mode) ... 32 Dual Access ... 33 Transmission with Image Rotation ...
- Page 493 5. Using Fax with Computers Sending Fax Documents from Computers ... 49 Before Use ... 50 Installing the Software... 50 Auto run program... 50 Installing individual applications ... 51 Applications Stored on the CD-ROM ... 52 LAN-Fax Driver... 52 Address Book ... 52 LAN-Fax Cover Sheet Editor ...
- Page 494 7. Key Operator Setting Key Operator Tools List ... 75 Using Key Operator Settings ... 76 Counters... 76 Forwarding ... 76 Programming an End Receiver ... 77 Quitting the forwarding function... 78 Forwarding Mark... 78 Memory Lock... 79 User Parameters ... 80 Changing the User Parameters ...
-
Page 495: How To Read This Manual
How to Read This Manual Symbols In this manual, the following symbols are used: R WARNING: This symbol indicates a potentially hazardous situation that might result in death or serious injury when you misuse the machine without following the in- structions under this symbol. -
Page 496: Names Of Major Options
Names of Major Options The following software products are referred to using a general name: • DeskTopBinder V2 Lite and DeskTopBinder V2 Professional → DeskTop- Binder V2 Lite/Professional Major options of this machine are referred to as follows in this manual: •... -
Page 497: Transmission Mode
1. Transmission Mode Sending at a Specific Time (Send Later) Using this function, you can instruct the machine to delay transmission of your fax message until a specified lat- er time. This allows you to take ad- v a n t a g e o f o f f - p e a k t e l e p h o n e charges without having to be by the machine at the time. - Page 498 Transmission Mode D D D D Select [Send at specified time] using { { { { U U U U } } } } or { { { { T T T T } } } } , and then press the { { { { OK} } } } key.
-
Page 499: User Transmission
User Transmission This function allows you to check each user or department's transmis- sion history. To use the function, you need to program a user code (eight digits max.) for each user or depart- ment, to be entered before transmis- sion. - Page 500 Transmission Mode ❒ When canceling transmission by user code, to delete the pro- grammed user code, press the { { { { Clear/Stop} } } } key, and then the { { { { OK} } } } key. E E E E Press the { { { { OK} } } } key.
-
Page 501: Two-Sided Transmission (Double-Sided Transmission)
Two-Sided Transmission (Double-Sided Transmission) The optional ARDF is required. Use this function to send two-sided originals. Note ❒ Originals placed on the exposure glass cannot be sent. ❒ The front and back of the scanned original will be printed in order on separate sheets at the other end. - Page 502 Transmission Mode B B B B Press [TX Mode]. C C C C Select [2 Sided TX] using { { { { U U U U } } } } or { { { { T T T T } } } } , and then press the { { { { OK} } } } key. D D D D Specify the transmission mode from [2 Sided from 1st Page] or [1 Sid-...
-
Page 503: E-Mail Options
E-mail Options When using the Internet Fax function, you can make the following settings: • Attach Subject You can enter a subject for the e- mail you want to send. Note ❒ For convenience, program fre- quently used subjects. [Urgent] and [High] are programmed by default. -
Page 504: Fax Header Print
Transmission Mode Fax Header Print In some cases, you may want the oth- er party to receive an unmarked copy of your original. To do this, switch Fax Header off. When the Fax Header is set to “On”, the stored name is printed on the re- ceiver's paper. -
Page 505: Label Insertion
Label Insertion With this function you can have the receiver name printed on the message when it is received at the other end. The name will be printed at the top of the page and will be preceded by “To:”. Note ❒... - Page 506 Transmission Mode...
-
Page 507: Communication Information
After you have pressed the { { { { Start} } } } key (after scanning originals), you can check and edit the destination or settings of Memory Transmission. You can also can- cel a transmission, print a stored file and print a list of stored files. •... - Page 508 Communication Information Note ❒ If multiple destinations were specified, only one destination number appears. D D D D Press [Delete]. The selected file is deleted. The display returns to that of step B. Note ❒ To quit transmission cancel, press [No]. ❒...
-
Page 509: Printing A List Of Files In Memory (Print Tx Standby File List)
Printing a List of Files in Memory (Print TX Standby File List) Print this list if you want to find out which files are stored in memory and what their file numbers are. Knowing the file number can be useful (for ex- ample when erasing files). -
Page 510: Checking The Transmission Result (Tx File Status)
Communication Information Checking the Transmission Result (TX File Status) You can browse a part of the Trans- mission Result Report on the display. Note ❒ Only the transmission result of the last 100 communications (recep- tions & transmissions) are shown. ❒... -
Page 511: Checking The Reception Result (Rx File Status)
Checking the Reception Result (RX File Status) You can browse a part of the Recep- tion Result Report on the display. Note ❒ Only the reception result of the last 100 communications (receptions & transmissions) are shown. ❒ You can also check the reception result using Web browser. -
Page 512: Printing A File (Print Tx Standby File)
Communication Information Printing a File (Print TX Standby File) If you want to check the contents of a file that is stored in memory and not yet sent, use this procedure to print it out. Note ❒ You can also print files that have not been successfully transmitted. -
Page 513: Printing A File Received With Memory Lock (Print Memory Lock File)
Printing a File Received with Memory Lock (Print Memory Lock File) This is a security function designed to prevent unauthorized users from reading your messages. If Memory Lock is switched on, all received mes- sages are stored in memory and are not automatically printed. - Page 514 Communication Information D D D D Enter a 4-digit Memory Lock ID using the number keys, and then press the { { { { Start} } } } key. The display returns to that of step Note ❒ If the Memory Lock ID does not match, the message "...
-
Page 515: Printing The Journal
Printing the Journal The Journal contains information about the last 50 communications (maximum) made by your machine. It is printed automatically after every 50 communications (receptions & trans- missions). You can also print a copy of the Jour- nal at any time by following the pro- cedure below. -
Page 516: Journal
Communication Information Journal Printing date Shows the date and time when the report is printed. Programmed sender name Shows the sender name programmed for printing. Date Shows the transmission or reception date. Time Shows the transmission or reception start time. Other end To prioritize a fax number or name pro- grammed in the destination list, contact... - Page 517 Communication mode • For fax transmissions and receptions After “T” for outgoing fax or “R” for ingoing fax, shows a communication mode. • For Internet Fax transmissions and re- ceptions After the e-mail symbol, and "T" for outgoing e-mail or "R" for ingoing e- mail, the communication mode ap- pears in alphabetical letters or sym- b o l s .
-
Page 518: E-Mail Reception
Communication Information E-mail Reception You can receive Internet Fax docu- ments manually using the { { { { Job Infor- mation} } } } key. Newly-arrived e-mail is printed out when received manually. Note ❒ E-mail can also be received manu- ally using the User Function keys. -
Page 519: Other Transmission Features
3. Other Transmission Features Handy Dialing Functions Chain Dial This allows you to compose a tele- phone number from various parts, some of which may be stored in Quick Dials and some of which may be entered using the number keys. Note ❒... -
Page 520: Redial
Other Transmission Features Redial The machine stores the last 10 desti- nations specified. If you want to send a message to a destination which you sent faxes to recently, the Redial func- tion saves you time by finding and entering the destination again. Limitation ❒... -
Page 521: On Hook Dial
On Hook Dial The On Hook Dial function allows you to dial while hearing tone from the internal speaker. You can send a fax checking the connection. Note ❒ This function is unavailable in some countries. A A A A Place the original, and then select the scan settings you require. -
Page 522: Manual Dial
Other Transmission Features Manual Dial The external telephone is required. Pick up the handset of the external telephone and dial. When the line is connected and you hear a high- pitched tone, press the { { { { Start} } } } key to send your fax message. -
Page 523: Transmission Features
Transmission Features Stamp The optional ADF or ARDF is required. When sending a fax message using the ADF or ARDF, the machine can stamp a circle mark at the bottom of the original. When sending a two-sid- e d d o c u m e n t , t h e d o c u m e n t i s marked at the bottom of the front page and top of the rear page. -
Page 524: Detecting Blank Sheet
Other Transmission Features C C C C Specify the destination, and then press the { { { { Start} } } } key. Note ❒ The Stamp indicator goes out when transmission has been fin- ished for Immediate Transmis- sion or when scanning has been finished for Memory Transmis- sion. -
Page 525: More Transmission Functions
More Transmission Functions If Memory Runs Out While Storing an Original If memory runs out while storing or sending an original (free space reach- es 0%), one of the following messages appears. Press [Exit] to transmit stored pages only. • During Memory Transmission: "... -
Page 526: Checking The Transmission Result
Other Transmission Features Checking the Transmission Result • Turn the Transmission Result Re- port on if you want a report to be printed after every successful transmission. See p.35 “Transmis- s i o n R e s u lt R e p o rt ( M e m o ry Transmission)”. -
Page 527: Dual Access
Dual Access The machine can scan other messages into memory even while sending a fax message from memory, receiving a message into memory, or automati- cally printing a report. Since the ma- chine starts sending the second message immediately after the cur- rent transmission ends, the line is used efficiently. -
Page 528: Journal By E-Mail
Other Transmission Features Note ❒ If the key operator's e-mail address is wrong, you may not be able to acquire Journal. ❒ If the Journal in e-mail format fails to be transmitted, the Journal is printed out. ❒ The name of an attached CSV file is "JOURNAL+year, month, hours, min- utes". -
Page 529: Printed Report
Printed Report Memory Storage Report This report is printed after an original is stored in memory. It helps you re- view the contents and the destina- tions of stored originals. Limitation ❒ If you use Parallel Memory Trans- mission, the Memory Storage Re- port is not printed. -
Page 530: Communication Failure Report
Other Transmission Features Communication Failure Report This report is printed when a message could not be successfully transmitted with Memory Transmission. If the machine is set up to print a Transmission Result Report, this re- port is not printed. Use it to keep a record of failed transmissions so you can send them again. -
Page 531: Reception Features
4. Reception Features Reception Immediate Reception Each page of a fax message is printed as soon as it is received. This method is used for standard fax messages. Normally this machine receives mes- sages by Immediate Reception. How- ever, depending on settings or certain conditions, Memory Reception or Substitute Reception is used. -
Page 532: Substitute Reception
Reception Features Important ❒ When about one hour passes after power of the machine is turned off, all fax messages stored in memory will be lost. If any messages have been lost for this reason, a Power Failure Report is automatically printed when the operation switch is turned on. -
Page 533: Receiving Messages Unconditionally
Receiving messages unconditionally If one of the conditions listed below occurs, the machine receives all fax messag- es using Substitute Reception. Problems Causes h is lit. Paper is jammed. h is lit. The cover is open. The machine is printing The machine is busy print- with other function. -
Page 534: Reception Functions
Reception Features Reception Functions Forwarding Received Documents This machine can forward received documents to other destinations pro- grammed in memory based on Own Name, Own Fax Number or sender's e-mail address. If a sender's e-mail address is programmed as the destination, docu- ments received are forwarded as e-mail. -
Page 535: Smtp Reception Using Internet Fax
SMTP Reception Using Internet Fax You can set SMTP reception with this machine. With SMTP reception, e-mail is received as soon as it is sent to the e-mail address set by the machine. You can route received e-mail to other Internet Fax machines also. -
Page 536: Routing E-Mail Received Via Smtp
Reception Features Routing E-mail Received via SMTP E-mail received via SMTP can be routed to other fax machines. It can also be routed to destinations programmed as Quick Dial entries or Groups. Preparation Before routing e-mail received via SMTP, you first must set "SMTP RX File Delivery Settings"... -
Page 537: Jbig Reception
- Specifying E-mail Transfer The originator can request transfer of e-mail sent to another fax machine by spec- ifying the e-mail address as follows: ❖ ❖ ❖ ❖ Fax Number fax=destination fax number@host name of this machine. domain name Example: to transfer to fax number 212-123-4567, specify: fax=2121234567@abc.company.com ❖... -
Page 538: Printing Options
Reception Features Printing Options Print Completion Beep When this function is turned on, the machine beeps to let you know when a received message has been printed. Note ❒ You can alter the volume of the beep or turn it off completely (set the volume to the minimum level). -
Page 539: Reception Time
Reception Time You can have the date and time print- ed at the bottom of the message when it is received. You can turn this func- tion on or off using Reception Set- tings. See p.73 “Reception Settings”. Note ❒ When a received message is print- ed on two or more sheets, the date and time is printed on the last page. -
Page 540: Page Separation And Length Reduction
Reception Features Note ❒ You can turn this function on or off with the User Parameters. See p.80 “User Parameters” (switch 10, bit ❒ This function uses Memory Recep- tion. Page Separation and Length Reduction When the size of a received message is longer than the paper loaded in the machine, each page of the message can be split and printed on several... -
Page 541: When There Is No Paper Of The Correct Size
When There Is No Paper of the Correct Size If there is no paper in your machine that matches the size of a received message, the machine will choose a paper size based on the paper availa- ble. For example, if your machine has "×11"K and A3L loaded and you receive a A4L size message, check the A4L column of the follow-... -
Page 542: Setting Priority Trays
Reception Features Setting priority trays With the same size of paper loaded into multiple trays, you can make the machine use one tray for one function and another tray for another function. For example, you may load white A4 or 8 "×11"... -
Page 543: Using Fax With Computers
5. Using Fax with Computers Sending Fax Documents from Computers The optional printer/scanner unit is required. Using computers connected to the machine through parallel ports, IEEE 1394 (IP Over 1394) ports, LANs, or wireless LANs, you can fax documents, created us- ing Windows applications, to other fax machines over a telephone line. -
Page 544: Before Use
Using Fax with Computers Before Use To use these features, a LAN-Fax Driver must be installed on your computer. Use the LAN -Fax driver included on the printer CD-ROM. You must also make the required computer to fax network settings on the machine, according to the type of connection. -
Page 545: Installing Individual Applications
❒ Auto Run might not work auto- matically with certain OS settings. If this is the case, double-click “Set- up.exe”, located on the CD-ROM root directory. ❒ If you want to cancel Auto Run, hold down the { { { { SHIFT} } } } key (when y o u r s y s t e m i s W i n d o w s 2000/Windows XP or Windows... -
Page 546: Lan-Fax Driver
Using Fax with Computers Applications Stored on the CD-ROM This section provides information about LAN-Fax Driver, Address Book, and LAN-Fax Cover Sheet Edi- tor. LAN-Fax Driver This driver allows you to use LAN- Fax functions. ❖ ❖ ❖ ❖ Location of the File The following folders are on the CD-ROM: •... -
Page 547: Setting Lan-Fax Properties
Setting LAN-Fax Properties This section describes how to make settings such as paper size, resolu- tion, and options. • Paper Size: • Orientation: • Tray: • Resolution: • Gray Scale: (Windows 95/98/Me) • Print graphics 95/98/Me) • Reduce 400dpi image data to 200dpi When this machine is connected to a network, selections for the option... -
Page 548: Basic Transmission
Using Fax with Computers Basic Transmission This section describes how to send fax documents created using Windows applications. To send a fax, simply select [Print] from the Windows application, then select [LAN-Fax M4] as the printer, and then specify a destination in the [LAN- Fax] dialog box. - Page 549 Specifying a destination by directly entering a fax number A Enter a fax number in the [Fax Number:] box. Note ❒ To enter a pause, click [Pause]. B Click [Next Number]. The entered destination is add- ed and displayed in the [List of Destinations:] box.
-
Page 550: Attaching A Cover Sheet
Using Fax with Computers Attaching a cover sheet Selecting the [Attach a Cover Sheet] check box causes a cover sheet to be attached to the top of the fax docu- ment. The cover sheet includes the follow- ing items: • Company Name as destination info. •... - Page 551 - Transmission result notification After you have sent faxes, this func- tion informs you whether the fax was successfully transmitted to its desti- nation or not. When you use this machine just as a printer, this function also informs you whether data was successfully trans- mitted to this machine or not.
-
Page 552: Printing And Saving
Using Fax with Computers Printing and Saving You can print documents created us- ing Windows applications. You can also save documents in TIF format. Open the application document you want to print or create a new docu- ment, and then perform the following procedure. -
Page 553: Editing Address Book
Editing Address Book You can program and edit destina- tions in the address list using the Ad- dress Book. For details, see Help. A A A A On the [Start] menu, point to [Pro- grams], [LAN-Fax Utilities], and then click [Address Book]. The Address Book display ap- pears. - Page 554 Using Fax with Computers - Using the machine's Address Book data as the LAN-Fax's Address Book data You can retrieve the Address Book data of this machine using SmartDe- viceMonitor for Admin and edit it to program in the LAN-Fax's Address Book.
-
Page 555: Editing Fax Cover Sheets
Editing Fax Cover Sheets LAN-Fax Cover Sheet Editor allows you to edit the format for fax cover sheets. It is necessary to create a cover sheet file before attaching a cover sheet to fax messages using LAN-Fax Driver. Creating a cover sheet Use the following procedure to create a fax cover sheet. - Page 556 Using Fax with Computers E E E E Enter the destination informa- tion. Note ❒ You can select [Use Address Book], [To Whom It May Concern], [Edit Names], or [None]. Selecting [Edit Names] allows you to enter company, department, and per- son names.
-
Page 557: Lan-Fax Operation Messages
LAN-Fax Operation Messages Note ❒ You can have the LAN-Fax Error Report printed when options are not prop- erly selected, or there is a communication error with a computer. See p.80 “User Parameters” (switch 20, bit 0). Message Cannot access the print- er. -
Page 558: Editing Receiver's Fax Information Via Web Browser
Using Fax with Computers Editing Receiver's Fax Information Via Web Browser W h e n t h e r e c e i v e r b e i n g p r o - grammed or added to the address book is a T.37 full mode compatible type with the Internet Fax function, you can set the following receiver's... - Page 559 B Under [Internet Fax Data Format], set the items of fax information to meet the receiver's specifica- tions, except for [Select mode]. Note ❒ If [Simple mode] is selected, the fax information cannot be set. Select the T.37 full mode compatible receiver in step A, when [Full mode] is select- C Click [OK] in the upper right.
- Page 560 Using Fax with Computers...
-
Page 561: Facsimile Features
6. Facsimile Features Function List The User Tools allow you to program your identification, store frequently used numbers and settings, and customize default settings to meet your needs. The User Tools are grouped by functions so that you can quickly and easily find the desired User Tool. - Page 562 Facsimile Features ❖ ❖ ❖ ❖ E-mail Settings Description • Internet Fax Settings • Maximum E-mail Size • SMTP RX File Delivery ❖ ❖ ❖ ❖ Key Operator Tools Description • Communication Page Count • Memory Lock • Forwarding • Parameter Setting •...
-
Page 563: Key Operator Code
- Key Operator Code When Key Operator Code is programmed and turned on, users have to enter a programmed Key Operator Code (eight digits maximum) to operate the User Tools. This prevents unauthorized people from changing settings. Note ❒ You can turn the Key Operator Code on or off in “System Settings”. ❒... -
Page 564: Accessing User Tools (Facsimile Features)
Facsimile Features Accessing User Tools (Facsimile Features) Customize the facsimile settings ac- cording to the operations to be fre- quently performed. Note ❒ The machine allows you to change the facsimile defaults in a mode that is not the facsimile mode. Af- ter changing the defaults, select facsimile mode again. -
Page 565: Quitting Default Settings
E E E E Follow the displayed instructions to change the default, and then press the { { { { OK} } } } key. Depending on the menu, you may need to repeat step When you have selected the print menu, press the { { { { Start} } } } key to print. -
Page 566: General Settings/Adjust
Facsimile Features ❖ ❖ ❖ ❖ Print TX Standby File List (Print Transmission Standby File List) Use this function to print the trans- mission standby file list. Select [Print TX Standby File List] using { { { { U U U U } } } } or { { { { T T T T } } } } , and then press the { { { { OK} } } } key. -
Page 567: Reception Settings
• TX by User Code (Transmission by User Code) • Transmission Stamp • E-mail Options • Print TX Status Report (Print Transmission Status Report) • Manual E-mail Reception Select User Function key you want to program. Select the function you want to program in the User Function key. - Page 568 Facsimile Features Select [On] using { { { { U U U U } } } } or { { { { T T T T } } } } , and then press the { { { { OK} } } } key. Enter the maximum e-mail size using the number keys.
-
Page 569: Key Operator Setting
7. Key Operator Setting Key Operator Tools List You can also set the line type for the machine connection, program Memory Lock ID, fax destinations, and many other items. In addition, you can check the number of documents transmitted and received. Function name Communication Page Count Memory Lock... -
Page 570: Using Key Operator Settings
Key Operator Setting Using Key Operator Settings Counters This function allows you to check the total number of pages transmitted and received on the display. • Transmissions: Total number of transmitted pages • Receptions: Total number of received pages A A A A Press the { { { { User Tools/Counter} } } } key. -
Page 571: Programming An End Receiver
Note ❒ An e-mail address can be set as the forwarding destination. ❒ If you do not program an End Re- ceiver, the machine performs printing but not forwarding even with the Forwarding function On. ❒ You can program one of the User Function keys with operations for this function. -
Page 572: Quitting The Forwarding Function
Key Operator Setting Note ❒ If there is an End Receiver already programmed, a receiver name is shown. If you want to change the receiver, press the { { { { Clear/Stop} } } } key and proceed to step F. ❒... -
Page 573: Memory Lock
Memory Lock When you switch Memory Lock on, received messages are stored in mem- ory and not printed automatically. When a message is received in the Memory Lock mode, the Receive File indicator blinks. To print this mes- sage, enter the Memory Lock ID. A user without the ID cannot print the message. -
Page 574: User Parameters
Key Operator Setting User Parameters User Parameters allow you to customize various settings to suit your needs. To change function settings, set the User Parameter Switches. Preparation Access to some User Parameter Settings requires other settings be made be- forehand. ❖... - Page 575 Switch Item 0 Receive Service Call (SC) Condition (Substitute Recep- tion during service call) 2, 1 Substitute the reception when the machine cannot print (because all pa- per trays have run out of paper, toner is empty, or all paper trays are out of order) 00: Enabled unconditionally (Free) 01: Enabled when Own Name/Own Fax Number is received...
- Page 576 Key Operator Setting Switch 0 Print date with Fax Header 1 Print transmitter origin with 2 Print file number with Fax 3 Print page number with Fax 1 Sort Journal by line type 0 Automatic printing of the 1 Reprint documents that could 5, 4, 3, 2 Reprinting time of stored documents in memory that could not be print- 7 LAN-Fax error mail notifica- 0 Print results of sending Re-...
-
Page 577: Changing The User Parameters
Changing the User Parameters Important ❒ We recommend you print and keep a User Parameter list when you program or change a User Pa- rameter. See p.84 “Printing the User Parameter List”. ❒ Do not change any bit switches other than those shown on the pre- vious pages. -
Page 578: Printing The User Parameter List
Key Operator Setting Printing the User Parameter List Print this list to see the current User Parameter settings. However, only items of importance or often-used items are included in the list. A A A A Press the { { { { User Tools/Counter} } } } key. User Tools/ Counter On Hook Dial... -
Page 579: Home Position
Home Position Items used for transmitting documents can be set as the home positions. When documents are scanned and transmission is completed, items automatically re- turn to their home positions. ❖ ❖ ❖ ❖ Home Position Setting Functions • Image Density Allows one of five image density steps to be set as the home position. - Page 580 Key Operator Setting Important ❒ If you turn this function off, the scale of the original is maintained and some parts of the image may be lost at the other end. • Fax Header Allows the fax header as the home position to be set to on or off. See p.10 “Fax Header Print”.
- Page 581 Note ❒ For details about setting parameters, see p.80 “User Parameters”. Follow the procedure below to set the home position parameters. Important ❒ Do not change any bit switches other than those shown in the above table. A A A A Press the { { { { User Tools/Counter} } } } key.
- Page 582 Key Operator Setting F F F F Select the switch number you want to change using the scroll keys, and then press the { { { { OK} } } } key. G G G G Select the bit number you want to change. When you press the bit number, the value switches between 1 and 0.
-
Page 583: Special Senders To Treat Differently
Special Senders to Treat Differently By programming particular receivers in advance, you can set the following function for each receiver: • Authorized Reception • Forwarding • Memory Lock Use the Own Name or Own Fax Number to program your receivers. If the receiver has a machine of the same manufacturer, program an Own Name that has already been pro-... - Page 584 Key Operator Setting Note ❒ You can program up to 24 charac- ters for the sender. ❒ You can check Own Name and Own Fax Number using the Jour- nal. You can check programmed Special Senders using the specified sender list. See p.21 “Printing the Journal”.
-
Page 585: Programming/ Changing Special Senders
❖ ❖ ❖ ❖ Memory Lock Use this function to store incoming documents from programmed senders (Special Senders) in mem- ory without printing them. People without the Memory Lock ID can- not print the documents, and therefore this function is useful for receiving confidential documents. - Page 586 Key Operator Setting G G G G Enter a destination name using the number keys, and then press the { { { { OK} } } } key. Enter a destination name using Own Name or Own Fax Number. Reference “Entering Text”, General Set- tings Guide H H H H...
- Page 587 B Select [On] or [Off], using { { { { U U U U } } } } or { { { { T T T T } } } } , and then press the { { { { OK} } } } key.
-
Page 588: Deleting A Special Sender
Key Operator Setting Deleting a Special Sender Use this function to program “Initial Set Up” of a Special Sender. A A A A Press the { { { { User Tools/Counter} } } } key. User Tools/ Counter On Hook Dial On Hook Dial B B B B Select [Fax Features] using { { { { U U U U } } } } or... -
Page 589: Programming Initial Set Up Of A Special Sender
Programming Initial Set Up of a Special Sender Use this function to program “Initial Set Up” of a Special Sender. A A A A Press the { { { { User Tools/Counter} } } } key. User Tools/ Clear Counter Modes On Hook Dial On Hook Dial... -
Page 590: Printing The Special Sender List
Key Operator Setting Programming Special RX Function A Select [Special RX Function] us- ing { { { { U U U U } } } } or { { { { T T T T } } } } , and then press the { { { { OK} } } } key. -
Page 591: Programming A Memory Lock Id
G G G G Press the { { { { User Tools/Counter} } } } key. The standby display appears. Programming a Memory Lock Program a Memory Lock ID to be en- tered before printing documents when the Memory Lock function is activated. -
Page 592: Selecting Dial/Push Phone
Key Operator Setting Selecting Dial/Push Phone Use this function to select a line type. Dial and Push lines are available for selection. Note ❒ This function is not available in some areas. A A A A Press the { { { { User Tools/Counter} } } } key. User Tools/ Counter On Hook Dial... - Page 593 A A A A Press the { { { { User Tools/Counter} } } } key. User Tools/ Clear Counter Modes On Hook Dial On Hook Dial B B B B Select [Fax Features] using { { { { U U U U } } } } or { { { { T T T T } } } } , and then press the { { { { OK} } } } key.
- Page 594 Key Operator Setting Outside Access No. A Select [Outside Access No.] using { { { { U U U U } } } } or { { { { T T T T } } } } , and then press the { { { { OK} } } } key.
-
Page 595: Solving Operation Problems
8. Solving Operation Problems When An Error Report is Printed An Error Report is printed if a mes- sage cannot be successfully sent or re- ceived. Possible causes include a problem with your machine or noise on the tel- ephone line. If an error occurs during transmission, resend the original. -
Page 596: Turning Off The Main Power/In Case Of A Power Failure
Solving Operation Problems Turning Off the Main Power/In Case of a Power Failure R CAUTION: • When you disconnect the power plug from the wall outlet, always pull the plug (not the cable). Even if the main power switch is turned off, the contents of the ma- chine memory (for example, pro- grammed numbers) will not be lost. -
Page 597: When An Error Occurs Using Internet Fax
When an Error Occurs Using Internet Fax Error Mail Notification The machine sends the Error Mail Notification to the sender when it is unable to successfully receive a particular e-mail message. A "cc" of this notification is also sent to the key operator's e-mail address when one is specified. Note ❒... - Page 598 Solving Operation Problems...
-
Page 599: Appendix
Replacing the Stamp Cartridge The optional ADF or ARDF is required. When the stamp becomes lighter, re- place the cartridge. Note ❒ Use the cartridge specified for this machine. ❒ Do not add ink to the cartridge by yourself. Neglecting this can cause ink leakage. -
Page 600: Connecting The Machine To A Telephone Line And Telephone
Appendix Connecting the Machine to a Telephone Line and Telephone Connecting the Telephone Line To connect the machine to a telephone line, use a snap-in modular type connec- tor. Important ❒ Make sure the connector is the correct type before you start. ❖... -
Page 601: Specifications
Specifications ❖ ❖ ❖ ❖ Fax Transmission and Reception Standard Resolution Transmission time Data compression method Maximum original size Maximum scanning size Print process Transmission speed ❖ ❖ ❖ ❖ Power Consumption Low power mode Sleep mode Standby mode Memory Reception Memory Transmission Transmission Reception... -
Page 602: Compatible Machines
Appendix E-mail format Authentication method Internet communication E-mail send functions E-mail receive functions Supported for A4, 8 Compatible Machines This machine can communicate with Internet Fax machines that meet the follow- ing specification requirements. Communication protocols E-mail format Data format Available in full mode, depending on the other party's settings. -
Page 603: Acceptable Types Of Originals
Acceptable Types of Originals Make sure your originals are completely dry before setting them in the machine. Wet ink or correcting fluid from originals will mark the exposure glass and affect the resulting image. Acceptable original sizes Where original is set Acceptable original size Exposure glass Up to A3 (297×420 mm),... - Page 604 Appendix ❖ ❖ ❖ ❖ ADF or ARDF Limitation ❒ There may be a difference in the size of the image when it is printed at the des- tination. ❒ If you place an original larger than A3, 11"×17" on the exposure glass, only an A3, 11"×17"...
- Page 605 ❖ ❖ ❖ ❖ Inch Version -9.8" × -9.6" 9.6"-10.6" 11"×8 "K 10.6"- 11"×8 "K × - Unable to auto detect Normally a length of about 420 mm (16.5") can be scanned; however, it is only possi- ble to specify a scanning size up to 432 mm (17"). - Maximum scan area The maximum scan area is shown below: •...
-
Page 606: Maximum Values
Appendix Maximum Values The following list contains the maximum value for each item. Note ❒ The maximum number of pages that can be stored or transmitted may de- crease depending on the contents of documents. Item Memory The number of pages that you can store in memory (Using A4 size Standard <ITU-T #4Chart>... - Page 607 INDEX Address Book , 52 Applications Stored on the CD-ROM , 52 Authorized Reception , 73 , 90 Auto Fax Reception Power-up , 43 Automatic Redial , 32 Auto Reduce , 85 Auto run program , 50 Basic Transmission , 54 Batch Transmission , 32 Canceling a Transmission , 13 Centre Mark , 44 , 73...
- Page 608 JBIG Reception , 43 Transmission , 33 Journal , 22 , 71 Journal by E-mail , 34 Journal by E-mail, Transmitting , 33 Just size printing , 48 Key Operator Code , 69 Key Operator Settings , 76 Key Operator Tools , 68 Key Operator Tools List , 75 Label Insertion , 11 LAN-Fax...
- Page 609 Scanned Area , 109 Sending Fax Documents from Computers , 49 Send Later , 3 Server-Generated Error E-mail , 103 SMTP reception , 41 SMTP RX File Delivery , 74 Sound Volume, Adjust , 72 Special Sender List , 96 Special Senders , 91 Special Senders to Treat Differently , 89 Specifications , 107...
- Page 610 MEMO...
- Page 611 MEMO...
- Page 612 MEMO B620-8658...
- Page 613 Copyright © 2003...
- Page 614 Printed in China B620-8658...
- Page 615 Network Guide Functions Available over a Network Connecting the Network Cable to the Network Setting Up the Machine on a Network Windows Configuration Using the Printer Function Using SmartDeviceMonitor for Client Using SmartDeviceMonitor for Admin Configuring the Network Interface Board Using a Web Browser Appendix For safe and correct use of this machine, please be sure to read the Safety Information in the "Copy Reference"...
- Page 616 Introduction This manual describes detailed instructions on the operation and notes about the use of this machine. To get maximum versatility from this machine all operators are requested to read this manual carefully and follow the instructions. Please keep this manual in a handy place near the machine. Important Contents of this manual are subject to change without prior notice.
- Page 617 Manuals for This Machine The following manuals describe the operational procedures of this machine. For particular functions, see the relevant parts of the manual. Note ❒ Manuals provided are specific to machine type. ❒ Adobe Acrobat Reader is necessary to view the manuals as a PDF file. ❒...
- Page 618 ❖ ❖ ❖ ❖ Manuals for DeskTopBinder V2 Lite DeskTopBinder V2 Lite is a utility included on the CD-ROM labeled “Scanner Driver & Document Management Utilities”. • DeskTopBinder V2 Lite Setup Guide (PDF file - CD-ROM2) Describes installation of, and the operating environment for DeskTop- Binder V2 Lite in detail.
- Page 619 TABLE OF CONTENTS Manuals for This Machine ...i How to Read This Manual ...1 1. Functions Available over a Network Using the Printer ...3 Using Fax...4 Internet Fax ... 4 LAN-Fax ... 5 Network Scanner...6 E-mail ... 6 Network Delivery Scanner... 7 Network TWAIN Scanner ...
- Page 620 5. Using the Printer Function Printing with Windows ...45 Printing with a Windows 2000/XP, Windows Server 2003 or Windows NT 4.0 Print Server ...45 Printing without a Print Server... 46 Printing with a Macintosh ...49 Changing to EtherTalk ...49 Configuring the Printer ...50 Changing the Printer Name...50 Changing the Zone...50 Printing with NetWare...51...
- Page 621 9. Appendix Remote Maintenance by telnet ... 81 Using telnet ... 81 Commands List ... 82 Using DHCP... 97 Using AutoNet ... 98 SNMP... 99 Error Messages on the Display ... 100 Messages without Code Numbers ... 100 Messages with Code Numbers ...101 Understanding Displayed Information...
-
Page 623: How To Read This Manual
How to Read This Manual Symbols In this manual, the following symbols are used: R WARNING: This symbol indicates a potentially hazardous situation which, if instructions are not followed, could result in death or serious injury. R CAUTION: This symbol indicates a potentially hazardous situation which, if instructions are not followed, may result in minor or moderate injury, or damage to proper- * The statements above are notes for your safety. - Page 624 Names of Major Options The following software products are referred to using a general name: • DeskTopBinder V2 Lite and DeskTopBinder V2 professional→ DeskTop- Binder V2 Lite/professional • ScanRouter V2 Lite and ScanRouter V2 professional (optional)→ ScanRouter V2 Lite/professional...
- Page 625 1. Functions Available over a This machine provides printer, LAN-Fax, Internet Fax, and scanner functions over a network. Using the Printer The network interface board is compatible with NetWare Windows NT 4.0 (TCP/IP, NetBEUI BEUI , IPP ), Windows XP (TCP/IP, IPP ), Windows 95/98/Me (TCP/IP, NetBEUI and Macintosh (AppleTalk) protocols.
-
Page 626: Functions Available Over A Network
Functions Available over a Network Using Fax Internet Fax This machine converts scanned document images to e-mail format and transmits the data over the Internet. Specify the e-mail address instead of the fax number, and then send the docu- ment. E-mail can be received on a fax machine that supports Internet Fax, or on a com- puter that can receive normal e-mail. -
Page 627: Lan-Fax
LAN-Fax You can fax documents over phone lines from any computer connected to the machine via Ethernet, IEEE 1394 (IP over 1394), or IEEE 802.11b (wireless LAN). To send a fax, print from the Windows application you are working with, select LAN-Fax as the printer, and then specify the destination. -
Page 628: Network Scanner
Functions Available over a Network Network Scanner E-mail Scan file attached to an e-mail can be sent using the e-mail system through a LAN or the Internet. Reference For details about what settings to make, see p.13 “Setting Up the Machine on a Network”. -
Page 629: Network Delivery Scanner
Network Delivery Scanner You can use the machine as a delivery scanner for ScanRouter V2 Lite / Profes- sional. Scan file or document received by fax can be stored in the delivery server, or de- livered via the network to specified folders on client computers. Reference For details about what settings to make, see p.13 “Setting Up the Machine on a Network”. -
Page 630: Network Twain Scanner
Functions Available over a Network Network TWAIN Scanner You can use the scanning function of this machine from a computer connected via a network (Ethernet, IEEE 1394(IP over 1394), or IEEE 802.11b (wireless LAN)). You can scan documents the same way you would if you were using a scanner connected directly to your computer. -
Page 631: Connecting The Network Cable To The Network
2. Connecting the Network Cable to the Network Confirming the Connection When the IEEE 1394 When the IEEE 802.11b interface unit (optional) interface board (optional) is installed. is installed. 10BASE-T/100BASE-TX port Port for connecting the 10BASE-T or 100BASE-TX cable IEEE 1394 ports (optional) Ports for connecting the IEEE 1394 inter- face cable Wireless LAN card (optional) -
Page 632: Connecting To The Ethernet Interface
Connecting the Network Cable to the Network Connecting to the Ethernet Interface The network interface board supports 10BASE-T or 100BASE-TX connec- tions. A A A A Turn off the main power switch. Important ❒ Make sure the main power is off. -
Page 633: Using The Ieee 802.11B (Wireless Lan)
Connecting to the IEEE 1394 Interface Important ❒ Before making the connection, touch the metallic part to ground yourself. Note ❒ Use the interface cable supplied with the IEEE 1394 interface board (optional). ❒ Make sure the interface cable is not looped. - Page 634 Connecting the Network Cable to the Network Confirming the Connection A A A A Make sure the LED of the IEEE 802.11b card is lit. ❖ ❖ ❖ ❖ When using in infrastructure mode If it is connected properly to the network, the LED is green when in infrastructure mode.
-
Page 635: Setting Up The Machine On A Network
3. Setting Up the Machine on User Tools Menu (System Settings) This section describes the network settings you can change with User Tools (Sys- tem Settings). Make settings according to functions you want to use and the in- terface to be connected. Important ❒... - Page 636 Setting Up the Machine on a Network Interface IEEE 1394 (IP over 1394) IEEE 802.11b (wireless LAN) Appears when the IEEE 1394 interface board (optional) is installed. Appears when the IEEE 802.11b unit (optional) is installed. If Ethernet and IEEE 802.11b (wireless LAN) are both connected to the machine, the selected interface has priority.
-
Page 637: Internet Fax
Internet Fax Interface Ethernet Interface Settings/ Network See p.26 “Interface Settings/Network”. File Transfer See p.30 “File Trans- fer”. User Tools Menu (System Settings) Settings IP Address Gateway Address DNS Configuration WINS Configuration Effective Protocol LAN Type Ethernet Speed Host Name Domain Name SMTP Server SMTP Authentication... - Page 638 Setting Up the Machine on a Network Interface IEEE 1394 (IP over 1394) Settings Interface Settings/ IP Address IEEE 1394 WINS Configuration See p.27 “Interface IP over 1394 Settings/IEEE 1394”. Host Name Domain Name Interface Settings/ Gateway Address Network DNS Configuration See p.26 “Interface Effective Protocol Settings/Network”.
- Page 639 Interface IEEE 802.11b Interface Settings/ (wireless LAN) Network See p.26 “Interface Settings/Network”. Interface Settings/ IEEE 802.11b See p.29 “Interface Settings/IEEE 802.11b”. File Transfer See p.30 “File Trans- fer”. Appears when the IEEE 1394 interface board (optional) is installed. Appears when the IEEE 802.11b unit (optional) is installed. If Ethernet and 802.11b (wireless LAN) are both connected to the machine, the select- ed interface has priority.
-
Page 640: E-Mail
Setting Up the Machine on a Network E-mail Interface Ethernet IEEE 1394 (IP over 1394) Settings Interface Settings/ IP Address Network Gateway Address See p.26 “Interface DNS Configuration Settings/Network”. WINS Configuration Effective Protocol LAN Type Ethernet Speed Host Name Domain Name File Transfer SMTP Server See p.30 “File Trans-... - Page 641 Interface IEEE 802.11b Interface Settings/ (wireless LAN) Network See p.26 “Interface Settings/Network”. Interface Settings/ IEEE 802.11b See p.29 “Interface Settings/IEEE 802.11b”. File Transfer See p.30 “File Trans- fer”. Appears when the IEEE 1394 interface board (optional) is installed. Appears when the 802.11b unit (optional) is installed. If Ethernet and 802.11b (wireless LAN) are both connected to the machine, the select- ed interface has priority.
- Page 642 Setting Up the Machine on a Network Network Delivery Scanner Interface Ethernet IEEE 1394 (IP over 1394) Settings Interface Settings/ IP Address Network Gateway Address See p.26 “Interface DNS Configuration Settings/Network”. WINS Configuration Effective Protocol LAN Type Ethernet Speed Host Name Domain Name File Transfer Delivery Option...
- Page 643 Interface IEEE 802.11b Interface Settings/ (wireless LAN) Network See p.26 “Interface Settings/Network”. Interface Settings/ IEEE 802.11b See p.29 “Interface Settings/IEEE 802.11b”. File Transfer See p.30 “File Trans- fer”. Appears when the IEEE 1394 interface board (optional) is installed. Appears when the IEEE 802.11b unit (optional) is installed. If Ethernet and IEEE 802.11b (wireless LAN) are both connected to the machine, the selected interface has priority.
- Page 644 Setting Up the Machine on a Network Network TWAIN Scanner Interface Ethernet IEEE 1394 (IP over 1394) IEEE 802.11b (wireless LAN) Appears when the IEEE 1394 interface board (optional) is installed. Appears when the IEEE 802.11b unit (optional) is installed. If Ethernet and 802.11b (wireless LAN) are both connected to the machine, the select- ed interface has priority.
-
Page 645: Network Configuration
Network Configuration Any change you make with User Tools remains in effect even if the main power switch or operation switch is turned off, or the { { { { Clear Modes} } } } key is pressed. Configuring the network using the control panel Note ❒... - Page 646 Setting Up the Machine on a Network Name on the control panel Interface Network Settings IEEE 1394 IP Specify Server 1 Configu- Server 2 ration Server 3 WINS Server Configu- Scope ID ration Auto Select Frame Ethernet II Type Ethernet 802.2 Ethernet 802.3 Ethernet SNAP Ethernet...
- Page 647 Name on the control panel Interface IEEE Communication Mode Settings 802.11b SSID Setting Channel WEP (Encryption) Setting Communication Speed File Delivery Option Transfer SMTP Server SMTP Authentication POP before SMTP Reception Protocol POP3/IMAP4 Settings Key Operator's E-mail Add. E-mail Reception Port E-mail Recept.
- Page 648 Setting Up the Machine on a Network Settings You Can Change with User Tools Interface Settings/Network ❖ ❖ ❖ ❖ IP Address Before using this machine in the network environment, you must configure the IP address and sub- net mask. •...
- Page 649 ❖ ❖ ❖ ❖ Effective Protocol Select the protocol to use in the network. • TCP/IP:Effective/Invalid • NetWare:Effective/Invalid • SMB:Effective/Invalid • AppleTalk:Effective/Invalid Note ❒ Default: TCP/IP: Effective, Net- Ware: Effective, SMB: Effective, AppleTalk: Effective ❖ ❖ ❖ ❖ NW Frame Type Select the frame type when you use NetWare.
- Page 650 Setting Up the Machine on a Network ❒ When you use the IEEE 1394 in- terface on a network, you can- not use the Ethernet interface in the same domain. To use both interfaces in the same domain, set different values for [Sub-net Mask:].
- Page 651 Interface Settings/IEEE 802.11b Preparation You must install the IEEE 802.11b unit (optional) into the machine. Note ❒ Be sure to make all settings simul- taneously. ❖ ❖ ❖ ❖ Communication Mode Specifies the communication mode of the wireless LAN. • 802.11 Ad hoc •...
- Page 652 Setting Up the Machine on a Network Interface Settings/Print I/F Settings List You can check items related to the network in use. Reference For details about printing, see p.34 “Printing the interface settings lists”. File Transfer ❖ ❖ ❖ ❖ Delivery Option E n a b l e s o r d i s a b l e s s e n d i n g scanned documents via the Scan- Router V2 Professional/Lite deliv-...
- Page 653 Note ❒ Default: Off ❒ [Encrypt:]-[Auto]: If the authenti- c a t i o n m e t h o d i s P L A I N , LOGIN, or, CRAM-MD5. ❒ [Encrypt:]-[On]: If the authentica- tion method is CRAM-MD5. ❒...
- Page 654 Setting Up the Machine on a Network Note ❒ [Encrypt:]-[Auto]: Password en- cryption is automatically set ac- c or d in g t o t h e P O P s e rv er settings. ❒ [Encrypt:]-[On]: Encrypt password. ❒ [Encrypt:]-[Off]: Do not encrypt password.
- Page 655 ❖ ❖ ❖ ❖ Prog./Change/Del. Subject You can program, change, or de- lete the subject used when sending an Internet fax or scan file as an at- tachment. • Program/Change • Delete Note ❒ Enter a subject using up to 20 al- phanumeric characters.
- Page 656 Setting Up the Machine on a Network Deleting a subject A Select [Delete] using { { { { U U U U } } } } or { { { { T T T T } } } } , and then press the { { { { OK} } } } key.
-
Page 657: Windows Configuration
4. Windows Configuration Configuring TCP/IP This describes how to configure Win- dows for TCP/IP and IPP. Configuring a Windows 95/98/Me Computer Follow the procedure below to con- figure a Windows 95/98/Me compu- ter to use TCP/IP. A A A A Open [Control Panel], and then double-click the Network icon. -
Page 658: Configuring A Windows Xp Computer
Windows Configuration Configuring a Windows XP Computer Follow the procedure below to con- figure a Windows XP computer to use TCP/IP. A A A A On the [Start] menu, click [Control Panel], and then click [Network and Internet Connections]. B B B B Click [Network Connections], and then double-click [Local Area Con- nection]. - Page 659 Configuring a Windows NT 4.0 Computer Follow the procedure below to con- figure a Windows NT 4.0 computer to use TCP/IP. A A A A Open [Control Panel], and then double-click the Network icon. Make sure [TCP/IP Protocol] is se- lected in the [Network protocols] box on the [Protocols] tab.
-
Page 660: Configuring Netbeui
Windows Configuration Configuring NetBEUI This describes how to configure Win- dows to use NetBEUI. Limitation ❒ NetBEUI cannot be used under Windows XP. Note ❒ NetBEUI appears as SMB in the control panel, manual, and related utilities. Configuring a Windows 95/98/Me Computer Follow the procedure below to con- figure a Windows 95/98/Me compu-... - Page 661 Configuring a Windows NT 4.0 Computer Follow the procedure below to con- figure a Windows NT 4.0 computer to use NetBEUI. A A A A Open [Control Panel], and then double-click the Network icon. Make sure [NetBEUI Protocol] is listed in the [Network protocols] box on the [Protocols] tab.
- Page 662 Windows Configuration...
-
Page 663: Using The Printer Function
5. Using the Printer Function This section contains instructions for configuring the machine as a network printer. Read the section that relates to your network environment for informa- tion about correct configuration. ❖ ❖ ❖ ❖ Printing with a Windows 2000/XP, Windows Server 2003, or Windows NT 4.0 Print Server To set up the machine as a network printer in Windows 95/98/Me, Windows 2000/XP, Windows Server 2003, and Windows NT 4.0 environment, see p.45... - Page 664 Using the Printer Function • Printing without a print server TCP/IP Note ❒ Under Windows XP, you cannot print via NetBEUI using SMB. ❖ ❖ ❖ ❖ Printing with a Macintosh To set up the machine as a network printer in a Macintosh environment, see p.49 “Printing with a Macintosh”.
- Page 665 ❖ ❖ ❖ ❖ Printing with NetWare To set up the machine as a print server or remote printer in a NetWare envi- ronment, see p.51 “Printing with NetWare”. The network interface board al- lows you to use the machine as either a print server or a remote printer. •...
- Page 666 Using the Printer Function ❖ ❖ ❖ ❖ Printing with UNIX For UNIX printing information, visit our Web site or consult your authorized dealer. TCP/IP UNIX AAW013S1...
-
Page 667: Printing With Windows
Printing with Windows Printing with a Windows 2000/XP, Windows Server 2003 or Windows NT 4.0 Print Server This describes how to configure a cli- ent computer on a network using Windows 2000/XP, Windows Server 2003, Windows NT 4.0 Server or Win- dows NT 4.0 Workstation as a print server. -
Page 668: Printing Without A Print Server
Using the Printer Function E E E E On the network tree, double-click the name of the computer used as the print server. The printers connected to the net- work are displayed. F F F F Click the name of the printer you want to use, and then click [OK]. - Page 669 ❖ ❖ ❖ ❖ NetBEUI Note ❒ Do not use NetBEUI un- der Windows XP. Click [NetBEUI], and then click [Search]. Available printers are listed. Click the printer you want to use, and then click [OK]. Note ❒ Printers that respond to a broadcast from the com- puter will be displayed.
- Page 670 Using the Printer Function C In the [Printer Name or IP Address] box, enter the printer name or IP address, and then click [Next]. D In the [Add Standard TCP/IP Print- er Port Wizard] dialog box, click [Finish]. LPR Port A Click [LPR Port], and then click [New Port].
-
Page 671: Printing With A Macintosh
Printing with a Macintosh This describes how to configure a M a c i n t o s h c o m p u t e r t o u s e EtherTalk. Actual procedures may vary depending on the version of the Mac OS. -
Page 672: Configuring The Printer
Using the Printer Function Configuring the Printer Use the control panel to activate the AppleTalk protocol. (The default is active.) Reference For more information about con- figuration, see p.26 “Interface Set- tings/Network”. Changing the Printer Name If the network has several similar model printers, the names will be the same. -
Page 673: Printing With Netware
Printing with NetWare This describes how to configure the machine for use as a print server or remote printer in a NetWare environ- ment. NetWare Basic Procedure Install the NIB Setup Tool Print Server Remote Printer Configure the network interface board Restart the printer Configure the NetWare Start the print server... -
Page 674: Setting Up As A Print Server
Using the Printer Function Setting Up as a Print Server NetWare 3.x A A A A Log on to the file server as a Su- pervisor, or equivalent. B B B B Start SmartDeviceMonitor Admin. C C C C On the [Group] menu, point to [Search Device], and then click [IPX/SPX]. - Page 675 NetWare 4.x, 5/5.1, 6 Important ❒ You must set up the print server using NDS mode in NetWare 4.x, 5/5.1, 6. ❖ ❖ ❖ ❖ To use NetWare 5/5.1, 6 • Use the printer as a print server. Do not use it as a remote printer in a PureIP environment.
- Page 676 Using the Printer Function J J J J Enter the print server name in the [Print Server Name:] box, the printer name in the [Printer Name:] box, the print queue name in the [Print Queue Name:] box, and the print queue volume in the [Queue Vol- ume:], and then click [Next >].
- Page 677 B In the [Print Server Name:] box, enter the print server name. Limitation ❒ Enter up to 47 alphanumeric characters. C In the [File Server Name:] box, en- ter the name of the file server in which the print server is to be created.
-
Page 678: Setting Up As A Remote Printer
Using the Printer Function Setting Up as a Remote Printer NetWare 3.x A A A A Log on to the file server as an ad- ministrator, or equivalent. B B B B Start SmartDeviceMonitor Admin. C C C C On the [Group] menu, point to [Search Device], and then click [IPX/SPX]. - Page 679 B To create a new print server, press the { { { { INSERT} } } } key, and then enter a print server name. Note ❒ If you are using a currently defined print server, select o n e o f t h e p r in t s e rv e rs shown in the [Print Server] list.
- Page 680 Using the Printer Function NetWare 4.x, 5/5.1, 6 A A A A Log on to the file server as an ad- ministrator, or equivalent. B B B B Start SmartDeviceMonitor Admin. C C C C On the [Group] menu, point to [Search Device], and then click [IPX/SPX].
- Page 681 H Click [OK] to close the [NIB Set- up Tool - Network board list] dialog box. H H H H Quit SmartDeviceMonitor Admin. I I I I On Windows, start NWadmin. Reference For more information about NWadmin, see the operating in- structions that come with the NetWare.
-
Page 682: Setting Up A Client Computer
Using the Printer Function D Select the [Define additional prop- erties] check box, and then click [Create]. N N N N Assign the printer to the created print server as follows: A Click [Assignments], and then click [Add] in the [Assignments] area. - Page 683 D D D D On the [File] menu, click [Proper- ties]. E E E E Click the [Details] tab, and then click [Add Port]. F F F F Click [Network], and then click [Browse]. G G G G In the tree pane, double-click the name of the file server.
- Page 684 Using the Printer Function - NDPS The machine operates using NDPS. Operating requirements are as fol- lows: • NetWare Version: 5/5.1, 6 ❖ ❖ ❖ ❖ Printer Drivers and Operating Systems Printer driver PostScript 3 To use the machine with NDPS, NDPS Gateway is required.
- Page 685 6. Using SmartDeviceMonitor SmartDeviceMonitor for Client SmartDeviceMonitor for Client is equipped with the following functions. We recommend all users of this printer to install this software. ❖ ❖ ❖ ❖ Protocol Stack Operating system Microsoft Windows 95/98/Me Microsoft Windows 2000 Microsoft Windows XP Microsoft Windows Server 2003 Microsoft Windows NT 4.0...
-
Page 686: Using Smartdevicemonitor For Client
Using SmartDeviceMonitor for Client • Notification function • An error message appears if there is an error on the specified printer during transfer or printing of data. • A window opens to notify you of print completion. You can also select to be notified of the print condition, such as displaying the notice only when Recovery Printing is executed. -
Page 687: Smartdevicemonitor For Client
Setting the Network Monitoring Function To view the status of machines using SmartDeviceMonitor for Client, you must configure SmartDeviceMonitor for Client in advance, so that it monitors the ma- chine whose status you want to view. A A A A Start SmartDeviceMonitor for Client. - Page 688 Using SmartDeviceMonitor for Client...
- Page 689 7. Using SmartDeviceMonitor SmartDeviceMonitor for Admin Using SmartDeviceMonitor for Admin, not only can you monitor the status of network printers, but you can also change the configuration of the network in- terface board using TCP/IP or IPX/SPX protocol. ❖ ❖ ❖ ❖ Protocol Stack Operating system Microsoft Windows 95/98/Me Microsoft Windows 2000...
-
Page 690: Using Smartdevicemonitor For Admin
Using SmartDeviceMonitor for Admin • Check the machine's network settings and detailed device information. • Change the machine's network settings. • Check details of print jobs sent from a computer. • Check job histories of printed, faxed (LAN-Fax), scanned, and photocop- ied documents identified by user codes. -
Page 691: Smartdevicemonitor For Admin
Changing the Network Interface Board Configuration Limitation ❒ Internet Explorer 4.01 or a later version is required to use NIB Set- up Tool. A A A A Start SmartDeviceMonitor Admin. B B B B On the [Group] menu, point to [Search Device], and then click [TCP/IP] or [IPX/SPX]. -
Page 692: Locking The Control Panel Menu
Using SmartDeviceMonitor for Admin Locking the Control Panel Menu A A A A Start SmartDeviceMonitor Admin. B B B B On the [Group] menu, point to [Search Device], and then click [TCP/IP] or [IPX/SPX]. A list of machines appears. Note ❒... -
Page 693: Managing User Information
Managing User Information A A A A Start SmartDeviceMonitor Admin. B B B B On the [Group] menu, point to [Search Device], and then click [TCP/IP] or [IPX/SPX]. A list of machines appears. Note ❒ Select the protocol of the ma- chine for which you want to change configuration. -
Page 694: Managing Address Information
Using SmartDeviceMonitor for Admin Managing Address Information A A A A Start SmartDeviceMonitor Admin. B B B B On the [Group] menu, point to [Search Device], and then click [TCP/IP] or [IPX/SPX]. A list of machines appears. Note ❒ Select the protocol of the ma- chine for which you want to change configuration. -
Page 695: Configuring The Network Interface Board Using A Web Browser
8. Configuring the Network Interface Board Using a Web Browser You can check the status of a machine and change its settings using the Web browser. ❖ ❖ ❖ ❖ What can it do? You can remotely check the status of a machine or specify its settings over the network using a computer's Web browser. -
Page 696: Going To The Top Page
Configuring the Network Interface Board Using a Web Browser Going to the Top Page Header area You can register favorite URLs using [URL]. To view the Help section, click [Help]. Menu area These menus are for configuring the net- work interface board and checking ma- chine status. -
Page 697: Types Of Menu Configuration And Mode
Types of Menu Configuration and Mode Items that appear on the menu area differ between user mode and administrator mode. The work area which appears under the selected menu displays machine status under user mode and machine status and settings under administrator mode. Note ❒... - Page 698 Configuring the Network Interface Board Using a Web Browser Configura- Paper tion System Printer E-mail Interface Network Webpage Security You can make the IEEE 802.11b, IEEE 1394, or parallel interface settings. You can also check the Ethernet status. Reference For more information about displaying status and changing settings, see p.79 “Using Help on the Web Browser”.
-
Page 699: Verifying The Network Interface Board Settings
Verifying the Network Interface Board Settings A A A A Start the Web browser. B B B B In the [Address] box, enter the ma- chine's IP address (for example http://XXX.XXX,XXX,XXX, where the Xs are the numbers of the IP address). -
Page 700: Configuring The Network Interface Board Settings
Configuring the Network Interface Board Using a Web Browser Configuring the Network Interface Board Settings A A A A Start the Web browser. B B B B In the [Address] box, enter the ma- chine's IP address (for example http://XXX.XXX,XXX,XXX, where the Xs are the numbers of the IP address). -
Page 701: Using Help On The Web Browser
Using Help on the Web Browser When using Help for the first time, clicking either [Help] in the header area or the icon marked “?” in the work area makes the following screen appear. From there you can check Help in two different ways, as shown below: ❖... - Page 702 Configuring the Network Interface Board Using a Web Browser...
-
Page 703: Appendix
Remote Maintenance by telnet You can view printer status and con- figure the network interface board us- ing telnet. Note ❒ You should specify a password so only the network administrator, or a person with network administra- tor privileges, can use remote maintenance. -
Page 704: Commands List
Appendix Commands List Use the “help” command to display remote maintenance use. Note ❒ Enter “help” to display a list of commands that can be used. msh> help ❒ Enter “help command_name” to display information about the syn- tax of that command. msh>... - Page 705 - Address ❖ ❖ ❖ ❖ Subnet Mask A number used to numerically “mask” or hide the IP address on the network by eliminating those parts of the address that are alike for all machines on the network. ❖ ❖ ❖ ❖ Broadcast address A specified address for sending data to specific devices on the net- work.
- Page 706 Appendix DHCP Use the “dhcp” command to config- ure the DHCP settings. ❖ ❖ ❖ ❖ Reference The following command displays the current DHCP settings. msh> dhcp ❖ ❖ ❖ ❖ Configuration You can configure the DHCP set- tings. msh> dhcp interface_name [on|off] Note ❒...
- Page 707 Printer status The following command can be used to get information about the current printer status: msh> command Command Information that is dis- played status Status of printer. Information about print jobs. info Information about the paper tray, output tray, printer language of print- prnlog [ID] Lists the last 20 print jobs.
- Page 708 Appendix ❖ ❖ ❖ ❖ Display Shows SNMP information and available protocols. msh> snmp ? The following command displays the settings of registered number specified. msh> snmp [registered_number] Omitting the number displays all access settings. msh> snmp [-p] Note ❒ Add “-p” (as above) to have the in formation d is pla yed one screen at a time.
- Page 709 The following is a sample configu- r a t i o n u s i n g t h e r e g i s t r a tio n number 3 with the IP address 192.168.15.16: msh> snmp 3 ip 192.168.15.16 The following is a sample configu- r a t i o n u s i n g t h e r e g i s t r a tio n number 3 with the IPX address...
- Page 710 Appendix Example output: port 9100 timeout=300(sec) bidirect off • “Port” specifies the port number of the direct printing port. • The “bidirect” setting indicates whether the direct printing port is bidirectional or not. ❖ ❖ ❖ ❖ Setting timeout You can specify the timeout inter- val in use when receiving data from the network.
- Page 711 Use the “smb” command to configure or delete the NetBEUI settings such as the computer name or workgroup name. msh> smb parameter Parameter Settings comp Your computer name consist- ing of up to 15 characters group Workgroup name consisting of up to 15 characters comment Comment consisting of up to 31 characters...
- Page 712 Appendix SPRINT Use the “sprint” command to view and configure SCSI print (SBP-2) on IEEE 1394. Limitation ❒ You can use this function when the optional IEEE 1394 board is in- stalled. ❖ ❖ ❖ ❖ Viewing settings The following command displays the current IEEE 1394 (SCSI print) settings: msh>...
- Page 713 Parameter Value to be con- figured enc [on|off] You can enable or disable the WEP function. To enable the WEP function, select [on]; to disa- ble it, select [off]. To start the WEP function, enter the correct WEP key. key [key value] 64-bit or 128-bit can be set.
- Page 714 Appendix Note ❒ Enter the printer name using up to 15 characters. ❒ You cannot use a printer name starting with “RNP” or “rnp”. ❒ The Ethernet interface and IEEE 802.11b interface will have the same printer name. WINS Use the “wins” command to config- ure WINS server settings.
- Page 715 AutoNet Use the “autonet” command to con- figure AutoNet settings. ❖ ❖ ❖ ❖ Display The following command displays the current AutoNet settings. msh> autonet ❖ ❖ ❖ ❖ Configuration You can configure the AutoNet settings. msh> autonet interface_name [on|off] Note ❒...
- Page 716 Appendix Use the “dns” command to configure or display DNS (Domain Name Sys- tem) settings. ❖ ❖ ❖ ❖ View setting The following command displays current DNS settings: msh> dns ❖ ❖ ❖ ❖ Using the DNS server obtained from the DHCP server The following command ena- bles/disables use the DNS server...
- Page 717 - Setting Protocols The protocols described in this sec- tion provide various functions that can be used on the machine. Important ❒ If a protocol is disabled or inactive, functions provided by that proto- col cannot be used. Reference For more information about set- ting protocols, consult your net- work administrator.
- Page 718 Appendix ❖ ❖ ❖ ❖ RSH/RCP • Printer function using the com- mand line • Scanner function using the Net- work TWAIN Driver • Function to obtain device infor- mation using the command line ❖ ❖ ❖ ❖ DIPRINT • Printer function using SmartDe- viceMonitor for Client ❖...
-
Page 719: Using Dhcp
Using DHCP You can use the printer in a DHCP en- vironment. You can also register the printer NetBIOS name on a WINS server when it is running. If you connect an Ethernet interface and IEEE 1394 (IP over 1394) interface simultaneously, pay attention to the following: ❖... -
Page 720: Using Autonet
Appendix Note ❒ If a static address is not selected, or is set to 0.0.0.0, the interface using the address assigned by DHCP is used. Note ❒ Printers that register the printer NetBIOS name on a WINS server must be configured for the WINS server. -
Page 721: Snmp
SNMP The machine is equipped with an SNMP (Simple Network Management Proto- col) agent that operates under UDP and IPX on the Ethernet/wireless LAN in- terface, and UDP on the IEEE 1394 (IP over 1394) interface. Using the SNMP manager you can get information about the machine. The default community names are “public”... -
Page 722: Error Messages On The Display
Appendix Error Messages on the Display This section describes the most common network-related messages that appear on the display. If a message not described here appears, act according to that message. Messages without Code Numbers Reference Before turning the main power off, see “Turning On the Power”, Copy Refer- ence. -
Page 723: Messages With Code Numbers
Messages with Code Numbers Note ❒ A message reporting an error appears on the display as shown. Message Causes Cannot The DHCP server cannot be connect found. with DHCP server The same The specified IP address overlaps IP Ad- another IP address. dress al- ready exists... - Page 724 Appendix ❖ ❖ ❖ ❖ Code Numbers The problem interface is displayed. • 1XX: Ethernet • 2XX: IEEE 802.11b • 3XX: IEEE 1394 • 0XX: Independent of interface ❖ ❖ ❖ ❖ Order of priority of messages (when multiple errors occur) Order of interface priority •...
-
Page 725: Understanding Displayed Information
Understanding Displayed Information This section describes how to read the status information returned by the net- work interface board. Print Job Information Print job status can be viewed using the following commands: • telnet : Use the “status” command. See p.85 “Printer status”. Item name Rank Print job status:... -
Page 726: Machine Status And Configuration
Appendix Machine Status and Configuration You can check the machine status and configuration using telnet or UNIX. ❖ ❖ ❖ ❖ telnet Use the “info” or “status” command. ❖ ❖ ❖ ❖ UNIX Use the “lpr” or “lpstat” command, or “stat”, “info” parameter of rsh, rcp, or ftp. Machine status Status Call Service Center... - Page 727 Status Malfunction: Tray 2 Malfunction: Tray 3 Malfunction: Tray 4 Mismatch: Paper Size Mismatch: Paper Size and Type Mismatch: Paper Type No Paper: Selected Tray Not Detected: Selected Tray Paper Misfeed: Duplex Unit Paper Misfeed: Input Tray Paper Misfeed: Internal Path Paper Misfeed: Internal Tray 2 Printing Ready...
- Page 728 Appendix Machine configuration Note ❒ “*” (asterisk) is displayed with the current setting. ❒ Regarding *1-*5, see table below. Item Input Tray Name Paper Size Status Output Tray Name Status ❖ ❖ ❖ ❖ *1 Input Tray: Name Name Tray X Bypass Tray ❖...
- Page 729 Paper size × 11 11 × 8 × 8 × 5 Custom Size × 7 × 10 × 13 × 13 8 × 13 8K (267 × 390) 16K (195 × 267) 16K (267 × 195) ❖ ❖ ❖ ❖ *3 Input Tray: Status Status Normal Not Detected...
-
Page 730: Configuring The Network Interface Board
Appendix Configuring the Network Interface Board The network interface board settings can be displayed using the commands be- low. • telnet : Use the “show” command. See p.85 “Network interface board config- uration settings information”. Item name Common Mode Protocol Up/Down AppleTalk TCP/IP NetWare... - Page 731 Item name TCP/IP Mode telnet diprint http ftpc snmp autonet EncapType DHCP Address Netmask Broadcast Gateway AccessRange[✩] Time server Time Zone Time server polling time SYSLOG server Home page URL Home page link name Help page URL SNMP protocol Understanding Displayed Information Meaning “Up”...
- Page 732 Appendix Item name NetWare EncapType RPRINTER number Print server name File server name Context name Switch Mode NDS/Bindery Packet negotiation Login Mode Print job timeout Protocol SAP interval time NDS Tree Name Switch Mode Direct print Notification Workgroup name Computer name Comment Share name[1] Protocol...
- Page 733 Item name IEEE 802.11b Device name DHCP Address Netmask Broadcast SSID Channel range Channel Communication mode Authentication Tx Rate WEP encryption Encryption key IP over 1394 Device name DHCP Address Netmask Broadcast SCSI print Bidi. Server[✩] use DHCP parameters Domain name ether ip1394 wlan...
- Page 734 Appendix Item name WINS ether Primary WINS Secondary WINS ip 1394 Primary WINS Secondary WINS wlan Primary WINS Secondary WINS Shell mode You can display these item names when installing the optional 1394 interface board. ✩ represents a target number between 1 and 5. You can display these item names when installing the optional 802.11b interface unit.
-
Page 735: Message List
Message List This is a list of messages written to the machine's system log. The system log can be viewed using the “syslog” command. System Log Information You can use the following methods to view the system log: • telnet : Use the “syslog” command. See p.85 “System log information”. Message Access to NetWare server <file server name>... - Page 736 Appendix Message Cannot find rprinter (<print server name>/ <printer number>) Change IP address from DHCP Server. child process exec error! (process name) Connected DHCP Server (<DHCP server ad- dress>). connection from <IP address> Could not attach to PServer <print server name>...
- Page 737 Message Frametype =<frame type name> httpd start. IEEE 802.11b <Transmission mode> mode IEEE 802.11b current channel <Channel> IEEE 802.11b Card Firmware REV. <Version> IEEE 802.11b MAC Address = <MAC Ad- dress> IEEE 802.11b SSID <ssid> (AP MAC Address < MAC Address>) Causes and solutions The <frame type name>...
- Page 738 Appendix Message IEEE 802.11b TX Rate <Transfer Speed> inetd start. <interface> started with IP: <IP address> <Interface>: Subnet overlap. IPP cancel-job: permission denied. ipp disable. ipp enable. IPP job canceled. jobid=%d. job canceled. jobid=%d. LeaseTime=<lease time>(sec), RenewTime= <renew time>(sec). Login to fileserver <file server name> (<IPX|IP>,<NDS|BINDERY>) multid start.
- Page 739 Message NetBEUI Computer Name =<computer name> The NetBEUI Computer Name is defined as nmsd start. (NetBEUI) nprinter start. (NetWare) nwstart start. (NetWare) Open log file <file name> papd start. (Apple Talk) permission denied. phy release file open failed. Print queue <print queue name> cannot be serviced by printer 0, <print server name>...
- Page 740 Appendix Message session<community name> not defined. session_ipx<community name> not defined. Set context to <NDS context name> shutdown signal received. network service re- booting... smbd start. (NetBEUI) Snmp over ip is ready. Snmp over IP over 1394 is ready. Snmp over ipx is ready. snmpd start.
- Page 741 Message SMTPC: no smtp server. connection close. SMTPC: failed to connect smtp server. SMTPC: username or password wasn’t correct. Failed to connect the SMTP server. This could WINS name registration: No response to serv- er (WINS server address) WINS name registration/refresh error code (error code) WINS wrong scopeID write error occurred.
-
Page 742: Limitation
Appendix When Using Windows Terminal Service/MetaFrame Operating Environment The following combinations of oper- ating system and MetaFrame are sup- ported: ❖ ❖ ❖ ❖ Windows NT Server 4.0 Terminal Server Edition • MetaFrame 1.8 SP3/FR1 SP3 • MetaFrame XP 1.0 SP1/SP2/FR1 ❖... - Page 743 • When printing a large number of bitmap images or using the server in a WAN environment over dial-up lines such as ISDN, depending on the data rate, printing may be disabled or er- rors may occur. • When using MetaFrame XP 1.0 or later versions, we recom- mend configuring [Client Printer bandwidth] available from [Citrix...
-
Page 744: Precautions
Appendix Precautions Please pay attention to the following when using the network interface board. When configuration is neces- sary, follow the appropriate proce- dures below. Connecting a Dial-Up Router to a Network When using NetWare (file server) If the NetWare file server and printer are on opposite sides of a router, packets are sent back and forth con- tinuously, possibly incurring com-... - Page 745 When Using Network Utility If the machine is connected to a net- work, observe the following points when setting up the machine or changing settings: For more details, see the operating in- structions and Help for ScanRouter V2 Lite/Professional and DeskTop- Binder V2 Lite/Professional.
-
Page 746: Netware Printing
Appendix NetWare Printing Form feed You should not configure form feed on NetWare. Form feed is controlled by the printer driver on Windows. If NetWare form feed is configured, the printer might not work properly. If you want to change form feed set- tings, always configure them using Windows. -
Page 747: When The Ieee 80211.B Interface Unit (Optional) Is Installed
• If a print job sent from SmartDe- viceMonitor for Client is interrupt- ed and the network printer cancels the job because something went wrong, send the print job again. • Print jobs sent from another com- puter do not appear in the print queue window, regardless of pro- tocol. -
Page 748: Specifications
Appendix Specifications Interface Frame type Protocol SNMP The 1394 interface board supports only TCP/IP. Use the SmartDeviceMonitor for Client port. To use IPP under Windows XP or Windows Server 2003, use the Standard IPP port. Note, in SmartDeviceMonitor for Client however, this port does not support digest access authentication. - Page 749 INDEX Access Control , 83 access type , 86 AutoNet , 93 , 98 Bidirectional SCSI print , 28 Broadcast address , 83 Channel , 29 Communication Mode , 29 Communication Speed , 29 community name , 86 configuration access type , 86 community name , 86 Network Interface Board configuration , 108 Web Browser , 73...
- Page 750 remote maintenance telnet , 81 Return to Defaults , 29 ROUTE , 89 SCSI print (SBP-2) , 28 SLP , 89 SmartDeviceMonitor for Client , 124 SMB , 89 SMTP Server , 30 SNMP , 85 , 99 specifications , 126 SPRINT , 90 SSID Setting , 29 subnet mask , 83...
- Page 751 Copyright © 2003...
- Page 752 GB GB EN USA B622-8535...
- Page 753 PostScript3 Unit Type 2018 Operating Instructions Supplement...
- Page 754 Introduction This manual describes detailed instructions on the operation and notes about the use of this machine. To get maximum versatility from this machine all operators are requested to read this manual carefully and follow the instructions. Please keep this manual in a handy place near the machine. Important Contents of this manual are subject to change without prior notice.
- Page 755 TABLE OF CONTENTS How to Read This Manual ...1 1. PostScript 3 Installable Options... 3 Setting Up Options ... 3 Printing a Document...5 Toner Saving, Edge Smoothing ... 8 Printer Utility for Mac... 10 Installing Printer Utility for Mac... 10 Starting Printer Utility for Mac ...
-
Page 757: How To Read This Manual
How to Read This Manual Symbols In this manual, the following symbols are used: R WARNING: This symbol indicates a potentially hazardous situation which, if instructions are not followed, could result in death or serious injury. R CAUTION: This symbol indicates a potentially hazardous situation which, if instructions are not followed, may result in minor or moderate injury, or damage to proper- * The statements above are notes for your safety. -
Page 759: Postscript
Installable Options The following options are available: ❖ ❖ ❖ ❖ Input Paper Device • Lower Paper Trays ❖ ❖ ❖ ❖ Output Paper Device • Internal Tray 2 Setting Up Options To use installed options correctly, first set up the printer driver. If the options are not recognized, you cannot use them, even though they are physically installed. - Page 760 PostScript 3 ❖ ❖ ❖ ❖ Mac OS You can set up all options using the [Chooser] dialog box. Limitation ❒ Under Mac OS X, this function is not available.
-
Page 761: Printing A Document
Printing a Document This section describes how to print documents from an application. Note ❒ The Mac OS X referred to in this section is Mac OS 10.1. ❖ ❖ ❖ ❖ Paper Source The following table shows where you can select this function. Windows 95/98/Me Windows 2000/XP Windows NT 4.0... - Page 762 PostScript 3 ❖ ❖ ❖ ❖ Duplex Printing Use this function to select duplex printing. Limitation ❒ This function is available on Type 3 machines only. Check your machine type. The following table shows where you can select this function. Windows 95/98/Me Windows 2000/XP Windows NT 4.0...
- Page 763 ❖ ❖ ❖ ❖ Edge Smoothing Use this function to improve the print quality of text. Indentations in curved lines are automatically smoothed producing a cleaner appearance. Limitation ❒ When [Edge Smoothing] is selected, [Toner Saving] is disabled. ❒ This function is for improving the quality of printed text, so set it to OFF when printing pictures and half tone data.
-
Page 764: Toner Saving, Edge Smoothing
PostScript 3 Toner Saving, Edge Smoothing Follow the procedure below to print documents using Toner Saving or Edge Smoothing. Windows 95/98/Me A A A A From an application, click [Print] on the [File] menu. The [Print] dialog box appears. B B B B Select the printer, and then click [Properties]. - Page 765 D D D D Click [Print Mode] to select the function you want to use. E E E E Click [OK] to close the [Advanced Options] dialog box. F F F F After making the necessary settings, click [OK] to close the [Printing Preferenc- es] dialog box.
-
Page 766: Printer Utility For Mac
PostScript 3 Printer Utility for Mac By using Printer Utility for Mac, you can download fonts, change the printer name, and so on. Limitation ❒ If the Macintosh and printer are connected by USB, you cannot use Printer Utility for Mac. Note ❒... -
Page 767: Starting Printer Utility For Mac
Starting Printer Utility for Mac This describes how to start Printer Utility for Mac. Mac OS Important ❒ Before starting Printer Utility for Mac, make sure the printer is selected in [Chooser] on the Apple menu. A A A A Double-click the Printer Utility for Mac icon. -
Page 768: Printer Utility For Mac Functions
PostScript 3 Printer Utility for Mac Functions Printer Utility for Mac functions are described below. ❖ ❖ ❖ ❖ Apple menu (Mac OS), Printer Utility for Mac menu (Mac OS X) • [About Printer Utility for Mac...] • [Choose Printer...] (Mac OS X) Displays the [Choose target printer] dialog box. -
Page 769: Downloading Ps Fonts
Downloading PS Fonts You can download the PS fonts to the machine memory. Important ❒ The following download procedure assumes you are a system administrator. If you are not, consult your system administrator. ❒ Resetting the machine deletes the fonts. ❒... -
Page 770: Deleting Fonts
PostScript 3 Deleting Fonts You can delete fonts from machine memory. A A A A On the [File] menu, click [Display Printer's Fonts...]. The dialog box appears. B B B B Select the fonts you want to delete. Limitation ❒ You cannot delete fonts that appear in italics. C C C C Click [Delete]. -
Page 771: Printing Font Samples
Printing Font Samples You can print samples of fonts that have been downloaded into the memory. Limitation ❒ Under Mac OS X, this function is not available. Note ❒ The paper selected under [Page Setup] is used. A A A A On the [File] menu, click [Print Fonts Sample...]. -
Page 772: Restarting The Machine
PostScript 3 Mac OS X A On the [Printer Utility for Mac] menu, click [Choose Printer...]. B In the [Available Network Zones:] list, click the zone for the Macintosh in use. C In the [Available Printers:] list, select the printer whose name you changed B B B B in step , and then click [Choose]. -
Page 773: Selecting The Zone
Selecting the Zone You can change the zone the machine belongs to under Appletalk. Important ❒ Make sure the machine and Macintosh are connected in the Appletalk envi- ronment. A A A A On the [Utility] menu, click [Select Zone...]. The zone the printer belongs to and the available zone list appear. -
Page 774: Launching The Dialog Console
PostScript 3 Launching the Dialog Console You can create and edit PostScript files for printing and downloading to the ma- chine. Important ❒ Because the “Launch Dialogue Console” is recommended for users who have a firm grasp of PostScript, you are advised to take extreme care when using it. ❒... - Page 775 INDEX Collate , 6 Deleting Fonts , 14 Destination Tray , 5 Displaying Fonts , 13 Displaying the Machine Status , 17 Downloading PostScript Files , 16 Downloading PS Fonts , 13 Duplex Printing , 6 Edge Smoothing , 7 Installing Printer Utility for Mac , 10 Launching the Dialog Console , 18 Page Setup , 14...
- Page 776 B622-8569...
- Page 777 Copyright © 2003...
- Page 778 GB GB EN USA B622-8569...
- Page 779 UNIX Supplement...
- Page 780 Introduction This manual describes detailed instructions on the operation and notes about the use of this machine. To get maximum versatility from this machine all operators are requested to read this manual carefully and follow the instructions. Please keep this manual in a handy place near the machine. Important Contents of this manual are subject to change without prior notice.
- Page 781 TABLE OF CONTENTS How to Read This Manual ...1 1. UNIX Configuration Before Setup...3 Using the “lp”/“lpr” commands... 3 Using the “rsh”/“rcp”/“ftp” commands ... 3 Using the Installation Shell Script...4 Assigning the IP Address ... 4 Executing the Installation Shell Script ... 5 After Executing the Installation Shell Script ...
-
Page 783: How To Read This Manual
How to Read This Manual Symbols In this manual, the following symbols are used: R WARNING: This symbol indicates a potentially hazardous situation which, if instructions are not followed, could result in death or serious injury. R CAUTION: This symbol indicates a potentially hazardous situation which, if instructions are not followed, may result in minor or moderate injury, or damage to proper- * The statements above are notes for your safety. -
Page 785: Unix Configuration
1. UNIX Configuration This section explains how to set up a network printer and check print status us- ing UNIX. Limitation ❒ To print from a UNIX workstation, use a file that the printer supports. Before Setup Setup varies depending on the printing commands. Be sure to make settings ac- cordingly. - Page 786 UNIX Configuration Using the Installation Shell Script The installation shell script helps the setup process. The installation shell script automates some of the tasks in configuring /etc/hosts, /etc/printcap; creating the spool directory for BSD UNIX; and running the “lpadmin” command for System V UNIX.
-
Page 787: Using The Installation Shell Script
A A A A Enter the following: # ping 192.168.15.16 If the address is configured correctly, the following message appears: 192.168.15.16 is alive If the address is configured incorrectly, the following message appears: no answer from 192.168.15.16 Note ❒ When you use NIS, the IP address and host name are written to /etc/hosts on the master server. - Page 788 ❒ Insert a period and slash before the current directory. D D D D Enter a number to select the workstation operating system you are using. Network printer install shell Copyright RICOH CO.,LTD. 1994-2002 Select your workstation OS type 1.SunOS 4.x.x 2.Solaris 2.x, Solaris 7-8 (SunOS5.x) 3.HP-UX...
- Page 789 Note ❒ The IP address will be added to the /etc/hosts file. ❒ If the host name of the printer has already been configured, press the { { { { RE- TURN} } } } ({ { { { ENTER} } } } ) key. Nothing will be added to the /etc/hosts file. F F F F Enter the printer's host name.
- Page 790 UNIX Configuration I I I I Do a test print to make sure that the settings are correct. # lpr -Pnp file_name # lp -dnp file_name Reference For more information about the “lpr” and “lp” commands, see p.14 “Print- ing Methods”. Deleting the printer To print using the “lp”...
-
Page 791: After Executing The Installation Shell Script
After Executing the Installation Shell Script The printing environment is automatically set up when the installation shell script is executed. This section describes setup contents when the installation shell script is execut- ed under Red Hat Linux, Solaris, and HP-UX. Linux ❖... - Page 792 UNIX Configuration ❒ Each entry is separated into several fields by colons. Each entry begins with a colon, followed by the entry, and then ends with a colon, a back slash, and finally a return. ❒ The first line of the field is the name of the printer. Use this name when log- ging on to a network printer from a workstation.
- Page 793 ❖ ❖ ❖ ❖ Making the log file Error messages are logged to a file created in the /var/log directory. The log file name is the printer name followed by “d-errs”. Note ❒ The log file is used for logging errors or warning messages by the UNIX workstation.
- Page 794 UNIX Configuration Register the printer as a remote printer. # lpadmin -p np -s nphost!option -T dump -I any • “np” is the printer name. “nphost” is the host name. For more informa- tion about “option”, see p.19 “Specifying the Device Option”. “lp”...
- Page 795 Set the printer so the print job is put in the print queue. /usr/lib/accept np Set the printer to perform the print job. /usr/lib/enable np Restart the scheduler. /usr/lib/lpsched Using the Installation Shell Script...
-
Page 796: Printing Methods
UNIX Configuration Printing Methods Printing with “lpr” and “lp” Execute one of the following commands according to type of workstation used: ❖ ❖ ❖ ❖ BSD UNIX workstation, Linux % lpr -Pprinter_name file_name [file_name...] For example: (printer name: “np”; file names: “file1” and “file2”) % lpr -Pnp file1 file2 ❖... - Page 797 % rsh host_name print < file_name For example: (host name: “nphost”; file name: “file1”) % rsh nphost print < file1 Note ❒ “host_name” is the name entered when executing the installation shell script. ❒ If you are using HP-UX, use the “remsh” command instead of “rsh”. ❖...
- Page 798 UNIX Configuration Note ❒ You can use wild cards (“*” or “?”) for the file name with the “mput” com- mand. The following procedure shows an example of how to print a file using the “ftp” command. A A A A Start ftp using the IP address or host name of the printer.
-
Page 799: Printer Status
Printer Status You can use the following commands to have information and printer status dis- played or copied to a file. Use the “lpq” or “lpstat” command to display printer status, or information about print jobs. Use the “rsh”, “rcp”, or “ftp” commands to get more detailed information from the printer. -
Page 800: Copying Information To A File
UNIX Configuration Note ❒ Leave the user name and password field blank and press the { { { { RETURN} } } } ({ { { { EN- TER} } } } ) key. ❒ “-” indicates standard output. It will be displayed on screen if standard out- put has not been specified. -
Page 801: Specifying The Device Option
Specifying the Device Option With the following options, you can print with specific printer functions. Configuring the Device Option The configuration of the print option varies, depending on printing commands. • rsh % rsh host_name print option1=value1,… < file_name • rcp % rcp file_name host_name:option1=value1,…... - Page 802 UNIX Configuration Limitation ❒ The optional character strings the printer can recognize contain a maximum of 256 bytes. ❒ The number of available characters used as options is limited, depending on operating systems. - Using the “cd” command with ftp For printing with ftp, if the option is specified using the “cd”...
-
Page 803: Printer Language
Device option resolution symbol set Printer Language Specify a printer language to print in. filetype=printer language fil=printer language Printer language PCL 5e PostScript 3 The following sample shows how to print with PostScript 3 (host name: “nphost”; file name: “file1”): •... -
Page 804: Input Tray
UNIX Configuration Input Tray Specify a default input tray. Limitation ❒ Only installed input trays are available. ❒ Before printing a PostScript 3 or PCL 5e file, the input tray option must be set to on. tray=value of input tray Input tray Tray 1 Tray 2... - Page 805 Paper size 11 × 17 × 11 × 8 × 14 × 10 8 × 13 × 13 × 13 MONARCH COM10 Custom size The following sample shows how to print using A4 paper (host name: “nphost”; file name: “file1”): •...
-
Page 806: Paper Type
UNIX Configuration Paper Type Specify the paper type. Limitation ❒ This function is available only for PostScript 3 or PCL 5e. ❒ Only the loaded paper types are available. mediatype=value of paper type Paper type Plain paper Letterhead Labels OHP transparency Recycled paper Color paper Special paper... -
Page 807: Output Tray
Output Tray Specify the output tray. outbin=value of output tray Limitation ❒ Only installed output trays are available. Output tray Internal tray 1 Internal tray 2 The following sample shows how to print from internal tray 1 (host name: “nphost”; file name: “file1”): •... -
Page 808: Collating
UNIX Configuration Collating Specify the number of collated sets. qty=number of collated sets (1 to 999) Limitation ❒ This function is available only for PostScript 3 or PCL 5e. ❒ Do not specify “qty” and “copies” commands at the same time. The following sample shows how to print 10 copies using the collate function (host name: “nphost”;... -
Page 809: Binding
• ftp ftp> put file1 duplex=on,binding=longedge Binding Specify the binding side for duplex printing. Limitation ❒ This function is available on Type 3 machines only. Check your machine type. Note ❒ Before specifying the binding option, the duplex option must be set to on. ❒... -
Page 810: Symbol Set
UNIX Configuration • rcp % rcp file1 nphost:orientation=portrait • ftp ftp> put file1 orientation=portrait Resolution Specify the printing resolution. resolution=value of resolution Resolution 300 dpi 600 dpi The following sample shows how to print with 600 dpi and better quality. (host name: “nphost”;... - Page 811 Font ISO 69 ISO L1 ISO L2 ISO L5 Legal Math-8 MS Publ PC-8 PC-850 PC-852 PC-8 D/N PC8-TK Pifont PS Math PS Text Roman-8 VN Intl VN Math VN US Win 3.0 Win L1 Win L2 Win L5 The following sample shows how to print using the ISO 4 character set (host name: “nphost”;...
- Page 812 INDEX Binding Option , 27 BSD UNIX workstation Deleting the printer , 8 Printer Status , 17 Printing Method , 14 Collating Option , 26 configuration UNIX , 3 Copies Option , 25 Deleting the printer , 8 Device Option , 19 Duplex Printing Option , 26 Printing , 15...
- Page 813 Copyright © 2003...
- Page 814 GB GB EN USA...