Table of Contents
Advertisement
Contens
Overview ............................................................................ 4
Use ....................................................................................... 5
Scope of delivery/device parts ......................................... 6
Preface ................................................................................ 9
General ..............................................................................10
Read and keep instructions ................................................ 10
Explanation of symbols ........................................................ 10
Quick start instructions for Windows ............................... 12
Quick Start Instructions for MAC OS .................................16
Quick Start Guide using App .............................................23
Safety .................................................................................26
Correct use ............................................................................. 26
Safety information ................................................................ 26
Start .................................................................................. 30
Content of box ........................................................................30
Preparing the IP security camera .......................................30
Assembling the security camera .........................................31
Installing the IP security camera ........................................ 33
Install Cloud supra space: ....................................................36
Call up Cloud supra space ....................................................40
Use camera through supra space .......................................41
Use app Maginon IPC Viewer ..............................................42
Installation on Mac OS X. ......................................................43
Use ..................................................................................... 48
Using with computer ............................................................48
Alignment of camera head ..................................................50
Save items ............................................................................... 52
Setting the camera image ...................................................53
Settings ............................................................................. 55
Setting the device status .....................................................55
Setting up camera name .....................................................56
Setting current date and time............................................. 57
AFTER SALES SUPPORT
1 800 623 432
AUS
AUS
Contens
7
Advertisement
Table of Contents

Related Manuals for MAGINON IPC-100AC


Summary of Contents for MAGINON IPC-100AC
-
Page 1: Table Of Contents
Installing the IP security camera ........33 Install Cloud supra space: ............36 Call up Cloud supra space ............40 Use camera through supra space ........41 Use app Maginon IPC Viewer ..........42 Installation on Mac OS X............43 Use ..................48 Using with computer ............48 Alignment of camera head ..........50... - Page 2 Contens Setting up/setting the user account .........58 Changing the network settings ..........60 Wireless settings ..............62 UPNP settings .................65 DDNS Settings ................66 Mail settings ................66 FTP settings ................68 Alarm settings ................70 Head adjustments ..............73 Resetting the IP security camera ........74 Restarting the IP security camera ........
-
Page 3: Preface
Preface Preface Dear customer, Congratulations on purchasing a high quality MAGINON product. You have chosen a modern IP Security Camera with excellent technical equipment and respective accessory, which is particularly easy to operate. The device comes with a 3 year warranty. In case of a defect in the IP Security Camera , you require the enclosed warranty card and proof of purchase. -
Page 4: General
General General Read and keep instructions This Operating Instruction belong to this IP Security Camera. It contains important information about the start up and handling. For ease of understanding, the “IP Security Camera” is just referred to as Security Camera in these Operating Instructions. - Page 5 General WARNING! These signal words indicate a medium level hazard which could cause death or serious injury if not avoided. CAUTION! These signal words indicate a medium level hazard which could cause death or serious injury if not avoided. NOTE! This signal word warns against potential material damage or provides useful additional information regards assembly or operation.
-
Page 6: Quick Start Instructions For Windows
Quick start instructions for Windows Quick start instructions for Windows 1. Hardware installation • Connect the IP security camera to your router. Either using supplied network cable or via WLAN. To connect the security camera using WLAN read instructions on page 33. •... - Page 7 Quick start instructions for Windows 2. Software installation • Install “Supra IPCam“ software on your computer using the supplied CD. 3. Configuring the IP security camera • In the program supra IPCam Config, click on “Start search“. After the camera has been found and is highlighted, check whether a new update exists for the camera.
- Page 8 Quick start instructions for Windows 4. Implement Setup assistant • Select the second menu point “Installation with supra space” from Setup assistant. 5. Activate the IP security camera • Enter www.supra-space.de in your Browser and log in. info@supra-electronics.com 1 800 623 432...
- Page 9 Quick start instructions for Windows 6. Download Smartphone app • Use App Store or Google play to download the app “Maginon IPC-Viewer“ for your Smartphone or your Tablet PC and install app. 7. Setting up IP security camera in app •...
-
Page 10: Quick Start Instructions For Mac Os
Quick Start Instructions for MAC OS Quick Start Instructions for MAC OS 1. Hardware installation • Connect the IP security camera to your router. Either using supplied network cable or via WLAN. To connect the security camera using WLAN read instructions on page 33. •... - Page 11 Quick Start Instructions for MAC OS 2. Determine IP address of your router • First you require the local IP address of your router. In order to determine the IP address of the router on your Mac computer, click on menu bar .
- Page 12 Quick Start Instructions for MAC OS Note down this local IP address. 3. Determine IP address of security camera • Open Internet Browser “Safari“ and enter the previously determined IP address of the router. • The configuration page of the router opens. info@supra-electronics.com 1 800 623 432...
- Page 13 Quick Start Instructions for MAC OS • Log on to the router. The log-on information can be found in the Operating Instructions of your router. • Look through the settings for an option with the name “DHCP table“ or “DHCP reservation”. All devices connected to the router are listed here.
- Page 14 Quick Start Instructions for MAC OS 4. Set up supra space Open “Safari“ Internet browser and enter the determined IP address of the camera. The configuration page of the camera opens. Log on with user name “admin” and without a password. Select “settings”.
- Page 15 • Enter www.supra-space.de in your Browser and log in. 6. Download Smartphone app • Use App Store or Google play to download the app “Maginon IPC-Viewer“ for your Smartphone or your Tablet PC and install app. AFTER SALES SUPPORT 1 800 623 432...
- Page 16 Quick Start Instructions for MAC OS 7. Setting up IP security camera in app • Use symbol to log onto supra space. Use the log-on information used in the Setup Assistant. • After logging on, the camera is immediately available from a list under the chosen camera name.
-
Page 17: Quick Start Guide Using App
Quick Start Guide using App Quick Start Guide using 1. Hardware installation • Connect the IP security camera to your router. Either using supplied network cable or via WLAN. To connect the security camera using WLAN read instructions on page 33. •... - Page 18 Quick Start Guide using App 2. Download Smartphone app • Use App Store or Google play to download the app “Maginon IPC-Viewer“ for your Smartphone or your Tablet PC and install app. 3. Setting up security camera in app Select (+) symbol to start the set-up of the security camera.
- Page 19 Quick Start Guide using App Click on “Save” to complete set up. Once the camera has been configured, wait two minutes until the camera has restarted. The security camera is the ready for use. AFTER SALES SUPPORT 1 800 623 432...
-
Page 20: Safety
Safety Safety Correct use The Security Camera is solely designed to be used as a Security Camera. It is only suitable for private and not for commercial use. Only use Security Camera as described in the operating instructions. Any other use is deemed to be incorrect and can cause material damage and loss of data. - Page 21 Safety − Do not open housing but have repair carried out by an expert. Contact a specialist workshop. All liability and warranty claims shall be void in case of repairs carried out by users, incorrect connection or improper use. − The Security Camera may not be operated with an external timer or separate remote control system.
- Page 22 Safety WARNING! Hazard or children and persons with reduced physical, sensory or mental abilities (such as partially disabled, older persons with limited physical and mental abilities) or lack of experience and know-how (such as older children). − This IP security camera may be used by persons with reduced physical, sensory or mental abilities or lack of experience or know-how provided they are supervised or have been instructed on how to safely use the IP security...
- Page 23 Safety − Place IP security camera on an easily accessible, level, dry, heat-resistant and sufficiently sturdy work surface. Do not place IP security camera at the edge or periphery of the work surface. − Avoid overheating by never positioning the IP security camera directly against a wall or underneath mounted cupboards.
-
Page 24: Start
Start Start Content of box WARNING! Caution! Keep plastic foil and bags away from babies and small children as danger of suffocation. Note! Danger of damage! If the packaging is carelessly opened with a sharp knife or other pointed objects, the product can be easily damaged. −... -
Page 25: Assembling The Security Camera
Start Assembling the security camera Using the supplied wall fixing, install IP security camera at a fixed location. NOTE! Material damage! Incorrect use of the security camera during assembly can cause the security camera to be damaged. − Do not place the IP security camera directly next to electronic devices as this could produce interference. - Page 26 Start Secure IP security camera Place the stand thread of the security camera on the holding plate of the wall mount and secure the camera by tightening the stand bolt. Next, align the camera to the desired position, using the screw thread. Complete camera assembly Connect security camera to the power supply and plug power supply into mains socket.
-
Page 27: Installing The Ip Security Camera
Start Installing the IP security camera Hardware installation In order to carry out the first settings in the IP security camera, the network cable must be connected to the router. A wireless connection via WLAN is only available once this has been set up in the IP security camera using the cable connection. -
Page 28: System Requirements
Start For this purpose deactivate all networks existing on your computer and plug the network cable of the IP security camera directly into the computer. You can also access the IP security camera via the program supra IPCam Config (see section Software installation). - Page 29 2. The below selection menu should then appear automatically. If the menu does not start automatically, select drives from your computer and open the CD/DVD drive named “Maginon IP Camera” by clicking on it with the mouse. 3. Start program by double clicking on CDMenu/CDMenu.exe.
-
Page 30: Install Cloud Supra Space
(computer, mobile, TabletPC) Only the connecting data required for the camera are stored at supra space but not camera images. Below, the few steps for setting up your Maginon IPC-100AC for use via the Cloud are explained. info@supra-electronics.com... - Page 31 Select “Setup” option for further set- up of the camera. 2. Select “Maginon IPC-100AC“ as camera model and click on “OK”. This calls up the existing settings of the camera. 3. In order to set up the camera for use via supra space select the third option “Camera with supra space during the next step...
- Page 32 Start 5. In the next step select Wireless network and set region to “Europe” and enter the key. 6. Now enter the registration data for logging on to supra space. Select any user name and a password consisting of at least 8 characters.
- Page 33 Start AFTER SALES SUPPORT 1 800 623 432...
-
Page 34: Call Up Cloud Supra Space
Start Call up Cloud supra space Entering link http://supra-space.de or http://supra-space.com in your Browser open the start page of the Cloud. Enter user name specified in the Set-up assistant. The overview now lists all products of your IP camera. Select these to call up your camera. -
Page 35: Use Camera Through Supra Space
Maginon IPC-100AC. Using call up the Web surface of your camera. Log on with user name “admin” and without a password. You then have access to all settings of your Maginon IPC-100AC. AFTER SALES SUPPORT 1 800 623 432... -
Page 36: Use App Maginon Ipc Viewer
Start Use app Maginon IPC Viewer The app “Maginon IPC Viewer“ is available for your camera from the App Store and from Google Play. Load the App onto a Smartphone or a TabletPC and start App. Use symbol to log onto supra space. Use the log-on information used in the Setup Assistant. -
Page 37: Installation On Mac Os X
Next, you require the IP address of the IP security camera from the settings data of the router. The configuration page of the IPC-100AC can be opened with this address and settings of the security camera can be entered. Determine IP address of your router 1. - Page 38 Start 4. Change to page “TCP/IP“ ,where you find the IP address of your router under “Router”. The address in the below example is 192.168.16.1. info@supra-electronics.com 1 800 623 432...
- Page 39 Start Determine IP address of the security camera Open Internet Browser “Safari“ and enter the previously determined IP address of the router. The configuration page of the router opens. Generally an option “DHCP table“ or “DHCP reservation“, can be found under Settings, which can be called up.
- Page 40 Start In this list, the IP security camera can be found under the name “ipcam_xxx“ . In the above example this would be “ipcam_006E060241B6“. Next to it is the local IP address of the IP security camera (here: 192.168.1.113). Enter it in a new window of the Browser (Safari) in order to open the configuration page of the IP security camera.
- Page 41 Start 6. Deactivate “DHCP“ and enter under “Static configuration“: • IP address: 169.254.10.100; Subnet mask: 255.255.0.0 • “Standard gateway“ and “DNS Server“ remain empty 7. Click on “Apply” and wait until the program shows the IP security camera. The wireless connection between the IP security camera and the router is not working.
-
Page 42: Use
Using with computer Activate IP security camera 1. First open your Browser program (Internet Explorer, Firefox, Opera, Google Chrome, Safari or similar). Next to it is the local IP address of the IP security camera. If you wish to access the IP security camera from a computer in the same network, you can also enter the local network address at this point. - Page 43 Control IP security camera Various elements and options are available for controlling the IP security camera. The control elements for directly controlling the alignment of the camera head and some basic camera settings are shown below the camera image. The operating elements available and settings that can be changed depend on the authority of the user account.
-
Page 44: Alignment Of Camera Head
As anAdministrator you have access to all control elements and settings. As anOperatoryou can control the alignment of the camera head but cannot change any settings. As a User you can only bring up the camera image but cannot operate the controls or change any settings. Alignment of camera head Directional arrows Horizontal patrolling... - Page 45 By pushing the middle “Calibrate” button, the camera button is re-aligned. For this purpose click on the button once and keep mouse pointer on button until camera head no longer moves. As soon as the security camera is connected to power, a calibration is automatically carried out.
-
Page 46: Save Items
Save items In section “Items“ up to three fixed positions of the camera head can be stored so that they can be called up at a later stage. Click on 1, 2 or 3 , in order to safe the camera position under this number. -
Page 47: Setting The Camera Image
Setting the camera image Under View enter the settings for the camera image. • Resolution:This allows you to select whether the image of the IP security camera is shown in a resolution of 640 x 480 pixels or 320 x 240 pixel. •... - Page 48 This can installed from: http://get.adobe.com/go/getflashplayer/. Horizontal and vertical mirroring of the camera image can, for instance be used when the IP security camera is ceiling mounted. info@supra-electronics.com 1 800 623 432...
-
Page 49: Settings
Settings Settings The below sections provide an overview of all possible options of the IP security camera. In case of problems during the installation or use or changing of the settings of the IP security camera, these sections contain information outlining the available options. -
Page 50: Setting Up Camera Name
Settings Setting up camera name You can assign a name to the IP security camera in order to for instance make it easier to find in the network or to allow a clear assignment where several IP security cameras are used. Select 2nd symbol “Camera name”... -
Page 51: Setting Current Date And Time
Settings Setting current date and time Set the time zone of the IP security camera and whether date and time should be automatically updated via a so-called NTP server (Time server). The correct time is, for instance, required for planning alarms or FTP transfers. 3. -
Page 52: Setting Up/Setting The User Account
Settings 6. NTP Server: Select the NTP Server via which the date and time are to be updated from the specified list. You can also enter NTP servers by name or IP address that are not listed. 7. Click on “Apply“, to accept the changed settings. The changes are saved without having to restart the IP security camera. - Page 53 Settings The following authorizations are available for a user account: 1. Visitor:Visitors can only call up the camera image but can not change any settings. 2. Operator: The user can call up the camera image and change the position of the security camera. The settings cannot be changed.
-
Page 54: Changing The Network Settings
Settings Changing the network settings In order to connect the IP security camera to an existing network or a router, network settings must be entered. 1. Use DHCP: If your network allows automatic addition of a new device (Client). select this option. All required data are obtained directly from the server or router. - Page 55 Settings Where automatic acceptance of new devices is not supported by your router, please deselect “Use DHCP“. Several new input fields appear. Manually enter the access data of your network. The required data can generally be called up from the computer via the network properties or can be obtained from the System Administrator of the network.
-
Page 56: Wireless Settings
Settings 2. Subnet mask:Generally, the value 255.255.255.0 must be specified. 3. Standard gateway:Connection to standard gateway is used for connecting to the Internet. Generally this is the network address of the router. 4. DNS Server:The address of the so-called DNS or name server can be called up from the network settings of your computer. - Page 57 Settings All data required for the used wireless network are stored in the router or Access Point through which the network is controlled. Select the router or access point settings and open the wireless network settings. Further information of how you can find this data is provided in the manual of your router or is available from your System Administrator.
- Page 58 Settings When “Uncoded“ is selected, data are not encoded prior to transmission. When using“WEP“, “WPA“ or “WPA2“ encoding, additional encoding information must be provided. Enter the same settings as shown for the router or access point. − Enter wireless network settings without changing.
-
Page 59: Upnp Settings
Settings UPNP settings Universal Plug and Play (UPnP) is used for controlling devices via an IP-based network. Where the router supports UPnP and where this function is activated, the required Firewall settings are automatically selected. 1. Select option “UPNP settings” from the bottom of the menu. 2. -
Page 60: Ddns Settings
Settings DDNS Settings The DDNS settings are not required for the correct operation of the security camera. The security camera can be reached from anywhere via supra space . If you do, however, wish to use DDNS you can register a free Internet address. In your Internet Browser open page http://supracam.net to register. - Page 61 Settings Activate “Use SMTP“, if an email is to be sent out in the event of an alarm. Please note that the alarm must be activated under alarm settings. The data required as regards the used email account will be provided by the Email provider. For your private email account you can also find this data in email programs such as Outlook or Thunderbird.
-
Page 62: Ftp Settings
Settings The SMTP Server (Simple Mail Transfer Protocol) is a post output server of an email provider. Emails are sent to this server for forwarding. • Server: Enter address of SMTP server of Email account. • Port: Enter port of SMTP server. The standard value is 25. •... - Page 63 Settings 2. Activate “Use FTP “, if images of the IP security camera are to be uploaded to an FTP server. • Server:Enter address of FTP server. • Port: Enter the port used for FTP-Server access. The standard value is 21. •...
-
Page 64: Alarm Settings
Settings to be taken and transferred. Values are in seconds. • Enter file name:Select this option if you wish to specify a file name. If this option has not been selected, a predefined file name will be used when saving the images. To test entries for the FTP settings, click on "Test“. - Page 65 Settings 1. Motion detection:Select this option to activate motion sensing. Select the times during which the alarm settings should be active. 2. Sensitivity: Enter the sensitivity for movement sensing using a value between 0 and 9. The higher the value, the higher the movement sensing sensitivity.
- Page 66 Settings sent out in the event of an alarm. 9. Report to FTP: Activate this option if images are to be stored on the FTP server in the event of an alarm. 10. Interval: Activate this option if images are to be stored on the FTP server in the event of an alarm.
-
Page 67: Head Adjustments
Settings 1 2 3 4 I/0 Alarm Head adjustments In this category, the settings as regards the camera head can be entered. AFTER SALES SUPPORT 1 800 623 432... -
Page 68: Resetting The Ip Security Camera
Settings 1. Infrared LEDs, use in dark conditions: If this option has been activated, Infrared LEDs are activated as additional light sources in dark conditions. 2. Fixed position during switch on: Activate this option if the camera head security camera is to assume a pre- specified position when the security camera is switched 3. -
Page 69: Restarting The Ip Security Camera
Settings − Selection of this function deletes all previous settings. − If the network settings have been changed, the IP security camera may no longer be attainable under the current address. The IP security camera can be found again using the configuration program. -
Page 70: Potential Legal Infringements
Potential legal infringements Potential legal infringements Observe the following information for using the Security camera: Copyright Generally every person owns his/her own image. According to the copyright law, images may only be published without the consent of the respective person if the person appears only as a person embellishment to a landscape image, or a location as a public place. - Page 71 Potential legal infringements Personal determinability Personal determinability exists, where it can be determined that a certain person was at a certain place at a certain time. The person can also be identified by a personal identifier such as a vehicle registration plate. Personal determinability of persons must be absolutely avoided.
-
Page 72: Declaration Of Conformity
Declaration of conformity Declaration of conformity The EC Declaration of Conformity can be requested from the below address. The Manufacturer hereby declares that the CE marking was applied to the product in accordance with the basic requirements and other relevant provisions of the following European Directives: 2011/65/EC RoHS Guideline 1999/5/EG R&TTE Guideline... -
Page 73: Cleaning
Cleaning Cleaning WARNING! Burn hazard! IP security camera becomes hot during operation! − Let IP security camera cool down completely! NOTICE! Danger of short circuit! Any water that has entered the housing can cause a short. − Never immerse IP security camera in water. −... -
Page 74: Technical Specification
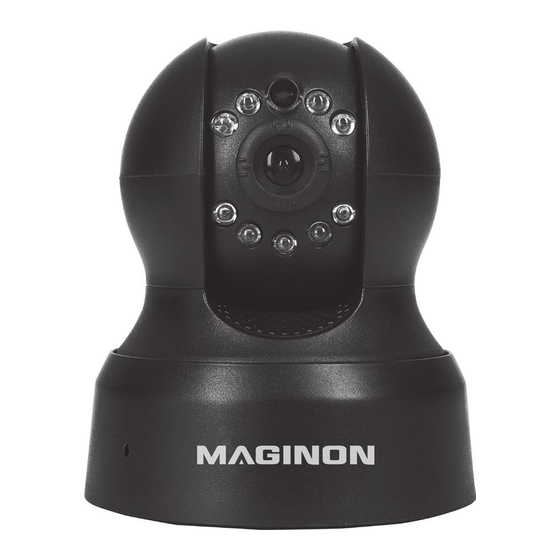
Technical specification Technical specification MODEL: IPC-100AC Image sensor 1/5“ Megapixels CMOS sensor, 640 x 480 pixels Lens: F=2.4, f=3.6 mm, Infrared lens Infrared light: 9 Infrared LEDs Night vision: 15 m Minimum lighting: 0.5 Lux (w/o LEDs) Angle of view: 60°... -
Page 75: Disposal
Disposal Disposal Dispose of packaging For disposal, separate packaging into different types. Cardboard and board must be disposed of as paper and foil must be recycled. Dispose of used camera (Applicable in European Union and other European countries using systems for separate collection of recyclables). Do not dispose of used cameras in household waste! If the IP security camera can no longer be used... -
Page 76: License- And Sourcecode Information
Foto-Elektronik-Vertriebs-GmbH Denisstrasse 28A, 67663 Kaiserslautern, Germany (or by e-mail to: Info@supra-elektronik.com) Subject: “Source code, Maginon IPC-100AC” To the extent the product includes proprietary software components, which stem from us and are linked with a library under the GNU Reader or Library General Public License, we allow... -
Page 77: Warranty Details
IP Security Camera IPC-100AC with built in microphone Warranty Details The product is guaranteed to be free from defects in workmanship and parts for a period of 36 months from the date of purchase. Defects that occur within this warranty period, under normal use and care, will be repaired, replaced or refunded at our discretion. -
Page 78: Repair And Refurbished Goods Or Parts Notice
IP Security Camera IPC-100AC with built in microphone Repair and Refurbished Goods or Parts Notice Unfortunately, from time to time, faulty products are manufactured which need to be returned to the Supplier for repair. Please be aware that if your product is capable of retaining user-generated data (such as files stored on a computer hard drive, telephone numbers stored on a mobile telephone,... -
Page 79: Warranty Certificate
QSL - MAGINON Service Rear Unit 11 Slough Business Park, 2 Slough Avenue, (off Rachael Close) Silverwater, NSW 2128 Australia MAGINON After Sales Support: 1800 623 432 (Operating Hours: Mon-Fri 08:00AM to 06:00PM EST) Email: info@supra-electronics.com AFTER SALES SUPPORT 1800 623 432... -
Page 80: After Sales Support
Rear Unit 11 Slough Business Park, 2 Slough Avenue, (off Rachael Close), Silverwater, NSW 2128, Australia MAGINON After Sales Support: 1800 623 432 (Operating Hours: Mon-Fri 08:00AM to 06:00PM EST) When making a return, please ensure the product is properly packaged so as to ensure that no damage occurs to the product during transit.