Dyson AM01 Operating Manual
Hide thumbs
Also See for AM01:
- Operating manual (29 pages) ,
- Operating manual (2 pages) ,
- Operating manual (5 pages)
Table of Contents
Advertisement
Quick Links
Download this manual
See also:
Operating Manual
OPERATING MANUAL
GUIDE D'UTILISATION
ASSEMBLY
• ASSEMBLAGE
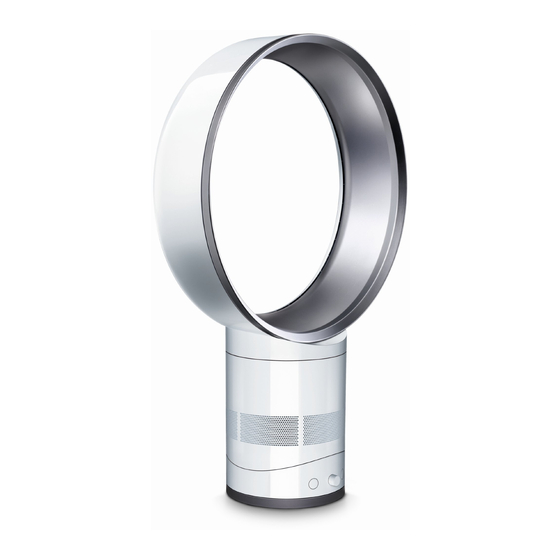
1
Lower the loop amplifier onto
the base, aligning the arrows.
Abaissez l'anneau sur le pied
en alignant les flèches.
REGISTER TODAY
3 easy ways to register
your 2 year warranty.
ENREGISTREz-vOUS
DèS AUjOURD'hUI
3 façons faciles de vous enregistrer
pour bénéficier d'une garantie de 2 ans.
2
Once aligned, turn the loop
amplifier clockwise to lock.
Une fois les flèches alignées,
faites tourner l'anneau en sens
horaire pour le verrouiller.
clik
1
clik
2
1
IMPORTANT
Remove clear film
Retirer le film transparent
Advertisement
Table of Contents

Related Manuals for Dyson AM01


Summary of Contents for Dyson AM01
- Page 1 OPERATING MANUAL GUIDE D’UTILISATION ASSEMBLY • ASSEMBLAGE Lower the loop amplifier onto Once aligned, turn the loop the base, aligning the arrows. amplifier clockwise to lock. Abaissez l’anneau sur le pied Une fois les flèches alignées, en alignant les flèches. faites tourner l’anneau en sens horaire pour le verrouiller.
-
Page 2: Important Safety Instructions
If the fan is not working as it should or has been damaged, do not use and contact the Dyson Helpline. Do not run cord under carpeting. Do not cover cord with throw rugs, runners or similar coverings. Arrange cord away from traffic area and where it will not be tripped over. -
Page 3: Consignes De Sécurité Importantes
16. Utilisez ce ventilateur seulement de la façon décrite dans le présent guide. N’effectuez aucun entretien autre que ceux indiqués dans ce guide ou recommandés par le service d’assistance téléphonique de Dyson. 17. Nous déconseillons l’utilisation d’une rallonge électrique. - Page 4 Control • Commande Clearing blockages • Élimination des obstructions AIRFLOW CONTROL ON/OFF OSCILLATION COMMANDE DU MARCHE/ARRÊT OSCILLATION DÉBIT D’AIR Tilt function • Inclinaison Adjust base forward or backward for required airflow angle. Déplacez le pied vers l’avant ou l’arrière de manière à obtenir l’angle de débit d’air voulu.
-
Page 5: Disposal Information
By completing and returning the attached Warranty Form to us by mail. • To clean, wipe with a dry or damp cloth. This will confirm ownership of your Dyson fan in the event of an insurance loss, • Do not use detergents or polishes to clean the fan. - Page 6 GARANTIE DE 2 ANS Ceci vous permet de confirmer que vous êtes le propriétaire de votre ventilateur Dyson en cas de sinistre et nous permet de communiquer avec vous au besoin. CONDITIONS DE LA GARANTIE LIMITÉE DYSON DE DEUx ANS.
- Page 7 ■ ■ ■ ■ Why did you choose to buy a Dyson fan? Pourquoi avez-vous choisi d’acheter un ventilateur Dyson? Please select up to 5 of the following choices below. Veuillez cocher jusqu’à cinq des énoncés ci-dessous. Frustration with existing fan Pas satisfait du ventilateur actuel ■...
-
Page 8: Warranty Form
Sans présentation de cette preuve, toute réparation des nouvelles technologies et des nouveaux services de Dyson ou obtenir votre opinion sur votre achat. Si vous effectuée vous sera facturée. Veuillez conserver votre reçu ou bon de livraison.