
Related Manuals for Coredy E750

Summary of Contents for Coredy E750
-
Page 1: User Manual
USER MANUAL V3.02 Coredy E750 WiFi Range Extender Installation Guide on Youtube https://goo.gl/d5hWKb Coredy E750 Dual Band Mini WiFi Range Extender/AP/Router... -
Page 2: Table Of Contents
Table of Contents Chapter 1. Introduction ..........Package Contents ............Parts & LED Indicators ..........Default Parameters ............Chapter 2. System & Environment Requirements Chapter 3. Quick Installation .......... Repeater (Range Extender) Mode......Option 1: Setup by Web Browser......Option 2: Setup by WPS.......... AP (Access Point) Mode.......... -
Page 3: Chapter 1. Introduction
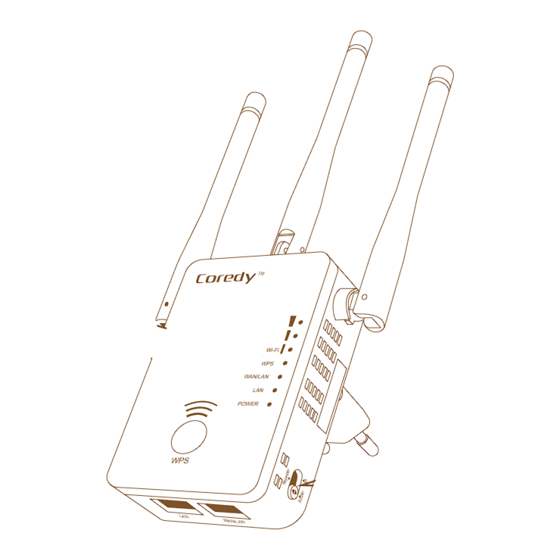
Table Contents Chapter 1. Introduction Package Contents: Coredy E750 Dual Band Mini WiFi Range Extender x 1 Repeater Quick Installation Guide x 1 RJ-45 Networking Cable x 1 User Manual x 1 Reset Pin x 1 Parts & LED Indicators: ①... -
Page 4: Lan Wan/Lan
It is used for establishing a secure connection between the E750 and other WPS-capable devices like Router, Access Point, Cellphone etc. Reset Button: It is used for restoring the E750 by using Reset Pin. Mode Selector Switch: It is used for selecting using mode physically. -
Page 5: Default Parameters
Modem; In Access Point mode, it is used for receiving network access from your local network. LAN Port: For connecting your Ethernet-enabled devices for wired network access. Default Parameters http://ap.setup/ Default IP 192.168.10.1 Login Name admin Password admin 2.4GHz SSID Coredy E750_2.4G 5GHz/AC SSID Coredy E750_5G... -
Page 6: Chapter 2. System & Environment Requirements
Place the E750 in a well-ventilated position far from any heater or heating vent. Place the E750 in a location where it can be connected from the various devices as well as from a power source. Avoid from strong light (such as sunlight) Keep at least 2 inches (5 cm) of clear space around the E750 Operating Temperature: 0~40℃... -
Page 7: Chapter 3. Quick Installation
Note: Please be sure your E750 is restored to factory default settings before getting start. Put your Target Network’s Router in an open space area, and keep the E750 next to your Target Network’s Router during the installation process. Option 1, Setup by Web Browser... - Page 8 Table Contents Connect Method 1. Connect by Smart Phone (Recommended) Select and connect the E750 default wireless network name: Coredy E750_xxG on your Smart Phone or other Mobile Device such as iPad, Tablet PC. * No password is required at the first time connecting.
- Page 9 Password and click Submit to login. Note: If you could not login the setup page, please restore the E750 to factory default settings (turn to page 32 for Physical Reset), or refer to Troubleshooting Q2 on manual for more solution.
- Page 10 Customize the E750’s wireless network names (SSIDs) or use the default SSIDs: Coredy E750_xxG_EXT, then click Apply. * It is recommended to use different network names/SSIDs of the E750 from your Target Network’s SSID. And the SSID of AC(5G) should be different from 2.4G’s.
- Page 11 3 bars Wi-Fi Indicator turning Note: If the Wi-Fi 1st Indicator keeps flashing, you may enter the the wrong password into E750 from the Target Router on Step 5 of manual. Please reset the E750, and reconfigure it again...
- Page 12 Plug the E750 into an electrical socket about halfway between your wireless Router and the WiFi dead zone. Try to place your E750 in an open space area where it can receive strong signal from your target router. The E750 would automatically reconnect your Router in approximately one minute after relocated.
- Page 13 Smart TV INTERNET WiFi WAN/LAN POWER 2.4G Reconnect After relocated successfully, refresh your wireless network options, select and connect the E750’s default SSIDs: Coredy E750_xxG_EXT or your customized SSIDs, security key is same as your target network. WLAN Settings WLAN...
-
Page 14: Option 2: Setup By Wps
Power Switch ON. Wait the Bar 1 of WiFi LED Indicator flashes. WiFi Wi-Fi WAN/LAN POWER WAN/LAN Set the E750 into WPS Pairing Mode Press the button on your E750 about 2 seconds till the WPS LED Indicator flashes. WiFi WAN/LAN Wi-Fi WAN/LAN POWER POWER WPS LED Indicator would flash... - Page 15 Option 1 on Page 5 of manual. Relocate Plug the E750 into an electrical socket about halfway between your wireless Router and the WiFi dead zone. Try to place your E750 in an open space area where it can receive strong signal from your target router.
- Page 16 Table Contents The E750 would automatically reconnect your Router in approximately one minute after relocated. It is recommended to place the E750 in a position with more than 2 bars WiFi Indicator 2.4GHz 5GHz Coredy E750_xxG_EXT or Target NetworkName CustomizeName.
- Page 17 Table Contents Reconnect After relocated successfully, refresh your wireless network options, select and connect the E750’s Coredy E750_xxG_EXT, default extended SSID: the security key is same as your target network. WLAN Settings WLAN Coredy E750_xxG_EXT ec:26:ca:56:f0:c8 WPA2 CHOOSE A NETWORK...
-
Page 18: Ap (Access Point) Mode
Table Contents AP (Access Point) Mode Note: Please be sure your E750 is restored to factory default settings before getting start. Power On Mode. Plug the E750 into a power Switch the E750 to socket with the Power Switch to ON. Wait all the 3 bars of WiFi LED Indicator turns ON. - Page 19 Information sent over this network might be visible to others. Connect automatically Connect Method 3. Connect by Wired PC Connect the E750 to your computer via an Ethernet cable. * Disable the wireless network if your computer has the WiFi function. WiFi WAN/LAN...
- Page 20 Note: If you could not login the setup page, please restore the E750 to factory default settings (turn to page 32 for Physical Reset), or refer to Troubleshooting Q2 on manual for more solution. http://ap.setup/ Username...
- Page 21 You can either use the default existed SSIDs or create your own new SSIDs. Select a security type and set a security key for both your E750’s new 2.4G and 5G/AC wireless network. Click Apply. Wireless AP Mode Coredy E750_2.4G 2.4G SSID...
- Page 22 Note: If the AP mode doesn't work for your network, Please try to set the E750 to Router mode, and select WAN connection type as “Automatically obtain an IP address (dynamic IP)”. More details please refer to page 21 of...
-
Page 23: Router Mode
Table Contents Router Mode Note: Please be sure your E750 is restored to factory default settings before getting start. Power On Router Mode. Plug the E750 into a Switch the E750 to the power socket with the Power Switch to ON. Wait all the 3 bars of WiFi Indicator turns ON. - Page 24 INTERNET WAN / LAN Port Connect by Device Method 1. Connect by Smart Phone (Recommended) Select and connect the E750 default wireless network name: Coredy E750_xxG on your Smart Phone or other Mobile Device such as iPad, Tablet PC. * No password is required at the first time connecting.
- Page 25 Information sent over this network might be visible to others. Connect automatically Connect Method 3. Connect by Wired PC Connect the E750 to your computer via an Ethernet cable. * Disable the wireless network if your computer has the WiFi function. INTERNET WiFi...
- Page 26 Table Contents Note: If you could not login the setup page, please restore the E750 to factory default settings (turn to page 32 for Physical Reset), or refer to Troubleshooting Q2 on manual for more solution. http://ap.setup/ Username admin Password...
- Page 27 Set the Wireless Network You can either use the default existed SSIDs or create your own new SSIDs. Then select a security type and set a security key for both your E750’s new 2.4G and 5G/AC wireless network. Click Apply.
- Page 28 Hide Password Apply Cancel Reboot It would take about 2 minutes to complete reboot. Reconnect After the E750 reboot successfully, refresh your wireless network options, select and connect the new wireless network (SSID) with the security key you’ve set. INTERNET 2.4G...
-
Page 29: Chapter 4. Other Settings
Set the Wireless transmission power. Wireless Settings Basic Settings Basic Settings WiFi 2.4G WiFi 5G/AC Wireless ON/OFF 2.4G Advanced Settings SSID Coredy E750_2.4G Coredy E750_5G AC Advanced Settings Standard WPA2-PSK (Strong Security) WPS Settings WiFi Key XXXXXXXX XXXXXXXX WiFi Channel... - Page 30 Broadcast SSID Enable Disable Help Enable Disable AP Isolation Enable Disable Enable Disable Short GI 20/40MHz coexist Enable Disable Apply 3. After the settings has been changed, Click Apply. The E750 will Reboot with your new settings coming into effect.
-
Page 31: Login Password Settings
192.168.10.1. Password Click in the Management field. Change your password User name New password Retype password Apply Cancel 3. After the settings has been changed, Click Apply. The E750 will Reboot with your new settings coming into effect. -
Page 32: Firmware Upgrade
Table Contents Firmware Upgrade In this field, you can add new functions to your Coredy E750 and fix any bugs. www.coredytech.com Please go to to download the latest firmware file. Login http://ap.setup/ or 192.168.10.1. Click Upgrade Firmware in the Management field. -
Page 33: Save/Reload/Reset Settings
Load Settings: Click Browse button to choose a previously downloaded configuration file. Then click Upload button, after it’s completed. The Coredy E750’s settings will be replaced by the configuration file you uploaded. Reset Setting: Click Load default button would Restore the... -
Page 34: Physical Reset
Table Contents Physical Reset Power on the E750, hold the Reset button by using a Reset Pin for approximately 3 seconds. Release the reset button while all lights flashing. When some of lights slow down flashing, the device has been reset successfully. -
Page 35: Chapter 5. Troubleshooting & Support
Chapter 5. Troubleshooting & Support How can I restore my E750 to its factory default settings? Power on the E750, hold the Reset button by using a Reset Pin for approximately 3 seconds. Release the reset button while all lights flashing. - Page 36 Table Contents mode, disconnect your Router’s Network from E750 firstly. Then connect your PC/devices to the E750 via an Ethernet Cable (Recommended) or Wirelessly. Then you could login the Web Management Page. After complete changing the setting, you could connect your Router’s Ethernet cable to the E750 again.
- Page 37 Weak signal strength may be caused by obstruction from walls or objects. If you are receiving low signal strength, try to place your E750 in an open space area, keep it away from obstructed locations like under or behind a Desk.
- Page 38 Password? It’s recommended to restore the E750 to its factory default settings, and re-configure it. What can I do if the E750 cannot works in AP mode? If the AP mode doesn't work for your network, please try to set the E750 to Router mode, and select WAN connection type as "Automatically obtain an IP address (dynamic IP)", refer more...
- Page 39 You may have entered the Wireless password of your Target Network incorrectly during the configuration. Find out the correct wireless password of your Target Network (SSID). Reset the E750 and refer to Repeater Installation Guide in Page 5 for reconfiguring it. Wireless Repeater Mode...
- Page 40 Bluetooth devices, and microwave ovens. What can I do if I could not find the E750's WiFi signal after it is powered on and its LED Indicator is "ON" status?
- Page 41 Table Contents What can I do if my internet speed is too slow after connecting my repeater? Please try experimenting with the channels for finding a mix that better benefits your network environment. 1. Login http://ap.setup/ 192.168.10.1 2. Select Basic Settings in the WiFi Setting field. 3.