
Related Manuals for Ricoh WG-M1


Summary of Contents for Ricoh WG-M1
-
Page 1: Digital Camera
Digital Camera Operating Manual To ensure the best performance from your camera, please read the Operating Manual before using the camera. - Page 2 Regarding copyrights Images taken using the RICOH WG-M1 that are for anything other than personal enjoyment cannot be used without permission according to the rights as specified in the Copyright Act. Please take care, as there are cases where limitations are placed on taking pictures even for personal enjoyment during demonstrations, performances or of items on display.
- Page 3 licensed to provide AVC video. No license is granted or shall be implied for any other use. Additional information may be obtained from MPEG LA, LLC. See http://www.mpegla.com. • All other trademarks are the property of their respective owners. • Throughout this manual, the following symbols are used to help you locate information quickly and easily: Indicates useful information.
- Page 4 To users of this camera • Do not use or store this device in the vicinity of equipment that generates strong electromagnetic radiation or magnetic fields. Strong static charges or the magnetic fields produced by equipment such as radio transmitters could interfere with the monitor, damage the stored data, or affect the product’s internal circuitry and cause camera misoperation.
-
Page 5: Using Your Camera Safely
Using Your Camera Safely We have paid close attention to the safety of this product. When using this product, we request your special attention regarding items marked with the following symbols. Warning This symbol indicates that violating this item could cause serious personal injuries. - Page 6 Caution • Some portions of the camera heat up during use, so please take care, as there is a risk of low temperature burns if such portions are held for long periods of time. • Should the LCD be damaged, be careful of glass fragments. Also, be careful not to allow the liquid crystal to get on your skin, in your eyes, or in your mouth.
-
Page 7: About The Battery
Caution • Do not place heavy objects on the USB cable, allow heavy objects to drop onto it or allow it to become damaged due to excessive bending. If the USB cable becomes damaged, consult your nearest service center. • Do not short or touch the output terminals of the product while it is still plugged in. - Page 8 Caution • Only use the specified battery with this camera. Use of other batteries may cause an explosion or fire. • Do not disassemble the battery. Disassembling the battery may cause an explosion or leakage. • Remove the battery from the camera immediately if it becomes hot or begins to smoke. Be careful not to burn yourself during removal.
-
Page 9: Care To Be Taken During Handling
Care to be Taken During Handling Before Starting Use • When the camera has not been used for a long time, confirm that it is still working properly, particularly prior to taking important pictures (such as at a wedding or when traveling). Contents of the recording cannot be guaranteed if recording, playback or transferring your data to a computer, etc. - Page 10 to the properties of the liquid crystal and is not a malfunction. • If the camera is subjected to rapid temperature changes, condensation may form on the inside and outside of the camera. Therefore put the camera in a bag or plastic bag and take the camera out when the difference in temperature has subsided.
- Page 11 Others • Care should be taken when removing the microSD Card immediately after using the camera, as the card may be hot. • Keep the battery/card cover closed and do not remove the microSD Card or turn the camera off while the data is being played back or saved to the card, or the camera is connected to a computer with the USB cable, as this may cause the data to be lost or the card to be damaged.
-
Page 12: Regarding Waterproof, Dustproof, And Shockproof Design
Regarding Waterproof, Dustproof, and Shockproof Design • This camera is provided with a waterproof/dustproof design complying with JIS waterproof grade 8 and JIS dustproof grade 6 (equivalent to IP68). • The camera satisfies our drop test (2 m height onto a 5 cm thick plywood surface) complying with MIL-Standard 810F Method 516.5-Shock testing. -
Page 13: Precautions When Using The Camera In The Water
• Make sure there are no foreign objects (dust, sand, hair, lint or liquid) on the rubber seals or the surface they contact before closing the battery/card cover. Wipe off any foreign objects with a clean lint-free cloth. • Close the battery/card cover properly until it click. Otherwise water may get in and damage the camera. -
Page 14: Precautions After Using The Camera In The Water
loss in waterproof performance. If the camera is subjected to substantial vibrations, shocks or pressure, take your camera to your nearest service center and have it checked. • Avoid getting sunscreen or sun oil on the camera as it may cause discoloration of the surface. If any oil gets on the camera, wash it off immediately with warm water. - Page 15 • Avoid cleaning with agents such as soapy water, mild detergents, or alcohol as this may compromise the waterproof performance of the camera. • To maintain the waterproof performance of the camera, you are recommended to change the waterproof packing once a year. Contact your nearest service center regarding changing the packing.
-
Page 16: Table Of Contents
Contents Using Your Camera Safely ..................4 Care to be Taken During Handling ................8 Regarding Waterproof, Dustproof, and Shockproof Design ..11 Contents ..................15 Getting Ready................19 Accessories Included ....................19 Part Names .......................21 Attaching the Carabiner Strap ..................23 Attaching and Removing the Lens Protector ............24 Installing Battery and Memory Card .................26... - Page 17 Charging ........................28 Introduction to Various Button Functions ..............29 Operation Method ............... 31 Turn On / Off ......................31 Set your Language, Date and Time after the first power-on ........32 LCD Screen Display ....................33 Introduction to Basic Operation of Recording and Shooting ........34 LCD Screen Display under Playback Mode ..............36 Introduction to Basic Operation of Playback .............37 Introduction to the Setting Mode of Menu Options ...........41...
- Page 18 Introduction to General Settings ................43 Introduction to Mode Settings ...................47 Movie Settings Introduction ..................48 Still Settings Introduction ..................55 AP Settings Introduction ...................58 Smart Device APP Operating Method ........61 Position Service Function ..................61 APP Home ........................63 Playback ........................63 Remote Viewfinder....................73 About ........................76...
- Page 19 Connection Port Introduction ............77 Connect to a Computer .....................77 HDMI Connected TV Output ..................78 Appendices ................. 79 Main Specifications ....................79 Prompts and Warning Messages ................84 Using the WG Flat Adhesive Mount O-CM1531 ......87 Warranty Policy ................90...
-
Page 20: Getting Ready
Getting Ready Accessories Included Rechargeable lithium-ion battery Power adapter DB-65 GAC-03 USB cable Carabiner strap I-USB152 O-ST153 Quick start guide Operating Manual (CD-ROM) The plug shape of the power adapter may vary depending on the country or region. The actual item may vary from the drawing. - Page 21 Lens protector Underwater lens protector O-LP1531 O-LP1532 Lens protector O-LP1531 has been installed on the product when leaving factory. In order to guarantee the waterproof and dustproof performance, please make sure to attach the lens protector to the camera all the time. Waterproof performance is guaranteed only when the camera is equipped with the underwater lens protector O-LP1532.
-
Page 22: Part Names
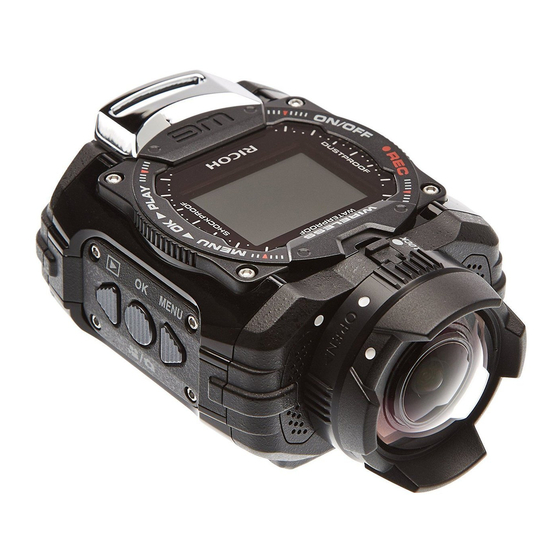
Part Names Strap Lug LCD Screen Lens Protector Lock Alignment Points Lens Protector Microphone Menu Button / Direction Button (Upper) OK Button Playback Button / Direction Button (Lower) - Page 23 Video Recording Button / Shutter Button Power Button / Delete Button Status Indicator Battery / Card Cover Cover Open Switch Cover Lock Positioning Hole Speaker Tripod Socket...
-
Page 24: Attaching The Carabiner Strap
Attaching the Carabiner Strap Attach the carabiner strap supplied with the camera. 1. Pass the end of the strap through the strap lug on the camera. 2. Fix the end of the strap to the stopper. Protective rubber ring The carabiner has rubber rings to prevent damage to the display. These rubber rings cushion the impact when the carabiner hits the display. -
Page 25: Attaching And Removing The Lens Protector
Attaching and Removing the Lens Protector Steps for removing the lens protector: Two types of replaceable lens protectors are provided for the product. Please put the 1. Slide the lens protector lock in the direction lens protector on all the time to ensure the shown by arrow ①... - Page 26 Steps for installing the lens protector: When the product is exposed to Slide the lens protector lock in the direction fluctuations in temperature, condensation shown by arrow ① . When three alignment may form on the inside surface of the points are in a straight line, rotate the lens lens protector.
-
Page 27: Installing Battery And Memory Card
Installing Battery and Memory Card 1. Open the battery/card cover 2. Insert the battery into the battery compartment according to the negative First, move the cover lock to the right (①), and positive directions as illustrated in the and push down on the cover open switch following picture. - Page 28 3. Insert the memory card into the card slot 4. Close the battery/card cover according to the direction illustrated in Close the battery/card cover around the the picture when the product is turned off. axis in the upward direction until it clicks, When inserting a memory card, make sure and move the cover lock to the left.
-
Page 29: Charging
Charging Please charge after the product is turned off. To have maximum battery life, charge the 1. Connect the product to the power adapter battery for at least 4 hours the first time. with the USB cable. 2. Then insert the plug of the power adapter to The longest charging time is 200 minutes the power outlet for charging. -
Page 30: Introduction To Various Button Functions
Introduction to Various Button Functions Viewfinder status refers to viewfinder of recording and shooting. To save power, if the product is not operated for 30 seconds, it will automatically enter the LCD off status (power saving mode). Pressing any button can wake LCD. Video mode or shooting mode: During Video Button... -
Page 31: Playback Mode
Playback mode: Movie Playback Button Name Photo Playback Fast Forwarding / Playing Back Pausing Rewinding Delete Back to the initial state of the movie Power Button / Delete Button Press and hold: turn off the product Photo file: no action Normal speed Continue to play OK Button... -
Page 32: Operation Method
Operation Method Turn On / Off Turn on: When the power is off, press and hold for more than 2 seconds to turn on the product; or press and hold for more than 2 seconds to turn on the product and enter playback mode. Turn off: When the power is on, press and hold for more than 2 seconds to turn off the product. -
Page 33: Set Your Language, Date And Time After The First Power-On
Set your Language, Date and Time after the first power-on Please set at the first time you use. 1. Press and hold the to turn on the product and enter the language selection screen; 2. Press to select language; 3. After pressing button to select desired language, the product will enter「Date / Time」setting screen;... -
Page 34: Lcd Screen Display
LCD Screen Display 1234 00:01:23 00:01:23 00:01:23 00:56:00 00:56:00 1080 1080 1. Mode Display 8. Remaining Recording Some icons will automatically Time Display 2. Time Lapse Display hide after 2 seconds. Press 9. Internal Memory / display all current setting. 3. -
Page 35: Introduction To Basic Operation Of Recording And Shooting
Introduction to Basic Operation of Recording and Shooting 1. Enter the viewfinder status, and press to switch between video mode and shooting mode; 2. Align the lens to the object to be recorded, and press for video recording or shooting; 3. - Page 36 Under shooting mode, when the product detects a human face, a green focus frame will appear. When two or more human faces are detected, a green main focus frame and a white secondary focus frame will appear. When in shooting and video mode, the LCD may turn off to save power. Pressing will turn on the LCD and immediately initiate / terminate recording.
-
Page 37: Lcd Screen Display Under Playback Mode
LCD Screen Display under Playback Mode 1/1234 1/1234 1/1234 1/1234 1080 1080 00:01:23 00:01:23 201 10-10 12:21 2014 10-10 12:21 00:01:23 00:01:23 201 10-10 12:21 2014 10-10 12:21 10. Still Size Display 1. Movie Display Some icons will automatically 11. Field of View Display hide after 2 seconds. -
Page 38: Introduction To Basic Operation Of Playback
Introduction to Basic Operation of Playback Single Photo: 1. When in viewfinder status, press to enter the playback mode of video and pictures; 2. Display movie or picture files on the LCD screen; 3. Press to view the movies or pictures stored in the memory card or internal memory. Press to return to the viewfinder status. -
Page 39: Movie Playback
Movie Playback: 1. Select movie to be played back, and press to start movie playback. 00:00:47 00:00:47 00:01:23 00:01:23 2. When playing back the movie, an operation guidance will appear on the screen. You can press buttons to perform the corresponding functions. Press : Movie playback rewind, multiple presses will fasten the speed: x2 / x4 / x8 / x16 Press... - Page 40 Movie playback rewind or forward: 00:00:47 00:00:47 00:01:23 00:01:23 Movie playback pause: 00:00:47 00:00:47 00:01:23 00:01:23 There will be no sound output during rewinding or forwarding.
- Page 41 Movie or Picture Delete: 1. Select the movies or photos to be deleted, and press to enter the Delete screen. Press to select 「Delete」, and press to confirm. 2. After a movie or a photo is successfully deleted, the LCD will display the next movie or photo. If you wish to delete additional files, please repeat the above step.
-
Page 42: Introduction To The Setting Mode Of Menu Options
Introduction to the Setting Mode of Menu Options 1. Under the viewfinder status, press to enter the setting menu; to select「Mode Settings」, 「Movie Settings」, 「Still Settings」, 「AP 2. Press Settings」 and 「General Settings」; 3. Select one item (except for 「Mode Settings」), press to enter the secondary level menu interface;... -
Page 43: Menu Introduction
Menu Introduction First Level Mode Movie Settings Still Settings General Settings Menu Settings Settings Movie Movie Size Still Size Sound Settings Still Time Lapse Burst Shot Power Off Wireless Power Loop recording Field of View Saving Field of View White Balance Date / Time Motion detection Exit... -
Page 44: Introduction To General Settings
Introduction to General Settings Sound Settings 11 options in 「General Settings」 of the first level menu: There are 4 options in 「Sound Settings」: • 「Sound Settings」 • Volume 1 • 「Power Off」 • Volume 2 • 「Wireless Power Saving」 • Volume 3 •... - Page 45 Wireless Power Saving Date / Time Wireless Power Saving mode means that after Date and time can be set when the product 30 seconds of remote-controlled recording is turned on for the first time. If you wish to with the APP, the wireless connection will change the date or time thereafter, please automatically disconnect, but the product will operate as the following.
- Page 46 Format Language Format can clear all data stored in the memory The language can be set when the product card or memory (including protected movies is turned on for the first time. If you wish and photos). to change the language thereafter, please operate as the following.
-
Page 47: Reset Settings
Copy to Card FW Version Copy to Card is to copy the files in the internal FW Version can display the current firmware memory to the memory card. version. There are 2 options in 「Copy to Card」: Screen rotate • Cancel When this function is enabled, the display on the LCD screen will rotate 180 degrees (up and... -
Page 48: Introduction To Mode Settings
Introduction to Mode Settings Mode Settings method of operation: 2 options in 「Mode Settings」 of the first level menu: 1. After selecting options, press to confirm. • 「Movie」: for recording movies 2. Press to enter the viewfinder status, and display your selected status. -
Page 49: Movie Settings Introduction
Movie Settings Introduction There are 8 options in first level menu 「Movie Movie Size Settings」: Movie Size indicates the image resolution during recording. • 「Movie Size」 There are 7 options in「Movie Size」: • 「Time Lapse」 1080 「1080p30」: 1920×1080 (30fps) • 「Loop recording」 「960p50」: 1280×960 (50fps) •... - Page 50 When selecting , the sound cannot be recorded. , 「Time Lapse」, 「Loop recording」or「Motion detection」 cannot When selecting be enabled. , 「Time Lapse」 or 「Loop recording」 cannot be enabled. When selecting The longest recording time is 25 minutes at one time. Please use a memory card (Class 4 or above) for video recording.
-
Page 51: Time Lapse
Time Lapse 2. Press , the LCD will display red font time countdown; Time Lapse enables the recording of an interval of time, and splices the frames 3. Press again to finish recording. together to present a condensed video which usually requires a long period of time to 00:08:08 00:08:08... - Page 52 Loop recording 00:00:23 00:00:23 Loop recording allows to record independent segments of movies according to selected time length. The product will continually record movies until the video recording button is pressed to terminate recording. When the memory card is full, the product will overwrite the recorded files to record another movies circularly.
-
Page 53: Motion Detection
Field of View Motion detection Field of View sets the viewing angle. Motion detection means that if the product detects moving objects entering into the There are 4 options in 「Field of View」: LCD screen, it will automatically start recording. During the recording process, if •... - Page 54 When Motion detection is enabled, Time When the memory card is full, ① will Lapse or Loop recording setting cannot become red font and flashes for 2 be performed. seconds. 15:00 15:00 00:00:00 00:00:00 Movie Size cannot be set to Motion detection interface icon: ①...
-
Page 55: Wind Cut
Wind Cut White Balance Wind Cut reduces noise caused by wind. White Balance means that the user adjusts the color temperature under different light sources There are 2 options in 「Wind Cut」: to ensure that the colors of the subjects are reproduced correctly. -
Page 56: Still Settings Introduction
Still Settings Introduction There are 5 options in first level menu 「Still Settings」: • 「Still Size」 • 「Burst Shot」 • 「Field of View」 • 「White Balance」 • 「Exit」... - Page 57 Still Size Burst Shot Still Size indicates the number of pixels for still Burst Shot allows ten photos to be captured pictures. continuously at one time. There are 3 options in 「Still Size」: There are 2 options in「Burst Shot」: • 「14M」 : 4320×3240(4:3) •...
- Page 58 Field of View White Balance Field of View sets the viewing angle. White Balance means that the user adjusts the color temperature under different light sources There are 4 options in「Field of View」: to ensure that the colors of the subjects are reproduced correctly.
-
Page 59: Ap Settings Introduction
AP Settings Introduction The camera can be wirelessly connected with your smart device. Please review the following items before your first connection: 1. Your smart device system version needs to be iOS 6.0-7.1 or Android 4.0-4.3. If not, please upgrade your smart device system version first. 2. - Page 60 Step 1: Install the dedicated application on the smart device. If there is a need to turn off wireless, press Download the dedicated application (WG-M1) button or press after selecting from Google Play or App Store, and install it on so that the selection interface appears.
- Page 61 1. Enable the wireless function of the smart device to search surrounding wireless devices; 2. Select the name of the camera to be connected (RICOH-WG-M1_XXXX), and input the eight-digit digital password displayed next to WPA2-PSK on the camera; APP connected screen...
-
Page 62: Smart Device App Operating Method
This function is not supported for movie files. Android system: 1. When the APP is enabled for the first time, it may prompt that 「“WG-M1” would like to use your current location」. If the position service of the smart device is not enabled, you can select whether to enable the position service or not according to prompting in the interface. - Page 63 1. When the APP is enabled for the first time, if the position service is enabled, it will prompt whether to not 「"WG-M1” would like to use your current location」; if the position service is disabled, it will prompt 「Turn on location services to allow "WG-M1" to determine your location」;...
-
Page 64: App Home
APP Home Playback Enter APP Home interface, and three options Click 「Playback」 in the APP Home to enter are displayed: the playback mode. There are two playback options in the playback • 「Playback」: enter playback mode mode: • 「Remote Viewfinder」: •... - Page 65 Index playback (camera / smart device) 2. When you press the icon, images that 1. In the APP Home, click 「Playback」to you downloaded to the smart device appear enter the index playback state, and enter as thumbnails. When you press the the photo album of the camera.
- Page 66 Enter the selection interface after selecting Setting function , and click thumbnails so that files can Click at the right upper corner of the be selected. Clicking the same thumbnail interface so that the setting interface can for the second time will cancel the selection. appear.
- Page 67 Download function In the index playback interface of the camera, You can choose up to 20 files at the click to enter the download mode. Select a same time. file to begin downloading. In the index playback interface, clicking < will pause downloading.
- Page 68 Delete function 1. In the index playback interface of the 2. In the index playback interface of the smart camera, click to enter the selection device, click to enter the selection interface. Select the files to be deleted, click interface. Select the files to be deleted, click again to choose whether or not to delete to choose whether or not to delete the the files.
- Page 69 Slide play function 1. In the index playback interface of the smart Clicking a photo in slide play will stop the device, click to enter the selection playback and the single photo interface interface; will appear. 2. Firstly, select the files to be played, and then click to start slide play;...
- Page 70 Share function 1. In the index playback interface of the smart Share option will differ according to the device, click to enter the selection settings of the smart device. interface. 2. Select the files to be shared, and click to pop up the share option. <...
- Page 71 Single Photo In the index playback interface, the single 1. Executable operations in single photo photo interface will appear if a single file is playback of the files at the camera side: clicked. • : enter the Remote Viewfinder status Previous and next files can be displayed by (See Page 73 for explanations.) scrolling.
- Page 72 2. Executable operations in single photo Edit function playback of the files on the smart device: 1. Editing photo files: Click to enter the effect interface, where • : share filter effects, brightness adjustment and modeling effects can be set. •...
- Page 73 • Brightness adjustment effects: 2. Editing movie files: Click to enter the trim interface. : Off : Auto Trim Trim • Modeling effects: : Off : Round shape : Belt-like shape (lateral direction) 00:00:00 00:00:08 First, click the desired effect and then click to select the options of 「Save」or 「Cancel」, or select the location to share the file.
-
Page 74: Remote Viewfinder
Remote Viewfinder Steps of movie trim: ① Click to increase or shorten Click 「Remote Viewfinder」 in the APP Home the number of frames. to enter the viewfinder status, and control the ② Slide the quick browse bar from side to camera to shoot by using the smart device. -
Page 75: Video Mode
Video mode: Field of View: Wide Medium 23:30 1080 Narrow < Underwater White Balance: 1080 99:99 Daylight Cloudy Fluorescent Underwater Still Size: 10M-16:9 • : enter the index playback state on Burst Shot: Single the camera. Burst Shot • : start video recording / stop video recording The characteristics of these parameters are the same as the camera. -
Page 76: Shooting Mode
Video mode method of operation: Shooting mode: 1. Click icons at the top of the interface to set Shooting mode method of operation: corresponding parameters. 1. Click icons at the top of the interface to set 2. Click to start video recording, and click corresponding parameters. -
Page 77: About
About 23:30 Click「About」 in the APP Home, so that the version of the APP can be checked. < < 9999 • : enter the index playback state on the camera. • : shoot photos • : switch to the video mode from the shooting mode... -
Page 78: Connection Port Introduction
Connection Port Introduction Connect to a Computer You can use the USB cable to connect the camera and copy (transmit) images to a computer. Transferring images to your computer Follow the steps below to connect the camera to a computer. 1. -
Page 79: Hdmi Connected Tv Output
Viewing Images on Computer Display transferred images on a standard image viewer etc. that an OS has. For details about viewing images, see the help menu on the viewer. Supported OS==>Windows: Windows Vista ® / Windows ® 7 / Windows ®... -
Page 80: Appendices
Appendices Main Specifications Type Compact Digital Still Camera Number of effective Approx. 14 megapixels pixels Image sensor 1/2.3 inch CMOS (4:3) 14M: 4320×3240 Still 5M: 2592×1944 (16:9) 10M: 4320×2432 1920×1080(30fps) Number of recorded 1280×960(50fps) pixels 1280×960(30fps) Movie 1280×720(60fps) 1280×720(30fps) 848×480(60fps) 848×480 (120fps) Sensitivity Automatic (ISO 100 - 800) - Page 81 Approximate Image Storage Capacity and Recording Time Still Built-in Memory 4GB microSD Memory Card 14M (4320×3240) 24 pictures 911 pictures 10M (4320×2432) 32 pictures 1208 pictures 5M (2592×1944) 64 pictures 2391 pictures • The image storage capacity is for reference only. The actual image storage capacity may vary depending on the microSD Memory Card and the subject.
- Page 82 AWB, Daylight, Cloudy, Fluorescent, Underwater White balance Focal Length: 3mm (approx. 16.8mm in 35mm format equivalent) Brightness: F2.8 Lens Lens Construction: 6 elements in 6 groups (2 aspherical elements) Maximum field of view: Still image approx. 160° (4:3 wide) Movie approx. 137° (1280 x 960) Image stabilization Electronic image stabilization (movie only) Display...
- Page 83 Power source Rechargeable lithium-ion battery: DB-65 The number of pictures is an Image Approx. 350 pictures estimated value based on our Storage (using specified battery) measurements. Actual number may Capacity vary according to usage conditions. The time is an estimated value Movie Approx.
- Page 84 Approx. 190g (including battery, memory card, and Lens protector O-LP1531) Weight Approx. 151g (excluding battery, memory card, and Lens protector) Rechargeable lithium-ion battery DB-65 Power adapter GAC-03 USB cable I-USB152 Carabiner strap O-ST153 Quick start guide Accessories Operating Manual(CD-ROM) Lens protector O-LP1531 Underwater lens protector O-LP1532 WG Flat Adhesive Mount O-CM1531...
-
Page 85: Prompts And Warning Messages
Prompts and Warning Messages Message Description Solution The file folders in the memory card have reached the maximum number (999), the Copy the images to your images will not be saved. PC and format the memory card. Too much folders in memory card will result in longer power up time. - Page 86 Message Description Solution The memory card still cannot be recognized after format. An error occurs when reading the memory card. Format the memory card. Interruption problem is encountered in the period of writing in the memory card during the video recording or shooting process. The internal memory can’t be identified after being formatted.
- Page 87 Message Description Solution Replace a new battery. The battery is used up. It is a warning indicating that the camera is going to shut Replace a fully charged down. battery. Remove the battery after the The message will be displayed when the product is turned off.
-
Page 88: Using The Wg Flat Adhesive Mount O-Cm1531
Using the WG Flat Adhesive Mount O-CM1531 This accessory included in the package fixes our digital camera on a flat surface. Please read the instructions below carefully for safe use. Warning Do not install this product in vehicles in a way which might hinder driving operations or cause accidents resulting from dropping the product. - Page 89 How to Install the Mount 1. Align the screw to the tripod socket of the camera. Rotate the screw for fixing. Appurtenant camera platform Screw 2. Inset the appurtenant camera platform with the nut into the adhesive mount and tighten the nut to fix them.
- Page 90 Caution: • Make sure to fix this product on a flat surface without irregularities or roughness after wiping off dirt or oil on it. • Do not twist this product forcedly after fixing since its adhesion may weaken. Make sure to use an optional double-sided adhesive tape (WG Repair Parts 1 O-CM1474) for replacing a used adhesive instead of reusing it.
-
Page 91: Warranty Policy
Warranty Policy All our cameras purchased through authorized bona fide photographic distribution channels are guaranteed against defects of material or workmanship for a period of twelve months from the date of your purchase. Service will be rendered, and defective parts will be replaced without cost to you within that period, provided the camera does not show evidence of impact, sand or liquid damage, mishandling, tampering, battery or chemical corrosion, operation contrary to operating instructions, or modification by an unauthorized repair shop. - Page 92 Procedure During 12-month Warranty Period Any camera which proves defective during the 12-month warranty period should be returned to the dealer from whom you purchased the camera or to the manufacturer. If there are no representatives of the manufacturer in your country, send the camera to the manufacturer, with postage prepaid.
-
Page 93: For Customers In Canada
For customers in USA STATEMENT OF FCC COMPLIANCE This device complies with Part 15 of the FCC Rules. Operation is subject to the following two conditions: (1) This device may not cause harmful interference, and (2) this device must accept any interference received, including interference that may cause undesired operation. - Page 94 Pour les utilisateurs au Canada Cet appareil numérique de la classe B est conforme à la norme NMB-003 du Canada. FOR CALIFORNIA, U.S.A. ONLY Perchlorate Material-special handling may apply. The lithium battery used in this camera contains perchlorate material, which may require special handling. See www.dtsc.ca.gov/hazardouswaste/perchlorate...
- Page 95 Declaration of Conformity According to 47CFR, Parts 2 and 15 for Class B Personal Computers and Peripherals We: RICOH IMAGING AMERICAS CORPORATION Located at: 633 17 Street, Suite 2600, Denver, Colorado 80202, U.S.A. Phone: 800-877-0155 Fax: 303-790-1131 Declare under sole responsibility that the product identified herein complies with 47CFR Parts 2 and 15 of the FCC rules as a Class B digital device.
- Page 96 Information for Users on Collection and Disposal of Old Equipment and Used Batteries 1. In the European Union These symbols on the products, packaging and/or accompanying documents mean that used electrical and electronic equipment and batteries should not be mixed with general household waste.
- Page 97 RICOH IMAGING CHINA 23D, Jun Yao International Plaza, 789 Zhaojiabang Road, Xu Hui District, Shanghai, 200032, CHINA CO., LTD. (http://www.ricoh-imaging.com.cn) http://www.ricoh-imaging.co.jp/english • Specifications and external dimensions are subject to change without notice. Copyright © RICOH IMAGING COMPANY, LTD. 2014 54891EN 201409...