Table of Contents
Advertisement
Digital Camera
Start Guide
Thank you for purchasing the RICOH WG-M2
digital camera.
This Start Guide provides information on how to
get your RICOH WG-M2 ready for use and its
basic operations. To ensure proper operation,
please read this Start Guide before using the
camera.
For details on how to use the various shooting
methods and settings, please refer to the
Operating Manual (PDF) posted on our website.
Refer to p.39 for details on the Operating Manual.
Advertisement
Table of Contents

Related Manuals for Ricoh WG-M2


Summary of Contents for Ricoh WG-M2
- Page 1 Thank you for purchasing the RICOH WG-M2 digital camera. This Start Guide provides information on how to get your RICOH WG-M2 ready for use and its basic operations. To ensure proper operation, please read this Start Guide before using the camera.
- Page 2 List of accessories Rechargeable lithium-ion battery Power adapter USB cable D-LI68 D-PA164 I-USB157 Start Guide Regarding Waterproof Design Lens protector Underwater lens protector O-LP1631 O-LP1632 • The lens protector O-LP1631 is attached at delivery. • To maintain the waterproof and dustproof performance, be sure to keep the lens protector on.
-
Page 3: Table Of Contents
Table of contents Names of parts ............3 Preparing the camera ..........23 Setting communication devices (for Android) ....23 LCD screen display ..........5 Setting communication devices (for iOS) ..... 24 Screen display of playback mode ....... 6 Main Specifications ..........25 About the button functions ......... - Page 4 There is a possibility that the illustrations and the screen display in this manual are different from the actual ones. Regarding copyrights Images taken with this camera that are for anything other than personal enjoyment cannot be used without permission according to the rights as specified in the Copyright Act.
-
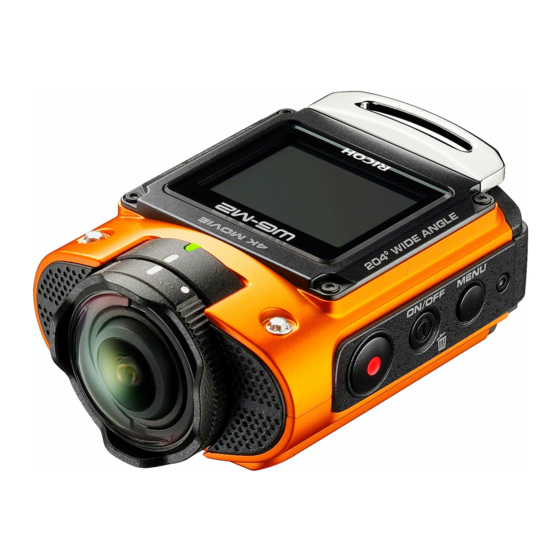
Page 5: Names Of Parts
Names of parts 1 Strap lug 2 LCD screen 3 Power lamp 4 Alignment points 5 Lens protector 6 Microphone 7 Playback button/direction button (upper) 8 OK button 9 Wi-Fi button/direction button (lower) - Page 6 0 Video recording button/shutter button a Power button/delete button b MENU button c Battery/card cover d Release latch e Lock lever f Positioning hole g Tripod socket h Speaker i Lens protector lock j HDMI terminal k MicroSD card slot l USB terminal m Battery lock lever...
-
Page 7: Lcd Screen Display
LCD screen display 56:00 Shooting mode Recorded Pixels Image Effect Modes 10 EV Compensation Angle of View 11 LCD Orientation Movie SR 12 Battery level indicator Internal memory/memory card display 13 White Balance Remaining recordable time/image storage capacity 14 Sensitivity Icon while recording movies (blinks while recording movies) 15 Vibration Recorded Pixels (Movie) -
Page 8: Screen Display Of Playback Mode
Screen display of playback mode 1 / 1 2 3 4 1 Recorded Pixels (Movie) 5 Z is displayed when playing back movies shot in [Extended Movie Recording]. 2 Recorded Pixels 6 Internal memory/memory card display 3 Playback mode display 7 Battery level indicator 4 Image number/total number of images 8 Guide display (movie) -
Page 9: About The Button Functions
About the button functions In shooting mode –: Button operations (short push) disabled While in the settings menu While in the shooting screen Buttons Name While recording display display – – – Power button/delete button Press and hold: turns the power off OK button Confirms a selection Displays hidden icons... -
Page 10: In Playback Mode
In playback mode When playing back a movie While in the playback Buttons Name screen display During playback While temporarily stopped Deletes the image – Power button/delete button Press and hold: turns the power off Starts movie playback OK button (unavailable during still Temporarily stops playback Restarts playback image display) -
Page 11: Attaching And Removing The Lens Protector
How to remove the lens protector Attaching and removing the lens protector While pressing on the lens protector lock on the back The camera comes with two types of lens protectors. To of the camera in the maintain the waterproof and dustproof performance, be sure to direction of arrow 1, keep the lens protector on. -
Page 12: How To Attach The Lens Protector
How to attach the lens protector Installing a memory card and battery While pressing on the lens protector lock on the back Slide the lock lever in the of the camera in the direction of 1 and release direction of arrow 1, align the lock. - Page 13 • The date and time may be reset to the default settings if the While the camera is turned camera is left without the battery for a long time. • Be careful as the camera or the battery may become hot off, slowly insert the when the camera is used continuously for a long period of memory card into the...
-
Page 14: Charging The Battery
• The battery has reached the end of its service life when it Charging the battery starts to run down soon after being charged. Replace it with a new battery. • If the power lamp does not light even if the camera is Connect the supplied power adapter (D-PA164) to the camera connected to a power outlet, the battery is faulty. -
Page 15: Turning The Camera On And Off
Turning the camera on and off Initial settings Do the initial settings to use your camera for the first time after To turn the camera on purchasing it. Language settings Press and hold the button to turn the camera on. The first time you turn the camera on, the [Language/u] screen appears. -
Page 16: Date Adjustment
t Memo Date adjustment • To change the language, date, or time you have setup, refer to the Operating Manual (PDF). (p.39) Press the button or the button. Select the date display style and press the button. Choose from [mm/dd/yy], [dd/mm/yy] or [yy/mm/dd]. Press the button or the button. -
Page 17: Settings Menu List
Settings menu list This list shows the items that can be set on the settings menu screen and their details. List of shooting modes You can set the shooting mode for movies and still images. Item Details Default setting Still Image You can shoot still images. -
Page 18: List Of Shooting Settings
List of shooting settings You can set the functions for shooting movies and still images. Some functions may not be available or may not function fully depending on the selected [Rec. Mode]. Item Details Default setting Image Effect Modes You can change image enhancements, such as tone, and shoot. n (Bright) EV Compensation You can adjust the brightness of the whole image being shot. -
Page 19: List Of General Settings
List of general settings You can set the general settings for the camera. Item Details Default setting Operation Volume Playback You can set the volume of operation sounds and playback sounds, as Volume Sound well as the sounds for the shutter and operations. Operation Sound Shutter Sound 1... -
Page 20: Shooting Mode Settings
Shooting mode settings For [Time-Lapse Movie], select the speed. For [Extended Movie Recording], select the recording time. Press the button. You can set the shooting mode for movies and still images. Shooting mode Icon Details Press the button on the shooting screen. You can shoot movies at 30 The settings menu is displayed. -
Page 21: Setting The Camera Functions
• The current settings for the [Shooting Settings] and [Setting] Setting the camera functions are saved even when the camera is turned off. However, the settings may not be saved, depending on the [Rec. Mode] (p.15) selected. You can set items in [Shooting Settings] and [Setting]. Press the button on the shooting screen. -
Page 22: Shooting Movies And Still Images
Shooting movies and still images Playing back movies and still images Select the shooting mode according to the subject or scene and shoot movies or still images. Press the button on the shooting screen. t Memo This changes the screen to playback mode and the last still •... - Page 23 u Caution Operations that can be performed during movie playback • The [Power Saving] function is not available in playback Pressing the button: Pauses playback mode. Press and hold the Fast-reverses t Memo button: • When reversing frames, the first frame of every 30 frames Press and hold the Fast-forwards playback appears with each press of the...
-
Page 24: Deleting Movies And Still Images
Deleting movies and still images Connecting the camera and a communication device Change to playback mode. (p.20) The following functions can be used by directly connecting the camera to a communication device via Wi-Fi and using the Press the button or the button. -
Page 25: Preparing The Camera
Preparing the camera Tap [RICOH_XXXXX] on the [Network List]. Press and hold the The [Enter Password] screen button in shooting SSID appears. RICOH_ mode and enable the wireless LAN (Wi-Fi). Password After the waiting for connection screen appears, the Wi-Fi function is enabled. -
Page 26: Setting Communication Devices (For Ios)
Setting communication devices (for iOS) Enable the wireless LAN (Wi-Fi) function on the communication device. Tap [RICOH_XXXXX] from the list of detected networks. Enter the password, and tap [Join]. The camera and communication device are connected via Wi-Fi. Start Image Sync on the communication device. The list of images appears. -
Page 27: Main Specifications
Main Specifications Type Compact digital camera Number of Approx. 8 megapixels Effective Pixels Image Sensor 1/2.3 inch CMOS Still 3264 x 2448 3264 x1840 2448 x 2448 2592 x 1944 2592 x 1464 Number of 3840 x 2160•30 fps 1920 x 1080•60 fps 1920 x 1080•30 fps 1280 x 720•120 fps Recorded Pixels... - Page 28 White Balance Auto, Auto outdoor, Manual 1.6 mm (equivalent to approx. 14 mm in 35 mm format) Focal Length Focus Range 20 cm to ∞ Brightness F2.0 Lens 8 elements in 8 groups (6 aspherical elements) *when lens protector O-LP1631 is attached Lens Construction Still...
- Page 29 Image Storage Capacity Recording capacity shows the approximate number of shots recorded during CIPA-compliant testing (at 23°C Approx. 450 (73.4°F) with display on). Actual performance may vary according to operating conditions. pictures Playback Time Approx. 160 min. According to the results of in-house testing. Battery Life (for d with Y movies)
- Page 30 Image storage capacity and recordable time Still image Recorded pixels Internal memory Memory card (8 GB) n (3264 x 2448) 4199 M (3264 x1840) 5092 m (2448 x 2448) 5092 L (2592 x 1944) 5838 69 ........7479 l (2592 x 1464) •...
-
Page 31: Using Your Camera Safely
• Depending on your individual factors or physical condition, the use of the camera may cause itching, rashes or blisters. In case of any Using your camera safely abnormality, stop using the camera and get medical attention immediately. We have paid close attention to the safety of this camera. When using this About the power adapter and the AC adapter camera, we request your special attention regarding items marked with the following symbols. -
Page 32: Care To Be Taken During Handling
one end with a molded-on male attachment plug cap (with a specified NEMA configuration), and the other is provided with a molded-on female Keep the camera and its accessories out of the connector body (with a specified IEC nonindustrial type configuration) or reach of small children the equivalent. -
Page 33: Storing Your Camera
Precautions on carrying and using your camera Storing your camera • Hot and humid places should be avoided. Particular care should be • Avoid storing the camera where pesticides and chemicals are handled. taken regarding vehicles, which can become very hot inside. Remove the camera from its case and store it in a well-ventilated place •... -
Page 34: Regarding Waterproof, Dustproof, And Shockproof Design
• Please note that deleting data, or formatting the microSD cards or the built-in memory does not completely erase the original data. Deleted files can sometimes be recovered using commercially available software. It is user’s responsibility to ensure the privacy of such data. •... -
Page 35: Precautions When Using The Camera In The Water
• If the camera becomes very dirty or after it has been used in the sea, Precautions when using the camera in the make sure that it is turned off and the battery/card cover is firmly closed before rinsing it under running tap water or leaving it in a bowl of clean water water for a short time (2 or 3 minutes). - Page 36 In the frequency band used by the camera, along with industrial, Trademarks scientific, and medical devices such as a microwave oven, premises radio stations (wireless stations requiring license) and specified low • microSDXC logo is a trademark of SD-3C, LLC. power radio stations (wireless stations not requiring license) for •...
-
Page 37: Warranty Policy
WARRANTY POLICY All our cameras purchased through authorized bona fide photographic distribution channels are guaranteed against defects of material or workmanship for a period of twelve months from the date of your purchase. Service will be rendered, and defective parts will be replaced without cost to you within that period, provided the camera does not show evidence of impact, sand or liquid damage, mishandling, tampering, battery or chemical corrosion, operation contrary to... - Page 38 camera will be returned to you upon completion of servicing. If For customers in USA the camera is not covered by warranty, regular charges of the STATEMENT OF FCC COMPLIANCE manufacturer or of its representatives will apply. Shipping This device complies with Part 15 of the FCC Rules. Operation charges are to be borne by the owner.
-
Page 39: Declaration Of Conformity
Phone: 800-877-0155 some biological effects might occur, but such findings have not Fax: 303-790-1131 been confirmed by additional research. RICOH WG-M2 has Declare under sole responsibility that the product identified been tested and found to comply with IC radiation exposure... - Page 40 été confirmés par des recherches electrical and electronic equipment and batteries supplémentaires. RICOH WG-M2 a été testé et jugé conforme should not be mixed with general household aux limites d’exposition aux rayonnements IC énoncées pour waste.
-
Page 41: Information On The Operating Manual
The CE Mark is a Directive conformity mark of the European Union. Information on the Operating Manual An Operating Manual (PDF) containing information on how to use this camera is available. Please download it from our website. Operating Manual Download: http://www.ricoh-imaging.com/ manuals/... - Page 42 Memo...
- Page 43 Regarding User Registration http://www.ricoh-imaging.com/registration/ In order to better serve you, we request that you complete the user registration, which can be found on our website. Thank you for your cooperation.
- Page 44 (http://www.ricoh-imaging.com.cn) http://www.ricoh-imaging.co.jp/english This contact information may change without notice. Please check the latest information on our websites. • Specifications and external dimensions are subject to change without notice. Copyright © RICOH IMAGING COMPANY, LTD. 2015 55374 R01BAL15 Printed in Indonesia...