Table of Contents
Advertisement
Advertisement
Table of Contents

Related Manuals for Drive Odyssey LX


Summary of Contents for Drive Odyssey LX
- Page 1 YSSEY Y LX WNER R’S MA ANUA A L...
-
Page 2: Table Of Contents
TABLE OF CONTENTS PREFACE AND INTRODUCTION ……..…………………………………… 2 SAFETY NOTICE………………………………………………………...….. 2.1 Before driving 2.2 While driving 2.3 Labeling PARTS INTRODUCTION……………………………………………..………. Parts description OPERATION…………………………………………………………………..4.1 Control panel 4.2 How to operate your scooter BATTERY CHARGING AND CARE………………………………………..5.1 Charging the battery 5.2 Battery INSPECTION AND MAINTENANCE……………………………………..…... -
Page 3: Preface And Introduction
1 . P R E FA C E A N D I N T R O D U C T I O N Carefully read this owner’s manual before using the vehicle. Improper use of the vehicle could result in harm, injury or accidents. -
Page 4: Safety Notice
Ride on the pavement, single lane roads, or pedestrian areas only. Never ride on highways. Do not drive your scooter after consuming alcohol or when you are tired. Be careful when driving your scooter in low light. It has not been designed for use at night. - Page 5 ■ Ramps, inclines and drops Do not drive onto steep ramps greater than the specified gradient. Refer to the section entitled “CLIMBING ANGLE” in “7. SPECIFICATION“ Always use a low speed setting when ascending or descending a gradient.
- Page 6 7. Check the forward/reverse speed lever works correctly. 8. Make sure the electromagnetic brake works correctly. 9. Make sure it is safe around you before you drive on the street. WARNING ! Do not set in the freewheel mode when driving on a gradient.
-
Page 7: Labeling
2 . S A F E T Y N OT I C E 2.3 LABELING Carefully read all labels on the scooter before driving it. For future reference, do not remove them. NEVER LIFT THE SCOOTER UP BY THE FRONT OR REAR SHROUD WARNING ... -
Page 8: Parts Introduction
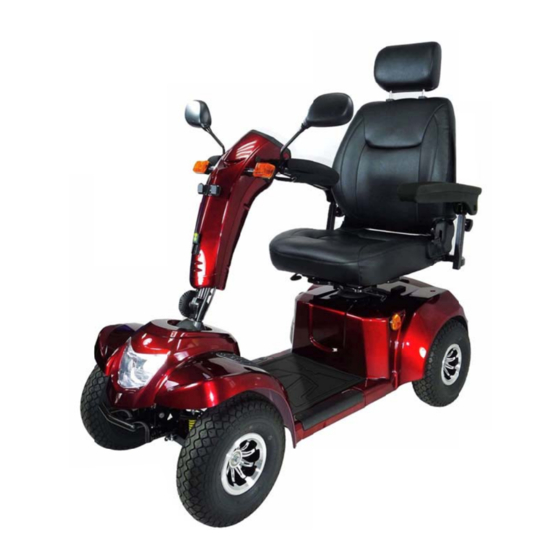
3 . PA R T S I N T R O D U C T I O N 3.1 PARTS DESCRIPTION 1. Indicator Lamp 2. Charger Socket Cover 3. Basket Bracket 4. Tiller Adjust Lever 5. Head Lamp 6. Seat 7. -
Page 9: Control Panel
4 . O P P E R AT T I O N 1 CONTRO OL PANEL 1.Speed D Dial 2. Horn B Button 3. Indicato or lamp swi itch 4. Head li ght / Rear L Light Button 5. Battery y Indicator 6. - Page 10 2. After ch harging or r replacing a n new battery y, drive the v vehicle for 2 2-3 minutes to make su ure the batter capacity is s sufficient.
- Page 11 eat can be tu urned to 45 degrees or 9 90 degrees. he seat adjus stment lever r forward an nd rotate se se the lever, continue ro otating the s seat until it locks in pos sition. n the seat to o the forwar d position b before drivin...
- Page 12 .1 CHAR GING THE E BATTER 1. Turn the e power swi itch to (OFF 2. Connec t the charge er’s power c cord into the e power out tlet. 3. Open th he charging socket cap p on the sco ooter’s tille er.
-
Page 13: Battery Charging And Care
Attention - Follow these procedures below to avoid accidents while charging. 1. Please use the enclosed charger only, and recharge the battery to its full capacity every time. You may damage the battery and scooter if you use a charger which is not to the correct specification. 2. -
Page 14: Inspection And Maintenance
■ Cleaning the battery If the batteries are contaminated by water, battery acid, dust or other substances, they will discharge quickly. The batteries supplied with the scooter are sealed and as such are maintenance free with no risk of battery leakage. Please follow the steps below to clean the battery. 1. -
Page 15: Inspection
6.1 INSPECTION Clean the scooter with a damp cloth and dust down approximately once a week to preserve the appearance of the scooter. Adjust the tiller height and return to the original position and swivel the seat once a week to ensure the parts adjust and remove smoothly and easily when required. -
Page 16: Storage
▓Tires The condition of the tires depends on how you drive and use your scooter. Inspecting tire tread Check the tread groove regularly. Replace the tires when the tread groove is less than 0.5 mm. -
Page 17: Warranty
9 . W A R R A N T Y 9.1 WARRANTY There is a limited lifetime warranty on your new Odyssey LX power chair. The warranty covers the power chair for parts only during this period. For more detail, please see the Warranty Conditions below. - Page 18 Warranty Conditions: Any work or replacement part installation must be carried out by an authorized Drive dealer / service agent. To apply the warranty should your power chair require attention please contact your service provider. The warranty on your new Odyssey LX power chair is as follows:...
- Page 19 99 Sea aview Bo oulevard Port Was shington, NY 110 16-998-4 4600 77-224-0 0946 www.d drivemed dical.com...