Sangean RCR-5 Operating Instructions Manual
Mw/fm 2 bands digital
clock radio
Hide thumbs
Also See for RCR-5:
- Operating instructions manual (72 pages) ,
- Manual (15 pages) ,
- Features (1 page)
Advertisement
381R801-A
MW/FM 2 bands Digital
Clock Radio
radio réveil numérique
2 bandes MW/FM
radio reloj digital de
2 bandas MW/FM
AM/FM 2 bands Digitale
Wekkerradio
MW/UKW 2-Band-
Digital-Radiouhr
Operating instruction
GB
Mode d'emploi
F
Instruccions de manejo
E
Gebruiksaanwijzing
NL
Bedienungsanleitung
D
RCR-5
Advertisement
Table of Contents

Related Manuals for Sangean RCR-5


Summary of Contents for Sangean RCR-5
- Page 1 MW/FM 2 bands Digital Clock Radio radio réveil numérique 2 bandes MW/FM radio reloj digital de 2 bandas MW/FM AM/FM 2 bands Digitale Wekkerradio MW/UKW 2-Band- Digital-Radiouhr 381R801-A Operating instruction Mode d’emploi Instruccions de manejo Gebruiksaanwijzing Bedienungsanleitung RCR-5...
-
Page 2: Important Safety Instructions
Important safety instructions 1. Read and understand all safety and operating instructions before the radio is operated. 2. Retain instruction: The safety and operating instructions should be retained for future reference. 3. Heed warnings. All warnings on the appliance and operating instructions should be followed. - Page 3 10. Power cords: The power cord should be positioned so it is not walked on, pinched, or items placed on top of it. Pay particular attention to cords at plugs, convenience receptacles, and the point where they exit from the unit. Unplug the power cord by gripping the power plug, not the cord.
-
Page 5: Lcd Display
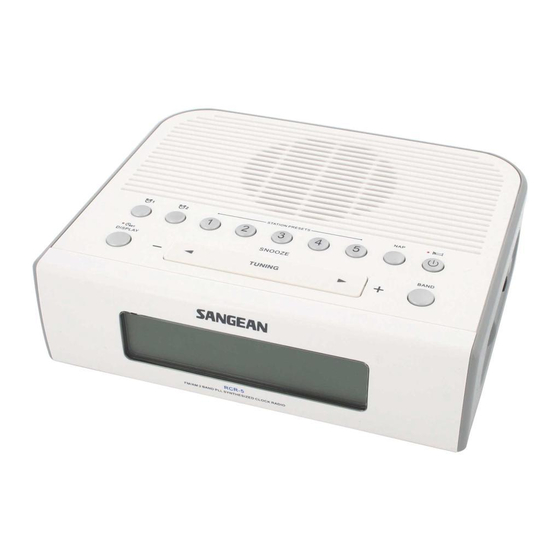
Controls Power on/off and Sleep Timer button BAND button NAP TIMER button STATION PRESETS TUNING Up/Down and Snooze TIME SET/DISPLAY button Alarm 2 button Alarm 1 button LCD Display Volume Control knob Headphones socket AUX in Display Backlight Adjustment button Logo and specification mark FM antenna Power socket... -
Page 6: Operation
Operation Clock Setting (date and time) Clock time has to be set before alarm setting. 1. Press and hold the TIME SET button for more than 2 seconds, the display will show , and flash the year digits. 2. Press TUNING Up/Down button to set the year. 3. -
Page 7: Radio Operation
Radio operation Turn on the radio with the POWER button. Tune into desired stations Station selection 1. Press the TUNING up/down button, to tune into the frequency of your desired stations 2. Scanning tuning- Press and hold the TUNING up/down button for more than 0.5 seconds and release, the radio will search for the next station. -
Page 8: Alarm Clock
Volume Turn the VOLUME knob to adjust the volume. Alarm Clock Alarm setting can be done while the power is during ON or OFF position. The alarm clock is equipped with two alarm systems which can be operated independently of each other. There are 2 kinds of alarm sounding, sound- buzzer and radio 1. - Page 9 5. Press the TIME SET button and then press the TUNING up/down button to select the alarm sound. There are RADIO ALARM , and BUZZER ALARM , 2 options. a. If the BUZZER ALARM is selected – press the TIME SET button to complete the setting.
-
Page 10: Nap Timer
Deactivate alarm setting Press the ALARM 1 or ALARM 2 button for 2 seconds until you hear the beep. The alarm symbol will show . And the alarm will be deactivated. To reactivate the alarm, press the ALARM 1 or ALARM 2 button for 2 seconds until you hear the beep. -
Page 11: Calendar Display
SLEEP timer – auto shut off Continuously pressing the POWER button will activate the sleep function, the radio will switch off automatically in 15, 30, 60, 90, or 120 minutes. The Sleep control begins when you release the POWER button and display will appear the minutes. - Page 12 24/12 hours format, AM, FM frequency step setting 1. Press and hold the BAND button for 6 second until you hear the beep, and the display will flash the current 24/12 hr format. Press the TUNING up/down button to select 24 hr (military hr) or 12 hr format.
-
Page 13: Aux In Socket
AUX IN socket Plug in external audio devices such as CD player to the AUX IN socket (on the side of the radio), then play your device and press the BAND button repeatedly until you see “AU” on the display. The radio will amplify and play out the signal form your device. -
Page 14: Technical Data
Technical data Power supply: 120 Volt/60 Hz (USA version); 230 Volt/50 Hz (Europe version)/ ADAPTOR DC OUT 6V/0.5A Frequency coverage: FM 87.5 – 108.0 MHz AM 520 – 1710 kHz (USA version); AM 522 – 1629 kHz (Europe version) If at any time in the future you should need to dispose of this product please note that: Waste electrical products should not be disposed of with household waste.