
Subscribe to Our Youtube Channel
Related Manuals for BinTec X3200


Summary of Contents for BinTec X3200
- Page 1 X3200 User’s Guide Installation and Configuration © Copyright 2001 BinTec Communications AG, all rights reserved. Version 1.0 Document #71000Q September 2001 X3200 User’s Guide...
- Page 2 The information in this manual is subject to change without notice. Additional in- formation, including changes and release notes for X3200, can be found at www.bintec.net. As an ISDN multiprotocol router,...
- Page 3 How to reach BinTec Communications AG BinTec Communications France Südwestpark 94 6/8 Avenue de la Grande Lande D-90449 Nürnberg F-33174 Gradignan Germany France Telephone: +49 911 96 73 0 Telephone: +33 5 57 35 63 00 Fax: +49 911 688 07 25...
- Page 4 BinTec Communications AG...
-
Page 5: Table Of Contents
Inhaltsverzeichnis Inhaltsverzeic hnis Inhaltsverzeichnis Welcome! What Do You Need X3200 For? Scope of Supply BinTec ISDN Companion CD BinTec Documentation System Requirements Guarantee Terms About this Manual 1.7.1 Contents 1.7.2 Meaning of Symbols Used General Safety Precautions Getting Started Setting Up and Connecting In Advance of Configuration 3.2.1... - Page 6 Connecting Over the Serial Interface 4.1.2 Connecting Over a LAN 4.1.3 Connection Over ISDN Logging In Configuration options 4.3.1 Methods of Configuration 4.3.2 Operation and Menu Architecture of the Setup Tool Basic Configuration with the Setup Tool BinTec Communications AG...
- Page 7 Entering System Data 5.1.3 Configuring the LAN Interface 5.1.4 Configuring the WAN Interface 5.1.5 Configuring the High-Speed Internet Interface 5.1.6 Configuring X3200 as DHCP Server 5.1.7 Setting Filters X3200 and the WAN 5.2.1 Configuring WAN Partners 5.2.2 Internet Access with X3200 5.2.3...
- Page 8 Access Security 7.2.1 Logging In 7.2.2 Checking the Calling Party Number 7.2.3 Authentication of PPP Connections with PAP, CHAP or MS-CHAP 7.2.4 Callback 7.2.5 Closed User Group 7.2.6 Access to Remote CAPI 7.2.7 NAT (Network Address Translation) BinTec Communications AG...
- Page 9 Startup Procedure 7.4.2 Auto Logout 7.4.3 Prevention of Denial-of-Service Attacks Checklist Configuration Management Administration of Configuration Files Resetting X3200 to the Ex Works State Updating Software Troubleshooting Aids to Troubleshooting 9.1.1 Local SNMP Shell Commands 9.1.2 External Aids Typical Errors 9.2.1...
- Page 10 General Product Features 10.2 Front Panel LEDs 10.3 Rear Panel Connections 10.4 Pin Assignment 10.5 BOOT Sequence Important Commands 11.1 SNMP Shell Commands 11.2 BRICKtools for Unix Commands General Safety Precautions in 15 Different Languages Glossary Index BinTec Communications AG...
-
Page 11: Welcome
You can, therefore, easily integrate branch offices into the security concept of your entire enterprise. X3200, of course, ensures the flow of all kinds of information, since it supports fax and other network applications like eMail, Home Banking or File Transfer. - Page 12 How to change the passwords is described in "Changing the password", page Otherwise..BinTec Communications AG wishes you lots of fun with your new product. Pick-up Service However, should you have any problems with your...
-
Page 13: What Do You Need X3200 For
What Do You Need X3200 For? What Do You Need X3200 For? Internet Router of your Internet Service Provider Network of your Internet Service xDSL Provider X3200 ISDN Router of your Company’s Head Office Your Local Area Network Network of your Company’s... - Page 14 When using ISDN cards, ev- ery workplace would have to be equipped separately. If you configure high-speed Internet access with X3200, all the users in the local network profit from shorter Internet access times. The bandwidth of up to...
- Page 15 This is made possible by X3200’s SAFERNET func- tions such as NAT, encryption, filters and monitoring. Configuration and A number of options are available for configuring X3200. Most of the configura- administration tion methods are independent of your computer’s operating system.
- Page 16 ISDN connection. Simple configuration for you and remote administration by an administrator at head office. Independence from the operating system of your PC. On top of all that, you need not do without security, convenience and economy. BinTec Communications AG...
-
Page 17: Scope Of Supply
Adapter cable (reversed) together with red LAN cable for LAN connec- tion directly to PC – ISDN cable (RJ45, black) for ISDN connection – Serial cable (gray) – Power cable BinTec Companion CD Documentation: – User’s Guide – Quick Install Guide – Release Notes, if required Additional material: –... -
Page 18: Bintec Isdn Companion Cd
Configuration Manager allows you to configure and administrate all BinTec routers in the network via a graphic interface. Here you can view and edit SNMP tables and variables. DIME Tools are for monitoring and administration of your X3200. - Page 19 BinTec ISDN Companion CD What else? The Companion CD also contains a range of other useful directories in which you can find the following, for example: The documentation in electronic form (see chapter 1.4, page A copy of the router software (in its unconfigured ex works state), if appli-...
-
Page 20: Bintec Documentation
UK information (English, PDF) Instructions for the operation of BinTec routers in Great Britain. You have received the documentation together with your X3200. The User’s Guide you have received in print; in addition, you can find the complete docu- mentation in electronic form (PDF, HTML) on the BinTec Companion CD. More- over, the latest versions of all documents can be downloaded from www.bintec.net. -
Page 21: System Requirements
400, Macintosh or Novell. For a Windows PC If you use a Windows PC to configure X3200, you need a terminal program for the serial connection, e.g. HyperTerminal. Make sure that HyperTerminal is also installed on the PC during the Windows installation. -
Page 22: Guarantee Terms
Before making a claim under guarantee, make sure you save a backup copy of your configuration. BinTec is not liable in the event of loss of these data. Before you return the equipment for repair via your dealer, please remove all parts, functions, equipment, changes and additional equipment not cov- ered by the guarantee. - Page 23 BinTec; (g) use of equipment with accessories, equipment or additional equipment from manufacturers not authorized by BinTec. 5. If BinTec can prove that no case exists for a claim under the guarantee, the costs of troubleshooting and other related services shall be charged to the customer.
-
Page 24: About This Manual
Configuration Wizard and how to install and configure other useful software. 4: "Connecting X3200" A basis for working with the Setup Tool. 5: "Basic Configuration How to get X3200 working with the Setup Tool with the Setup Tool"... -
Page 25: Meaning Of Symbols Used
To help you locate and interpret information easily, this manual uses the follow- ing visual aids: Symbol Meaning Points out useful and relevant tips and tricks. Predicts potential pitfalls and explains how to avoid them. Brings to your attention general and important points. Explains additional background information. X3200 User’s Guide... - Page 26 Caution (indicates possible danger that, if unheeded, could cause material damage) Warning (indicates possible danger that, if unheeded, could cause bodily harm) Danger (indicates danger that, if unheeded, could lead to serious bodily harm or death) Table 1-2: List of visual aids BinTec Communications AG...
- Page 27 Windows Start menu Indicates keys, key combinations and Win- dows terms. italics, e.g. Indicates values that can be entered or set in the Setup Tool or MIB variables. none Online: blue Indicates links. Table 1-3: Typographical elements X3200 User’s Guide...
- Page 28 Welcome! BinTec Communications AG...
-
Page 29: General Safety Precautions
Make doubly sure the cabling is correct – especially the ISDN and LAN ca- bles – before you turn on X3200. X3200’s ISDN connection must not be connected to the Ethernet connection of your PC or hub, and X3200’s LAN connection should not be connected to the ISDN connection. - Page 30 Cleaning and repair The equipment should only be opened by trained personnel. Only service centers authorized by BinTec should carry out any repairs to the equip- ment. Your dealer will tell you where the service centers are situated. Un- authorized opening and improper repairs can result in serious danger for the user (e.g.
-
Page 31: Getting Started
A configuration assistant, the Configuration Wizard, helps to make the configu- ration as easy as possible. With its help, you can configure X3200 in a matter of minutes. At the end of this chapter you will be able to: Reach... -
Page 32: Setting Up And Connecting
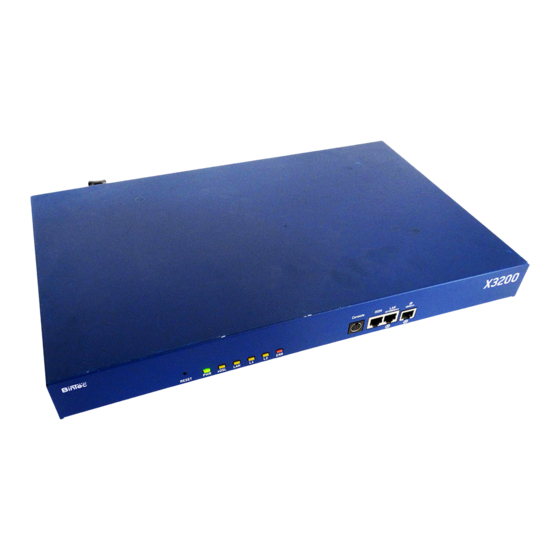
Power LED ISDN S port xDSL LED LAN interface (10/100 Base-T Ethernet) LAN LED High-speed Internet interface (10 Base-T Ethernet) -1 LED Power connection -2 LED Mounting bracket Error LED Figure 3-1: X3200 front and rear view BinTec Communications AG... - Page 33 PABX. This enables you to disable extensions, for example, so that these never reach X3200 at all. Or you can check the charges for the ex- tensions you assign to X3200. Caution! Incorrect cabling of ISDN or LAN interfaces can cause your router to malfunc- tion!
- Page 34 Connect X3200’s LAN interface to your PC. This is done by connecting the red LAN cable to the LAN interface of X3200, which is marked red (10). Plug the adaptor cable into the red cable. Connect the adaptor cable to the network card of your PC.
-
Page 35: In Advance Of Configuration
You should supplement the table with your personal data under the heading "Your value". Then you can refer to the values later when needed. Basic router For the basic configuration of your X3200, you need information about your configuration ISDN connection and network environment: Access data... - Page 36 All you now need for the basic configuration is your license card, which you re- ceived together with your X3200. On the card you will find a serial number, mask and key, which you will need to activate certain features of your X3200.
- Page 37 Some ISPs also offer the option of accessing the Internet without logging in first ("Internet by call"). This means you can check immediately whether your Internet access works with X3200, even if you want to apply to another ISP for your personal access data later on.
-
Page 38: What To Do In Your Windows Network
To check if the TCP/IP protocol is already installed or to install it now, proceed as follows: Windows 95/98 Click the Windows Start button and then Settings Control Panel. Double click Network. Look for TCP/IP in the list of network components. BinTec Communications AG... - Page 39 Click the Protocols tab in the Network dialog box. Click Add. Select TCP/IP protocol from the list of network protocols. Click OK. If setting up a new network, click Yes to answer the question. In an existing network, ask your system administrator. X3200 User’s Guide...
- Page 40 Follow the on-screen instructions and restart your PC when you have fin- ished. Finally Repeat the installation for all PCs on the network where you want to use the LAN-LAN connection, Internet access or communications programs over X3200. BinTec Communications AG...
-
Page 41: Installing Brickware Under Windows
Proceed as follows to install BRICKware: Click Next. Enter the directory in which BRICKware is to be installed or accept the de- fault directory. Click Next. Select your router type, i.e. the group X1000, X1200, X3200 or X4000 . Click Next. X3200 User’s Guide... - Page 42 Configuration Wizard if you want to use the Configuration Wizard for basic configuration of X3200. Click Next. A list of the components selected for the installation appears. To install these components, click Next. The files are copied. A window appears after a short time telling you that...
-
Page 43: Solution Scenarios
T-ISDN ADSL T-ISDN dsl ISDN telephone ADSL splitter (BBAE) 192.168.1.1 ADSL modem 192.168.1.2 (NTBBA) X3200 192.168.1.254 192.168.1.3 Figure 3-2: T-ISDN dsl connection You can quickly and easily configure high-speed Internet access for X3200 der Windows using the Configuration Wizard. X3200... - Page 44 T-DSL configuration example for the Internet Service Provider T-On- line (see chapter 5.2.2, page 155). Please also note the configuration example for an ADSL connection of the ISP Telekom Austria (see chapter 5.2.2, page 155). BinTec Communications AG...
-
Page 45: Using Communications Applications
Solution Scenarios 3.4.2 Using Communications Applications Mailbox analog ISDN FTP server X3200 FAX server Router of your Your Local Area Network Internet Provider Datex-J server Internet Figure 3-3: X3200 with communications applications Use the Configuration Wizard under Windows to use communications appli- cations (e.g. -
Page 46: Connecting A Branch Office To Head Office
– Connection to a Corporate Network, e.g. for connecting to a head of- fice (chapter 3.5.3, page 58). Complete the configuration as described in chapter 3.5.4, page Make additional settings on your PCs (chapter 3.7, page 65). BinTec Communications AG... -
Page 47: Providing Access To Head Office For Field Service Staff Without Router Access (Dial-In)
To provide field service or home office staff with access to data at their head office (dial-in), you need the Setup Tool for configuring your X3200. A PC in a home office can access the corporate network via an ISDN connec-... -
Page 48: Configuring X3200 Under Windows
X3200 Under Windows You started the Configuration Wizard chapter 3.3, page 41, which you can now use to configure X3200. X3200 must first be ready for operation. The following configuration options are available: Basic router configuration Internet access Corporate network connection An extensive online Help Assistant is available if you have any questions dur- ing configuration. - Page 49 Configuring X3200 Under Windows Starting the If the Configuration Wizard has not yet been started, proceed as follows: Configuration Wizard Select the Windows Start menu and click Program BRICKware Configuration Wizard. The start window of the Configuration Wizard opens: Figure 3-6:...
- Page 50 Making a serial Click Next. connection Configuration Wizard establishes a connection to X3200. After that the router is restarted and the type of router identified: in your case, X3200. If the Configuration Wizard cannot establish a connection or an error message appears:...
-
Page 51: Configuring The Basic Router Configuration
X3200 basic configuration Caution! All BinTec routers are shipped with the same user names and passwords. As long as the password remains unchanged, they are not protected against unau- thorized use. How to change the passwords is described in "Changing the pass- word", page... - Page 52 65). An already configured If your PC has a fixed IP address, the Wizard asks you in the Router IP Ad- dress window for X3200’s IP address in the LAN and the corresponding network netmask. Enter the values, e.g. 192.168.1.254 255.255.255.0...
- Page 53 Configuring X3200 Under Windows Enter the extensions of your ISDN port that you want to use with X3200: Enter an extension in the Extensions field and click Add. Repeat the entry for all other extensions (cf. figure 3-8, page 53).
- Page 54 Configuration in Expert You can also do the following in Expert Mode: Mode Change the system data, e.g. contact, name and location of X3200. Specify the IP address of a DNS. Configure your router as a DHCP server. Receive the system time from a source other than ISDN.
-
Page 55: Internet Access With X3200
Configuring X3200 Under Windows Monitor the utilization of X3200. State the time when charging information is to be obtained from ISDN. Configure user accounts for telecommunications applications (CAPI and/or TAPI). 3.5.2 Internet Access with X3200 Internet ( 1234567 GoInternet MyName... - Page 56 Enter the access number of the Internet Service Provider, e.g. 1234567 use the preset number. Click Next. Enter your user name and the associated password, e.g. MyName TopSecret Click Next. The configuration of your Internet connection is complete. BinTec Communications AG...
- Page 57 Configuring X3200 Under Windows Conventional Internet To configure a conventional Internet access, proceed exactly as for an Internet access test access. In this case, you can set up a connection to any Internet Service Provider from which you have previously received access data.
-
Page 58: Connecting X3200 To A Corporate Network
Click Next. Enter your local name and the common password, e.g. LittleIndian Secret Your local name must be the same name as your partner uses for you as a WAN partner. Click Next. BinTec Communications AG... - Page 59 Configuring X3200 Under Windows Add a route to your head office: If you have not configured Internet access, choose Use Default Route. If you have configured Internet access, then enter the route yourself: Click Add. Enter the IP address or network address and the netmask, e.g.
-
Page 60: Completing The Configuration
X3200 before overwriting. Click Finish to complete configuration. The Wizard logs in to X3200. An existing configuration is saved on the rout- er as old_cfg. The new configuration is transferred to X3200 and also saved on your PC under the name brick.cfg in the BRICK directory. A message appears after a while saying that the configuration is completed. - Page 61 If you know the password of the existing configuration, enter the password and click OK. The Wizard tries to log in to X3200. If you do not know the password, click Unknown and then OK. X3200 is reset to the ex works state and all the previous configurations are lost.
- Page 62 Getting Started The Remote Clients Configuration window opens: Figure 3-13: Remote CAPI configuration BinTec Communications AG...
-
Page 63: Remote Capi Interface On The Pc
Follow the instructions on the screen. Click OK. The Remote CAPI configuration window appears (cf. figure 3-13, page 62). 3.6.2 Configuring Remote CAPI Proceed as follows (see figure 3-13, page 62): Enter X3200’s IP address, e.g. 192.168.1.254 in the Remote CAPI tab. X3200 User’s Guide... - Page 64 You can find a more detailed description of the Remote CAPI configuration in BRICKware for Windows. A description of the Multibrick CAPI for Windows NT is also included there, which allows you to define several BinTec routers in the network as CAPI servers. BinTec Communications AG...
-
Page 65: Configuring A Pc
Double click Network. Click TCP/IP Properties. Enter a unique IP address for your PC and the netmask in the IP Address tab, e.g. 192.168.1.1 255.255.255.0. 192.168.1.254, Enter X3200’s IP address, e.g. in the Gateway tab. Click Add. X3200 User’s Guide... - Page 66 Getting Started If you do not have your own DNS, enter X3200’s IP address in the DNS 192.168.1.254 Configuration tab under DNS Server Search Order, e.g. Windows NT Click the Windows Start button and then Settings Control Panel. Double click Network.
-
Page 67: Finding Pcs On Your Partner's Network
To avoid unintentional charges, it is essential that you monitor your X3200. Use the Credits Based Accounting System for this purpose (see chapter 7.1.3, page 268). - Page 68 If in doubt, ask your system administrator. You can also register completely with the Windows NT domain of a partner net- work. To test such a configuration, BinTec provides a test access for your use. How to configure this access is described at www.bintec.net.
- Page 69 Another possible method of setting up a network drive connection is as follows: drive Open Windows Explorer, click Tools, then Map network drive. Specify the drive and enter the path, e.g. \\BossPC Click Reconnect at logon. Click OK. X3200 User’s Guide...
-
Page 70: Configuring Fax And Answering Machine With Rvs-Com Lite
Configuring Fax and Answering Machine with RVS-COM Lite After you have configured your PC and X3200, install RVS-COM Lite. You can obtain the necessary license key by registering your router at www.bintec.net. RVS-COM Lite offers you facilities for the following:... - Page 71 Figure 3-14: Start window of the RVS-COM Lite configuration assistant Should an error message appear saying no CAPI interface has been installed: Make sure X3200 is connected to your ISDN connection. Make sure your Remote CAPI configuration is configured as described in chapter 3.6.2, page...
- Page 72 The area code must be entered without the "0" prefix. You only need the exchange number if you are operating X3200 with a PABX. Normally, the exchange numbers for local and long-distance calls are the same (see figure 3-15, page 72). BinTec Communications AG...
-
Page 73: Configuring Rvs-Com Lite
ISDN phone numbers (point-to-multipoint) and extension number and prefix of the extension (point-to-point). If you are operating X3200 on a point-to-point connection, an entry must be made in Setup Tool in addition to the settings under Wizard. In CM-1BRI, ISDN... - Page 74 Select the Start button in the Windows menu and click Program RVS- COM Lite CommCenter. Click Add in the Phone Numbers tab to enter more phone numbers. Enter the numbers that you have already used for router configuration with the Wizard (cf. figure 3-17, page 75). BinTec Communications AG...
- Page 75 Figure 3-17: Phone number configuration in RVS-COM Lite Click Apply after you have entered all the numbers. Make sure that the op- tions Use software fax for sending fax and Use software fax for receiv- ing fax are active in the Software fax tab. X3200 User’s Guide...
- Page 76 Click OK. Click Apply and finally OK. The following message appears in the list of connections: "ISDN: waiting for call." RVS CommCenter is ready to take calls and faxes. BinTec Communications AG...
-
Page 77: Testing Your Configuration
Internet provider. Make sure you configure a connection over your lo- cal network. Just send an e-mail to a good friend or – if you like – send one to BinTec! Use the following e-mail address for this: testmail@bintec.de - enter test mail as reference. - Page 78 The RVS Mail Spooler appears and informs you about the status of the fax being sent. If you have sent a fax to yourself, you should receive it right away (cf. chapter 3.9.4, page 79). This is the best way to check your fax application is working properly. BinTec Communications AG...
-
Page 79: Receiving A Fax
3.9.4 Receiving a Fax As the fax solution with X3200 and RVS-COM Lite is a softfax solution, the fax software must always be started if you want to receive faxes. RVS-COM Lite is created automatically in the Windows task bar during installation of RVS-COM Lite. - Page 80 Figure 3-19: RVS inbox Double-click the fax entry to open your received fax messages (including the test messages created by RVS-COM). The RVS Fax Viewer opens. If you have sent yourself a fax, you should find it in the inbox. BinTec Communications AG...
-
Page 81: Connecting X3200
Connecting X3200 This chapter includes explanations about the different access and configuration methods. You will learn the following: How to access X3200 How to log in What methods of configuration are available How the Setup Tool is structured X3200 User’s Guide... -
Page 82: Connection Methods
Connecting X3200 Connection Methods Before you can configure your router, you must connect it. There are three ways to do this: Over the serial interface Over your Over an ISDN connection Serial Connection X3200 ISDN isdnlogin Figure 4-1: Possible connections to... -
Page 83: Connecting Over The Serial Interface
Connecting Over the Serial Interface Initial configuration A serial interface connection is the most appropriate method if you are config- uring your X3200 for the first time. To connect X3200 to your PC over the serial port, proceed as explained in chapter 3.1, page... - Page 84 Connecting X3200 If the login prompt does not appear after pressing Return several times, the connection to X3200 has not been set up successfully. Check the settings of COM1 or COM2: Click File Properties. Click Configure..in the Connect To tab.
-
Page 85: Connecting Over A Lan
X3200 with telnet: Windows Click the Windows Start button and then Run..Type telnet <IP address of X3200>. Click OK. A window with the login prompt appears. You are now in the SNMP shell of X3200. Continue with chapter 4.2, page X3200 User’s Guide... -
Page 86: Connection Over Isdn
X3200 in the home of- fice merely has to be connected to the ISDN outlet and turned on. Access over ISDN costs money. If X3200, router and PC are in the same LAN, it is cheaper to access X3200 over the LAN or the serial interface. -
Page 87: Logging In
Logging In Logging In Regardless of how you access X3200, the SNMP shell X3200 with the login prompt always appears first. (Exceptions to this rule are the Configurati- on Wizard Configuration Manager under Windows.) Figure 4-2: Login prompt In order to log in, you need to know the user name and password. In its ex works... - Page 88 Your router then issues an input prompt, e.g. X1200:>. The login was suc- cessful. Caution! To prevent unauthorized access to X3200, you should change the passwords right away, in case you did not do this during the basic configuration with the Configuration Wizard.
-
Page 89: Configuration Options
Setup Tool The Setup Tool is a menu-driven tool for the configuration and administration of X3200. Configuration with the Setup Tool is much easier and clearer than con- figuration with SNMP commands, although not all settings can be made with the Setup Tool. -
Page 90: Operation And Menu Architecture Of The Setup Tool
4.3.2 Operation and Menu Architecture of the Setup Tool You can call up the Setup Tool once you have logged in to X3200: Type setup after the input prompt and press Return. The main menu of the Setup Tool appears. - Page 91 The menu line contains a navigation aid to show you where you currently are in the Setup Tool menu system. The system name of X3200 is also displayed. This is especially helpful if you are using several BinTec routers with different system names. X3200 User’s Guide...
- Page 92 Connecting X3200 The configuration window is where the actual entries are made and the respec- tive settings displayed. The field in which the cursor is currently located is also marked. The help line at the bottom of the window tells you how to move around or how to change entries in the menu currently being displayed.
- Page 93 All variables set in the current menu and all its submenus are saved to memory. These changes become effective immediately. EXIT To leave the current menu and return to the previous menu. Any entries made are lost. Table 4-3: Buttons in the Setup Tool X3200 User’s Guide...
- Page 94 List search function Some Setup Tool menus contain lists of items, e.g. the WAN P menu, ARTNER which lists all WAN partners currently configured. X3200 Setup Tool BinTec Communications AG [WAN]: WAN Partners MyRouter Current WAN Partner Configuration Partnername Protocol State ∧...
- Page 95 Table 4-4: Search results Changing the The procedure described below for changing the password applies to all X3200 password passwords: the access passwords for the user names admin, read and write, the HTTP password, the PPP password and the provider password.
- Page 96 Connecting X3200 Select the password field and enter the new password. The field changes to the change mode and the message Change Password appears in the help line. Now press Return, Tabulator or a Cursor key to confirm. The field changes to the confirm mode and Confirm Password is dis- played in the help line.
- Page 97 4-4, page 97. Not all functions are available on all routers (e.g. VPN). To use them, an extra license is necessary, which you can acquire from BinTec Communica- tions AG. When you activate the necessary license, X3200 detects this and dis- X3200 User’s Guide...
- Page 98 This menu is for entering the license information printed on the license card ICENSES supplied with the equipment. This menu is also used for activating extra licenses. In this menu, you enter the basic system settings of X3200, e.g. system name YSTEM and passwords. CM-100BT, F This menu is for configuring the interface of X3200.
- Page 99 IP addresses to the hosts in the LAN dynamically. SNMP is for changing the basic SNMP settings. DNS is for defining the procedure for name resolution in X3200. is for personal authentication of IP OKEN UTHENTICATION IREWALL connection partners.
- Page 100 Includes the settings for BinTec’s CAPI user concept. You can use this to assign user names and passwords to users of X3200’s CAPI applications. This makes sure that only authorized users can receive incoming calls and make outgoing calls via CAPI.
-
Page 101: Basic Configuration With The Setup Tool
LAN-LAN connection (e.g. corporate network connection) Saving the configuration file The basic router settings are essential for the operation of X3200. Depending on your needs, you can configure Internet access and corporate network ac- cess right away or later. - Page 102 Keep in mind that any changes made to the configuration of your router are lost after a reboot if you do not save the new configuration as boot configuration. chapter 5.3, page 172 on how to proceed. BinTec Communications AG...
-
Page 103: Basic Router Settings
Basic Router Settings Basic Router Settings The configuration of the basic router settings concerns only your X3200 your local network. The relevant detail from figure 5-4, page 131 is illustrated in figure 5-1, page 103. There you will find examples of names, IP address- es, extensions, etc. -
Page 104: Entering Licenses
The license entries are shown under (Serialnumber, Mask, Key). If you have not yet entered any licenses, only IP is entered in the subsystem list, i.e. routing is available ( builtin ). Subsystems The following subsystems can be activated on your X3200: Subsystems Meaning IP routing TUNNEL... -
Page 105: Entering System Data
If not ok is shown as the state, you have probably made a typing error. Try again. 5.1.2 Entering System Data System name, ... Next you should enter the basic system data for identification of your X3200. Go to S YSTEM X3200 User’s Guide... - Page 106 System Name Defines the system name of X3200, is also used as PPP host name. Appears as input prompt when logging in to X3200. If no system name is set, a warning appears on logging in with the user name admin.
- Page 107 YSTEM ASSWORD SETTINGS Caution! All BinTec routers are shipped with the same user names and passwords. As long as the password remains unchanged, they are not protected against unau- thorized use. How to change the passwords is described in "Changing the pass- word", page...
-
Page 108: Configuring The Lan Interface
225). 5.1.3 Configuring the LAN Interface address, The next step is to configure X3200’s LAN interface. The LAN interface is the netmask, physical interface to the local network. In the following menu, enter the address encapsulation where your router can be reached in the LAN. As long as your router does not have this entry, it cannot be recognized by other hosts in the network. - Page 109 Basic Router Settings If your X3200 is connected to a LAN that consists of two subnets, you should enter a Second Local IP Number and a Second Local Netmask for it for the second subnet. This is explained in the following example:...
- Page 110 Basic Configuration with the Setup Tool X3200 Setup Tool BinTec Communications AG [LAN]: Configure Ethernet Interface MyRouter IP Configuration Local IP Number 192.168.1.254 Local Netmask 255.255.255.0 Second Local IP Number Second Local Netmask Encapsulation Ethernet II Mode Auto IPX Configuration...
- Page 111 100 Mbps Full Duplex Table 5-4: CM-BNC/TP, E THERNET To do Proceed as follows to configure X3200’s LAN interface: Enter Local IP Number of X3200, e.g. 192.168.1.254 Enter Local Netmask, e.g. 255.255.255.0 If applicable, enter Second Local IP Number and Second Local Netmask.
-
Page 112: Configuring The Wan Interface
You have returned to the main menu and the entries have been saved. 5.1.4 Configuring the WAN Interface Interface to ISDN The next step involves configuring your X3200’s interface. The WAN interface is the physical interface to the ISDN. You can use it for di- alup connections and with an extra license for leased lines as well. - Page 113 D-channel and both B- channels leased line B1 + B2 different endpoints (digital 64S with dual connection): leased line to two different endpoints The settings for leased lines appear only if you have entered a relevant license. X3200 User’s Guide...
- Page 114 The settings for leased lines appear only if you have entered a relevant license. Table 5-5: CM-1BRI, ISDN S0 Do not use the setting not used for dialup connections under B-Channel 1 and B-Channel 2, as this mode can cause undesirable side effects. BinTec Communications AG...
- Page 115 X3200 supports the following services: PPP (routing) service is X3200‘s general routing service. It connects in- coming data calls from WAN partners’ dialup connections to your LAN. This enables partners outside your own local network to ac- cess hosts within your LAN.
- Page 116 Called Party Number (CPN) and the type of call (data or voice call). The CPN is the extension the partner has dialed to reach X3200. Then the call is forwarded to the corresponding service (see figure 5-3, page 116).
- Page 117 All incoming calls that do not match an entry are passed on to the CAPI ser- vice. Assign your own numbers to the various services. Enter your own numbers under Number. Now set the entries for Incoming Call Answering: Go to CM-1BRI, ISDN S0 NCOMING NSWERING X3200 User’s Guide...
- Page 118 Basic Configuration with the Setup Tool The following menu window opens: X3200 Setup Tool BinTec Communications AG [WAN][INCOMING]: Incoming Call Answering MyRouter Item Number Mode Username CAPI 1.1 EAZ 1 Mapping right to left CAPI 1.1 EAZ 1 Mapping right to left...
- Page 119 Enables 64 kbps PPP data connections. PPP 56k Enables 56 kbps PPP data connections. PPP Modem Not available in X3200. PPP DOVB Data transmission Over Voice Bearer - useful in the USA, for example, where voice connections are sometimes cheaper than data connections.
- Page 120 PPP V.110 Permits PPP connections to V.110 at bit rates (1200...38400) of 1200 bps, 2400 bps,..., 38400 bps. Pots Not available in X3200. PPP Modem Profile 1...8 Not available in X3200. CAPI 1.1 EAZ 0...9 Enables connections with Remote CAPI appli- Mapping cations.
-
Page 121: Configuring The High-Speed Internet Interface
X3200 is connected to a PABX, only the PABX extension number arrives at X3200. If you are not sure which number arrives at X3200, proceed as follows: Call X3200 with a conventional telephone using one of its extension num- bers. -
Page 122: Configuring X3200 As Dhcp Server
IP address pool. A PC sends out an address request and in turn receives its IP address assigned by X3200. You do not need to assign fixed IP addresses to PCs, which reduces the amount of configuration work in your network. To do... - Page 123 MAC Address. Gateway Defines which IP address is assigned to the DHCP client as gateway. If no IP address is entered here, the IP address of X3200 is also given. NetBT Node Type Defines how and in what order the assignment of NetBIOS names to IP addresses is attempted for the hosts of an address pool.
-
Page 124: Setting Filters
Use the serial interface or ISDN login to access X3200 for filter configura- tion. If you access X3200 over telnet, select IP CCESS ISTS EDIT : First rule = none . NTERFACES Go to IP ADD. CCESS ISTS ILTER BinTec Communications AG... - Page 125 Basic Router Settings The following menu window opens: X3200 Setup Tool BinTec Communications AG [IP][ACCESS][FILTER][ADD]: Configure IP Access Filter MyRouter Description wrong_dns Index Protocol Source Address Source Mask Source Port specify Specify Port Destination Address Destination Mask Destination Port specify...
- Page 126 To define rules for these filters, proceed as follows: Go to IP ADD: CCESS ISTS ULES X3200 Setup Tool BinTec Communications AG [IP][ACCESS][RULE][ADD]: Configure IP Access Rules MyRouter Action deny M Filter...
- Page 127 Basic Router Settings The following menu window displays all entries saved: X3200 Setup Tool BinTec Communications AG [IP][ACCESS][RULE]: Configure IP Access Rules MyRouter Abbreviations: RI (Rule Index) M (Action if filter matches) FI (Filter Index)!M (Action if filter does not match)
- Page 128 Leave the main menu via EXIT and save the configuration you have creat- ed with Save as boot configuration and exit. The settings are then saved to the flash memory and will not be lost when X3200 is switched off (chapter 5.3, page 172). BinTec Communications AG...
-
Page 129: X3200 And The Wan
X3200. This applies to outgoing connections (X3200 dials its WAN partner), incoming connections (a WAN partner dials the number of your X3200) and leased lines. If you want to access the Internet, you must configure your In- ternet Service Provider ( ISP) as a WAN partner. - Page 130 PC. A basic scenario is illustrated in figure 5-4, page 131 and gives you an idea of what connections from X3200 to the WAN partners, ISP and head office could look like. BinTec Communications AG...
-
Page 131: Configuring Wan Partners
X3200 and the WAN Internet Router of your Internet Service Provider Network of your Internet Service xDSL Provider X3200 ISDN Router of your Company’s Head Office Your Local Area Network Network of your Company’s Head Office Figure 5-4: Basic scenario 5.2.1... - Page 132 35). The terms used may vary slightly from pro- vider to provider. To enter a WAN partner, proceed as follows: Go to WAN P ARTNER The following menu window opens: X3200 Setup Tool BinTec Communications AG [WAN]: WAN Partners MyRouter Current WAN Partner Configuration Partnername...
- Page 133 If you have set up one or more leased lines (see chapter 5.1.4, page 112) on configuring the WAN interface of X3200, a WAN partner for each leased line is already created automatically in the WAN Partner menu. Edit this entry to suit your requirements.
- Page 134 X31 B-Channel: not available on X3200 X.25 No Signalling: not available on X3200 X.25 PAD: not available on X3200 X.25 No Configuration: not available on X3200 Frame Relay: not available on X3200 X.25 No Configuration, No Signalling: not available on X3200 BinTec Communications AG...
- Page 135 X3200 and the WAN Field Meaning Compression Defines the type of compression that should be used for data traffic to the WAN partner. Possi- ble values: STAC: only if Encapsulation = PPP MS-STAC: only if Encapsulation = PPP none X3200...
- Page 136 DES3 168: Triple DES with 168-bit key (with a valid VPN license only) none: no encryption These values are only available if PPP , Async PPP over X.75 , Async PPP over X.75/T.70/ BTX or X.25_PPP has been selected under Encapsulation. BinTec Communications AG...
- Page 137 X3200 and the WAN Field Meaning Calling Line Indicates whether calls from this WAN partner Identification should be identified by means of the calling party number ( CLID). The value of this field is dependent on Direction in the submenu WAN N and cannot be set here.
- Page 138 Basic Configuration with the Setup Tool Entering extension numbers X3200 Setup Tool BinTec Communications AG [WAN][ADD][WAN Numbers]: WAN Numbers (BigBoss) MyRouter WAN Numbers for this partner: WAN Number Direction 0911987654321 outgoing DELETE EXIT Press <Ctrl-n>, <Ctrl-p> to scroll, <Space> tag/untag DELETE, <Return>...
- Page 139 (CLID) For incoming and outgoing calls. incoming (CLID) For incoming calls, where your WAN partner dials in to your X3200. Table 5-13: Direction When X3200 is connected to a PABX system for which a "0" prefix is neces- sary for external line access, this "0"...
- Page 140 If the calling party number of an incoming call matches both a WAN partner’s Number with wildcards and a WAN partner’s Number without wildcards, the entry without wildcards is always used. To do Make the following entries: 0911987654321 Enter the Number, e.g. Select the Direction, e.g. outgoing BinTec Communications AG...
- Page 141 X3200 and the WAN Press SAVE. The entries are saved and listed. Leave WAN P WAN N with EXIT. ARTNER UMBERS Now enter the settings of your WAN partner. These are used to au- authentication thenticate your connection partner. When a call is received, the Calling Party Number is always sent over the ISDN D-channel.
- Page 142 Basic Configuration with the Setup Tool Field Meaning Partner PPP ID ID of WAN partner. Local PPP ID X3200’s ID PPP Password Password Keepalives Activates keepalive packets. Link Quality Monitoring PPP Link Quality Monitoring acc. to RFC 1989 WAN P...
- Page 143 X3200 and the WAN How to enter the passwords is described in "Changing the password", page Enter PPP Password, e.g. Secret Select Keepalives, e.g. Select Link Quality Monitoring, e.g. Confirm with OK. You have returned to WAN P ADD. ARTNER...
- Page 144 = 50% Connected Static Short Hold Short Hold Data Disconnected = 60 s Connected Dynamic Idle Timer Short Hold Data Disconnected = 50% 120 s 240 s 360 s Figure 5-5: Dynamic and static short hold BinTec Communications AG...
- Page 145 X3200 and the WAN Proceed as follows: Go to WAN P ARTNER DVANCED ETTINGS The following menu window opens: X3200 Setup Tool BinTec Communications AG [WAN][ADD][ADVANCED]: Advanced Settings (BigBoss) MyRouter Callback Static Short Hold (sec) Idle for Dynamic Short Hold (%)
- Page 146 IP address netmask of your partner. Proceed as follows: Go to WAN P IP : ARTNER X3200 Setup Tool BinTec Communications AG [WAN][ADD][IP]: IP Configuration (BigBoss) MyRouter IP Transit Network Local IP Address Partner’s LAN IP Address 10.1.1.0 Partner’s LAN Netmask 255.255.255.0...
- Page 147 X3200 and the WAN The menu contains the following fields: Field Meaning IP Transit Network Defines whether X3200 uses a transit network to the WAN partner. Local IP Address IP address of X3200. You do not normally need to make an entry...
- Page 148 DNS on the PCs of your network. Creating a Routing Entry Creating routing entry You have just entered a WAN partner in your X3200. A routing entry is created automatically in the routing table of your X3200 for every WAN partner. You can edit existing routing entries and add new ones.
- Page 149 X3200 and the WAN Proceed as follows: Go to IP OUTING X3200 Setup Tool BinTec Communications AG [IP][ROUTING]: IP Routing MyRouter The flags are: U (Up), D (Dormant), B (Blocked), G (Gateway Route), I (Interface Route) S (Subnet Route), H (Host Route), E (Extended Route)
-
Page 150: Bintec Communications Ag
Basic Configuration with the Setup Tool The following menu window opens: X3200 Setup Tool BinTec Communications AG [IP][ROUTING][ADD]: IP Routing MyRouter Route Type Network route Network WAN without transit network Destination IP Address 10.1.1.0 Netmask 255.255.255.0 Partner / Interface BigBoss... - Page 151 The Network field contains the following selection options: Possible Values Meaning Route to a destination host or LAN that can be reached via X3200’s LAN interface. WAN without transit Route to a destination host or LAN that can be network reached via a WAN partner without transit net- work.
- Page 152 Table 5-20: Network You can only configure one default route on your X3200. If you set up access to the Internet, you must therefore configure the route to your Internet Service Pro- vider (ISP) as a default route.
- Page 153 X3200 and the WAN ( 1234567 10.1.2.0 255.255.255.0 BigBoss LittleIndian Secret Subnet 2 of your Company’s Head Office ISDN Router of X3200 your Company’s Head Office ( 1234567 10.1.1.0 255.255.255.0 BigBoss LittleIndian Secret Your Local Area Network Subnet 1 of your Company’s...
- Page 154 More information about Network Address Translation (NAT) can be found in chapter 7.2.7, page 282. Proceed as follows to activate NAT: Go to IP ETWORK DDRESS RANSLATION X3200 Setup Tool BinTec Communications GmbH [IP][NAT]: NAT Configuration MyRouter Select IP Interface to be configured for NAT Name static mappings GoInternet...
-
Page 155: Internet Access With X3200
X3200 and the WAN X3200 Setup Tool BinTec Communications AG [IP][NAT][CONFIG]: NAT Configuration (GoInternet) MyRouter Network Address Translation Configuration for sessions requested from outside Service Destination Source Dep. Dest. Dep. Port Remap DELETE SAVE CANCEL Use <Space> to select To do Make the following entries: Select Network Address Translation: on . - Page 156 The T-Online number and the co-user number must be separated by # if the T- Online number has less than 12 digits. Type in PPP Password. Activate Keepalives on . Deactivate Link Quality Monitoring: off . Confirm with OK. You have returned to the menu WAN P ADD. ARTNER BinTec Communications AG...
- Page 157 X3200 and the WAN Setting short hold Select Advanced Settings and press Return. Select Callback: no . Enter Static Short Hold (sec), e.g. Enter Idle for Dynamic Short Hold (%): Enter Delay after Connection Failure (sec), e.g. Leave out Extended Interface Settings.
- Page 158 You do not need to enter a Partner PPP ID. This field remains empty. Enter Local PPP ID (= your user name) 3909987000 e.g. Type in PPP Password. Deactivate Keepalives: off . Deactivate Link Quality Monitoring: off . BinTec Communications AG...
- Page 159 X3200 and the WAN Confirm with OK. You have returned to the menu WAN P ADD. ARTNER Setting short hold Select Advanced Settings and press Return. Select Callback: no . Enter Static Short Hold (sec), e.g. . (If you use a flat-rate connection, you can enter Static Short Hold (sec) -1 .)
- Page 160 Add a new entry with ADD. Enter Number (= access number), e.g. 0191011 Select Direction: outgoing . Press SAVE. The extension you use to call T-Online is now in the list. Leave WAN P WAN N with EXIT. ARTNER UMBERS BinTec Communications AG...
- Page 161 X3200 and the WAN Selecting PPP Select PPP and confirm with Return. authentication Select Authentication: CHAP + PAP . Enter your Partner PPP ID (= provider name): T_Online . Enter Local PPP ID (= your user name): e.g. 000460004256091169386#0001 The T-Online user name comprises the following elements: <user account><T-Online number>#<co-user number>...
- Page 162 Press SAVE. Leave IP with EXIT. OUTING Activating NAT Go to IP ETWORK DDRESS RANSLATION Select the IP Interface T_Online and press Return. Select Network Address Translation: on . Press SAVE. Leave IP with EXIT. ETWORK DDRESS RANSLATION BinTec Communications AG...
-
Page 163: Dialing Into Corporate Network
X3200 and the WAN Leave IP with EXIT. You have returned to the main menu. Configuration of Internet access over T-Online is complete. 5.2.3 Dialing into Corporate Network Router of your Company’s Head Office ISDN X3200 ( 1234567 10.1.1.0 255.255.255.0... - Page 164 Select Advanced Settings and press Return. Select Callback: no . Enter Static Short Hold (sec), e.g. Enter Idle for Dynamic Short Hold (%), e.g. Enter Delay after Connection Failure (sec), e.g. Leave out Extended Interface Settings (optional). Select Channel Bundling: e..g. BinTec Communications AG...
- Page 165 X3200 and the WAN Select Layer 1 Protocol: ISDN 64 kbps . Confirm with OK. You have returned to the menu WAN P ADD. ARTNER Carrying out IP Select IP and press Return. configuration Select IP Transit Network: no .
- Page 166 Leave IP with EXIT. Corporate Network Connection Dial-in (without router) 192.168.1.1 Mobile phone and laptop ( 0911/1234567 ISDN X3200 192.168.1.2 192.168.1.254 Sinlge Workstation with ISDN card 192.168.1.3 Your Local Area Network 100.100.100.1 Figure 5-8: Scenario for dial-in BinTec Communications AG...
- Page 167 X3200 and the WAN To access the data at head office, field service staff can dial in over laptop and mobile phone to the network at head office. If home office staff have no router, they need either an ISDN card in their PC or a modem. The configuration of X3200 and the PC or laptop is basically identical in all these cases.
- Page 168 Select Layer 1 Protocol: ISDN 64 kbps . Confirm with OK. You have returned to the menu WAN P ADD. ARTNER Press Save. Leave WAN P with EXIT. ARTNER Entering IP address Go to IP IP A WAN (PPP) ADD. DDRESS BinTec Communications AG...
- Page 169 X3200 and the WAN Enter Pool ID, e.g. Enter IP Address (= IP address of your dial-in partner), e.g. 100.100.100.1 Enter Number of Consecutive Addresses, e.g. Press SAVE. Leave IP IP A WAN (PPP) with EXIT. DDRESS Leave IP with EXIT.
- Page 170 Create connection (Select). Entering user name and password (= Partner PPP ID and PPP Password under WAN P PPP in X3200). ARTNER The connection is set up on leaving the menu by pressing OK. If you want to dial in to a Windows network, you must carry out a few additional configuration steps.
- Page 171 X3200 and the WAN Configuration for If you want to log in to a Windows NT server, you or the system administrator Windows network must carry out configuration steps at two points: at the Windows NT Domain Server at the Windows PC...
-
Page 172: Saving The Configuration File
Basic Configuration with the Setup Tool Saving the Configuration File After creating a working configuration on your X3200, make sure you save it: In the Setup Tool main menu, select Exit and press Return. Another menu window opens: X3200 Setup Tool... -
Page 173: Advanced Configuration
Advanced Configuration This chapter contains more X3200 configuration options for the advanced user. This is the right chapter if you would like to make additional settings that are not covered by the Configuration Wizard or in chapter 5, page 101. -
Page 174: General Wan Settings
If a new dial-in takes place within an interval of one hour, an attempt is made to assign the same IP address assigned to this partner the last time. Configuration is made in: WAN (PPP) ADDRESS POOL WAN P ARTNER WAN P ARTNER DVANCED ETTINGS BinTec Communications AG... - Page 175 Table 6-1: ADDRESS POOL Field Meaning IP Transit Network Defines whether a transit network is to be used between X3200 and the WAN partner. You must select dynamic server here if you assign an address pool. WAN P Table 6-2: ARTNER...
-
Page 176: Capi User Concept
This password ensures that only users entered with a user name and password can use X3200’s CAPI services. Example This means, for example, that an incoming fax for the user Winnetou is only passed to Winnetou and not to a user such as Old Shatterhand, who is located in the same LAN. - Page 177 General WAN Settings Field Meaning CAPI Determines whether access to the CAPI ser- vice is allowed or denied for the user Name. Possible values: enabled: access to CAPI allowed disabled: access to CAPI denied Table 6-4: CAPI X3200 User’s Guide...
- Page 178 Table 6-5: CM-1BRI, ISDN S0 NCOMING NSWERING If there is no entry in CAPI on starting X3200, a standard entry is cre- ated automatically without password (with Name = default and CAPI = enabled ). To do Proceed as follows:...
- Page 179 Select Item: CAPI . If you use a communications application on your PC that is based on Remote CAPI 1.1 (current version: Remote CAPI 2.0), X3200 must translate the MSNs (= Number, multidigit) of the incoming call to EAZs (single digit) (CAPI 1.1 can only detect single-digit numbers).
-
Page 180: General Ppp Settings
WAN partner. If the data (password, partner PPP ID) obtained by executing the authentication protocol are the same as the data of an entered WAN partner, X3200 accepts the incoming call. BinTec Communications AG... - Page 181 Table 6-6: To do Proceed as follows to define the general PPP settings: Go to PPP . CHAP + PAP + MS-CHAP Select Authentication Protocol, e.g. Select PPP Link Quality Monitoring, e.g. Press SAVE. X3200 User’s Guide...
-
Page 182: Tei
Default , the value of the CAPI application is ignored and the default value set here is always used. Set to Packet Switch if you want to use X.31 TEI for the X.25 router. CM-1BRI, ISDN S0 Table 6-7: DVANCED ETTINGS BinTec Communications AG... -
Page 183: Settings Specific To Wan Partners
The configuration steps necessary in each case are explained in detail below. 6.2.1 Delay after Connection Failure This function enables you to set the period of time X3200 is to wait after an un- successful attempt to set up a call. X3200... -
Page 184: Channel Bundling - Basic Configuration For Dialup Connections
This is based on the calculated utilization of the channel group after switching out one B-channel. A B-channel is dropped if the calculated value stays below 80% of the maximum permissible throughput of the remaining channels for 10 seconds. BinTec Communications AG... - Page 185 If dynamic short hold has been configured, the calculated value men- tioned above must also apply. Static In static channel bundling, you specify right from the start that X3200 is to use two B-channels for connections to the WAN partner, regardless of the amount of data transferred.
-
Page 186: Channel Bundling - Bandwidth On Demand (Bod) - Advanced Configuration For Ppp Connections
PPP authentication of the connection partner is typically not necessary for set- ting up a leased line, but authentication is necessary for any dialup connections switched in. BOD is configured in WAN P ARTNER DVANCED ETTINGS XTENDED NTERFACE ETTINGS OPTIONAL BinTec Communications AG... - Page 187 6.2.2, page 184). The menu WAN P ARTNER DVANCED ETTINGS XTENDED ) contains the following fields: NTERFACE ETTINGS OPTIONAL Field Meaning Mode Defines which mode is used for BOD. Possible values: see table 6-12, page 191. X3200 User’s Guide...
- Page 188 B-channels are dropped until the remaining channels have at least the remaining percent- age utilization. A B-channel is dropped if the cal- culated value is below the Gear Down Threshold of the remaining channels for 10 seconds. BinTec Communications AG...
- Page 189 Bandwidth On Demand Deactivates BOD, no additional channels are Disabled opened (default value). Bandwidth On Demand (For dialup connections only) Enabled Activates BOD, additional channels can be opened. The connection partner who initiated the connection opens the additional channels. X3200 User’s Guide...
- Page 190 Callback Request: the remote terminal is requested to add a B-channel; is initiated if applicable. Link Drop Request: one communication partner wants to drop a B-channel; drop- ping is initiated or accepted if applicable. BinTec Communications AG...
- Page 191 B-chan- nels on demand. Bandwidth On Demand (For leased lines only) Passive Enables BOD and defines the passive partner. This page does not activate adding and drop- ping additional channels. Table 6-12: Mode X3200 User’s Guide...
-
Page 192: Always On/Dynamic Isdn (Ao/Di)
Always On/Dynamic ISDN (AO/DI) uses the existing ISDN infrastructure to con- figure a new service for the user without hardware changes: AO/DI is a perma- nently available (always on) but nevertheless low-cost connection from the end customer to the Service Provider. BinTec Communications AG... - Page 193 How Does AO/DI Work? AO/DI is implemented in X3200 via a special PPP interface. As soon as the in- terface is configured and ready for operation, the initial PPP connection is set up via X.31 (X.25 in the D-channel). This involves carrying out authentication of the PPP connection partner and assigning a dynamic IP address and DNS ad- dresses, if applicable (AO/DI Client Mode).
- Page 194 Some of the X.25 parameters must be adapted to the X.25 network connected. For Datex-P, the Windowsize/Packetsize Neg. field must be deactivated using the Setup Tool. For X3200, the X.25 software is designed as an X.25 switch. This switch must be appropriately configured for AO/DI (see "X.25 configuration", page 195).
- Page 195 Settings Specific to WAN Partners You will find all the necessary steps below for configuring X3200 for AO/DI with the Setup Tool. X.31 configuration Proceed as follows to assign X.31/X.25: Go to CM-1BRI, ISDN S0 (the menu is described DVANCED ETTINGS chapter 6.1.4, page...
- Page 196 Source interface of data packets. Destination Link Destination interface of data packets. Destination X.25 X.25 destination address Address Table 6-14: X.25 OUTING Select Source Link: local . Select Destination Link, e.g. x31d2-0-1 Enter Destination X.25 Address, e.g. 019011 Press SAVE. BinTec Communications AG...
- Page 197 The following part of the menu is relevant for this configuration step: Field Meaning Layer 1 Protocol Defines which Layer 1 Protocol X3200 is to use. There is only one meaningful setting for AO/DI: AO/DI . Channel Bundling Defines whether or which type of channel bun- dling is to be used for connections to the WAN partner (see manual, chapter 7.2.2).
- Page 198 Defines the maximum number of channels that Channels may be opened for dynamic channel bundling. Possible values for X3200: 1 or 2 . Remote X.25 Address X.25 destination address. Appears only if AO/ DI is selected under Layer 1 Protocol.
- Page 199 Maximum number of channels that may be Dialup Channels opened. The value is defined in the Total Number of Channels field under WAN ARTNER DVANCED ETTINGS Table 6-16: WAN P ARTNER DVANCED ETTINGS EXTENDED NTERFACE ETTINGS OPTIONAL X3200 User’s Guide...
- Page 200 To enter the necessary ISDN extensions for adding the B-channel, proceed as follows: Go to WAN P WAN N ARTNER UMBERS Enter the Number, e.g. 0911123456 Select Direction: outgoing . Press SAVE. Leave WAN P WAN N with Exit. ARTNER UMBERS BinTec Communications AG...
-
Page 201: Bod For Ip-Based Applications
Leave IP (BOD) with Exit. ANDWIDTH ON EMAND ILTER A rule for BOD is defined in a similar way to a rule for IP packets (see chapter 7.2.8, page 286). Different rules normally consist of different filters and X3200 User’s Guide... - Page 202 : incoming data packets outgoing : outgoing data packets both : incoming and outgoing data packets Number of Channels Number of B-channels that are to be added. Possible values for X3200: 1 or 2 . Table 6-18: (BOD) ANDWIDTH ON EMAND...
- Page 203 Additional bandwidth for HTTP connections Restricting mail reception to D-channel Additional bandwidth The following example shows a special configuration of X3200 for connection for HTTP connections setup of the PC with the IP address 172.16.77.11 (TCP Port 80) to the Internet.
- Page 204 Choose the interface you are configuting BOD for: e.g. bod_partner In the next menu window choose the First Rule to be applied: RI 1 FI 1 (hostxy_http_out) . Confirm with Save and Exit until you have returned to the main menu. BinTec Communications AG...
- Page 205 ANDWIDTH ON EMAND ONFIGURE NTERFACES BOD . to Interfaces Choose the interface you are configuring BOD for: e.g. bod_partner In the next menu window choose the First Rule to be applied: RI 2 FI 2 (mail_pop3_in) . X3200 User’s Guide...
-
Page 206: Layer 1 Protocol (Isdn B-Channel)
Layer 1 Protocol contains the following selection options: Possible Values Meaning ISDN 64 kbps For 64-kbps ISDN data connections. This is the default value. ISDN 56 kbps For 56-kbps ISDN data connections. Modem Not available in X3200. BinTec Communications AG... - Page 207 V.110 (1200 ... 38400) For GSM connections to V.110 at bit rates of 1200 bps, 2400 bps,..., 38400 bps. Modem Profile 1 ... 8 Not available in X3200. PPTP PNS For VPN interface. PPP over Ethernet For connections to ADSL (see chapter 5.1.5,...
-
Page 208: Ip Transit Network
Advanced Configuration 6.2.7 IP Transit Network When you enter a WAN partner in X3200, there are various options for indicat- ing the IP address of the partner or partner network: You enter the IP address netmask of the partner or part- ner network. - Page 209 X3200 uses a transit network to the WAN partner. Local IP Address IP address of X3200. Appears only for the following values of IP Transit Network: no, dynamic client, dynamic server . You normally do not need to make any entry here.
-
Page 210: Transfer Of Dns And Wins Ip Addresses To Wan Partner
(name resolution). Domain Name Servers form a hierarchical tree structure. As soon as a request is sent to your primary DNS, it tries to execute name resolu- tion using its internal tables. If it cannot find the name, it asks a higher-level DNS that it knows. BinTec Communications AG... - Page 211 How to configure the DNS Proxy function is described in chapter 6.3.2, page 229. When you enter a WAN partner in X3200, you can define whether X3200 sends or answers requests for WINS or DNS IP addresses. Configuration is made in:...
- Page 212 If you have set up a DNS or WINS in your LAN, enter its IP address. To do Proceed as follows if you have not made this entry already (chapter 6.3.2, page 229): Go to IP TATIC ETTINGS Enter Primary or Secondary Domain Name Server, if applicable. BinTec Communications AG...
-
Page 213: Routing Information Protocol (Rip)
Enter Primary or Secondary WINS, if applicable. Press SAVE. Proceed as follows if you want X3200 to report the DNS or WINS server IP ad- dresses entered to the WAN partner (Server Mode) or if DNS/WINS addresses other than those in the LAN are to be used for connections to the WAN partner (Client Mode, e.g. - Page 214 LAN of the WAN partner. Receiving routing tables via the RIP is a possible security loophole, as external computers or routers can change X3200’s routing functionality. RIP packets do not set up or hold ISDN connections. Configuration is made in:...
- Page 215 Proceed as follows: Go to WAN P ARTNER DVANCED ETTINGS Select RIP Send. Select RIP Receive. Confirm with OK. Press SAVE. Press SAVE. Go to CM-BNC/TP, E THERNET DVANCED ETTINGS Select RIP Send. Select RIP Receive. Press SAVE. X3200 User’s Guide...
-
Page 216: Compression
Configuration is made in: WAN P ARTNER WAN P ARTNER DVANCED ETTINGS Field Meaning Compression Defines the type of compression for connec- tions to the WAN partner. Table 6-29: WAN P ARTNER BinTec Communications AG... - Page 217 Enables STAC data compression (if Encapsulation = PPP ). MS-STAC Enables STAC data compression for dialing into a Windows Remote Access Server (if Encapsulation = PPP ). MPPC Not available in X3200. Table 6-30: Compression Field Meaning Van Jacobson Header Enables VJHC.
-
Page 218: Proxy Arp (Address Resolution Protocol)
X3200 answers the ARP request with its own hardware address. This is sufficient for establishing the connection: The data packets sent to X3200, which then forwards them to the desired host. 192.168.1.4 MAC = ? ISDN 192.168.1.254 192.168.1.4... - Page 219 Settings Specific to WAN Partners Field Meaning Proxy Arp Enables X3200 to answer ARP requests from the LAN as well as from the hosts of defined WAN partners. Table 6-32: WAN P ARTNER DVANCED ETTINGS CM-BNC/TP, E THERNET DVANCED ETTINGS...
-
Page 220: Keepalive Monitoring
PCs are switched off. As it is not possible to determine whether the hosts can be reached until the connection is set up, costs are incurred by the calling party, i.e. the head office. BinTec Communications AG... -
Page 221: Branch Office
Settings Specific to WAN Partners The following scenario illustrates Keepalive Monitoring: Central Server No Host reachable! Reachable? X3200 Headquarter’s Router 192.168.1.10 Group 0 Reachable? LAN IP LAN IP 192.168.1.20 10.1.1.1 192.168.1.254 Group 0 Headquarters Branch Office Connection setup attempt X3200 is "busy", no connection is possible... - Page 222 Field Meaning Group Defines a group of hosts, whose reachability is to be monitored by X3200. Each host to be monitored is assigned to a group. A total of ten groups can be configured with up to ten hosts each.
- Page 223 FirstIfIndex Defines the first interface of an interface range in X3200, for which the action defined under DownAction is to be executed. Possible values: 10001 ... 15000 (default value: 10001 ).
- Page 224 WAN partners are deactivated. X3200 continues to check the hosts at a time interval of 300 s and X3200 activates the interfaces again as soon as at least one host is reachable again. BinTec Communications AG...
-
Page 225: Basic Ip Settings
Basic IP settings Basic IP settings Here you will find a number of basic settings you can define in X3200: Deriving system time Name resolution ( DNS) in X3200 port numbers BOOTP Relay Agent The necessary configuration steps are explained below. - Page 226 For Time Protocol = TIME/UDP , TIME/TCP or SNTP : Current time is checked after every Time Update Interval in seconds. For Time Protocol = ISDN: Current time is checked for each first ISDN connection after expiry of the Time Update Interval. BinTec Communications AG...
- Page 227 Field Meaning Time server IP address of the time server used by X3200. Time Server is not needed if you set ISDN as Time Protocol. Table 6-36: TATIC ETTINGS The Time Protocol field contains the following selection options: Possible Values...
- Page 228 PC for Time Server, make sure the time server of DIME Tools is active on your PC every time you start X3200. If your PC has no fixed IP address but is assigned a changing IP address dynamically via DHCP, you cannot use your PC as a time server.
-
Page 229: Name Resolution In X3200 With Dns Proxy
Proceed as follows to enter the system time in X3200 manually: If a method for automatically deriving the time is defined in X3200, the values obtained in this way automatically have higher priority. That is, if X3200 receives a relevant time signal (e.g. from a time server), any system time entered manually is overwritten. - Page 230 If, for example, you have configured two WAN partners in X3200, your head office and your Internet Service Provider, it is advisable to have Internet names resolved by the DNS of your ISP, but names from within the corporate network by the DNS of the head office.
- Page 231 DNS and this DNS answers with a DNS record, the resolved name is saved with the associated IP address as a positive dynamic entry in the DNS cache of X3200. This means that once a name has been resolved and is required again,...
- Page 232 X3200 itself. In the latter case, DNS requests from the DHCP clients are sent to X3200, which either an- swers these itself or passes them on if necessary (proxy function). BinTec Communications AG...
- Page 233 Client Mode (Dynamic Name Server Negotiation = client (receive) ), name server addresses can if necessary be negotiated with the WAN partner, who is the IP address server, and sent to X3200. These can be entered as global name servers in...
- Page 234 Overview of Configuration The configuration and monitoring of name resolution in X3200 is set in: TATIC ETTINGS TATIC OSTS ORWARDED OMAINS YNAMIC ACHE DVANCED ETTINGS LOBAL TATISTICS WAN P ARTNER DVANCED ETTINGS BinTec Communications AG...
- Page 235 IP address of another global Domain Name Name Server Server. Primary WINS IP address of X3200’s first global WINS (Win- dows Internet Name Server) or NBNS (Net- BIOS Name Server). Secondary WINS IP address of another global WINS or NBNS.
- Page 236 DHCP server. Possible values: none : No name server address is sent. self (default value): The address of X3200 is sent as name server address. global : The addresses of the global name servers entered in X3200 are sent. BinTec Communications AG...
- Page 237 Basic IP settings Field Meaning IPCP Assignment Defines which name server addresses are sent X3200 to a WAN partner for dynamic name server negotiation. Possible values: none : No name server address is sent. self : The address of X3200 is sent as name server address.
- Page 238 OSTS ADD contains the following fields: ORWARDED OMAINS Field Meaning Global Nameservers: The global name servers entered in IP are displayed. TATIC ETTINGS Default Domain: The Domain Name of X3200 entered in IP is displayed. TATIC ETTINGS BinTec Communications AG...
- Page 239 Period of validity in seconds for the assignment of Name to Address. Default value: 86400 (= 24 h) If the request from X3200 for Name is answered with a DNS record, this contains a TTL field (= Time To Live in s), whose value is...
- Page 240 Space bar and confirming with STATIC. The relevant entry then disappears from YNAMIC and is listed in ACHE TATIC . TTL is transferred in this operation. OSTS Table 6-43: YNAMIC ACHE BinTec Communications AG...
- Page 241 Table 6-44: DVANCED ETTINGS ... contains the following fields (the menu is LOBAL TATISTICS updated every second): Field Meaning Received DNS Packets Displays the number of DNS packets received, including the answer packets for forwarded requests. X3200 User’s Guide...
- Page 242 X3200 receives IP addresses for Primary Domain Name Server, Secondary Domain Name Server, Primary WINS and Secondary WINS from the WAN partner or sends them to the WAN partner. Table 6-46: WAN P ARTNER DVANCED ETTINGS BinTec Communications AG...
- Page 243 Table 6-47: Dynamic Name Server Negotiation Configuration Procedure To do Proceed as follows to configure name resolution with DNS Proxy in X3200: Name resolution in If applicable, first enter the global name servers in X3200: X3200 Go to IP...
- Page 244 Press SAVE. How to create static entries: Go to IP TATIC OSTS All the existing static entries are listed here. You can create a new entry with ADD. Enter Name. Select Response. Enter Address, if applicable. Enter TTL. BinTec Communications AG...
- Page 245 Proceed as follows if you would like to configure a WAN partner so that the ad- partner dress of a name server is sent by X3200 to the WAN partner or from the WAN partner to X3200, if applicable: Go to WAN P ARTNER DVANCED ETTINGS Select Dynamic Name Server Negotiation.
-
Page 246: Port Numbers
IP packet within the host, a port is also entered in addition to the IP address for a connection to X3200. This addresses the relevant application. Ports are only used in the TCP and UDP protocols. -
Page 247: Bootp Relay Agent
Protocol). Default value: 520. The RIP can be disabled with RIP UDP Port = 0 . HTTP TCP Port Port number for HTTP Requests. Default value: 80. HTTP TCP Port = 0 disables access to X3200’s HTTP status page (see chapter 7.1.4, page 271). Table 6-48:... - Page 248 Configuration is made in IP TATIC ETTINGS Field Meaning BOOTP Relay Server IP address of the BOOTP server. Table 6-49: TATIC ETTINGS To do Proceed as follows: Go to IP TATIC ETTINGS Enter BOOTP Relay Server. Press SAVE. BinTec Communications AG...
- Page 249 Basic IP settings If an ISDN connection is needed for the connection between the BOOTP server and BOOTP client, you must configure an appropriate WAN partner (see chapter 5.2.1, page 131). X3200 User’s Guide...
-
Page 250: Ipx Settings
X3200. The configuration is made in IPX : Field Meaning Local System Name IPX system name of X3200. This name may comprise upper case letters, numbers and the characters : / - Internal Network X3200’s internal network number. This value... - Page 251 Enables and disables spoofing of SPX session watchdog packets. Possible values: yes : low cost for SPX sessions over WAN connections NetBIOS Broadcast Defines how X3200 handles NetBIOS Replication packets. Table 6-50: NetBIOS Broadcast Replication contains the following selection options:...
-
Page 252: Configuring The Lan Interface
6.4.2 Configuring the LAN Interface The next step is to configure X3200’s LAN interface to the IPX network. The LAN interface is the physical interface to the local network. In the next menu, you tell the router the network number of the IPX LAN to which it is connected. -
Page 253: Configuring Wan Partners
X3200s. Send RIP/SAP Updates Defines how often (Routing Informa- tion Protocol) and SAP (Service Advertising Protocol) packets are sent by X3200 to the WAN partner. In IPX networks, RIP and SAP packets are sent broadcasts to connected networks to provide information about current routes and services. - Page 254 Cost-intensive! Table 6-54: Send RIP/SAP Updates To do Proceed as follows: Go to WAN P IP . ARTNER Select Enable IPX: yes . Enter IPX NetNumber, e.g. Select Send RIP/SAP Updates. Enter Update Time, if applicable. BinTec Communications AG...
- Page 255 IPX Settings Enter Age Multiplier, if applicable. Confirm with OK. Press SAVE. X3200 User’s Guide...
-
Page 256: Extra License Functions
VPN (Virtual Private Network) solu- tions. Over the last few years, PPTP (Point to Point Tunneling Protocol) and IP- Sec have emerged as the most promising methods. X3200 supports both of them. While PPTP transfers data through a tunnel on the second layer of the OSI Model, IPSec operates on layer three. - Page 257 IPSec Client installed on your PC or workstation. BinTec’s IPSec solution comprises such a client. If you wish to realize an IPSec solution, you will have to purchase an additional license which is available from your retailer.
- Page 258 Advanced Configuration BinTec Communications AG...
-
Page 259: Security Mechanisms
Security Mechanisms SAFERNET X3200 from BinTec Communications AG gives you a high degree of secu- rity for your network and connections. The security functions available (SAFER- NET) offer monitoring of activities via the router and effective access and line tapping security. The necessary configuration steps are described in this chap- ter. -
Page 260: Activity Monitoring
Security Mechanisms Activity Monitoring A major requirement for a high degree of security is the possibility of monitoring all activities on and over the router. BinTec Communications AG provides a va- riety of facilities for this purpose. 7.1.1 Syslog Messages All major events on X3200’s various subsystems (... - Page 261 Syslog Output on Serial Enables the display of syslog messages on the Console PC connected to the serial interface of X3200. Use this setting only if you make a fault analy- sis, as a large output over the serial console adversely affects the throughput of the other interfaces.
- Page 262 Priority of the syslog messages to be sent to Log Host. Corresponds to Message Level for Syslog Table in S YSTEM Facility Syslog facility at Log Host. Only required if the Log Host is a Unix computer. BinTec Communications AG...
- Page 263 Make the desired settings for syslog messages as follows: Go to S YSTEM Select Syslog Output on Serial Console. Select Message Level for Syslog Table. Enter Maximum Number of Syslog Entries. Go to S to pass syslog messages to YSTEM XTERNAL YSTEM OGGING external hosts. X3200 User’s Guide...
- Page 264 DVANCED ETTINGS Activate IP Accounting with on . IP accounting at WAN Proceed as follows to activate extended IP accounting. This saves accounting messages from TCP, UDP and ICMP sessions in X3200: Go to WAN P ARTNER DVANCED ETTINGS Activate IP Accounting with on .
-
Page 265: Monitoring Functions In The Setup Tool
Go to M ISDN M ONITORING AND EBUGGING ONITOR A list of the existing ISDN connections (incoming and outgoing calls) is dis- played. X3200 Setup Tool BinTec Communications AG [MONITOR][ISDN CALLS]: ISDN Monitor - Calls MyRouter Dir Remote Name/Number Charge Duration Stack... - Page 266 EBUGGING REDITS Select a subsystem and confirm with Return. The current status of the Credits Based Accounting System for the selected subsystem is displayed. X3200 Setup Tool BinTec Communications AG [MONITOR][ISDN CREDITS][STAT]: Monitor isdnlogin Credits MyRouter Total Maximum % reached...
- Page 267 REDITS REDITS The current status of the Credits Based Accounting System for PPPoE con- nections is displayed. Interface statistics Proceed as follows to display the current values and activities of X3200’s inter- faces: Go to M ONITORING AND EBUGGING NTERFACES The values for two interfaces are displayed side by side.
-
Page 268: Credits Based Accounting System
Credits Based Accounting System Credits X3200’s Credits Based Accounting System enables you to control the charges billed. This means you can keep the effects of possible configuration errors within limits. The system also enables you to define the maximum number of connections allowed in a certain period of time. - Page 269 Activity Monitoring The whole account is available again if you switch X3200 off and then switch it on again (i.e. reboot). Configuration is made in CREDITS ISDN C or CREDITS REDITS REDITS REDITS Field Meaning Surveillance Defines whether the Credits Based Accounting System is to be activated for the respective subsystem.
- Page 270 Activate Maximum Number of Outgoing Connections, if applicable, and enter the desired value. Activate Maximum Charge, if applicable, and enter the desired value. Activate Maximum Time for Incoming Connections (sec), if applicable, and enter the desired value. BinTec Communications AG...
-
Page 271: Http Status Page
Every BinTec router is equipped with an internal home page, the so-called HTTP status page. You can use this together with an Internet browser (e.g. Netscape Navigator, Internet Explorer) to display the status of X3200. This en- ables all users of the... - Page 272 Name> in your browser. (You can also enter X3200’s IP address instead of the name.) The HTTP status page of the BinTec router with the system name <System Name> or with the IP address entered is displayed. Figure 7-1:...
- Page 273 X3200’s subsystems. Hardware interfaces This table displays the LAN and WAN interface of X3200. The third column of the table provides information on the current status of the physical inter- faces with the following possible values:...
-
Page 274: Activity Monitor
Click system tables to display a list with all the X3200 MIB tables. Clicking a table name lists the variables contained in the table. If you don’t want to display X3200’s HTTP status page, enter 0 as the port number of the http port: Go to IP TATIC ETTINGS Enter HTTP TCP port: 0 . - Page 275 CTIVITY ONITOR Field Meaning Client IP Address IP address to which X3200 sends the UDP packets. The default value 255.255.255.255 means that the broadcast address of the first LAN interface is used. Note: If you enter the IP address of a WAN...
- Page 276 Security Mechanisms Select Type, e.g. physical_virt Enter Update Interval (sec), e.g. Press SAVE. BinTec Communications AG...
-
Page 277: Access Security
Caution! All BinTec routers are shipped with the same user names and passwords. As long as the password remains unchanged, they are not protected against unau- thorized use. How to change the passwords is described in "Changing the pass-... -
Page 278: Checking The Calling Party Number
MIB tables or variables (only incom- ing calls with the corresponding screening indicator are accepted): For incoming PPP connections: Screening variable in biboDialTable. For incoming ISDN Login connections: Screening variable in isdnloginAl- lowTable. BinTec Communications AG... -
Page 279: Authentication Of Ppp Connections With Pap, Chap Or Ms-Chap
A connection is then not set up until the calling party has been clearly identified by calling back. X3200 can answer an incoming call with a callback or dial into a WAN partner and then wait for a callback. - Page 280 CANCEL to close the dialog box that appears. Exception: This abort option cannot be used if the WAN partner dialing in uses Windows NT and his extension number is entered in X3200. X3200 calls back immediately, if requested to by the WAN partner.
-
Page 281: Closed User Group
CAPI user concept By using BinTec’s CAPI user concept, you can make sure that only users authenticated by user name and password can access X3200’s Remote CAPI interface (see chapter 6.1.2, page 176). Filters You can also prevent unauthorized access by defining filters (see chapter 7.2.8,... -
Page 282: Nat (Network Address Translation)
LAN IP 192.168.1.254 192.168.1.2 192.168.1.3 Network of your WAN Partner Your Local Area Network Figure 7-2: Forward NAT NAT always refers to an interface. X3200’s LAN side is always referred to as "internal", the WAN partner as "external". BinTec Communications AG... - Page 283 Access Security You will find more information on NAT in the Software Reference. Configuration is made in IP ETWORK DDRESS RANSLATION lists all the X3200 interfaces with a ETWORK DDRESS RANSLATION status display for current NAT settings: Field Meaning Name...
- Page 284 Service allowed for connections to the host defined under Destination. Possible values: telnet smtp domain/udp domain/tcp http nntp user defined: If you do not use any of the predefined services. Enter the required val- ues under Protocol and Port to define a service. BinTec Communications AG...
- Page 285 This activates NAT for the selected interface. Press SAVE. An entry takes effect as soon as you confirm it here with SAVE. Never forget this, especially if you are configuring NAT from a remote host, e.g. with telnet! X3200 User’s Guide...
-
Page 286: Filters (Access Lists)
A filter describes a certain part of the IP data traffic based on the source and/or destination IP address, netmask, protocol and source and/or destination port. If you define a filter, you are telling X3200: "Watch out for all data packets that match the following: ...". Rule... - Page 287 Combination of the two possibilities described above Several rule chains can be created, either completely or partly separated from each other. The shared use of filters is possible and practicable. Interface You can also assign a rule chain individually to each X3200 interface. X3200 User’s Guide...
- Page 288 Next Rule = 0 Rule 3 Next Rule = 0 Rule 0 = Discard Packet Figure 7-3: Rule chains for various interfaces Configuration is made in: CCESS ISTS ILTER CCESS ISTS ULES REORG CCESS ISTS ULES CCESS ISTS NTERFACES BinTec Communications AG...
- Page 289 Description Designation of the filter. Note that only the first 10 or 15 characters are visible in other menus. Index Cannot be changed here. X3200 automatically issues a number to newly defined filters. Protocol Defines a protocol. Possible values: any , icmp , ggp , ip , tcp , egp , igp , pup , chaos ,...
- Page 290 (5000..32767) Port numbers: 5000 ... 32767. clients 1 (1024.0.4999) Port numbers: 1024 ... 4999. clients 2 (32768..65535) Port numbers: 32768 ... 65535. unpriv (1024..65535) Port numbers: 1024 ... 65535. Table 7-14: Source Port and Destination Port BinTec Communications AG...
- Page 291 TCP, UDP Domain Name Server ( DNS) Trivial File Transfer Protocol TFTP) HTTP POP3 (e-mail inquiry) Network Time Protocol TCP, UDP NetBIOS Name (NBNAME) NetBIOS Datagram (NBDATA) NetBIOS Session (NBSESSION) Simple Network Management Protocol (SNMP) (Port Lists) X3200 User’s Guide...
- Page 292 As destination port, the client uses the number under which the FTP server offers the FTP service, e.g. . The FTP server then an- swers with IP packets that use as source port and as destination port: BinTec Communications AG...
- Page 293 Access Security Src IP = 192.168.1.1 Src Port = xyz Dest IP = 10.1.1.2 Dest Port = 21 ISDN 192.168.1.1 X3200 FTP Server Src IP = 192.168.1.1 10.1.1.2 192.168.1.2 Src Port = xyz Dest IP = 10.1.1.2 Dest Port = 21 192.168.1.3...
- Page 294 You can change the order of rules in a chain in the submenu IP CCESS REORG: ISTS ULES Field Meaning Index of Rule that gets Defines the first rule in the chain. Index 1 Table 7-19: REORG CCESS ISTS ULES BinTec Communications AG...
- Page 295 Access Security If you reorganize such a chain, X3200 renumbers the remaining rules according to the selection in Index of Rule that gets Index 1: REORG Before After “Rule 1 = 1st Rule of Chain” Rule 1 Rule 1 Next Rule = 4...
- Page 296 : A syslog message is generated with the protocol number, source IP address and source port number. dump : A syslog message is generated with the contents of the first 64 bytes of the de- nied packet. Table 7-20: CCESS ISTS NTERFACES BinTec Communications AG...
- Page 297 Action = Allow M , only what you have expressly allowed with the filter actually gets through. It may easily occur that your telnet access to X3200 is no longer allowed as soon as you enter the rule and confirm with SAVE.
- Page 298 Select an interface and confirm with Return if you wish to use a rule as the first rule for this interface that is not the rule displayed. Select First Rule. Select Deny Silent. Select Reporting Method. Press SAVE. BinTec Communications AG...
-
Page 299: Local Filters
282) or global filters (see chapter 7.2.8, page 286). Strategy As soon as at least one entry for local filters exists in X3200, incoming requests for the corresponding local services of X3200 are only allowed if 1. the source address is 127.0.0.1 (loopback address), or 2. - Page 300 ERVICES CCESS ONTROL Field Meaning Service Defines the local X3200 service to which access is to be controlled with this entry. Possi- ble values: snmp(udp) rip(udp) bootps(udp) dns(udp) telnet(tcp) trace(tcp) snmp(tcp) capi(tcp) tapi(tcp) rfc1086(tcp) http(tcp) nbns(udp) statmon(udp) BinTec Communications AG...
- Page 301 255.255.255.255 , the entry is a host entry, i.e. the IP address must match exactly. Verify Interface Defines if a check is to be made to determine which X3200 interface is used for an incoming call received for the service selected under Service. Possible values: verify don’t verify...
-
Page 302: Back Route Verification
Field Meaning (Only if Verify Interface = verify ) Interface Defines an interface of X3200. If X3200 receives an incoming call over this interface for the service selected under Service, the con- nection is allowed. If the incoming call crosses another interface, the next entry is checked. -
Page 303: Taf Agent
You can enable this function on BinTec’s corporate access routers and config- ure the router as TAF agent. A detailed description of operation and the neces- sary configuration steps are contained in BRICKware for Windows. - Page 304 MIB table ipExtRtTable. A detailed description (including configuration using the MIB variables) can be found in the Software Reference. For configuration with the Setup Tool, please see the relevant additions in the next version of the User’s Guide. BinTec Communications AG...
-
Page 305: Line Tapping Security
MPPE (Microsoft Point to Point Encryption) version 1 and 2, DES and Blowfish methods are used. DES and Blowfish are implemented as BinTec proprietary solutions and are only available with a VPN license. MPPE V2 The MPPE version 2 encryption protocol, the successor to MPPE, has been de- veloped by Microsoft and like version 1 also uses a 40-bit, 56-bit or 128-bit key. - Page 306 DES3 168: Triple DES with 168-bit key none: no encryption These values are only available if PPP , Async PPP over X.75 , Async PPP over X.75/T.70/ BTX or X.25_PPP has been selected under Encapsulation. Table 7-22: WAN P ARTNER BinTec Communications AG...
- Page 307 WAN partner is generated automatically or defined statically. Possible values: authentication (default value): Key is gener- ated dynamically by X3200. static : The key is defined statically and must be entered under Encryption Key (TX) and Encryption Key (RX). (Only for Encryption Key Negotiation = static )
-
Page 308: Vpn (With Extra License)
The IPSec security standard (Internet Protocol Security) enables you to ex- change IP-based data securely over public networks (e.g. the Internet). Detailed information and configuration instructions can be found in the IPSec Reference Manual, which you receive together with your IPSec license, or in the Software Reference. BinTec Communications AG... -
Page 309: Special Features
Special Features 7.4.1 Startup Procedure X3200 does not start its routing activities until the complete configuration is loaded, especially the defined filters. This means it is not possible to provoke a system start to make use of an intermediate system state in which perhaps rout- ing takes place before the filters are active. - Page 310 Security Mechanisms You can counter DoS attacks that speculate on destroying the system by caus- ing the log files to overflow (syslog messages) by suitably positioning and limit- ing the size of these files. BinTec Communications AG...
-
Page 311: Checklist
Checklist Checklist The following list indicates the most important critical security points that you should observe when configuring X3200: Have you changed all four passwords for system access (admin, read, write, http)? See chapter 5.1.2, page 105. Are the activities of your... - Page 312 Do you use the CAPI user concept? Are any additional user accounts created trouble-free? Have you prevented the interception of connections on the Ethernet by a suitable LAN infrastructure? BinTec Communications AG...
-
Page 313: Configuration Management
Configuration Management In this chapter, you will find instructions on the administration of your configura- tion files and on updating the X3200 software. The following areas are covered: Administration of Configuration Files – Where are the configuration files? – What is flash and memory? –... -
Page 314: Administration Of Configuration Files
X3200 is switched off. So if you modify your configuration and want to re- tain these changes for the next time you start X3200, you have to save the mod- ified configuration to the flash before switching off: Exit Save as boot configuration and exit (see chapter 5.3, page... - Page 315 Administration of Configuration Files You can perform the various operations with the help of the Setup Tool: Go to the C menu. ONFIGURATION ANAGEMENT X3200 Setup Tool BinTec Communications AG MyRouter Operation (TFTP --> FLASH) TFTP Server IP Address 192.168.1.1 TFTP File Name brick.cf...
- Page 316 <TFTP File Name>. As the configuration file is transferred to flash and not to memory, the file must then be loaded (FLASH --> MEMORY), so that the settings can take effect on X3200. BinTec Communications AG...
- Page 317 If an error should occur while running get (TFTP --> FLASH) and the operation is aborted, the file to be overwritten in the flash is deleted. So if you transfer a "boot" file, X3200’s boot file will be deleted and X3200 cannot load a configura- tion on restarting.
- Page 318 Setup Tool; State of last operation displays running. When the operation has been executed successfully, the operation is dis- played under Type of last operation, State of last operation assumes the value done . BinTec Communications AG...
- Page 319 C:\BRICK on your PC. Your PC has the IP address 192.168.1.1. If you want to transfer brick.cf from your PC to X3200, proceed as follows: For a Windows PC: Click the Windows Start button then Program...
- Page 320 . The configuration file brick.cf is saved, for example, in X3200’s flash under the name boot. To make the settings of brick.cf take immediate effect in X3200, proceed as fol- lows: Flash --> memory Reselect Operation: load (FLASH --> MEMORY) .
-
Page 321: Resetting X3200 To The Ex Works State
(see chapter 10.5, page 346). Observe the LEDs on the front of X3200. After running through the start mode (approximately 8 seconds; see chapter 10.2, page 339), all yellow LEDs light simultaneously. (If... -
Page 322: Updating Software
Configuration Management Updating Software As BinTec Communications AG is constantly improving the software for all its products and you certainly want to use the latest features of X3200, this chapter tells you how to update your software. www.bintec.net If you want to update your software, load new system software in X3200. Every system software includes new features, better performance and any necessary bugfixes from the previous version. - Page 323 Enter the www.bintec.de in your browser (e.g. Internet Ex- plorer or Netscape Navigator). The BinTec home page opens. Here you will find the latest software and documentation for X3200. Click the current system software (boot image, software image) with the right mouse button, e.g.
- Page 324 This procedure takes longer than a normal update! The following appears in the SNMP shell: Reboot now (y or n)? Enter y and confirm with Return. X3200 starts with the new system software. The existing configuration is transferred. BinTec Communications AG...
-
Page 325: Troubleshooting
Troubleshooting Tips If you are having problems with X3200, the following tips should help you to overcome some of the more usual stumbling blocks: Log in to X3200 and enter in the SNMP shell: debug all This makes available all the debugging information in the SNMP shell. -
Page 326: Aids To Troubleshooting
These commands are entered directly in X3200’s SNMP shell: debug You can use the debug command for troubleshooting in one or more sub- systems of X3200. A detailed explanation of the syntax and options can be found in chapter 11.1, page 350. -
Page 327: External Aids
Enter trace -ip next to display data packets that are to run over the next B-channel to be opened. Enter trace -x -s me -d 0:a0:f9:d:5:a 0 0 1 to output data pack- ets sent from X3200’s MAC address over the LAN to the host with the MAC address 0:a0:f9:d:5:a. 9.1.2... -
Page 328: Typical Errors
The password as well as the complete configuration of X3200 are deleted. Select (1) Boot System. X3200 is restarted. Reconfigure X3200. I can’t reach X3200 in the LAN. Try to establish a serial connection: Connect your PC to X3200 over the serial interface. -
Page 329: Isdn Connections
Use debug all or trace to check if a PC in the LAN is using a different netmask from the one entered on X3200. Use debug all or trace to check if a PC in the LAN is configured for Re- mote CAPI with an incorrect IP address (destination port 2662). - Page 330 (Number under WAN P ARTNER WAN N UMBERS Check if you left a trace program running over an ISDN PPP connection. This would cause packets to be sent constantly over ISDN and the connec- tion would remain permanently open. BinTec Communications AG...
- Page 331 Typical Errors Outgoing calls cannot be made. Check the LEDs on the front of X3200 to determine if a connection is made (see chapter 10.2, page 339). Use isdnlogin to check if outgoing calls are possible. Check M ISDN M...
-
Page 332: Ipx Routing
ARTNER IPX . The settings must be compatible with the settings on the serv- ers in X3200’s LAN. Check if a router between them filters out the SAP packets. Check with isdnlogin if an ISDN connection can be made between client and server. - Page 333 Check if NetBIOS over IPX is used in the LAN (Windows for Workgroups, NT, Win 95). If necessary, select no or on LAN only under IPX for NetBIOS Broadcast replication. Check if NDS Replica Synchronization is active (for Netware 4.1 servers and higher). X3200 User’s Guide...
- Page 334 Enter the command reset router on the console of the respective serv- All inactive connections between the server and X3200 are cleared. If the disconnect for the client is lost, SPX connections could remain until timeout. These connections would then be displayed in ipxAdmSpxConns until timeout. BinTec Communications AG...
-
Page 335: Technical Data
Technical Data This chapter presents the technical data of X3200. The following areas are cov- ered: General Product Features X3200 Front Panel, LEDs and Ports Pin Assignment BOOTmonitor X3200 User’s Guide... -
Page 336: General Product Features
Technical Data 10.1 General Product Features The general product features cover X3200’s performance features and the technical requirements for installation and operation. Feature Value Product name: X3200 Dimensions and weight (B x H x D): Dimensions without cables 440 mm x 42 mm x 273 mm... - Page 337 Lists, Allow Lists, CLID, NAT, TAF, MPPE Encryption. Licenses: Licenses included for CAPI, IP, IPX, leased lines and STAC. Extra licenses obtainable for VPN, IPSec. Software included: RVS-COM Lite (communications application) BRICKware for Windows BRICKtools for Unix X3200 User’s Guide...
- Page 338 Technical Data Feature Value Printed documentation included: User’s Guide Quick Install Guide Online documentation: BRICKware for Windows Software Reference User’s Guide Table 10-1: General product features of X3200 BinTec Communications AG...
-
Page 339: Front Panel Leds
(partial view) There are six LEDs on the front panel for indicating the current status of your X3200. Each LED can convey different information according to which mode X3200 is in. All LEDS light for half a second after the equipment is switched on to show that they are working. - Page 340 Data packet passing through the LAN inter- face. xDSL Blinking Connection is being set up (ADSL). (2) xDSL Connection is active (ADSL). (1) (2) Data packet passing through the LAN inter- face. Blinking ISDN B1-channel: Connection is being set up. BinTec Communications AG...
- Page 341 ISDN B2-channel: connection is active. (1) LAN error or collision has occurred. (intermit- tently) System stopped, restart is necessary. (perma- nently) Table 10-4: LEDs in normal mode (1) Charges are incurred. (2) Applies only if interface is configured for PPPoE. X3200 User’s Guide...
-
Page 342: Rear Panel Connections
Technical Data 10.3 Rear Panel Connections Console ISDN xDSL 100Mbit/s 10Mbit/s Seial interface LAN interface (10/100 Base-T Ethernet) ISDN S port High-speed Internet interface (10 Base-T Ethernet) Figure 10-2: X3200 front panel (partial view) BinTec Communications AG... -
Page 343: Pin Assignment
Serial port Figure 10-3: 8-pole mini DIN socket As console port, X3200 has a serial port with an 8-pole mini DIN socket. The equipment supports baud rates between 1200 and 115200. The pin assignment for the 8-pole mini DIN socket is as follows: Function For future applications. - Page 344 The pin assignment for the ISDN S0 BRI interface (RJ45 socket) (4) is as fol- lows: Function Not used Not used Send (+) Receive (+) Receive (-) Send (-) Not used Not used Table 10-6: Pin assignment for ISDN BRI interface BinTec Communications AG...
- Page 345 Table 10-7: Pin assignment for Ethernet 10/100Base-T interface If you want to connect X3200’s LAN interface directly to the Ethernet card of your PC and not to an external hub, you need the adaptor cable in addition to the red LAN cable.
-
Page 346: Boot Sequence
BOOTmonitor Mode Normal Mode After several selftests have been performed successfully in Start Mode, X3200 changes to the BOOTmonitor Mode. The BOOTmonitor prompt is displayed if you are connected to X3200 via a terminal program. Figure 10-6: BOOTmonitor BinTec Communications AG... - Page 347 BOOTmonitor settings are set to the default values. (5) Default BOOTmonitor parameters: You can change the default settings of X3200’s BOOTmonitor, e.g. the baud rate for serial connections. If you change the baud rate (the preset value is 9600 bauds), make sure the terminal program used also uses this baud rate.
- Page 348 Technical Data BinTec Communications AG...
-
Page 349: Important Commands
This chapter describes the following commands: SNMP shell commands: – telnet – ping – trace – isdnlogin – debug – ifconfig – ifstat – netstat – date – – nslookup BRICKtools for Unix commands: – bricktrace – capitrace X3200 User’s Guide... -
Page 350: Snmp Shell Commands
SNMP shell are given below. Entering? displays a list of the most important commands available on X3200. Please note: Parameters shown in the command lines inside square brackets [ ] represent optional values. - Page 351 B-channels) or the LAN. – -h: hexadecimal output. – -2: layer 2 output – -3: layer 3 output – -a: asynchronous HDLC (B-channel only) – -F: fax (B-channel only) – -A: fax and AT commands (B-channel only) X3200 User’s Guide...
- Page 352 -o: combine two or more -d filters or -s filters with a logical OR opera- tion. – specific <MAC filter>: me = X3200’s MAC address, bc = broadcast packets. You can combine a -d MAC filter and an -s MAC filter with a logical AND oper- ation by simply specifying them both.
- Page 353 [show]|[[-q] all|acct|system|<subs> [<subs> ...]] Is used to selectively display debugging information originating from one of X3200’s subsystems. – show: displays all possible subsystems that can be debugged. – -q: do not print a timestamp before each debugging message.
- Page 354 – destination <destaddrs>: destination IP address of a host. This adds a host route for this host in the routing table (ipRouteDest). – address: X3200’s IP address for the interface (ipRouteNextHop). – netmask <mask>: netmask of the interface (ipRouteMask). –...
- Page 355 SNMP Shell Commands date date [YYMMDDHHMMSS] X3200 has a software clock. Entering date displays the time set. Entering date YYMMDDHHMMSS sets the clock to the corresponding value (year, month, day, hour, minute, second). t [<seconds>] Is used to define the auto logout time for the current login session (a connection...
- Page 356 DNS proxy. Entering -? (e.g. netstat -?) usually provides syntax help. The update command can be found in chapter 8.3, page 322. Further SNMP commands can be found in the Software Reference. BinTec Communications AG...
-
Page 357: Bricktools For Unix Commands
11.2 BRICKtools for Unix Commands The bricktrace and capitrace programs are included in BRICKtools for UNIX on the BinTec Companion CD. They are started on a Unix workstation by entering the following commands. bricktrace bricktrace [-h23aeFpiNtxs] [-T <tei>] [-c <cref>] [-r <cnt>] [-H <host>] [-P <port>] <channel>... - Page 358 – Number of the tracer message (#<decimal>) – Length of the CAPI message ([<decimal>]) – Application ID (ID = <decimal>) – Number of the CAPI message (no. (<decimal>)) – Short output only: connection identifier (ident = 0x<hexadecimal>) BinTec Communications AG...
-
Page 359: General Safety Precautions In 15 Different Languages
Ihres Rechners oder Hubs verbunden werden, der LAN-Anschluß X3200 nicht mit Ihrem ISDN-Anschluß. Verwenden Sie für die Verkabelung nur die beigelegten Kabel. Falls Sie an- dere Kabel verwenden, übernimmt BinTec Communications AG für auftre- tende Schäden oder Beeinträchtigung der Funktionalität keine Haftung. X3200 User’s Guide... - Page 360 Reinigung und Das Gerät darf nur durch geschultes Fachpersonal geöffnet werden. Las- Reparatur sen Sie daher Reparaturen am Gerät nur von einer BinTec-autorisierten Servicestelle durchführen. Wo sich die Servicestelle befindet, erfahren Sie von Ihrem Händler. Durch unbefugtes Öffnen und unsachgemäße Repara- turen können erhebliche Gefahren für den Benutzer entstehen (z.
- Page 361 Niemals Scheuermittel, alkalische Reinigungsmittel, scharfe oder scheuernde Hilfsmittel benutzen. X3200 User’s Guide...
- Page 362 X3200 -laitteen LAN -li- itäntää saa yhdistää ISDN-liitäntääsi. Käytä laitteiden yhdistämiseen vain mukanatoimitettuja kaapeleita. Jos käytät muita kaapeleita, ei BinTec Communications AG vastaa tästä aiheu- tuvista vahingoista. Vedä kaapelit sellaisiin paikkoihin, että ne eivät aiheuta vaaratilanteita (ko- mpastumisia) eivätkä vahingoitu.
- Page 363 Luvaton aukai- seminen ja asiantuntemattomat korjaukset saatttavat aiheuttaa käyttäjälle vakavia vaaratilanteita (esim. sähköisku). Laitteiden luvaton aukaiseminen aiheuttaa BinTec Communications AG -takuun raukeamisen sekä kaikki- naisen vastuun epäämisen. Älä missään tapauksessa puhdista laitetta runsaalla vedellä. Sen sisään tunkeutunut vesi saattaisi aiheuttaa vakavia vaaroja (esim.
- Page 364 Installation et Avant de procéder à l’installation et à la mise en service de X3200, veuillez mise en service vous référer aux indications concernant les conditions d’environnement (cf.
- Page 365 à des risques très graves (risque d'électrocu- tion par ex.). L'ouverture non autorisée de l’appareil annule tout droit à la garantie et décharge la société BinTec Communications AG de toute re- sponsabilité. L’appareil ne doit être en aucun cas nettoyé à l’eau. Une pénétration d’eau dans l’appareil pourrait entraîner des risques graves pour l’opérateur (ris-...
- Page 366 General Safety Precautions in 15 Different Languages Ne jamais utiliser de produits récurants, de produits de nettoyage alcalins, ni d'outils tranchants ou grattants. BinTec Communications AG...
- Page 367 π ίε θα πρέπει να λά ετε πωσδήπ τε υπ’ ψιν σα κατά τη ρήση τ υ Router. Μεταφ ρά και Να µεταφέρετε και να απ θηκεύετε τ X3200 µ ν στη γνήσια απ θήκευση συσκευασία ή σε µία άλλη κατάλληλη συσκευασία, η...
- Page 368 τε νικ πρ σωπικ . Γι’ αυτ ν τ λ γ να επιτρέπετε τη διε αγωγή εργασιών επισκευή µ ν σε συνεργεία π υ έ υν ε υσι δ τηθεί απ την BinTec. Σ ετικά µε την έδρα των σ ετικών συνεργείων µπ ρείτε να ητήσετε πληρ φ ρίε απ τ ν εµπ ρικ...
- Page 369 νερ ύ µπ ρεί να πρ κύψ υν σηµαντικ ί κίνδυν ι για τ ρήστη (π. . ηλεκτρ πλη ία) και σ αρέ ηµιέ στη συσκευή. Να µη ρησιµ π ιείτε π τέ συρµάτινα σφ υγγαράκια και αι µηρά ή αδρά ηθητικά µέσα καθαρισµ ύ. X3200 User’s Guide...
- Page 370 X3200 deve essere usato soltanto con la spina originale BinTec Communications (5 V c. c.). La Bin- Tec Communications AG non risponde dei danni causati dall’utilizzo di una spina diversa. Per il cablaggio osservare l’ordine di successione descritto nel manuale.
- Page 371 Si consiglia pertanto di far riparare l’apparecchio soltanto pres- so un centro assistenza autorizzato BinTec. Gli indirizzi dei servizi assis- tenza sono a Sua disposizione presso il rivenditore. Apertura non autoriz- zata e riparazioni inappropriate possono essere fonte di gravi pericoli per l’utente (p.
- Page 372 X3200 niet met uw ISDN-aansluiting. Gebruik voor de aansluiting slechts de bijgevoegde kabels. Indien u andere kabels gebruikt, is BinTec Communications AG niet aansprakelijk voor op- tredende schade. Leg de kabels zodanig, dat zij geen gevaarsbron (struikelgevaar) vormen en niet worden beschadigd.
- Page 373 Het apparaat mag alleen door geschoold vakpersoneel worden geopend. reparatie Laat daarom reparaties aan het apparaat alleen uitvoeren door een door BinTec-geautoriseerde service-dienst. Waar zich deze service-dienst bev- indt, ervaart u bij uw handelaar. Door het onbevoegde openen en ondeskundige reparaties kunnen aanzienlijke gevaren ontstaan voor de gebruiker (bijv.
- Page 374 ISDN-tilkoplingen. Bruk kun de vedlagte kablene for tilkoplingen. Dersom du bruker andre kabler, overtar BinTec Communications AG intet ansvar for skader som måtte oppstå av den grunn. Legg opp ledningene slik at de ikke kan bli skadet og at de ikke danner farekilder (fare for å...
- Page 375 åpner eller reparerer apparatet, kan det oppstå alvorlige risikoer for brukeren (f. eks. elektrisk støt). Dersom apparatet blir ulovlig åp- net, kan det ha til følge at garantien tapes, og at BinTec Communications AG fraskriver seg ethvert ansvar. Apparatet må under ingen omstendighet rengjøres med vann. Dersom vann trenger inn, kan det oppstå...
- Page 376 Ao proceder à cablagem, respeite a sequência, tal como descrita no man- ual. Proceda primeiro à distribuição das ligações LAN, RDIS e em série, conecte depois a alimentação de corrente e, para terminar, ligue o X3200. Verifique se a cablagem, em especial da RDIS e da LAN, ficou bem feita, antes de pôr o...
- Page 377 BinTec autorizado. Informe-se junto do seu agente para saber onde encontrar um ponto de assistência técnica. O utilizador pode colocar-se a si próprio em perigo caso abra o dispositivo sem qualquer au- torização ou proceda a uma reparação imprópria (por ex.
- Page 378 X3200 ze złączem ISDN. Do przyłączenia produktu należy zastosować wyłącznie dostarczone wraz z nim przewody. W przypadku zastosowania innych przewodów firma BinTec Communications AG nie ponosi odpowiedzialności za powstałe szkody. Przewody należy ułożyć tak, aby nie występowało niebezpieczeństwo potykania się o nie oraz ich uszkadzania.
- Page 379 (np. porażenie prądem). Niedozwolone otwieranie urządzeń pociąga za sobą utratę gwarancji udzielanej przez firmę BinTec Communications AG oraz jej odpowiedzialności cywilnej za skutki użytkowania produktu. Urządzenia pod żadnym pozorem nie wolno czyścić na mokro. Dostanie się...
- Page 380 General Safety Precautions in 15 Different Languages Nigdy nie stosować środków do szorowania, zasadowych środków czyszczących, ostrych lub szorujących środków pomocniczych. BinTec Communications AG...
- Page 381 Colocación y Antes de la colocación y puesta en servicio de X3200, observe las instruc- puesta en servicio ciones acerca de las condiciones ambientales (ver Datos técnicos). Utilice una superficie firme y plana.
- Page 382 Por lo tanto, realice las posibles reparaciones del aparato sólamente a través de un servicio técnico autorizado por BinTec. Su vendedor le infor- mará de la dirección del servicio técnico. El abrir y reparar el aparato sin autorización puede conllevar un peligro considerable para el usuario (des- cargas eléctricas).
- Page 383 Utför kabeldragningen i den ordningsföljd som anges i handboken. Anslut först kablarna för LAN- och ISDN-anslutningar samt för serieanslutningar, anslut därefter strömförsörjningen och starta sedan X3200. Kontrollera att kabeldragningen har utförts rätt – speciellt för ISDN- och LAN-anslutningarna – innan X3200 startas.
- Page 384 Rengöring och Apparaten får endast öppnas av behörig fackpersonal. Reparationer får reparation: bara utföras av en av BinTec auktoriserad serviceverkstad. Återförsäljaren tillhandahåller information om närmaste serviceverkstad. Obehörigt öpp- nande resp ej sakkunniga reparationer på apparaten kan medföra fara för användaren (t ex elektriska stötar). Om apparaten öppnas utan tillstånd gäller inte längre garantiansvaret från BinTec Communications AG.
- Page 385 X3200 cihazının LAN bağlantısıda ISDN bağlantısı ile birleştirilmelidir. Kablo bağlantıları için, sadece cihazın yanında bulunan kabloları kullanınız. Başka kablo kullandığınız takdirde, BinTec Communications AG meydana gelen hasar veya fonksiyonlardaki olumsuz etkilerden dolayı sorumluluk üstlenmez. Kabloları, tehlike kaynağı olamayacak ve zarar görmeyecek şekilde (takılma tehlikesi) döşeyiniz.
- Page 386 Temizlik ve Cihaz sadece eğitilmiş uzman personel tarafından açılabilir. Bu yüzden Tamir cihazın tamiratını sadece BinTec yetkili servisi tarafından yaptırınız. Yetkili servis yerlerini nerede bulabileceğinizi satıcınızdan öğrenebilirsiniz. Müsaade edilen işlemler dışında açılması ve uygun olmayan şekilde tamir edilmesi, kullanıcı için büyük tehlikeler doğurabilir (örneğin elektrik çarpması).
- Page 387 Csak a mellékelt vezetékeket alkalmazza a vezetékezéshez. Amennyiben más vezetékeket alkalmaz, az emiatt fellépő károkért vagy a működésben fellépő változásokért a BinTec Communications AG nem vállal felelősséget. A vezetékeket úgy fektesse le, hogy azok ne lehessenek veszélyek forrásai (botlásveszély), azokban pedig kár ne keletkezhessen.
- Page 388 General Safety Precautions in 15 Different Languages X3200 irodai környezetben való alkalmazásra készült. Az X3200, mint Rendeltetésszerű alkalmazás, multi-protokoll-router, rendszerkonfigurációtól függően WAN- üzemeltetés összeköttetésekre épül. A nem kívánt telefondíjak elkerülése végett, a terméket feltétlenül tartsa megfigyelés alatt. X3200 megfelel az idevágó - irodai környezetben való használatra alkalmas információtechnikai berendezésekre vonatkozó...
- Page 389 Vaši přípojku ISDN. Na propojování použijte pouze přiložené kabely. Pokud použijete jiné kabely, odmítá BinTec Communications AG ručení za vzniklé škody nebo za omezenou funkčnost. Vedení ukládejte tak, aby se nestala zdrojem nebezpečí (např. zakopnutím) a aby se nepoškodily.
- Page 390 Čištění aopravy Přístroj smí otvírat pouze školený odborný personál. Provedením oprav přístroje proto pověřujte pouze autorizovaný servis firmy BinTec. Adresu servisu Vám sdělí Váš obchodník. Nepovolaným otevíráním a neodbornými opravami se uživatel vystavuje značnému ohrožení (např. zasažení elek- trickým proudem). Nedovolené otevření přístrojů má za následek zánik záruky a ručení...
- Page 391 ISDN-tilslutning. Apparatet må kun tilsluttes med de vedlagte kabler. Hvis du benytter andre kabler, fraskriver BinTec Communications AG sig ansvaret for evt. skader og funktionsbgrænsninger. Ledningerne skal trækkes på en sådan måde, at de ikke beskadiges og at de ikke er til fare for omgivelserne (fare for at snuble).
- Page 392 Uautoriseret åb- ning og ukorrekt udførte reparationer kan medføre betydelige farer for brugeren. BinTec Communications AG fraskriver sig ethvert ansvar og ga- rantien bortfalder, hvis apparatet åbnes uden tilladelse. Apparatet må under ingen omstændigheder rengøres med væske. In- dtrængende vand kan udsætte brugeren for alvorlige farer (f.eks.
- Page 393 X3200 User’s Guide...
- Page 394 General Safety Precautions in 15 Different Languages BinTec Communications AG...
-
Page 395: Glossary
DSS1. Standard interface for analog terminals (telephone, fax group 2/3, analog mo- dems). Only for BinTec routers with integrated PABX. Access list A rule that defines a set of packets that should or should not be transmitted by the router. - Page 396 This is done by using filter functions that allow data packets to pass to certain network segments only. Some BinTec routers can be operated in Bridging Mode. Broadcast Broadcasts (data packages) are sent to all stations in a network in order to ex- change information.
- Page 397 Channel bundling Channel bundling One of X3200’s features. Channel bundling is a method of increasing the data throughput. The data throughput is doubled by switching in a second channel for data transmission. Channel bundling can be either dynamic (= on demand) or static (= always).
- Page 398 Glossary Configuration Manager Windows application (similar to the Windows Explorer), which uses SNMP com- mands to request and carry out the configuration of X3200. Before BRICKware Version 5.1.3, the application was named Dime Browser. Data compression A process for reducing the amount of data transmitted. This enables higher throughput to be achieved in the same transmission time.
- Page 399 A domain refers to a group of devices in a network, whose host names share a common suffix, the domain name. Thus, in the Internet, a part of a nam- ing hierarchy (e.g. bintec.de). Downstream Data transmission rate from the Internet Service Provider to the client.
- Page 400 High Data Rate upstream downstream data rates are: 1.554 Mbps and 2.048 Mbps over ranges up to 4 km. The main HDSL applications are: High-speed data communication over leased lines. HDSL2 High Data Rate DSL, version 2 BinTec Communications AG...
- Page 401 An ISDN subscriber interface. The Basic Rate Interface consists of two face channels and a D-channel. Compare Primary Rate Interface. The interface to the subscriber is provided by an bus. ISDN BRI ISDN Basic Rate Interface ISDN Basic Rate Interface, also interface. X3200 User’s Guide...
- Page 402 The network card of a device defines this internationally unique address. Management Information Base The MIB is a database that describes all the manageable devices and functions connected to a network. All MIBs (including the BinTec MIB) contain objects specific to the manufacturer. SNMP is based on MIB.
- Page 403 IPX, etc. Network Address Translation Used as a security mechanism in X3200. Using NAT conceals your complete network to the outside world. The IP addresses of all devices in your own net- work remain confidential, only one IP address is made known for connections to the outside.
- Page 404 An ISDN PABX is used to set up an internal telephone infrastructure allowing internal connections between the PABX extensions without the need to connect to the telephone service provider. Not all BinTec routers include an exchange. Password Authentication Protocol Authentication process for connecting over PPP.
- Page 405 MAC address for a host whose IP address is known. RADSL Rate-Adaptive Digital Subscriber Line The data rate is up to 640 kbps upstream and 1.5 - 9 Mbps downstream over ranges of up to 18.5 km. X3200 User’s Guide...
- Page 406 X3200 is supplied as standard with suitable software (RVS-COM Lite). BinTec’s CAPI interface is implemented as a dual-mode CAPI. CAPI 1.1 and 2.0 applications can access ISDN resources parallel to one another. This means new CAPI 2.0 applications can be used on the network or on the same PC parallel to old applications based on CAPI 1.1.
- Page 407 TFTP server. In such a case, the server is not necessarily a computer server. Setup Tool Menu-driven tool for the configuration of X3200. The Setup Tool can be used as soon as the router has been accessed (serial, ISDN Login, LAN).
- Page 408 Transmission Control Protocol/Internet Protocol. A protocol suite for the connection of Wide Area Networks ( WANs). The two parts of this protocol suite are (layer 3 of the OSI model) and (layer 4 of the OSI model). BinTec Communications AG...
- Page 409 CCITT and ITU-T recommendation that defines the interface between a PC or terminal as Data Terminal Equipment ( DTE) and a modem as Data Cir- cuit-terminating Equipment ( DCE). V.28 TU-T recommendation for unbalanced dual-current interface lines X3200 User’s Guide...
- Page 410 ( switched leased lines). WAN partner Remote station that is reached over a WAN, e.g. ISDN. X.21 The X.21 recommendation defines the physical interface between two network components in packet-switched data networks (e.g. Datex-P). BinTec Communications AG...
- Page 411 The X.21bis recommendation defines the DTE/ interface to V- series synchronous modems. X.25 An internationally agreed standard protocol that defines the interface between network components and a packet-switched data network. X.31 For integration of X.25-compatible DTEs in ISDN. X3200 User’s Guide...
- Page 412 Glossary BinTec Communications AG...
-
Page 413: Index
AO/DI 180, 279, 303 Authentication Auto logout Back route verification Bandwidth on Demand Basic router configuration Configuration Wizard Setup Tool BinTec Companion CD Blowfish BOOT sequence BOOTmonitor BOOTP relay agent Branch office Callback CAPI user concept 184, 186 Channel bundling... - Page 414 Configuration file administration Configuration options Overview Configuring a PC Configuring answering machine Configuring fax Configuring WAN partners Connection methods ISDN Serial interface Connections Corporate network connection Configuration Wizard Dial-in (without router) General example Setup Tool Credits Based Accounting System BinTec Communications AG...
- Page 415 Extended IP routing Extra license Factory reset Field service staff 124, 286, 299 Filters Flash memory General PPP settings General Safety Precautions Guarantee terms High-speed Internet access HTTP status page Incoming Call Answering Installing BRICKware Installing the TCP/IP protocol X3200 User’s Guide...
- Page 416 Configuration Wizard Setup Tool Layer 1 Protocol Leased line LEDs License card Line tapping security Local filters 87, 277 Logging in Memory Monitoring functions in the Setup Tool MPPE MS-STAC 210, 229 Name resolution 154, 282 NetBIOS Netmask BinTec Communications AG...
- Page 417 Remote CAPI Routing entry Routing Information Protocol Rule RVS-COM Lite SAFERNET Safety Precautions Scope of supply Security mechanisms Access security Activity monitoring Checklist Line tapping security Special features Sending a fax 246, 286 Service Setting up and connecting X3200 User’s Guide...
- Page 418 Time server Token Authentication Firewall 155, 156, 160 T-Online Transit Network Troubleshooting Aids IPX routing ISDN connections System errors Update Van Jacobson Header Compression 256, 308 Virtual Private Network (VPN) 256, 308 WAN interface Windows networks, configuration BinTec Communications AG...
- Page 419 Index 210, 229 WINS X.31 TEI X3200 User’s Guide...
Need help?
Do you have a question about the X3200 and is the answer not in the manual?
Questions and answers