Table of Contents
Advertisement
Advertisement
Table of Contents

Related Manuals for Mira Vier


Summary of Contents for Mira Vier
- Page 1 Mira Vier Wireless Controller User Guide...
-
Page 2: Table Of Contents
CONTENTS Introduction ......................3 Safety Information ....................3 Control Layout ...................... 4 Display Symbols ....................5 Using the Shower ....................6 Switch on/off...................... 6 Adjust Temperature ................... 7 Adjust Flow ......................7 Functions ......................8 Function Menu ....................10 Enter the Function Menu ................. -
Page 3: Introduction
INTRODUCTION General Thank you for purchasing a quality Mira product. To enjoy the full potential of your new product, please take the time to read this guide thoroughly and keep it handy for future reference. The Mira Vier Wireless Controller is a remote user interface and controls the following functions: •... -
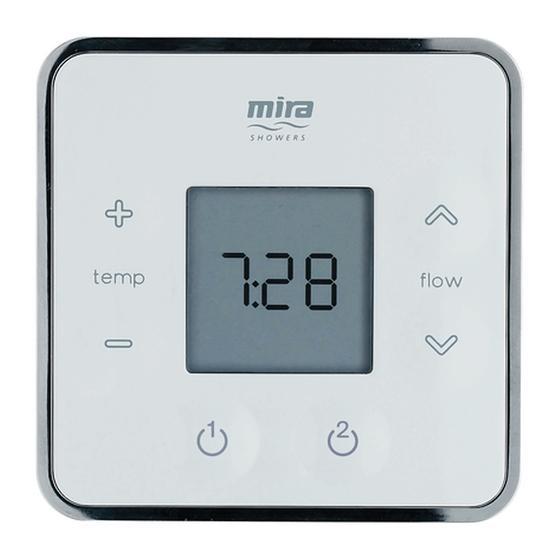
Page 4: Control Layout
CONTROL LAYOUT Increase Increase Flow Temperature Decrease Decrease Temperature Flow Start/Stop Display... -
Page 5: Display Symbols
DISPLAY SYMBOLS Low Battery Economy Flow Temperature Flow Level Control Out Of Range Clock... -
Page 6: Using The Shower
USING THE SHOWER Switch on/off Temperature and flow settings will be same as when last used. After a short period, display will dim to help extend battery life. Approximately 10 seconds after shower has stopped, display will turn off automatically. Shower will not run continuously for more than 30 minutes before stopping automatically (5 minutes when “ECO”... -
Page 7: Adjust Temperature
Adjust Temperature While shower is running, press “ ” or “ ” to adjust temperature. Showering temperature appears on display in degrees Celsius (°C). Adjust Flow Press “ ” or “ ” to adjust flow. Showering flow level appears on display in black segments. -
Page 8: Functions
FUNCTIONS The following functions can be altered individually to adjust how the shower operates: F1 - Maximum Showering Water Temperature. This is the temperature the shower cannot go beyond when in use. F2 - Eco. The shower will stop automatically after 5 minutes. - Page 9 F6 - Flow Range. For use with High Pressure/Combi Valve version only. The water flow rate (showering force) can be adjusted to within a desired range by setting a low point and a high point. During adjustment, the shower will need to be started. F7 - Control Frequency. An unreliable functioning of the appliance (not always able to change settings of shower) may indicate radio interference by another device transmitting locally on same channel.
-
Page 10: Function Menu
FUNCTION MENU Enter The Function Menu Press “ ” and “ ” buttons simultaneously until “End” appears. Use “ ” or “ ” buttons to cycle through functions and press “ ” to enter setting. (See following sections in this guide for details on each function and how to alter their settings.) Note! If signal loss occurs during a function change,... -
Page 11: Exit The Function Menu
Exit The Function Menu When finished, use “ ” or “ ” buttons to cycle back through functions until “End” appears. Press “ ” to exit. Control is ready to use. If necessary, test shower to see if functions are working as expected. -
Page 12: Change Functions/Settings
CHANGING FUNCTIONS/SETTINGS Maximum Showering Water Temperature Factory default “42°C”. Cycle menu to “F 1” and press “ ”. Press “ ” or “ ” to adjust temperature. Maximum = 48°C Minimum = 38°C... - Page 13 Press “ ” to set. Press “ ” to exit back to Function Menu. See section “Exit the Function Menu”.
-
Page 14: Eco
Factory default “off”. Cycle menu to “F 2” and press “ ”. Press “ ” or “ ” to change setting to “on” or “off”. - Page 15 Press “ ” to set. Press “ ” to exit back to Function Menu. See section “Exit the Function Menu”.
-
Page 16: Warm-Up
Warm-Up Factory default “off”. Note! Function may be impaired with combination boilers. Cycle menu to “F 3” and press “ ”. Press “ ” or “ ” to change setting to “on” or “off”. - Page 17 Press “ ” to set. Press “ ” to exit back to Function Menu. See section “Exit the Function Menu”.
-
Page 18: Clock Setting
Clock Setting Factory default “10:43”. Note! Can also be activated by disconnecting and reconnecting battery. Cycle menu to “F 4” and press “ ”. Press “ ” or “ ” to change hour setting. Press “ ” & “ ” to change minute setting. - Page 19 Press “ ” to set time and exit back to Function Menu. See section “Exit the Function Menu”.
-
Page 20: Clock Display
Clock Display Factory default “on”. Cycle menu to “F 5” and press “ ”. Press “ ” or “ ” to change setting to “on” or “off”. - Page 21 Press “ ” to set. Press “ ” to exit back to Function Menu. See section “Exit the Function Menu”.
-
Page 22: Flow Range
Flow Range For use with High Pressure/Combi version only. Factory default “1 - 99”. Cycle menu to “F 6” and press “ ”. Press “ ” again to access the flow range limits. - Page 23 Water begins to flow and the lower limit is displayed, e.g. “L 1”. Adjust flow to desired lower limit 1-99 using “ ” & “ ”. Note! If hot water is supplied from a combination boiler, make sure the lower limit is sufficient to activate the boiler. Press “ ” to set lower limit. Water continues to flow and the higher limit is displayed, e.g. “H 23”. Adjust flow to desired higher limit 1-99 using “...
- Page 24 Press “ ” to set and exit back to Function Menu. See section “Exit the Function Menu”.
-
Page 25: Control Frequency
Control Frequency Factory default “1”. Cycle menu to “F 7” and press “ ”. Press “ ” or “ ” to change channel “1-7”. - Page 26 Press “ ” to set. Press “ ” to exit back to Function Menu. See section “Exit the Function Menu”.
-
Page 27: Replacing The Batteries
REPLACING THE BATTERIES Change the batteries when the low battery symbol is displayed. To access the batteries, the controller must be removed from the wall. Press button to release and remove the controller from the wall. Make sure the controller is dry before removing the battery cover. -
Page 28: Fault Diagnosis
4. If shower operation does not return to normal, check the water supplies to the valve are within the correct temperature and pressure ranges. See “Mira Vier Installation Guide - Specifications”. 5. If problem still occurs, make a note of the error code and contact our Customer Services Team. -
Page 29: Error Code Number Not Previously Described
Control Sensor or PCB Relay 1. Turn Digital Mixer off for 15 seconds. Turn back on and allow 15 seconds to reset. 2. If shower operation does not return to normal, replace Thermistor. (To be performed by competent tradesperson only!) 3. -
Page 30: General Faults
(Function F1). Digital Mixer fitted Make sure hot and cold incorrectly. water supplies are connected correctly and delivering a constant flow and temperature within the required limits. See “Specifications” in the “Mira Vier Installation Guide”. If problem persists, contact our Customer Services Team. -
Page 31: Cleaning
CLEANING Many household cleaners contain abrasives and chemical substances, and should not be used for cleaning chrome plated or plastic parts. These finishes should be cleaned with a mild washing up detergent or soap solution, and then wiped dry using a soft cloth. DISPOSAL AND RECYCLING End of Product Life When the appliance has reached the end of its serviceable life, it should be disposed of in a safe manner and in accordance with current local authority recycling or waste disposal policy. -
Page 32: Customer Services
You have the assurance of a ● Water or electrical supply, waste and isolation issues. fully trained Mira Technician, genuine Mira spare parts and a 12 month guarantee on any chargeable work done. ● Compensation for loss of use of the product or consequential loss of any kind.
Need help?
Do you have a question about the Vier and is the answer not in the manual?
Questions and answers