Table of Contents
Advertisement
Quick Links
Download this manual
See also:
Installation Manual
Advertisement
Table of Contents

Related Manuals for 3xLogic VISIX 360


Summary of Contents for 3xLogic VISIX 360
- Page 1 Hardware Install Manual | VISIX 360 Network Camera VISIX 360 Network Camera Hardware Installation Manual 10225 Westmoor Drive, Suite 300, Westminster, CO 80021 | www.3xlogic.com | (877) 3XLOGIC...
- Page 2 UL MAKES NO REPRESENTATIONS, WARRANTIES OR CERTIFICATIONS WHATSOEVER REGARDING THE PERFORMANCE OR RELIABILITY OF ANY SECURITY OR SIGNALING RELATED FUNCTIONS OF THIS PRODUCT.” 10225 Westmoor Drive, Suite 300, Westminster, CO 80021 | www.3xlogic.com | (877) 3XLOGIC...
- Page 3 Hardware Install Manual | VISIX 360 Network Camera 10225 Westmoor Drive, Suite 300, Westminster, CO 80021 | www.3xlogic.com | (877) 3XLOGIC...
-
Page 4: Regulatory Information
(Cd), lead (Pb), or mercury (Hg). For proper recycling, return the battery to your supplier or to a designated collection point. For more information see: www.recyclethis.info. 10225 Westmoor Drive, Suite 300, Westminster, CO 80021 | www.3xlogic.com | (877) 3XLOGIC... -
Page 5: Safety Instruction
If the product does not work properly, please contact your dealer or the nearest service center. Never attempt to disassemble the camera yourself. (We shall not assume any responsibility for problems caused by unauthorized repair or maintenance.) 10225 Westmoor Drive, Suite 300, Westminster, CO 80021 | www.3xlogic.com | (877) 3XLOGIC... - Page 6 The foam ring around the lens must be seated flush against the inner surface of the bubble to isolate the lens from the IR LEDS. Fasten the dome cover to camera body so that the foam ring and the dome cover are attached seamlessly. 10225 Westmoor Drive, Suite 300, Westminster, CO 80021 | www.3xlogic.com | (877) 3XLOGIC...
-
Page 7: Table Of Contents
AMERA INSTALLATION ................................. 10 ............................10 EILING OUNTING ....................12 OUNTING WITH A LANT OUNTING ........................ 13 OUNTING WITH A UNCTION ........................15 OUNTING WITH A RACKET 10225 Westmoor Drive, Suite 300, Westminster, CO 80021 | www.3xlogic.com | (877) 3XLOGIC... -
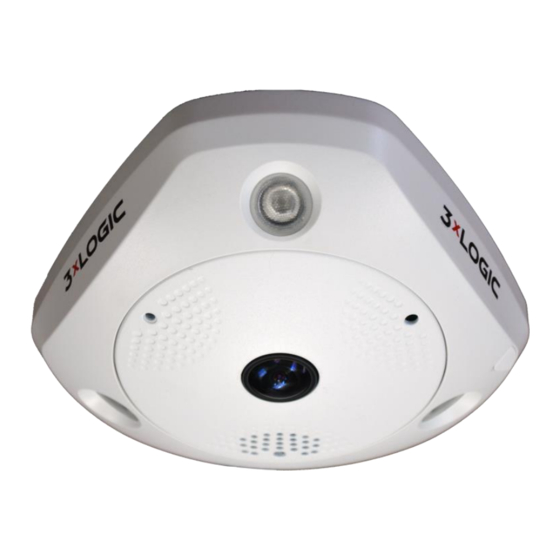
Page 8: Appearance Description
Hardware Install Manual | VISIX 360 Network Camera 1 Appearance Description 1.1 Overview of Fisheye Camera Figure 1-1 Overview of the Fisheye Camera Figure 1-2 Disassembly of Fisheye Camera 10225 Westmoor Drive, Suite 300, Westminster, CO 80021 | www.3xlogic.com | (877) 3XLOGIC... -
Page 9: Disassembling The Camera
Press and hold RESET for 10s when the camera is powering on or rebooting to restore the default settings, including the user name, password, IP address, port No., etc. 10225 Westmoor Drive, Suite 300, Westminster, CO 80021 | www.3xlogic.com | (877) 3XLOGIC... -
Page 10: Installation
1. Drill three screw holes and the cable hole according to the supplied drill template. Drill Template HoleA: for cables routed through the ceiling Screw hole 1: for Mounting Base Figure 2-1 Drill Template 10225 Westmoor Drive, Suite 300, Westminster, CO 80021 | www.3xlogic.com | (877) 3XLOGIC... - Page 11 6. Install the camera cover to the camera body, and fix them by tightening the lock screw on the camera cover. Figure 2-3 Install the Camera Figure 2-4 Tighten the Lock Screw on the Camera Cover 10225 Westmoor Drive, Suite 300, Westminster, CO 80021 | www.3xlogic.com | (877) 3XLOGIC...
-
Page 12: Slant Mounting Base
3. Screw the half-deep screws into the wall totally. 4. Install the camera cover to the camera body, and fix them by tightening the lock screw on the camera cover. 10225 Westmoor Drive, Suite 300, Westminster, CO 80021 | www.3xlogic.com | (877) 3XLOGIC... -
Page 13: Wall Mounting With A Junction Box
You have to purchase a junction box separately if this mounting method is selected. 3xLOGIC Product Number: VX-SMJ-360 Steps: 1. Fix the junction box to the wall with screws. 10225 Westmoor Drive, Suite 300, Westminster, CO 80021 | www.3xlogic.com | (877) 3XLOGIC... - Page 14 6. Install the camera cover to the camera body, and fix them by tightening the screw on the camera cover. Figure 2-10 Install the Camera Body and Cover 10225 Westmoor Drive, Suite 300, Westminster, CO 80021 | www.3xlogic.com | (877) 3XLOGIC...
-
Page 15: Wall Mounting With A Bracket
2. Align the screw holes to the inserted screws, hook the camera body to the screws, and route the camera body to secure the camera with the screws. 10225 Westmoor Drive, Suite 300, Westminster, CO 80021 | www.3xlogic.com | (877) 3XLOGIC... - Page 16 4. Install the camera cover to the camera body, and fix them by tightening the screw on the camera cover. Figure 2-13 Install the Camera Body and Cover Figure 2-14 Tighten the Screw on the Camera Cover 10225 Westmoor Drive, Suite 300, Westminster, CO 80021 | www.3xlogic.com | (877) 3XLOGIC...