
Subscribe to Our Youtube Channel
Related Manuals for R82 Gator


Summary of Contents for R82 Gator
- Page 1 English user manual 06.2011 © 2008 R82 A/S. All rights reserved. The R82 logo and the walking aid Gator are registered trademarks of R82 A/S.
-
Page 2: Table Of Contents
CONTENTS Gator.................. 3 Safety ................4 Warranty ................4 Tools .................. 4 Maintenance ..............4 Gator.................. 5 Handle rotation ..............5 Anti-reverse wheel stop ............. 6 Directional Stabilizers ............6 Locking lever ..............7 Locking ring ............... 7 Forearm support ..............8 Forearm support depth adjustment ........ -
Page 3: Gator
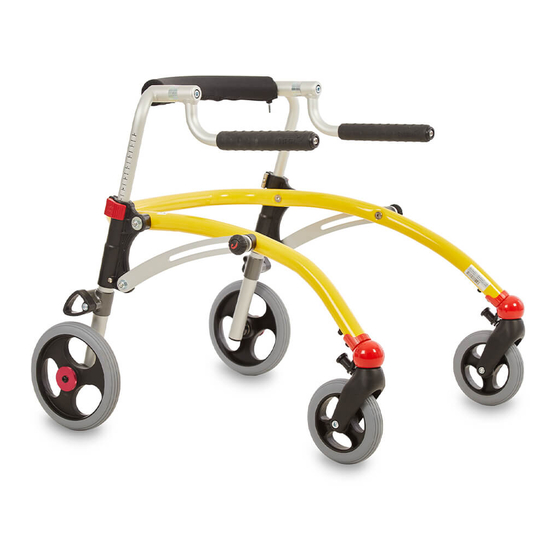
Congratulations on choosing the Gator form R82. We feel confident, that this product will meet and exceed your expectations. The Gator is an indoor device, designed for children from approximately 18 months to 6 years of age. In this user manual we will describe and illustrate the most important working... -
Page 4: Safety
The Gator har earned the CE-mark. This certifies that it meets all relevant European safety requirements. The durability of this product is 5 years when it is used on a daily basis. Hereafter the product must be renovated (by R82 personnel) to extend the lifetime. -
Page 5: Gator
GATOR 1) Handle Rotation 2) Handle Height Locking Lever 3) Locking Ring 4) Anti-Reverse System 5) Caster Directional Lock HANDLE ROTATION 1) Loosen socket head cap screw, using sup- plied 6 mm Allen key (A) 3) Rotate handle (B) 4) Retighten very securely... -
Page 6: Anti-Reverse Wheel Stop
ANTI-REVERSE WHEEL STOP To activate: Press the security pin (A) and flip down the anti- reverse wheel stop (B). The anti-reverse wheel stop is now engaged. To deactivate: Press the security pin (C) and flip up the anti- reverse wheel stop (D). When the securety pin clicks out the wheel stop is activated. -
Page 7: Locking Lever
LOCKING LEVER Handle Height Locking Lever To change lever direction pull lever towards ar- row and rotate (A). LOCKING RING The ring must be secure over both tubes before the Gator is used. Lift the ring from leg tube before folding. -
Page 8: Forearm Support
FOREARM SUPPORT 1) Remove existing grip (A) 2) Clamp forearm support assembly to rotational handle (B) 3) Adjust rotation and height (C). Clamp securely using the supplied 3/16“ Allen key. 4) Adjust grip angle using 6 mm Allen key through cap hole (D) FOREARM SUPPORT DEPTH ADJUSTMENT... -
Page 9: Pelvic Pad
PELVIC PAD 1) Remove one piece cover (A) 2) Split foam tube apart (B) 3) Attach receiver with clamps as shown (C) 4) Cover foam with split covers 5) Insert square backrest post into receiver and tighten all knobs and fasteners... -
Page 10: Back Prompt
BACK PROMPT 1) Install back prompt mount to the Gator handle bar as shown (A). Make sure to include pla- stic spacers to avoid slipping. 2) Install back prompt as shown (B) -
Page 11: Lateral Pads
LATERAL PADS 1) Remove cover (A) 2) Remove the Allen screws using supplied 3/16“ Allen key (B) 3) Thread cap screws through aluminum mounting plate and side pad slots into foam backing plate t-nuts 4) Adjust the side pad width and tighten secu- rely STRAP FOR LATERAL PADS... -
Page 12: Pelvic Strap
PELVIC STRAP 1) Remove cover (A) 2) Remove Allen screws using supplied 3/16“ Allen key 3) Sandwich the supplied belt between the alu- minum mounting pad and the foam backing plate 4) Thread fasteners through aluminum mounting pad into foam backing plate t-nuts 5) Tighten evenly and securely... -
Page 13: Anti-Tip Device
ANTI-TIP DEVICE 1) Secure anti-tips as shown. N.B.! The wheels should be positioned 6 mm to 13 mm above the floor. The wheels must be positioned parallel to the rear wheels as shown. -
Page 14: Ankle Prompts
ANKLE PROMPTS 1) The ankle prompts can be mounted over or under the leg as shown. Secure the ankles with the supplied hook & loop straps. SLING SEAT 1) Attach front clamps to handles as shown (A). 2) Attach rear clamps to back prompt mount as shown (B). -
Page 15: Product Identification
PRODUCT IDENTIFICATION A) Serial number The label is placed below the padding on the lower through-going bar. B) Producer The label is placed just above the left rear wheel. Dato: 31-01-02 Belast: 0840-01-111878-001 Varenr: 880003 5707292 134158 Parallelvej 3 DK-8751 Gedved... -
Page 16: Technical Data
Maximum load 32 kg (70,4 lb) Weight of unit 7,5 kg (16,5 lb) Frame width 46 (18") Handle width (min/max) 29-46 (11¼-18") Handle height (min/max) 34-66 (13¼-25¾") PRODUCER DISTRIBUTOR R82 A/S Parallelvej 3 8751 Gedved Please find your distributor on www.R82.com...
Need help?
Do you have a question about the Gator and is the answer not in the manual?
Questions and answers