Table of Contents
Advertisement
Quick Links
Download this manual
See also:
User Manual
Advertisement
Table of Contents

Related Manuals for NuVision TM800A510L


Summary of Contents for NuVision TM800A510L
- Page 1 Chapter Title 8” Tablet Quick Start Guide TM800A510L / TM800A520L For complete Instructions, visit www.nuvision.com...
-
Page 2: Customer Service
Customer Service NuVision Customer Service Phone: (800) 890-1288 Hours: 8:30am to 5:30pm PST M-F Email: cs@nuvision.com Full User Manual Available at www.nuvision.com... - Page 3 Introduction Thank you for purchasing the NuVision TM800A510L/520Lh 8” Internet tablet with Google Play. It utilizes touch technology and includes a high definition IPS wide-view panel for an immersive personal experience. The quad-core tablet powered by Intel is the perfect companion for accomplishing everyday tasks, playing adventurous games, and enhancing your productivity while on the go.
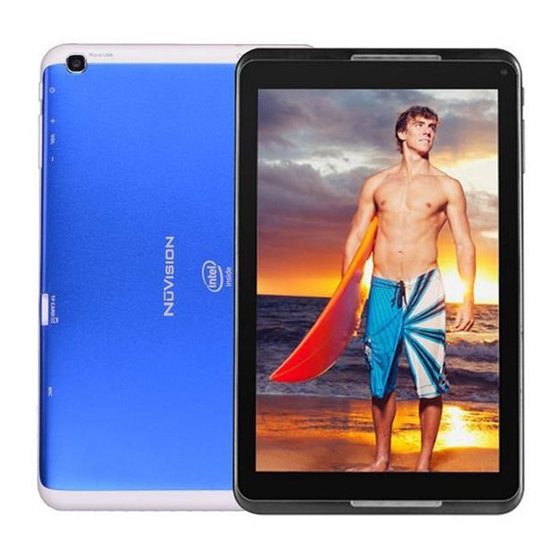
- Page 4 TM800A510L/520L Tablet At-a-Glance AC Power Adapter (May differ in appearance.) Tablet Transfer Cable...
- Page 5 TMAX DIGITAL,INC. MODEL:TM800A510L FCC ID: 2AAP6M8018 INPUT: 5V/2A MADE IN CHINA 1. Microphone 5. Headphone Jack 9. Speakers (Front) 2. Camera (Front) 6. Volume Control 3. TF Card Slot 7. Power Button 4. Micro USB 8. Camera (Back)
-
Page 6: Home Screen At A Glance
Home Screen At-a-Glance 11 10 1. Connection/Activity 6. App Tray 11. App 2. Google Search Box 7. Volume Up 12. Volume Down 3. Google Audio Search 8. Open Apps 13. Time Widget 4. Status Bar 9. Home 5. Volume Control 10. - Page 7 Starting Your Tablet 1. Press and hold the Power button for 3 seconds. (If your tablet does not turn on, or instructs you to “Connect your charger”, connect the AC adapter and charge the unit.) 2. At the Start-up screen, slide your finger to the right to unlock. 3.
-
Page 8: Charging Your Tablet
Charging Your Tablet It is recommended to fully charge the tablet before first use. To charge the tablet, plug the 1) USB cable into the AC adapter, and 2) attach the other end to the DC input on the tablet. 3) Plug the AC adapter into a wall outlet. If the tablet is on, the battery icon will pulse, showing that it is being charged. -
Page 9: Touching And Typing
Touching and Typing To select an item on the screen, simply tap it once with your fingertip. Some items may require you to “double-tap”. To type into an text field (i.e., when Type goes in field inputting your name, or a web address), Need Information tap the text field. -
Page 10: Connecting To The Internet
Wireless Router Connecting to the Internet WiFi Network Name/SSID Available Password Here Wireless Router In order to connect to the internet, you will need the following: • A wireless router or an access point with a broadband internet connection. • The name of your network (SSID), as well as the password or other credentials, if your network is secure. - Page 11 Apps that come with your Tablet The App Tray is a convenient way to access all of your applications (apps). Maxthon Internet Browser software is a After tapping the icon, the screen will powerful tabbed browser with a highly open to the Launcher Tab page. At the customizable interface.
- Page 12 Widgets Widgets are mini apps that run on your Home screen. Your tablet comes with several by default, including a calendar and a clock, and you can download more.
- Page 13 Getting More Apps and Widgets What you’ll need: 1) A wireless internet connection. 2) An active account with Google Play or similar App distribution service. Installing Apps from Google Play Click on the Google Play Icon. It will take you online to the Google Play Store. Shop the Google Play Store.
-
Page 14: Settings: Date, Time
Settings: Date, Time Tap on the Settings Icon This will take you to the Setting page, where all adjustments for the tablet can be made. 1) Scroll to ‘Date & Time’ under ‘Settings’, and select. 2) If you would like your Network to automatically set the date/time, tap on the corresponding box, and a checkmark will appear. -
Page 15: Using The Cameras
Using the Cameras Tap on the Camera Icon This will take you to into Camera mode. You’ll be able to take “selfies” or use like a regular camera or video recorder. 1. Camera/Video Mode 5. Continuous Snap Mode 2. Shutter (Tap to take photo/video) 6. - Page 16 Using Micro USB USB Cable Transfer Cable Connect to PC, another Tablet or Storage Device...
-
Page 17: Important Safety Instructions
Important Safety Instructions We would like you to have a safe and enjoyable experience. Please read the following instructions and notices before using your tablet. • Warning: This product may contain a chemical known to the State of California to cause cancer, birth defects, or other reproductive harm. -
Page 18: Compliance Information
Compliance Information FCC NOTICE The following statement applies to all products that have received FCC approval. Applicable products wear the FCC logo, and /or an FCC ID in the format FCC ID:xx-xxx-xxx on the product label. This mobile device complies with part 15 of the FCC Rules. Operation is subject to the following two conditions: This mobile device may not cause harmful interference, and this mobile device must accept any interference received, including interference that may cause undesired operation. -
Page 19: One Year Warranty
TO OBTAIN WARRANTY SERVICE Should it be necessary to contact Customer Support, call (800) 890-1288 or email at cs@nuvision.com. You will be instructed on how your claim will be processed. Have pertinent information available including proof of purchase and an understanding of the issue. - Page 20 Intel Inside logo are trademarks of Intel Corporation in the U.S./other countries. USB-if is the trademark of USB Implementers Forum Inc. Bluetooth and its logo are trademarks of Bluetooth SIG Inc. WIFI and its logo are trademarks of Wi-Fi Alliance. NuVision and the NuVision logo are registered trademarks and licensed by TMAX Digital, Inc.