Table of Contents
Advertisement
Australia
GN ReSound Pty. Ltd.
Unit R1 Regent Park Estate
391 Park Road
Regent Park NSW 2143
Tel.: (free) 1800 658 955
Fax: 02 9743 7472
www.gnresound.com.au
Any issues relating to the EU Medical Device Directive
93/42/EEC should be directed to ReSound A/S.
1
Worldwide Headquarters
ReSound A/S
Lautrupbjerg 7
DK-2750 Ballerup, Denmark
Tel.: +45 45 75 11 11
Fax: +45 45 75 11 19
www.resound.com
Advertisement
Table of Contents

Related Manuals for ReSound Ziga Lite ZL-61


Summary of Contents for ReSound Ziga Lite ZL-61
- Page 1 Regent Park NSW 2143 Tel.: +45 45 75 11 11 Tel.: (free) 1800 658 955 Fax: +45 45 75 11 19 Fax: 02 9743 7472 www.resound.com www.gnresound.com.au Any issues relating to the EU Medical Device Directive 93/42/EEC should be directed to ReSound A/S.
- Page 2 ReSound Ziga Lite USER GUIDE ReSound Ziga Lite BTE Models ZL-61 ZL-71 ZL-81...
- Page 3 Your hearing instruments have been adjusted to your hearing loss by your hearing care professional. Familiarising yourself with the functions of your new hearing instruments will help you get optimal benefit. ReSound is a trademark of GN ReSound A/S.
-
Page 4: Table Of Contents
Contents Your ReSound Ziga Lite Hearing Instrument ...3 Adjusting to a World of New Sounds ......4 How to adjust ............4 How to Use the Hearing Instrument ......5 Inserting the Instrument (with earmould) ....5 Inserting the Instrument (with dome) ......6 Removing the Hearing Instrument ......6 Volume Control (optional) ........7... -
Page 5: Your Resound Ziga Lite Tm Hearing Instrument
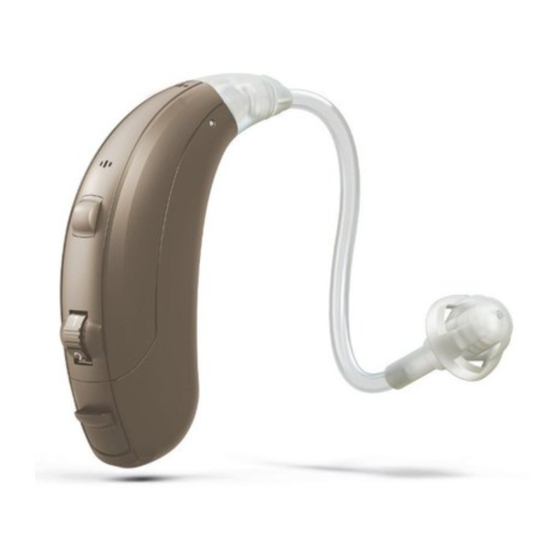
Your ReSound Ziga Lite Hearing Instrument 1. Programme Selector 2. Battery Compartment & On/Off Switch 3. Sound Outlet 4. 1 Microphone Sound Inlet 5. 2 Microphone Sound Inlet 6. Volume Control (optional) Direct Audio Input 8. Left/Right indicator (Right=Red, Left=Blue) 9. -
Page 6: Adjusting To A World Of New Sounds
Adjusting to a World of New Sounds New Sounds A hearing loss is typically acquired gradually over many years. You may have become accustomed to an everyday life with fewer sounds, which also means hearing less noise than people with normal hearing. -
Page 7: How To Use The Hearing Instrument
How to Use the Hearing Instrument On/Off Function 1. When the battery compartment is fully closed, the instrument is turned on and programme 1 will be activated. 2. To turn the instrument off, open the battery compartment. Many individuals use their finger tips to pull it open. 3. -
Page 8: Inserting The Instrument (With Dome)
Inserting the Instrument (with dome) 1. Place the hearing instrument behind the ear. 2. Hold the tube where it bends and gently push the dome into your ear canal (the dome should be placed far enough into the ear that the tube lies flush with your head). 3. -
Page 9: Volume Control (Optional)
Volume Control (optional) When using the instrument you can increase the volume by turning the volume control up, and /or reduce the volume by turning it down. For each volume step, you will hear a “beep” signal indicating the change. The loudness of the “beeps” will increase as you turn the volume up and decrease as you turn it down. -
Page 10: Stand-By Function
Stand-by Function In stand-by mode, the hearing instrument will not process sound or deliver an acoustic signal to the ear. When in this mode, a small amount of power will be used. To put the instrument in stand-by mode, hold down the programme selector for 5 seconds. You will hear a series of “beeps”... -
Page 11: Direct Audio Input (Dai)
Direct Audio Input (DAI) Using the Direct Audio Input socket enables direct, undisturbed connection to facilities such as: Television - Radio - Remote microphone. How to connect the audio boot to the hearing instrument: Pay close attention to the illustrations on how to connect and disconnect the audio boot below. -
Page 12: Maintenance
Maintenance Daily Maintenance It is important to keep your hearing instrument clean and dry every day. To clean the instrument, use a soft cloth. If the instrument has been exposed to high humidity or perspiration, use a drying kit that is available from your hearing care professional. -
Page 13: How To Mount The Dome
How to Mount the Dome We recommend that your hearing care professional changes the dome for you, since failure to change the domes in accordance with the instructions could result in injury. If you choose to change the dome yourself: 1. -
Page 14: General Precautions
General Precautions 1. Do not leave your hearing instrument in the sun, near an open fire or in a hot, parked car. 2. Do not wear your instrument while showering, swimming, in heavy rain or in a moist atmosphere such as steam bath or sauna. -
Page 15: Repairs
Repairs If your ReSound hearing instrument malfunctions it must be repaired by a qualified technician. Do not attempt to open the case of the hearing instrument as this will invalidate the warranty. If your hearing instrument requires service, please contact your hearing care professional for assistance. -
Page 16: Technical Data
Technical Data Maximum Output (2cc Coupler / IEC 60118-7) ZL61-DI Classic 123 dB SPL (Typical) ZL61-DI Open 123 dB SPL (Typical) ZL71-DVI- Classic /open 126 dB SPL (Typical) ZL71- DVI Thin Tube 129 dB SPL (Typical) ZL81- DVI 133 dB SPL (Typical) -
Page 17: Troubleshooting Guide
Troubleshooting Guide CAUSE SYMPTOM • Stand by mode No Sound • Not turned on • Dead single use battery • Dead rechargable battery • Battery improperly inserted • Blocked earmould or tube • Blocked sound outlet filter • Loose earmould Not loud enough • Blocked earmould or dome • Change in hearing sensitivity • Excessive ear wax • Blocked sound outlet filter • Volume set too low... - Page 18 POSSIBLE REMEDY • Re-activate by pushing the programme selector once • Turn on by closing the battery door • Replace battery • Recharge battery • Insert battery properly • Clean earmould or tube blockage • Consult your hearing care professional • Reinsert carefully or consult your hearing care professional • Clean earmould or dome • Consult your hearing care professional • Consult your physician...