Table of Contents
Advertisement
Advertisement
Table of Contents

Related Manuals for Saeco Modular Coffee


Summary of Contents for Saeco Modular Coffee
- Page 1 Saeco Automatic espresso coffee machine...
-
Page 2: Table Of Contents
English TABLE OF CONTENTS USING THE MACHINE……………………………….. 10 Machine statuses……………………………. Manual switching on…………………….…… 10 Programmed automatic switching on……… 10 TABLE OF CONTENTS………………………………….. 2 Temporary switching on from standby…….. Coffee dispensing……………………………. 10 MAIN PARTS……………………………………………… 3 Pre-ground coffee dispensing ……………… 10 Light coffee dispensing……………………… 11 INTRODUCTION TO MANUAL ……………………. -
Page 3: Main Parts
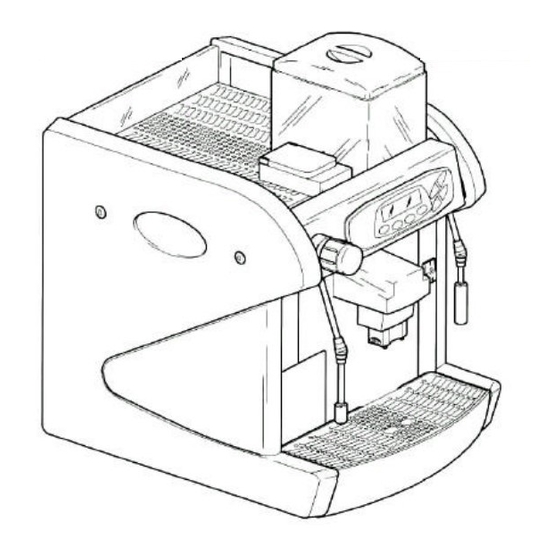
English MAIN PARTS Left hand side panel Rubber protector Glass Main switch Back cover panel Hot water spout (LUXE version) Cup heating plate Steam selection knob (LUXE version) Right hand side pane Front door Pre-ground coffee slot Rubber protector Coffee beans hopper Drip tray Control panel Steam spout (LUXE version) -
Page 4: Introduction To Manual
English 1 - INTRODUCTION TO MANUAL 2 - MACHINE INFORMATION Notes for the user Foreword • The machine is programmable with regard to the dosage for each type of dispensing. Important • The machine must be installed in a properly lit, sheltered and dry place and on a working surface able to withstand its weight. -
Page 5: Machine Identification
English 2.4 Machine identification The machine is identified by the model name and serial number to be found on the ID plate (fig. 2). The plate carries the following specifications: • Name of Manufacturer • CE marking • Machine model •... -
Page 6: Commands
English Key 1 Small cup (ref. 8b, fig. 1). If the user experiences machine malfunctions he must request (See "6 5 Coffee dispensing"). the intervention of the maintenance technician Re-programmable (See "6 1 1 Programming of dis- pensing keys"). Danger Key 2 Small cups (ref. -
Page 7: Coffee Dispenser Unit
English 4.3 Coffee dispenser unit - INSTALLATION The position of this unit (ref. 21, fig. 4) can be modified according to the height of the container used. In fact it is possible to move the mobile dispenser backwards Danger (ref. 23, fig. 4) and the telescopic dispenser upwards or downwards (ref. - Page 8 English rectly proportioned to the power drawn by the machine. Furthermore it is possible to dispose of the coffee grounds The connection point (electrical socket or all-pole directly into a container to be placed below the machine surface switch) must be placed in a position easily reachable top, as follows: by the user, in order to be able to disconnect the machine from the mains, should this be necessary.
-
Page 9: Insertion Of Nation Key
English 5.3 First switching on Important Fill the coffee hopper (ref. 7, fig. 1) with the selected coffee bean blend. It strongly suggested that the machine be supplied with water treated through a descaling device, especially in Important cases of water with a high content of calcium and Make sure that the coffee beans don't contain foreign magnesium salts (hard water). -
Page 10: Using The Machine
English 6.4 Temporary switching on from - USING THE MACHINE standby It is a manual and voluntary start, controlled by the User with the machine in " " mode. STANDBY Important It is obtained by pressing key for 3 seconds. Before operating the machine it is necessary to have read this publication carefully and to have gained a "STANDBY"... -
Page 11: Light Coffee Dispensing
English 6.7 Light coffee dispensing Hot water dispenser (LUXE version) This type of dispensing is performed by utilizing doses of pre- This function allows multiple (programmable) dispensing of ground coffee manually introduced into the machine through hot water in a single container. the pre-ground coffee slot (ref. -
Page 12: Programming Of Dispensing Keys
English 6.12 Grinder adjustment 6.11 Programming of dispensing keys All the dispensing keys Grinding adjustment changes according to the Country in are equipped with a self-learning memory. which the machine is utilized and according to the coffee Once they are programmed, they supply the same drink quantity blend utilized. -
Page 13: Display Messages
English 6.13 Display messages SENSOR ERROR 01: displayed when a temperature sensor A series of messages in addition to those already found in is out of order. Switch machine off and call the AUTHORISED the previous paragraphs, can be shown on the machine's SERVICE CENTRE. -
Page 14: Summary Of Menu Programmable Functions
English - The blinking cursor is positioned under the value to be modified. - Press keys (Up) or (Down) to modify the value. - Confirm the datum modified with key (Enter). 6.14.2 Functions description 6.14.1 Summary of menu programmable functions the outlining of functions continues on following page... - Page 15 English LANGUAGE If the "nation key" foresees the use of more than one language on display, by using from the " " LANGUAGE menu, access can be gained to their selection. If the "nation key" foresees a single language, by pressing no other selection is accessed.
- Page 16 English RINSING PROGRAMM This function allows the dispensing of a minimum quantify of hot water (abt 5 cc) by the machine to prevent sediments in the coffee dispenser from forming; this wash is automatically carried out after a programmed time lapse (20 to 240 minutes) from the last dispensing of coffee.
-
Page 17: Machine Switching Off
English ON/OFF TIME 6.15 Machine switching off This function allows the programming of the machine's Automatic programmed switching off automatic switch-on/off times for the whole of a weekly time It is possible when the function " AUTOMATIC OPERATION " span. (see "6.14.2 Functions description") is active and the By confirming "... -
Page 18: Disconnecting The Machine
English - Assemble the cup heating plate (ref. 4, fig. 11 by inserting 7 - MAINTENANCE the electrical connector info the electronic board properly, the fitting into the drain tube (ref. B, fig. 11, and by connecting the earth cable. - Manually rotate the studs (ref. -
Page 19: Coffee Dispenser
English 7.2.1 Coffee dispenser The following can be dismantled: - The top cover (ref. A, fig. 12), of the fixed dispenser (ref. F, fig. 12), by pulling it upwards; - The rubber gasket (ref. H, fig. 12); - The mobile dispenser (ref. G, fig. 12) by pulling it downwards;... -
Page 20: Coffee Grinder Dismantling/Assembly
English It will then be necessary to open the coffee grinder unit (ref. With the help of a vacuum cleaner remove the beans 19, fig. 1) and remove the cause of the jamming. from the grinder's inlet (fig. 16). Danger Disconnect the machine from the mains by way of the all-pole switch or disconnecting the plug, and wait for machine to be completely cooled off. - Page 21 English Secure the hopper (ref. 7, fig. 21) by hand-tightening To assemble the coffee grinder it is necessary to: the screws (ref. B, fig. 21). Completely screw the adjustment ring nut (ref. E, fig. 19), then unscrew it by half a turn. Important This last operation is necessary both to avoid the jamming and to prevent damaging the grinders.
-
Page 22: Troubleshooting -Causes And Remedies
English - TROUBLESHOOTING -CAUSES AND REMEDIES The following table lists a number of troubles that may occur dur- ing the working life of the machine. When the symbol appears in the "remedy" column it means that the intervention must be carried out by the Maintenance technician.